Welcome to this essential training module from Reasonable Risk, designed to equip you with the knowledge and tools for effective risk management within project frameworks. We will delve into the critical area of Remediation Project Risks, exploring how to map, manage, and mitigate potential threats to ensure the successful and secure execution of your initiatives and compliance.
1. Focus Area: Remediation Project Risks
Welcome to the Reasonable Risk Training Module. This session focuses on Remediation Project Risks, providing essential insights into managing and mitigating potential issues within your projects. We'll explore how to effectively identify, track, and resolve risks to ensure successful project outcomes.
2. Agenda: Topic - Remediation Project Risks
Our agenda today centers on Remediation Project Risks.
3. Modules
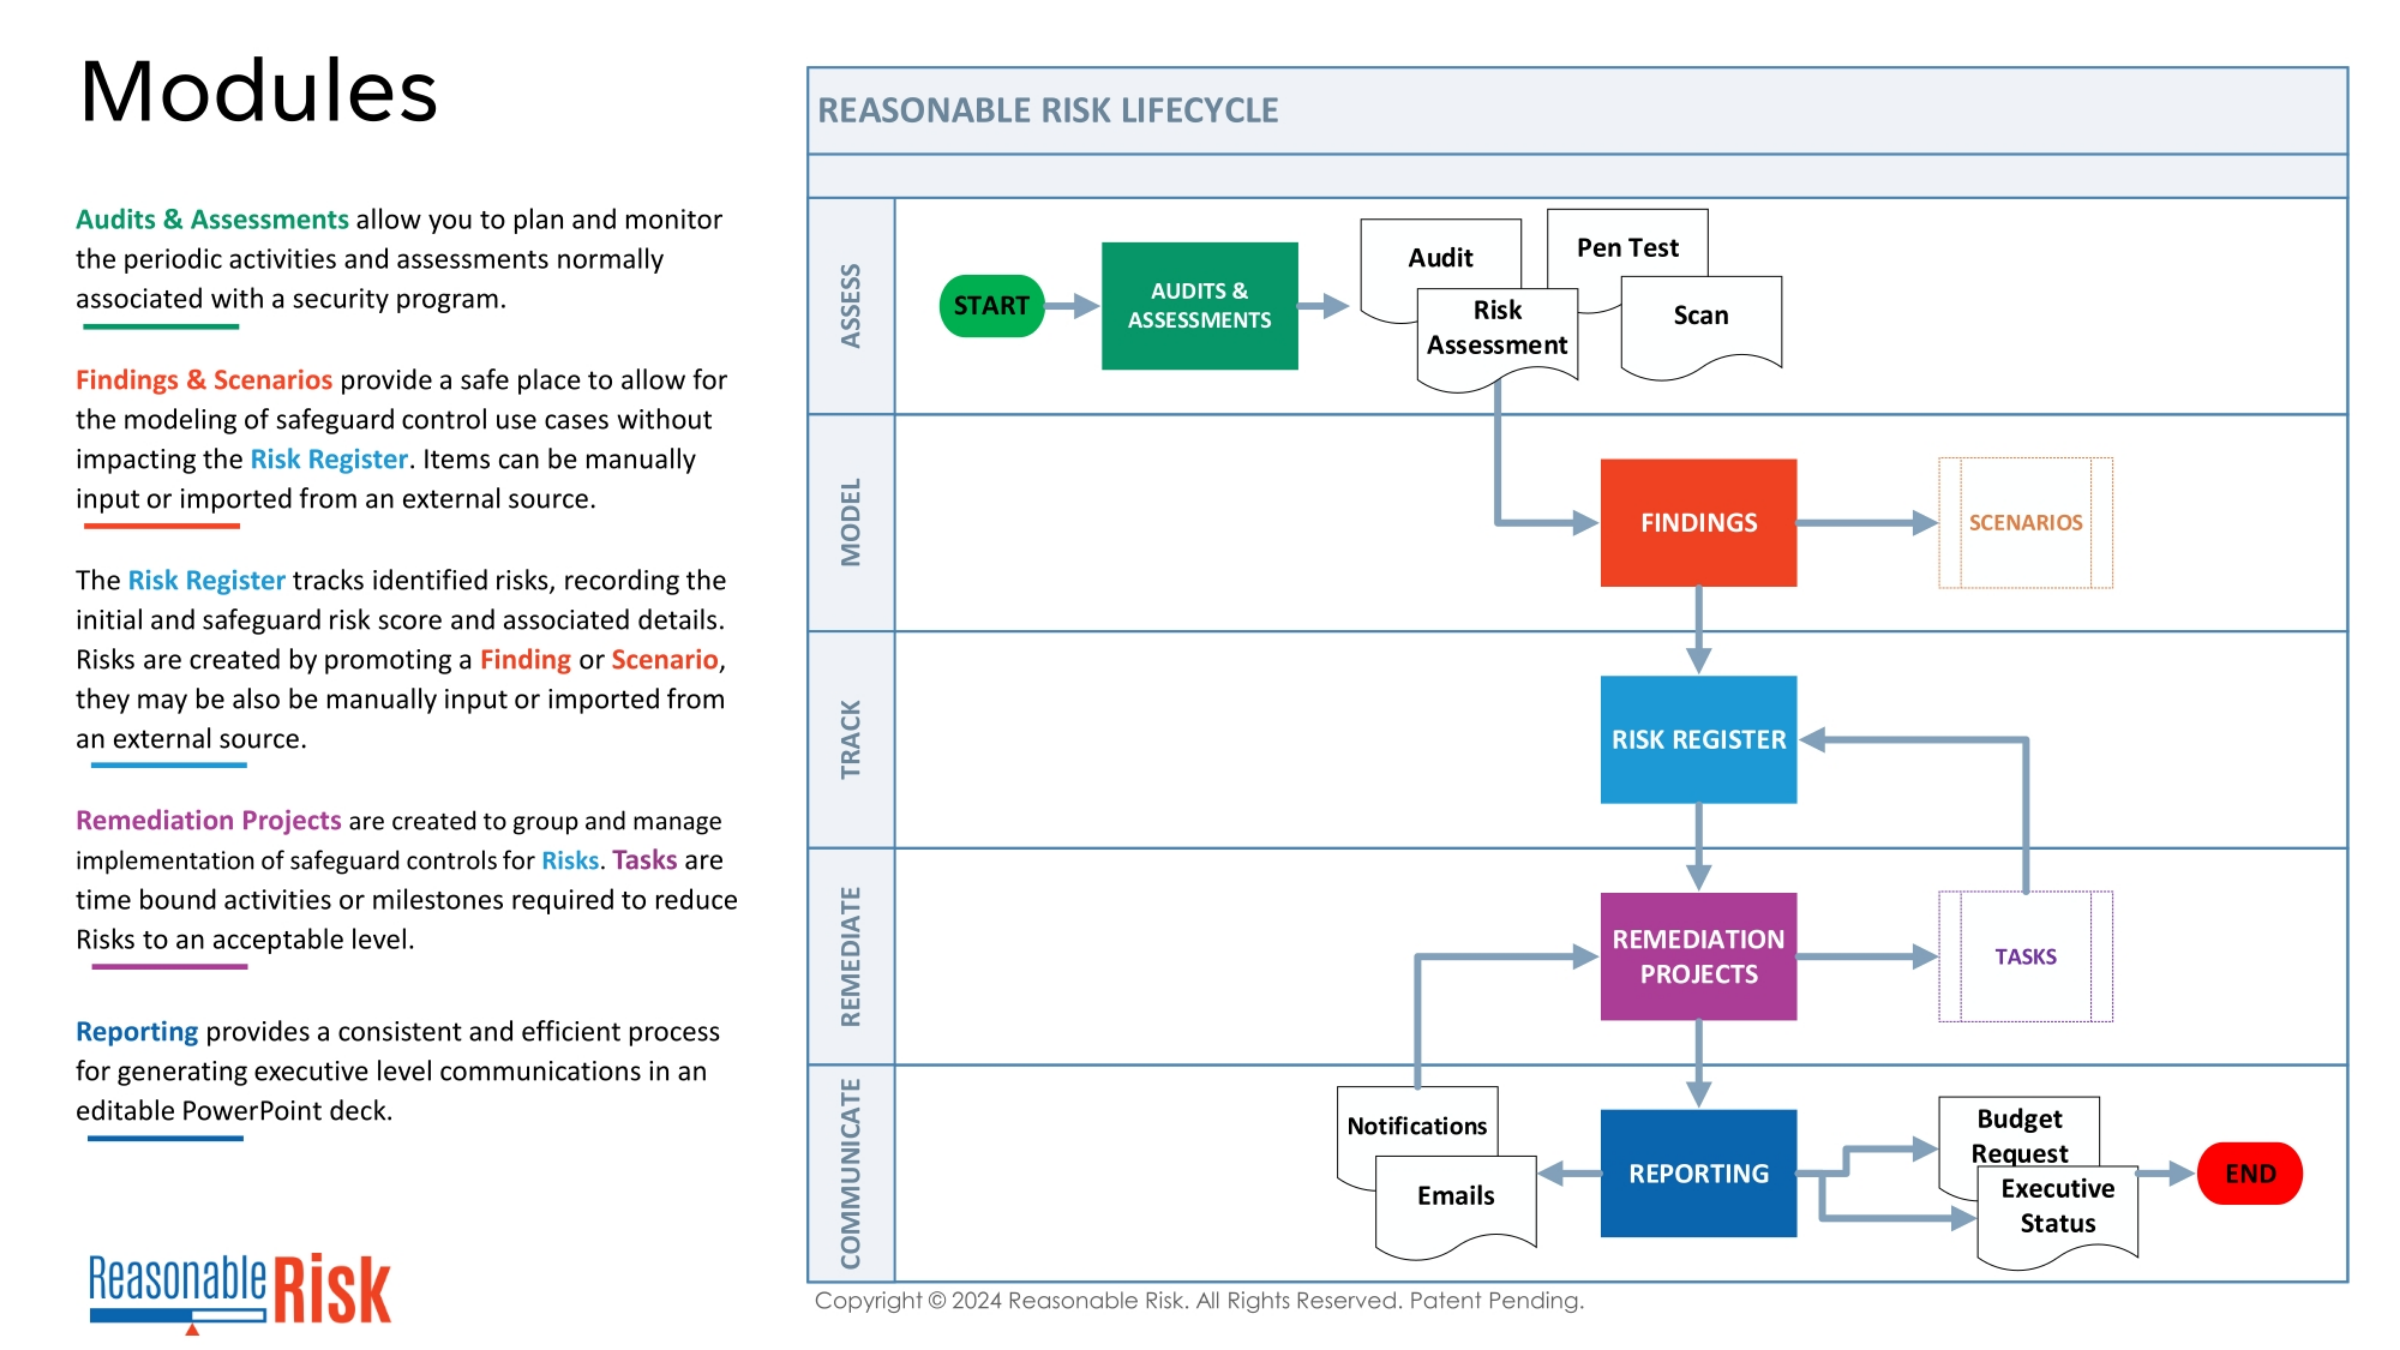
The Reasonable Risk Lifecycle begins with Audits and Assessments, which help plan and monitor security program activities. Findings and Scenarios allow for modeling safeguard control use cases without impacting the Risk Register. The Risk Register then tracks identified risks, recording initial scores and details. Remediation Projects are created to manage the implementation of controls for these risks, with Tasks being time-bound activities to reduce risks. Finally, Reporting provides an efficient process for generating executive-level communications.
4. Modules
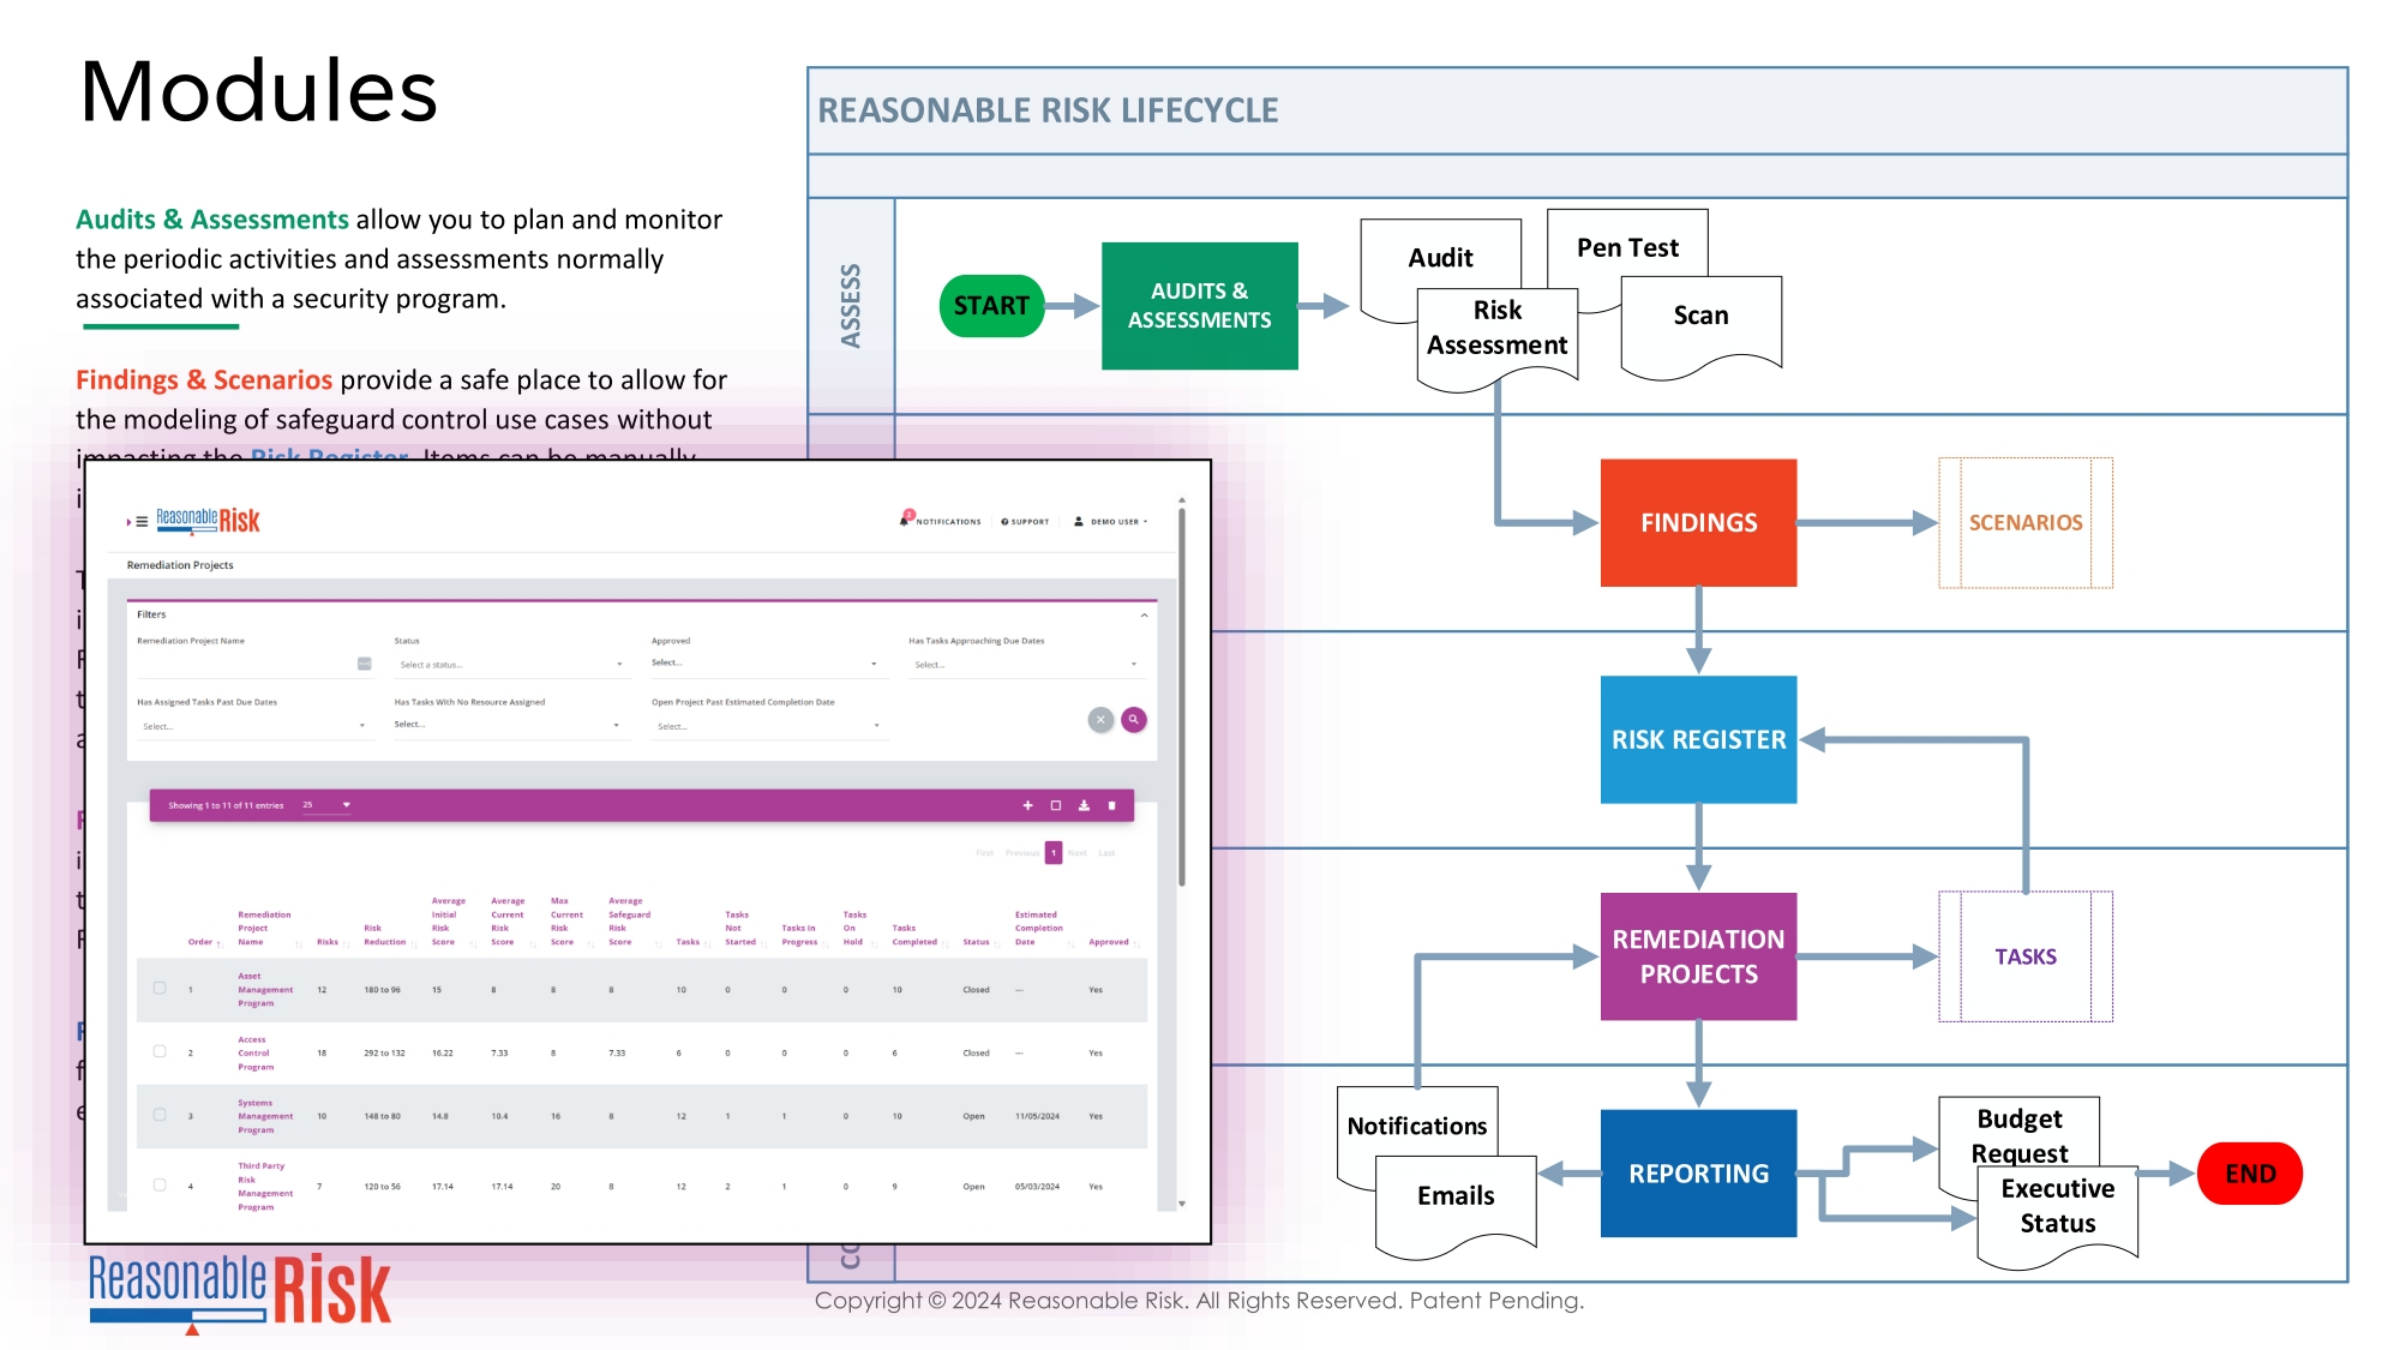
Continuing our look at the Reasonable Risk Lifecycle, we see how Audits and Assessments initiate the process, leading to Findings and Scenarios for modeling. These feed into the Risk Register, which is central to tracking identified risks. Remediation Projects are then established to manage the implementation of safeguard controls, with specific Tasks designed to reduce risks to an acceptable level. The screenshot illustrates the Remediation Projects interface, showing how these projects are organized and managed within the system, ultimately leading to comprehensive Reporting.
5. Project Risks
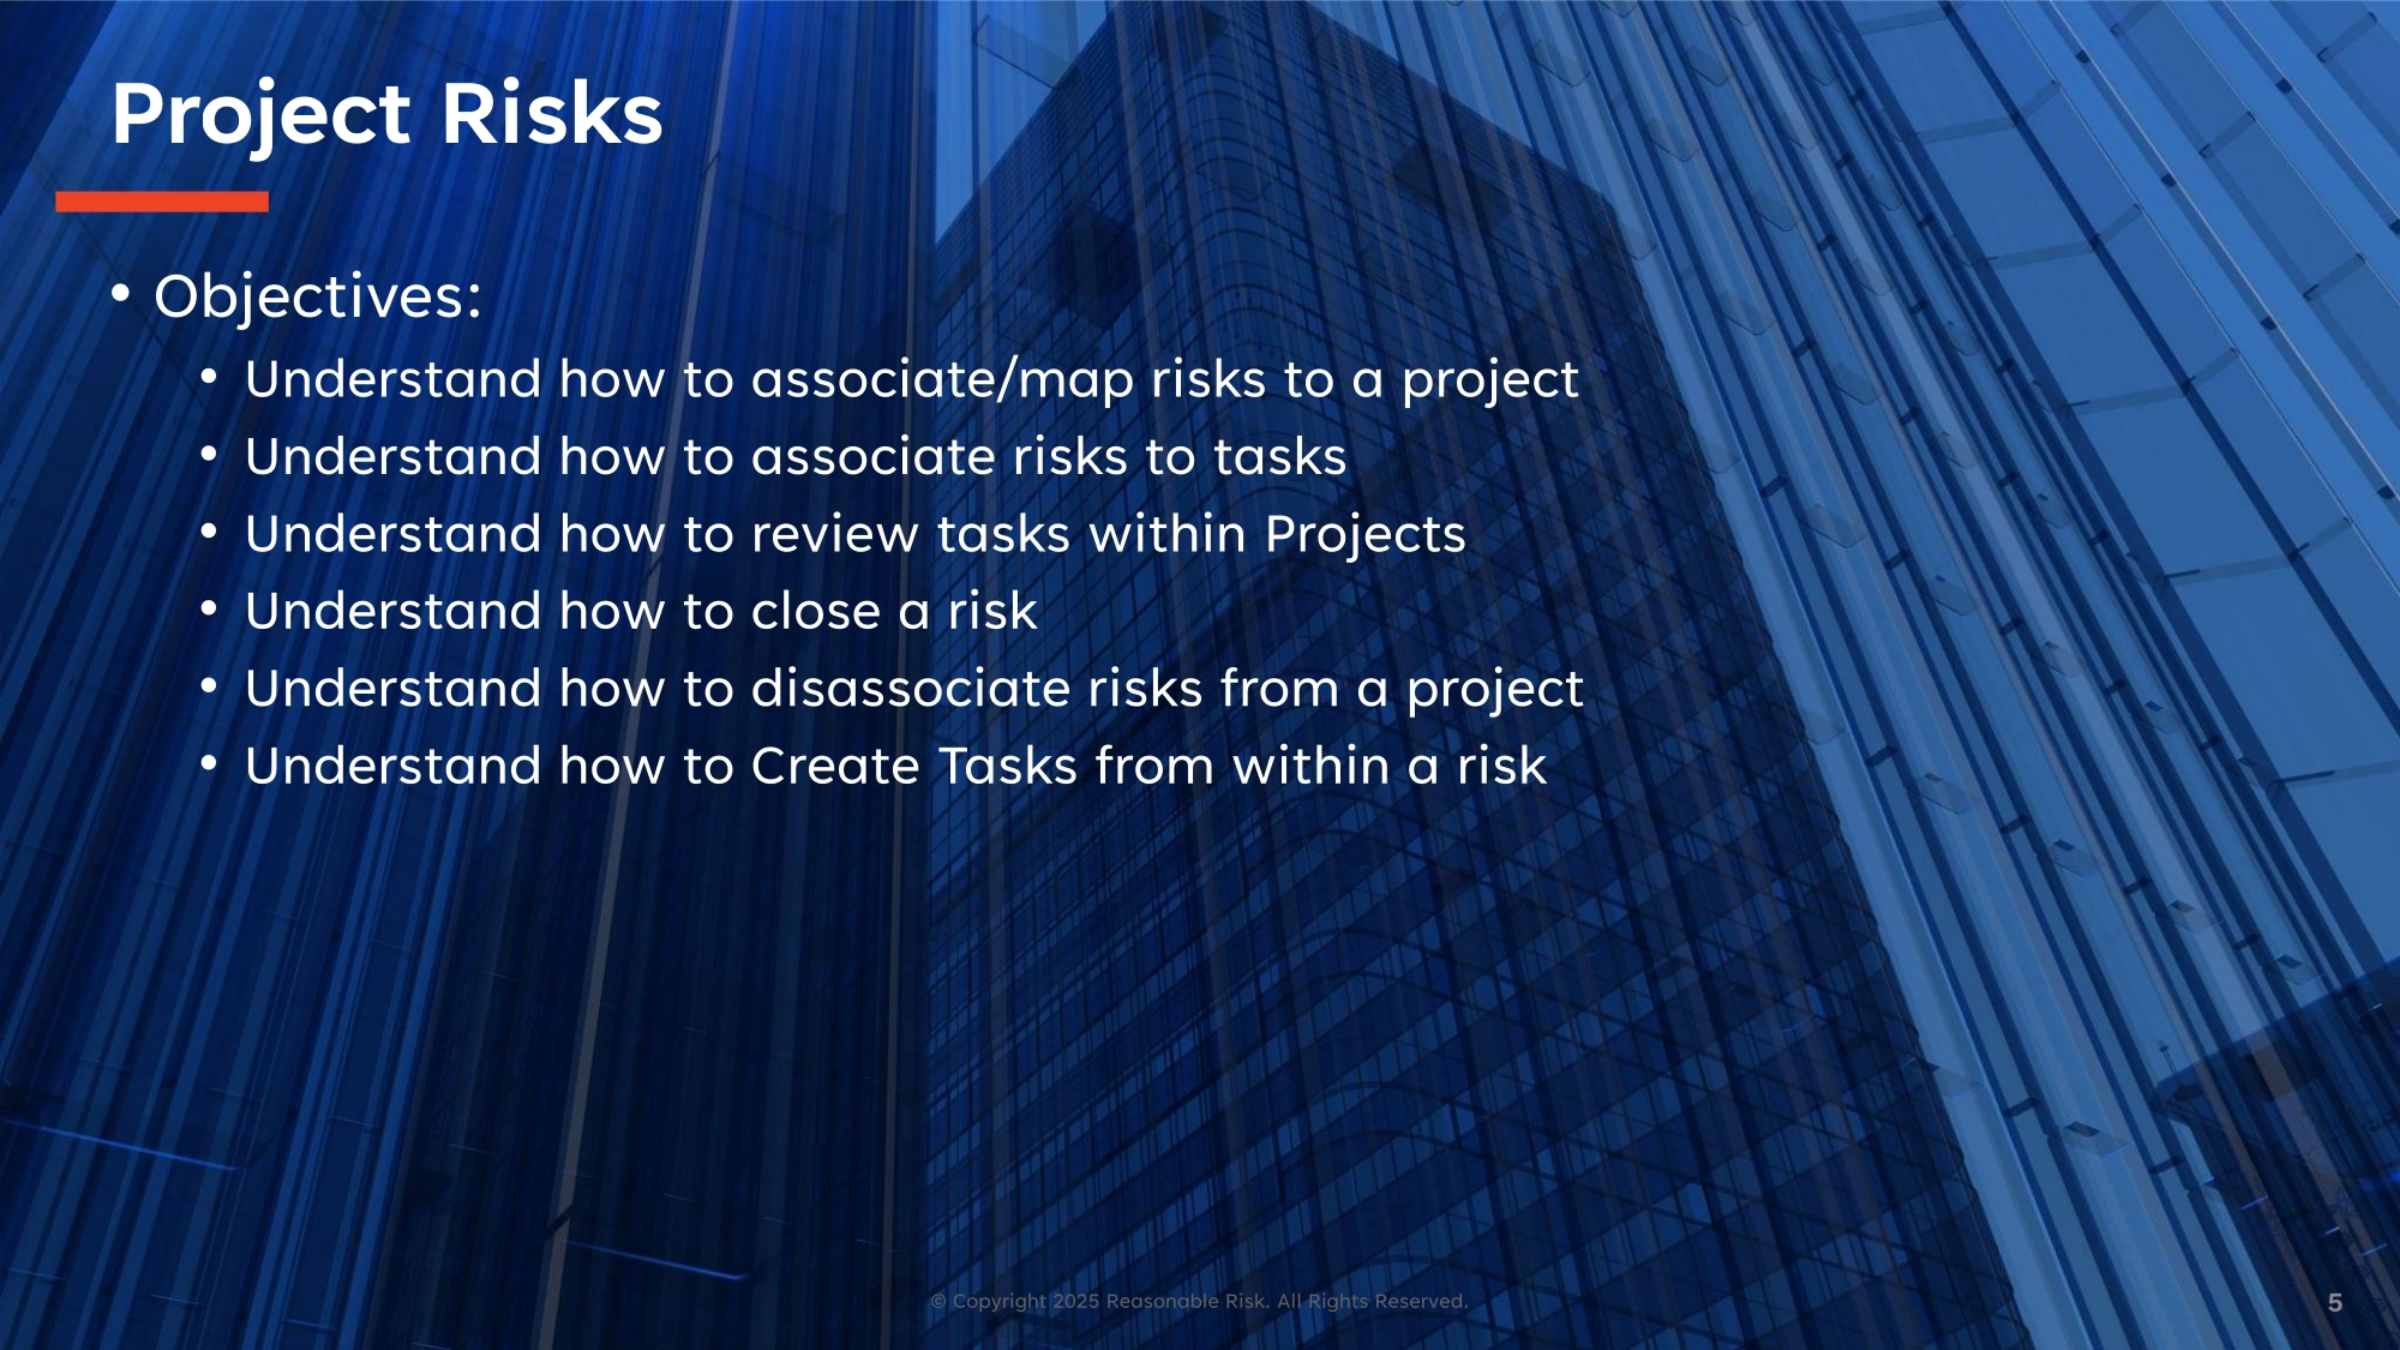
Our objectives for this module are clear. We aim to understand how to associate and map risks to a project, and how to link those risks to specific tasks. We will also cover how to review tasks within projects, the process for closing a risk, and how to disassociate risks from a project. Finally, we'll learn how to create tasks directly from within a risk, streamlining your remediation efforts.
6. Project Risks - Overview
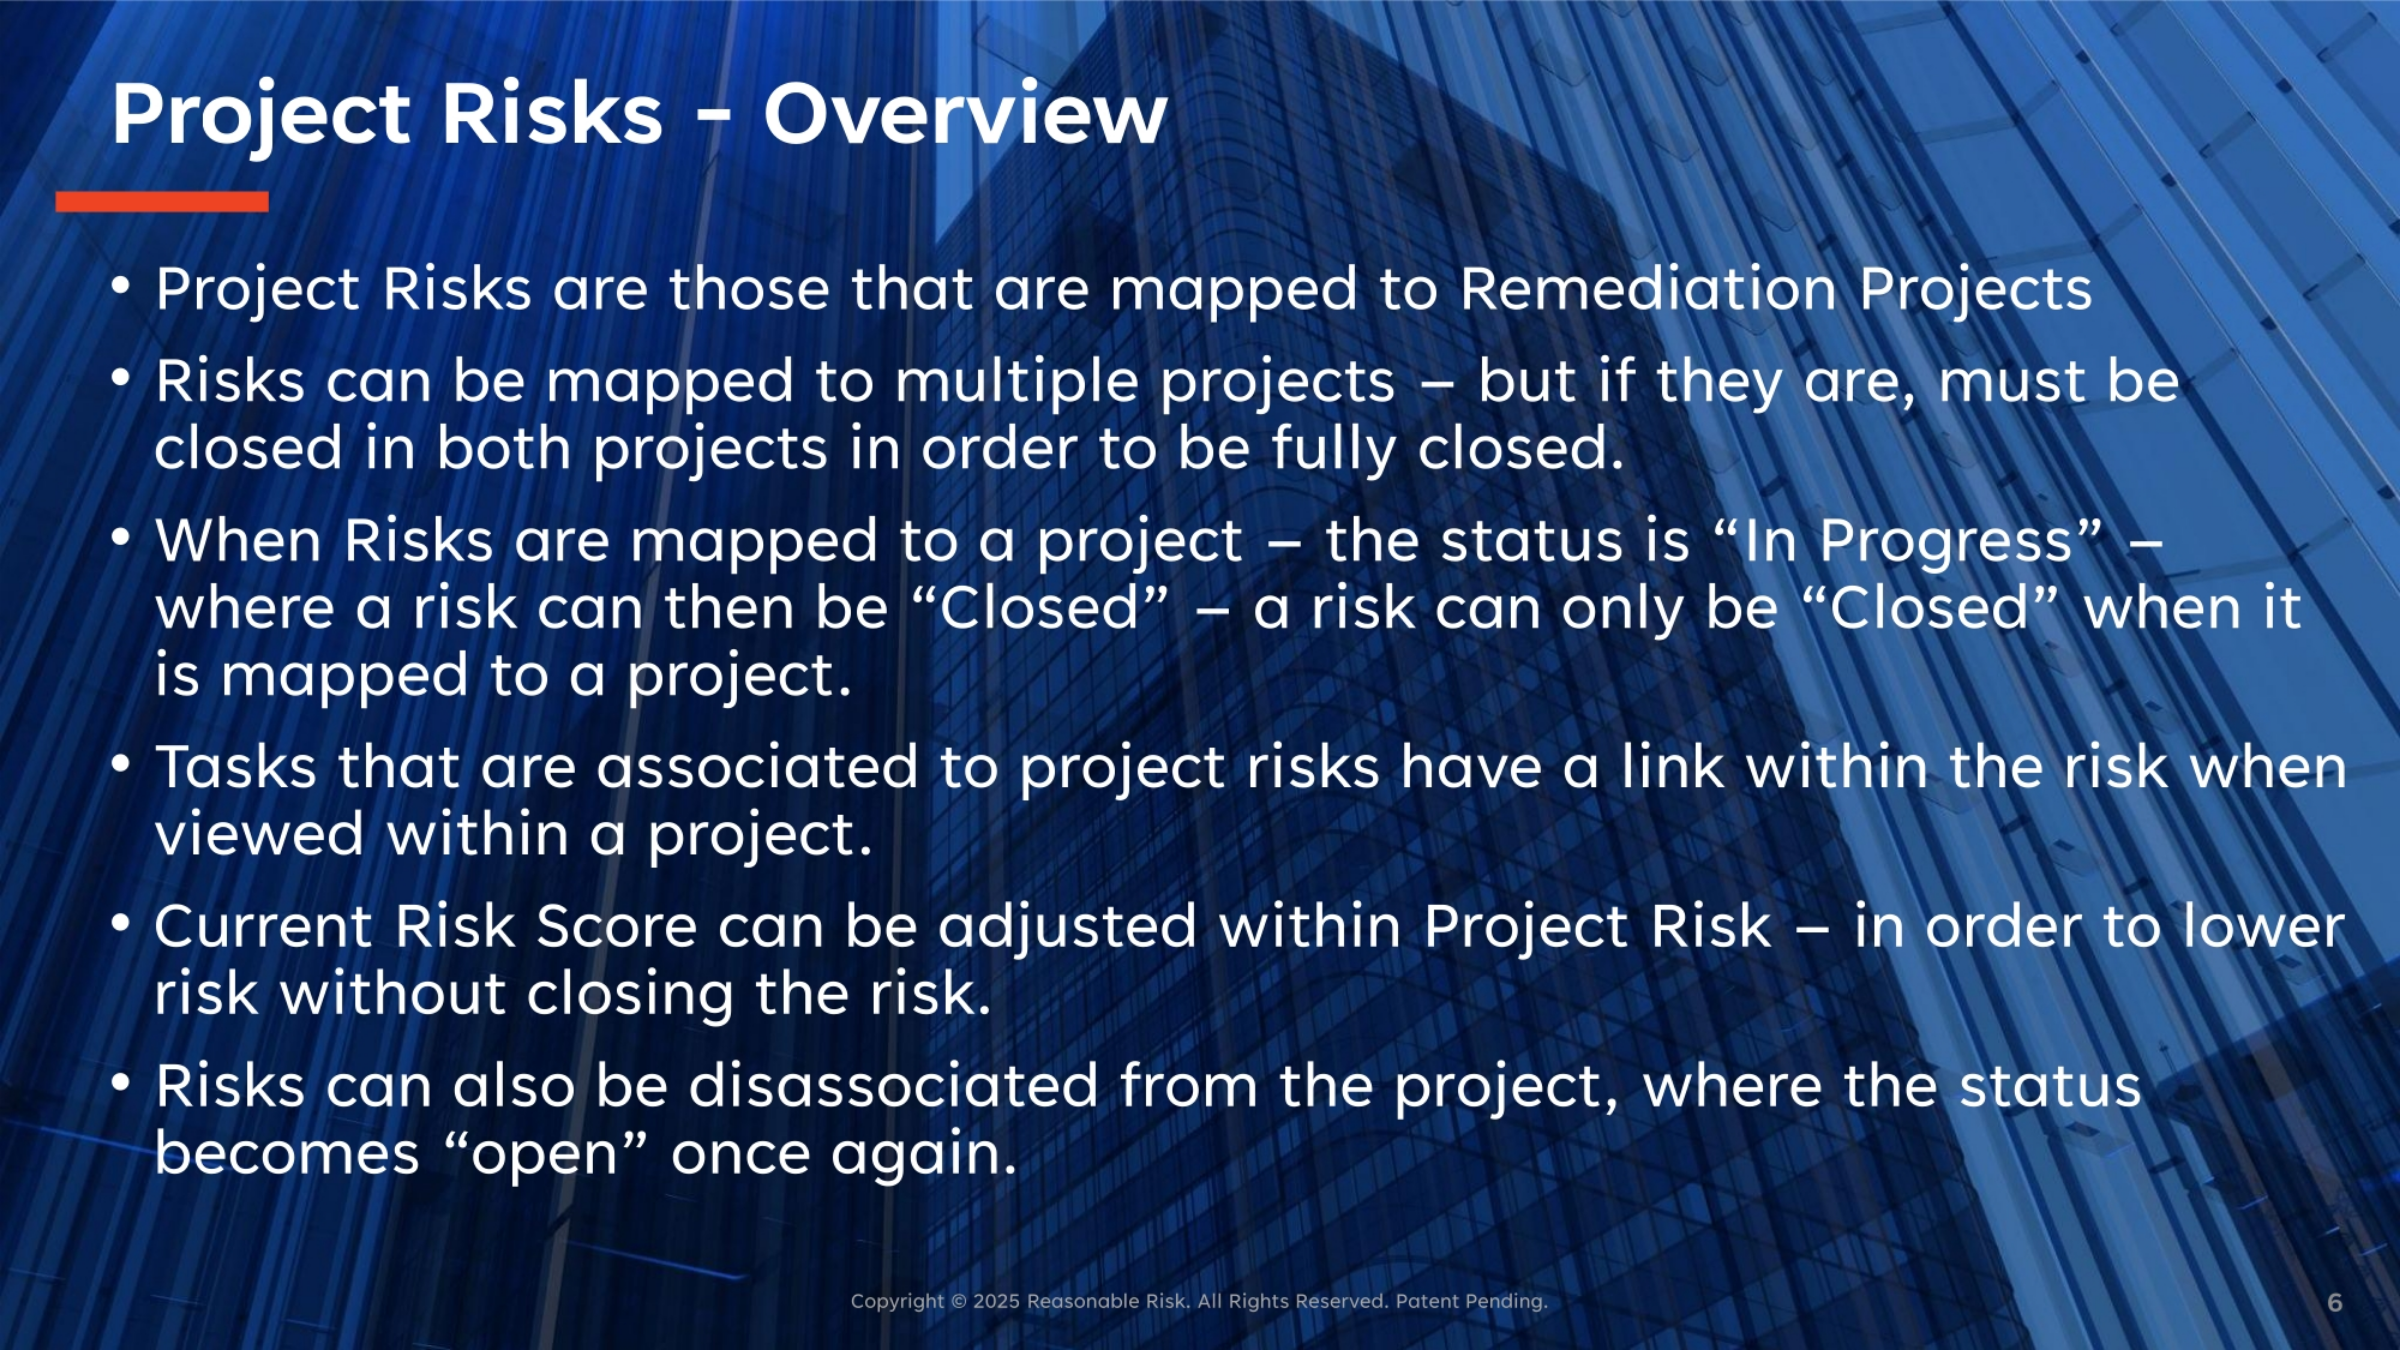
Project Risks are those directly mapped to Remediation Projects. If a risk is mapped to multiple projects, it must be closed in all of them to be fully resolved. When a risk is mapped to a project, its status becomes 'In Progress,' and it can only be 'Closed' once associated with a project. Tasks linked to project risks are visible within the risk when viewed in a project. The current risk score can be adjusted within Project Risk to lower it without fully closing the risk. Risks can also be disassociated, returning their status to 'open'.
7. Risk Lifecycle
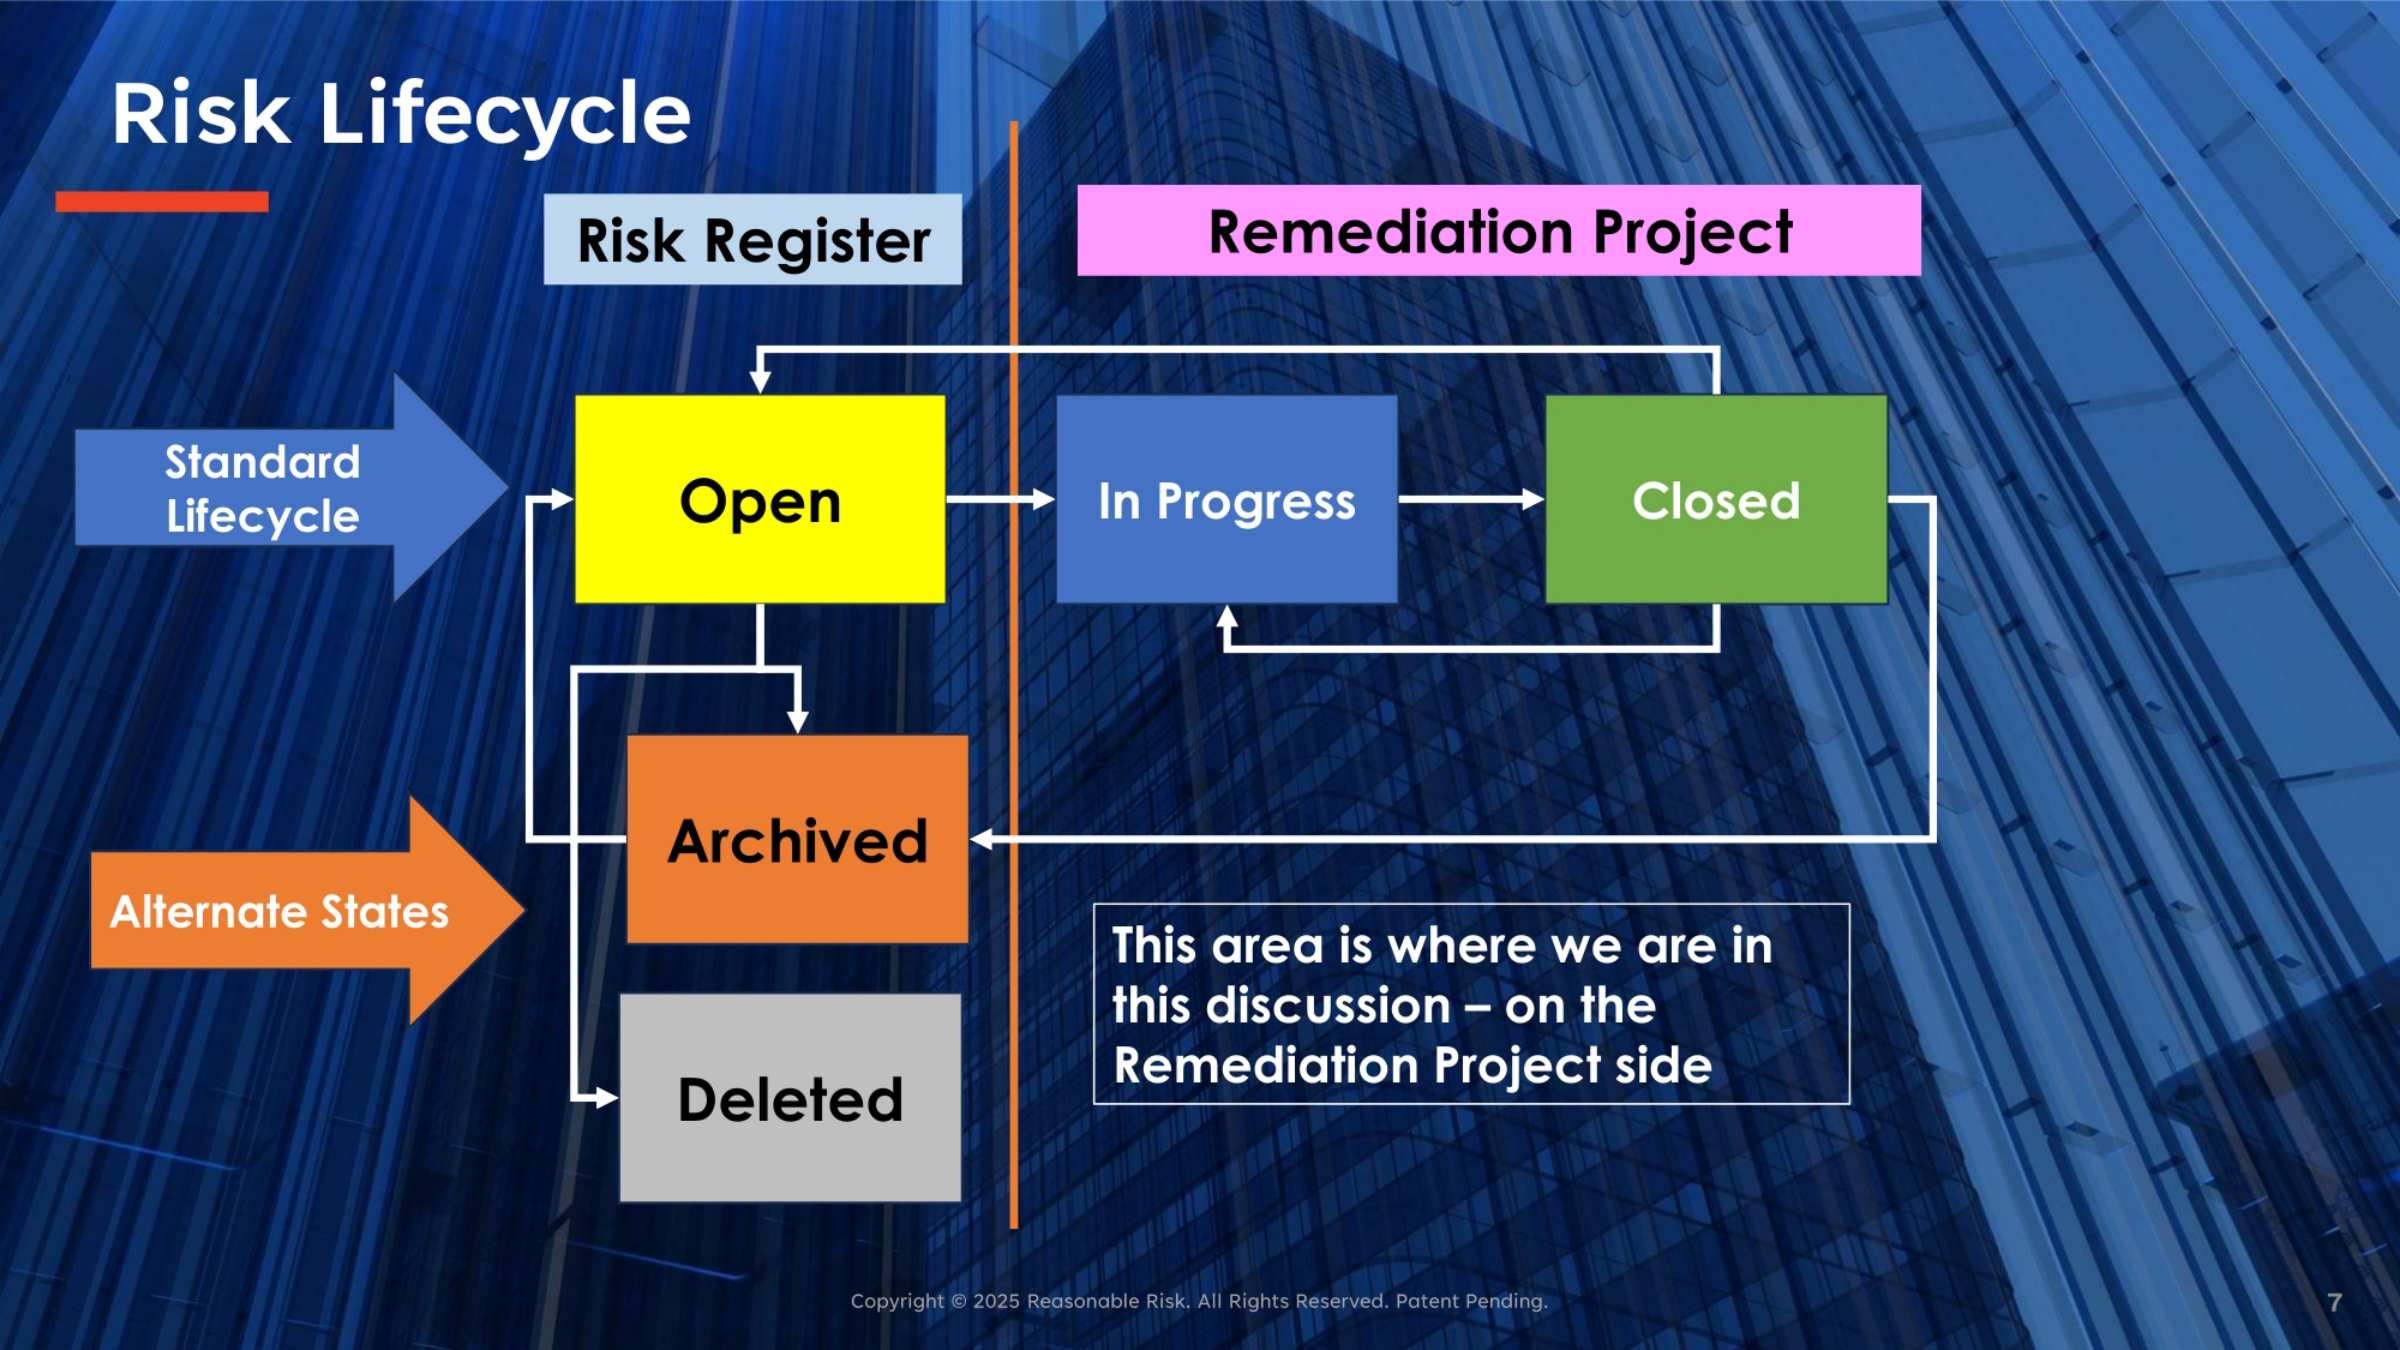
The Risk Lifecycle illustrates the journey of a risk. In the standard lifecycle, a risk moves from 'Open' to 'In Progress' once mapped to a remediation project, and then to 'Closed' upon completion. We also have alternate states like 'Archived' and 'Deleted' for risks no longer active. Our current discussion specifically focuses on the 'In Progress' and 'Closed' stages within the Remediation Project side of this lifecycle, highlighting how risks are actively managed and resolved.
8. Screen Narrative: Project Risk
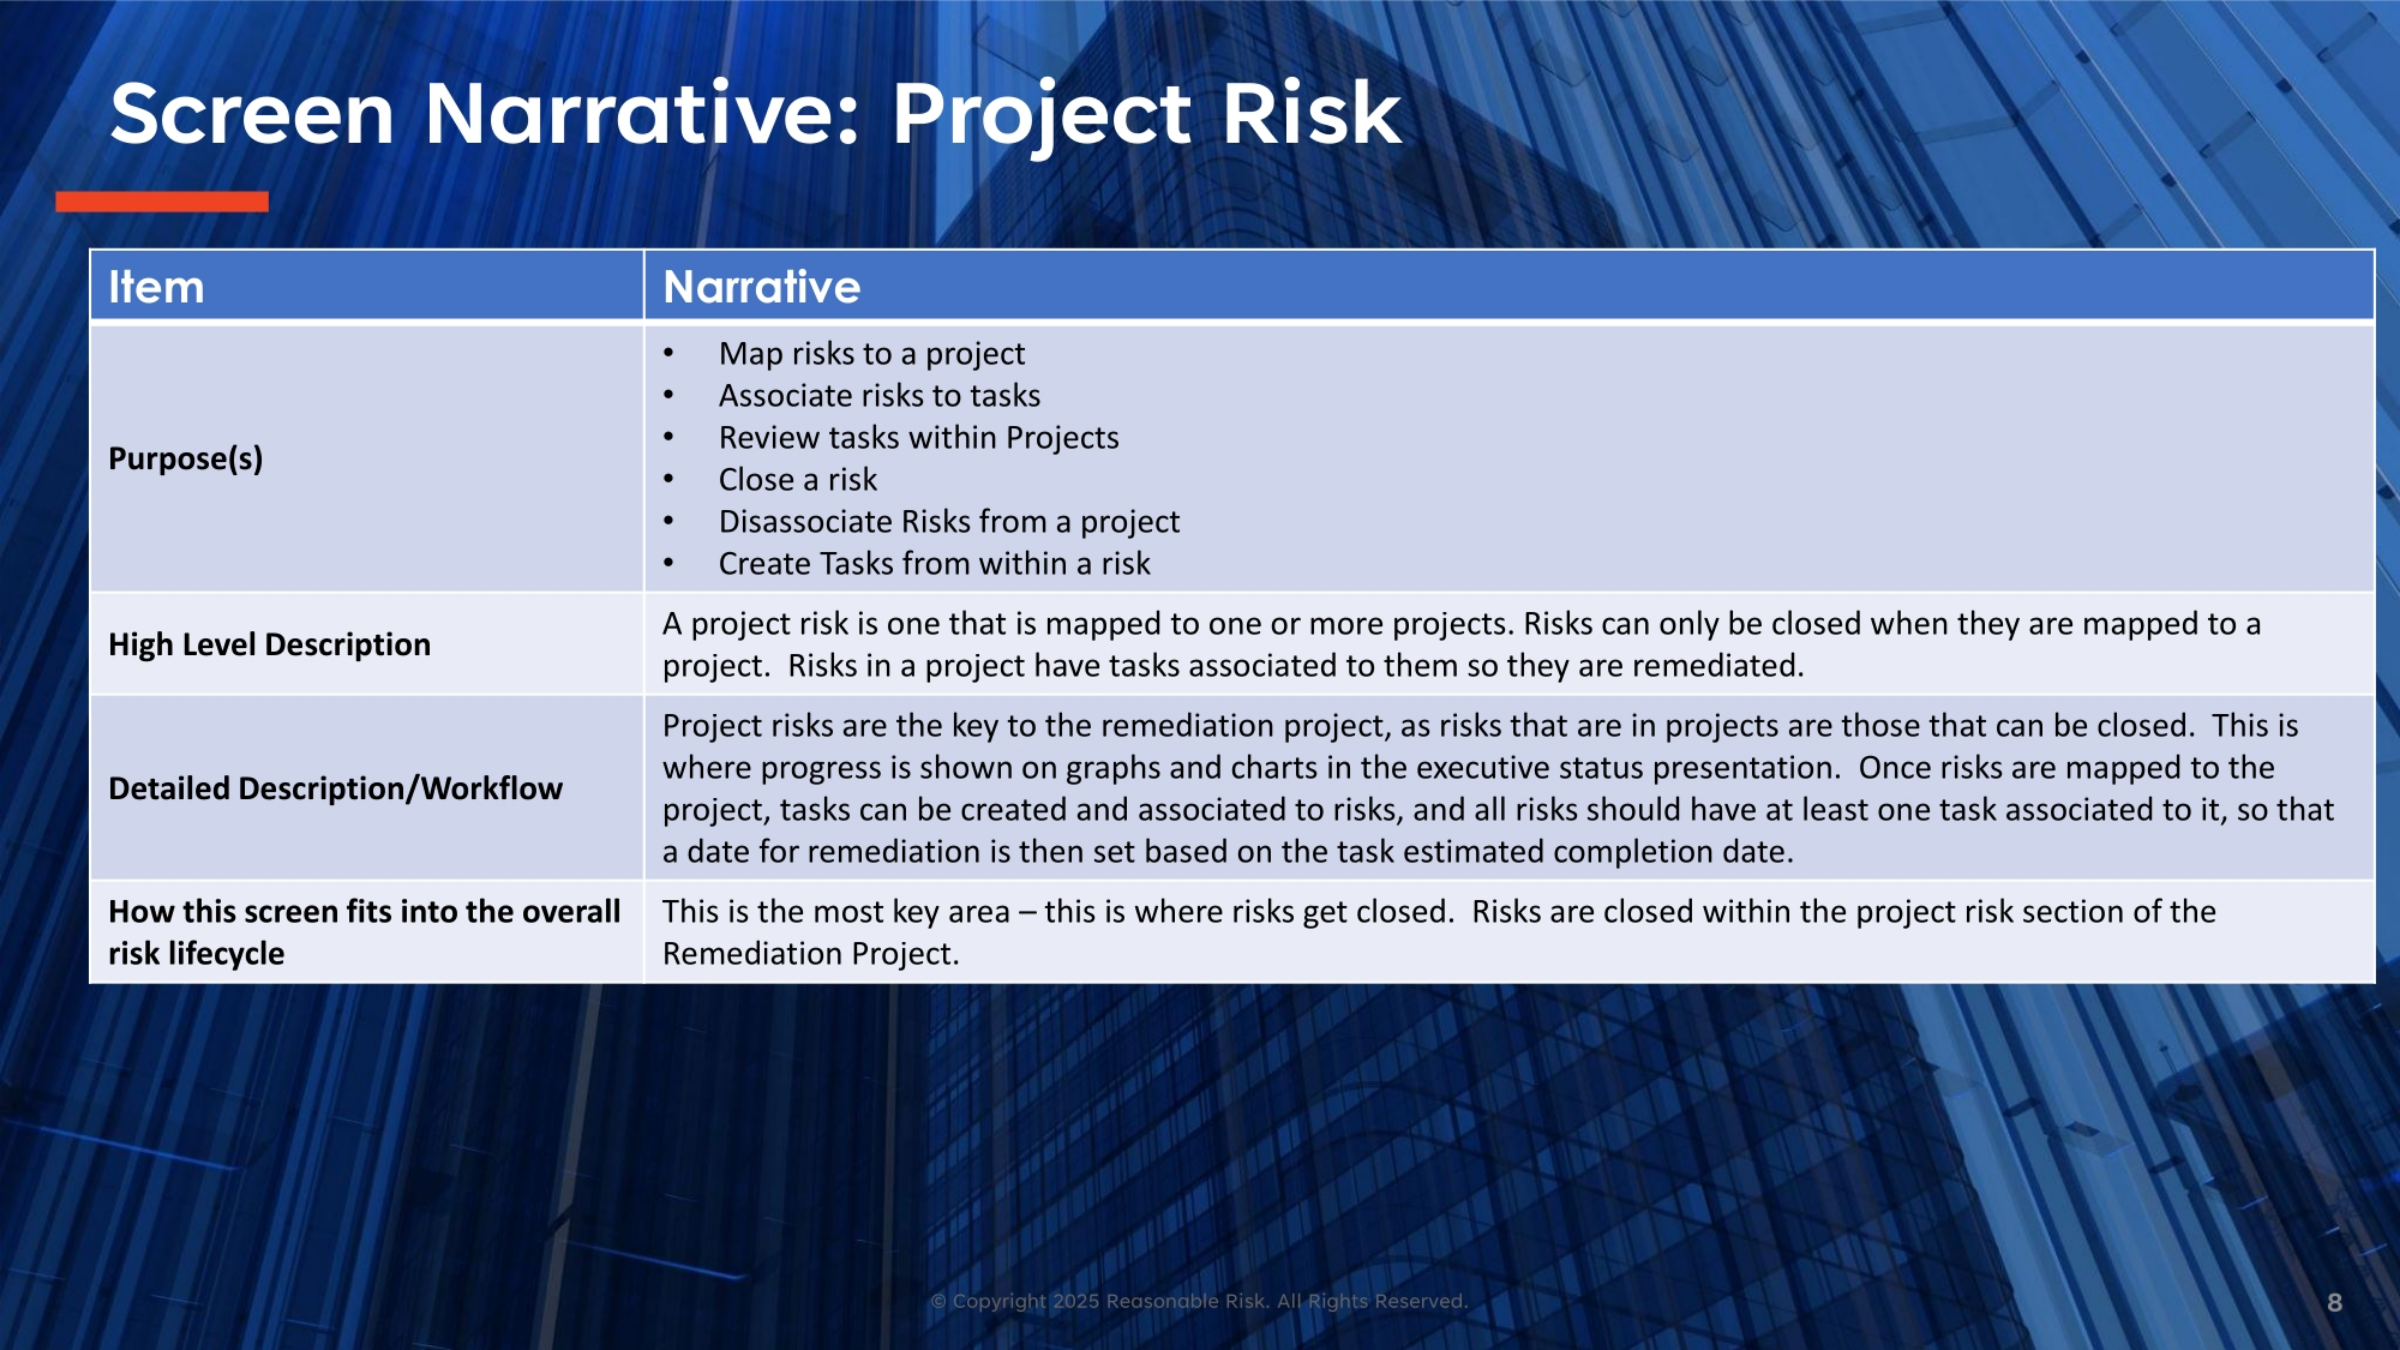
The Project Risk screen serves several key purposes, including mapping risks to a project, associating risks with tasks, reviewing tasks, closing risks, disassociating risks, and creating new tasks. At a high level, a project risk is one mapped to one or more projects, requiring associated tasks for remediation before it can be closed. This screen is crucial for remediation projects, as it's where progress is tracked and displayed in executive status presentations. Once risks are mapped, tasks can be created, and each risk should have at least one task to set a remediation completion date. This is the primary area for closing risks within the Remediation Project section.
9. Screen Review: Project Risk View
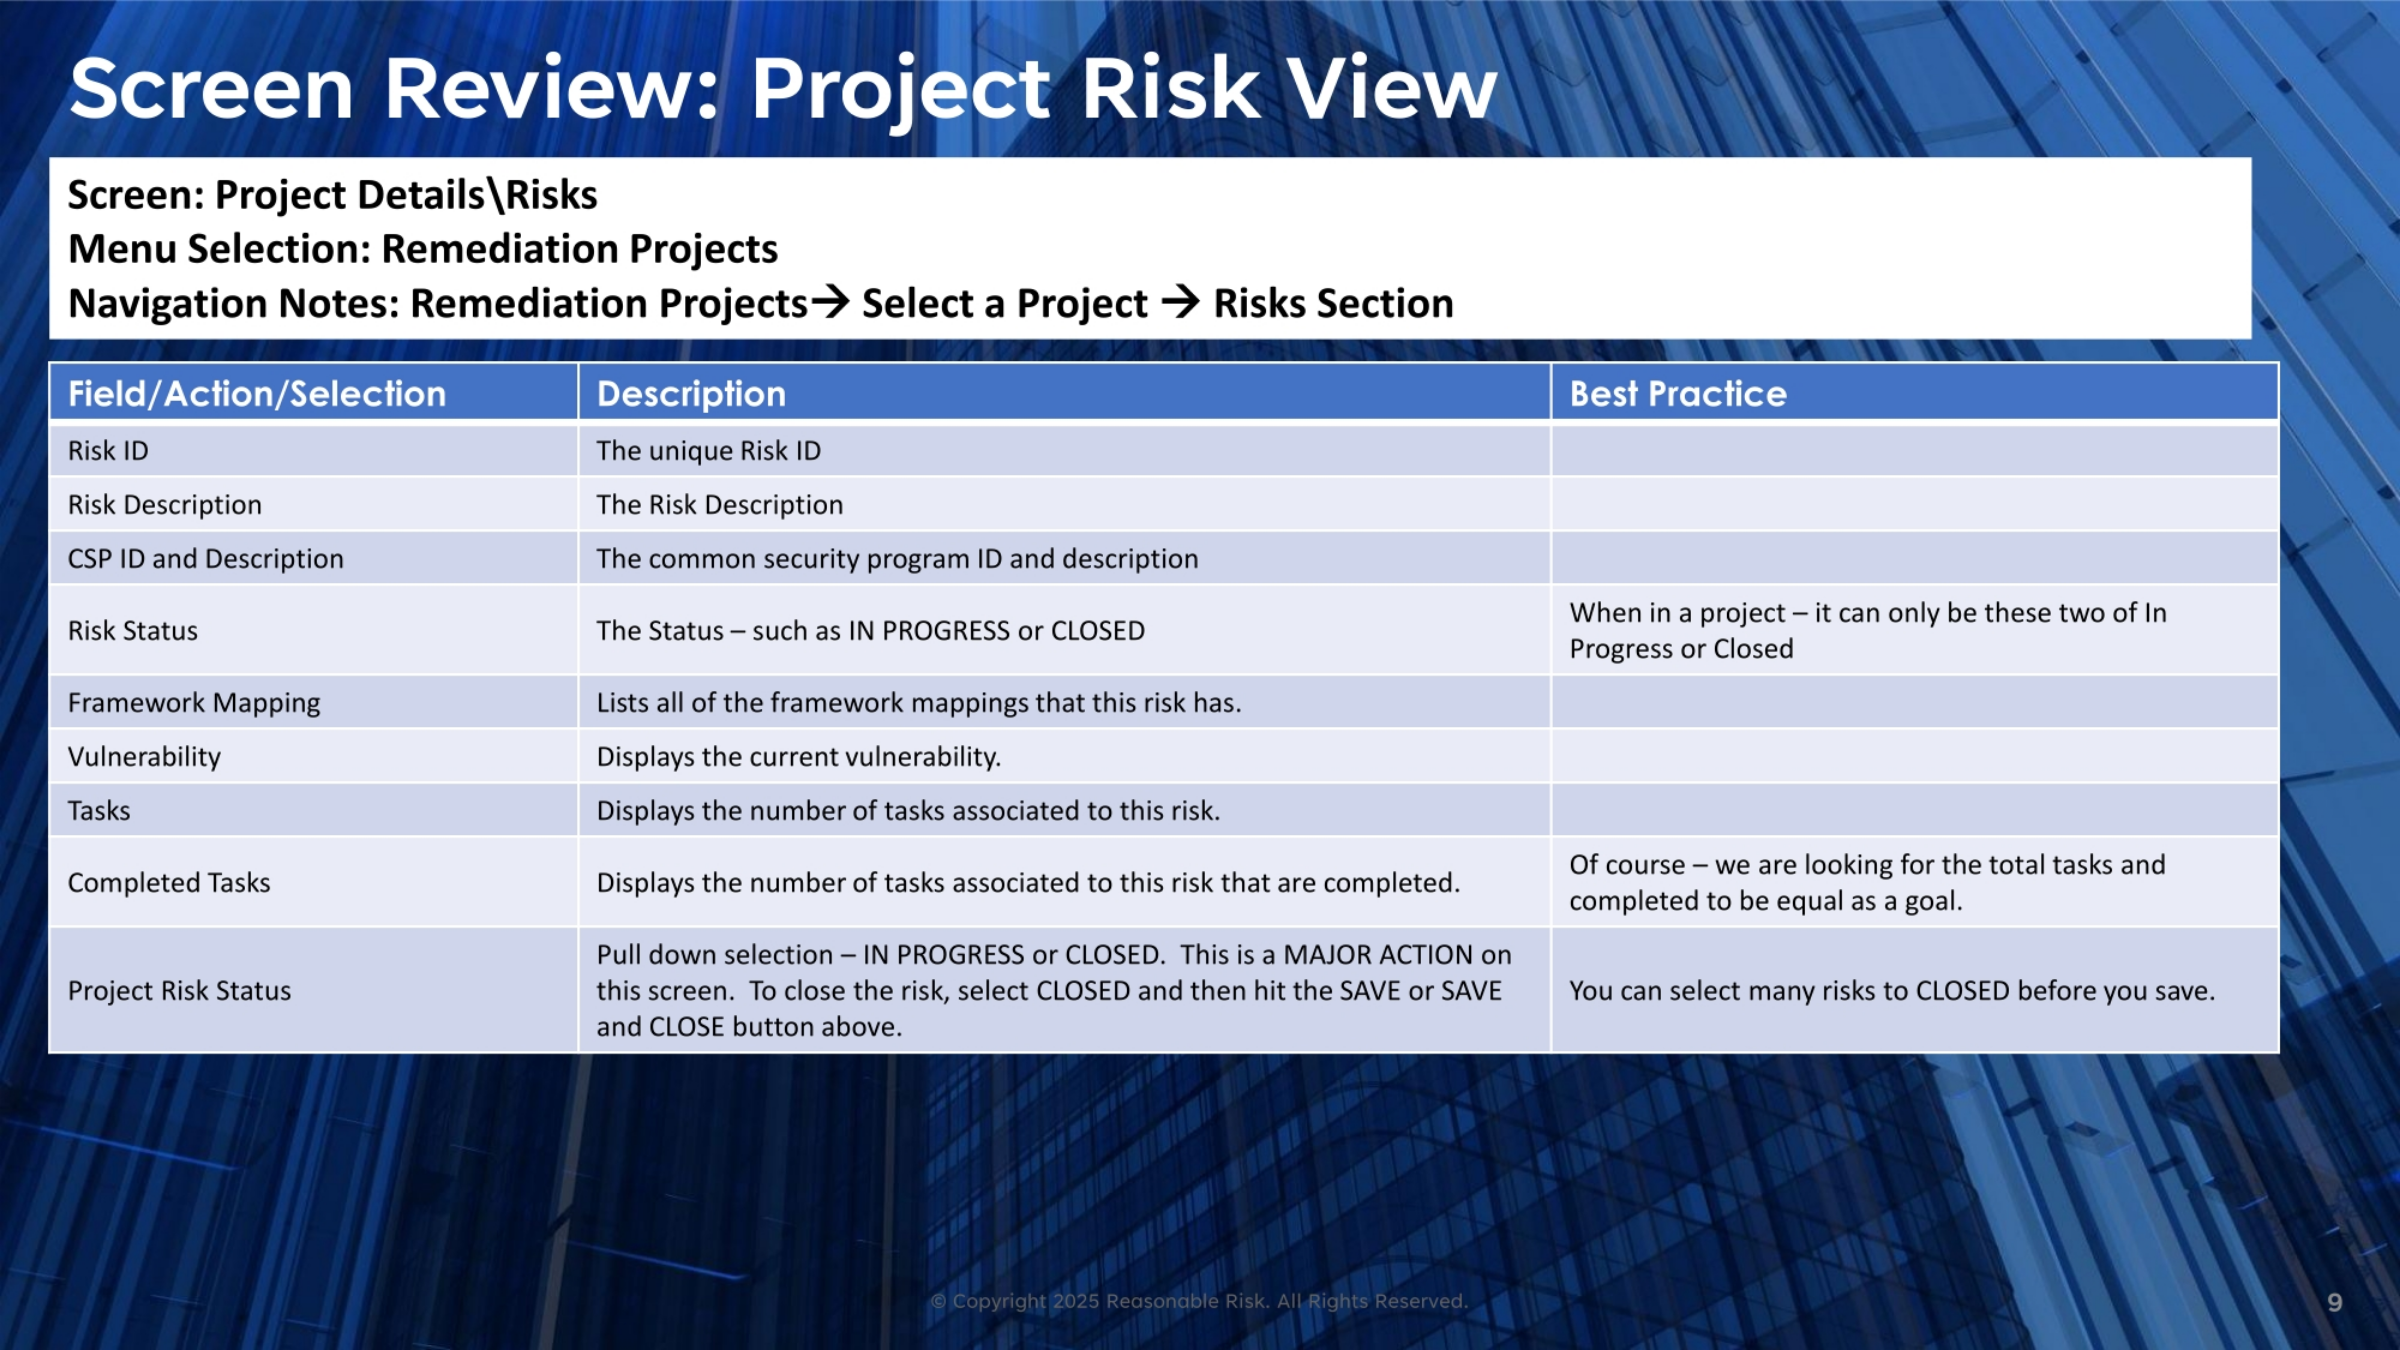
Reviewing the Project Risk View, we see fields like Risk ID, a unique identifier, and Risk Description, providing details. CSP ID and Description refer to the common security program. Risk Status indicates if a risk is 'In Progress' or 'Closed' within a project. Framework Mapping lists associated frameworks, while Vulnerability displays the current vulnerability. Tasks shows the total number of tasks, and Completed Tasks indicates how many are finished, with the goal being for these numbers to be equal. Project Risk Status allows you to change a risk to 'Closed' and save, enabling bulk closure of multiple risks.
10. Screen Review: Project Risk View
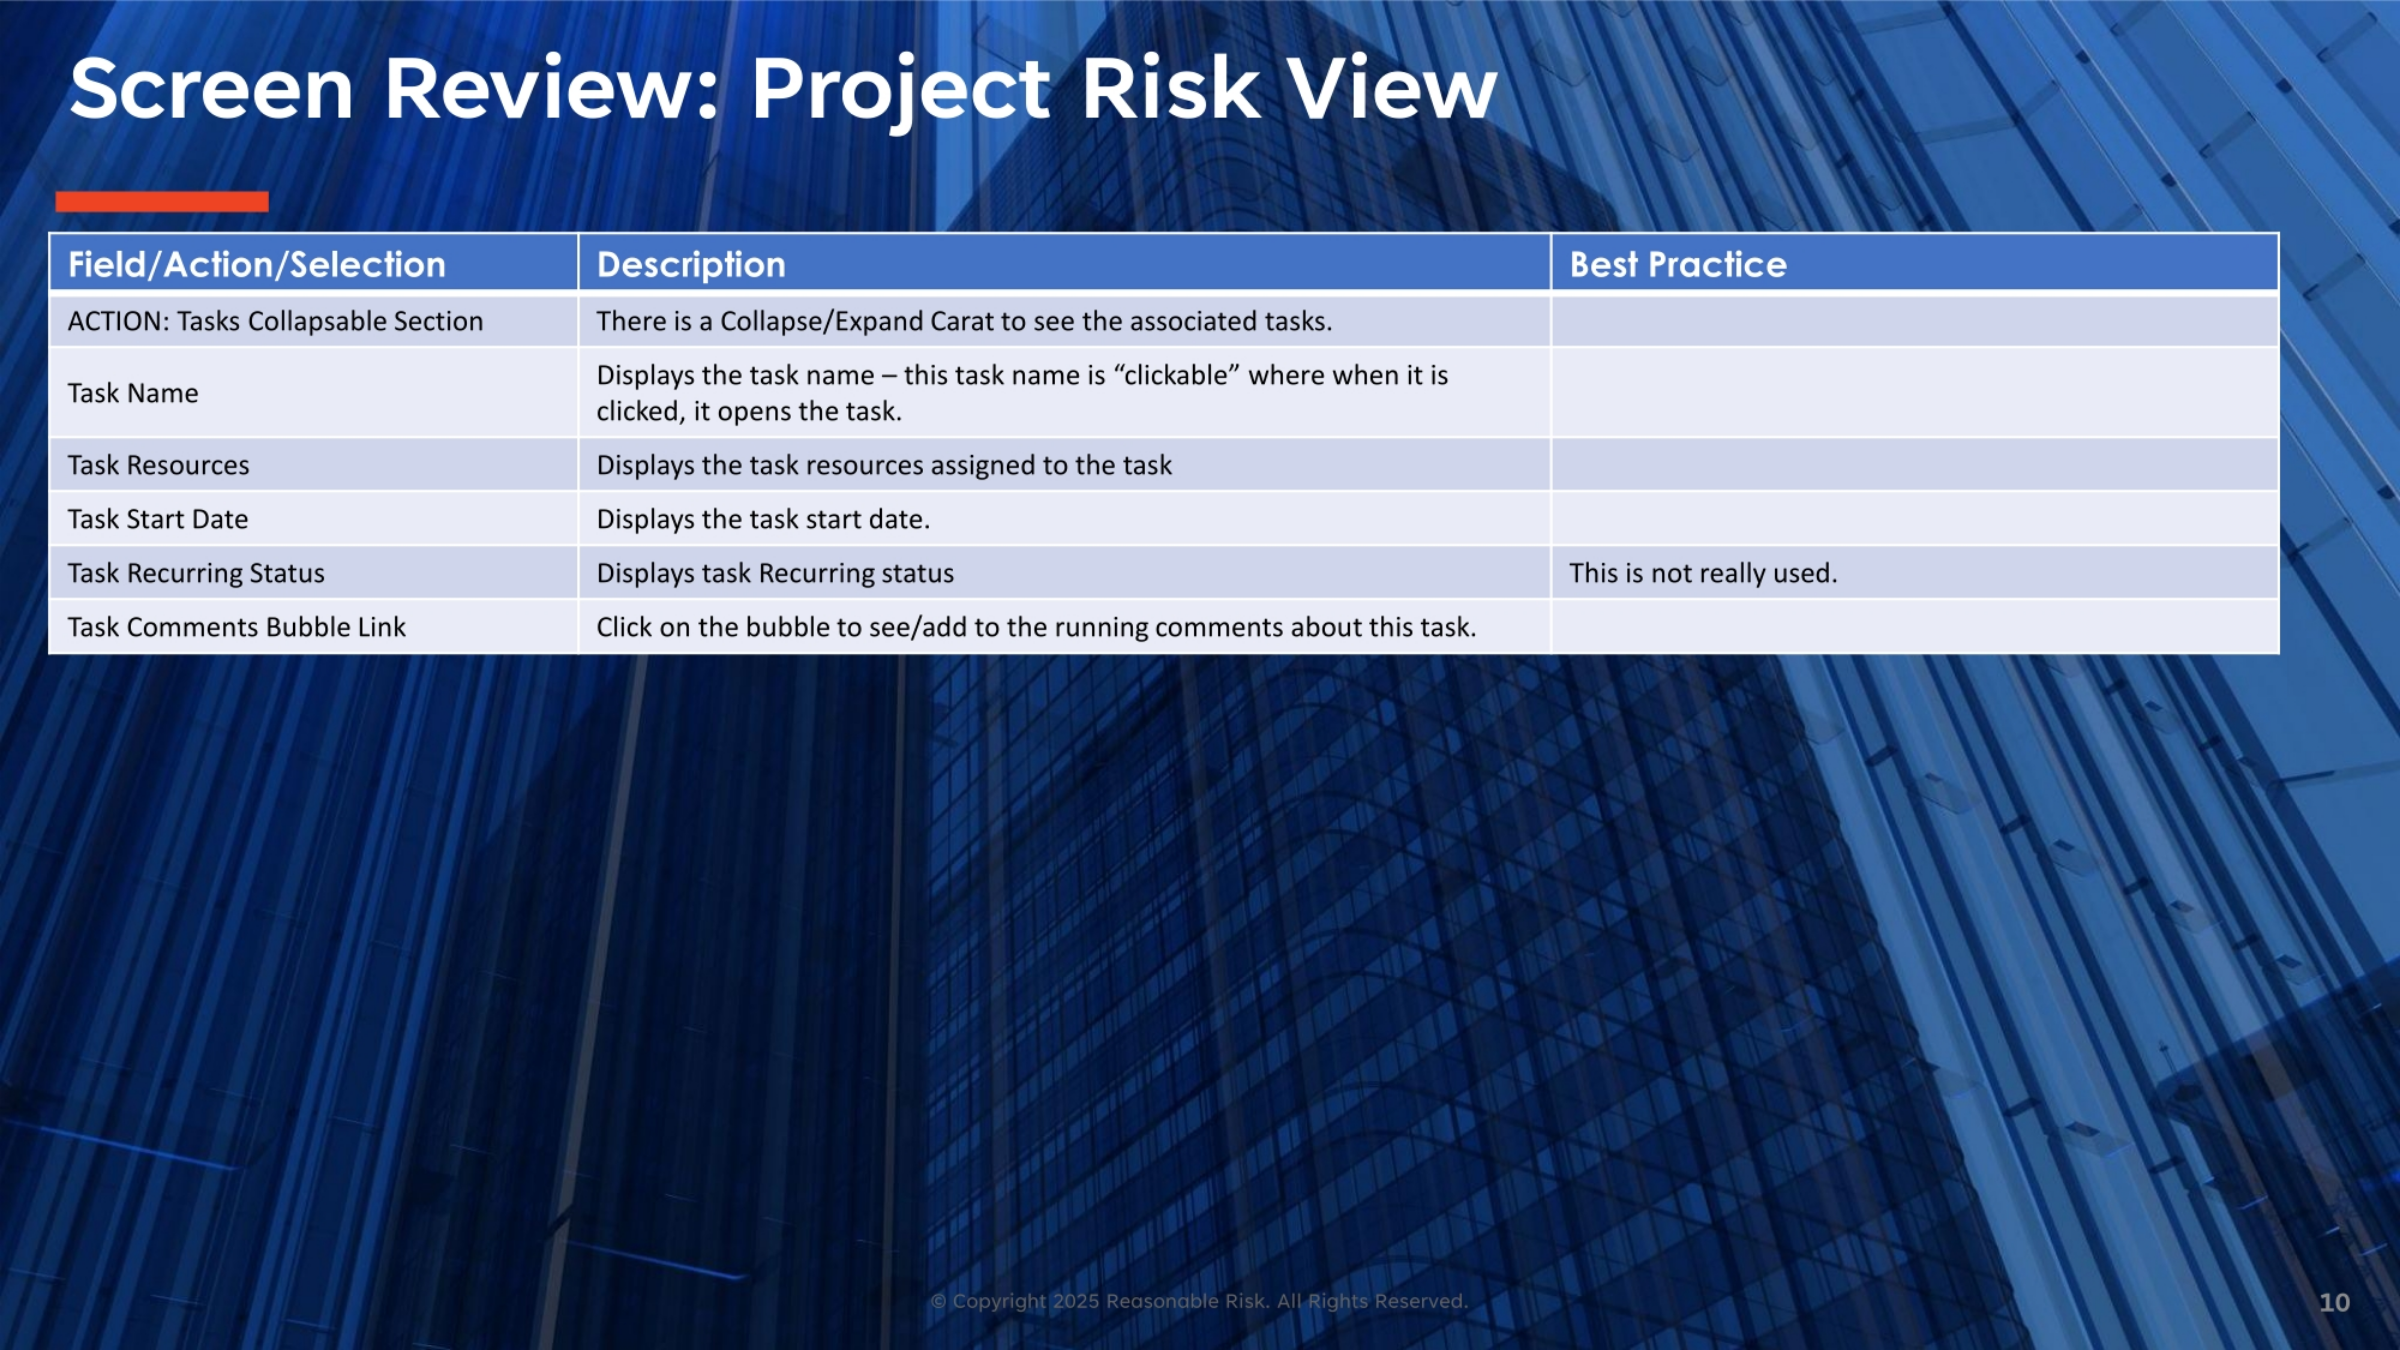
Continuing our review of the Project Risk View, the Tasks Collapsible Section allows you to expand or collapse the associated tasks. Each Task Name is clickable, opening the task details when selected. Task Resources displays the personnel assigned to the task, and Task Start Date shows when the task began. Task Recurring Status indicates if a task is recurring, though this feature is not widely used. Finally, the Task Comments Bubble Link allows you to view or add running comments about a specific task, facilitating communication and tracking.
11. Screen Review: Project Risk View
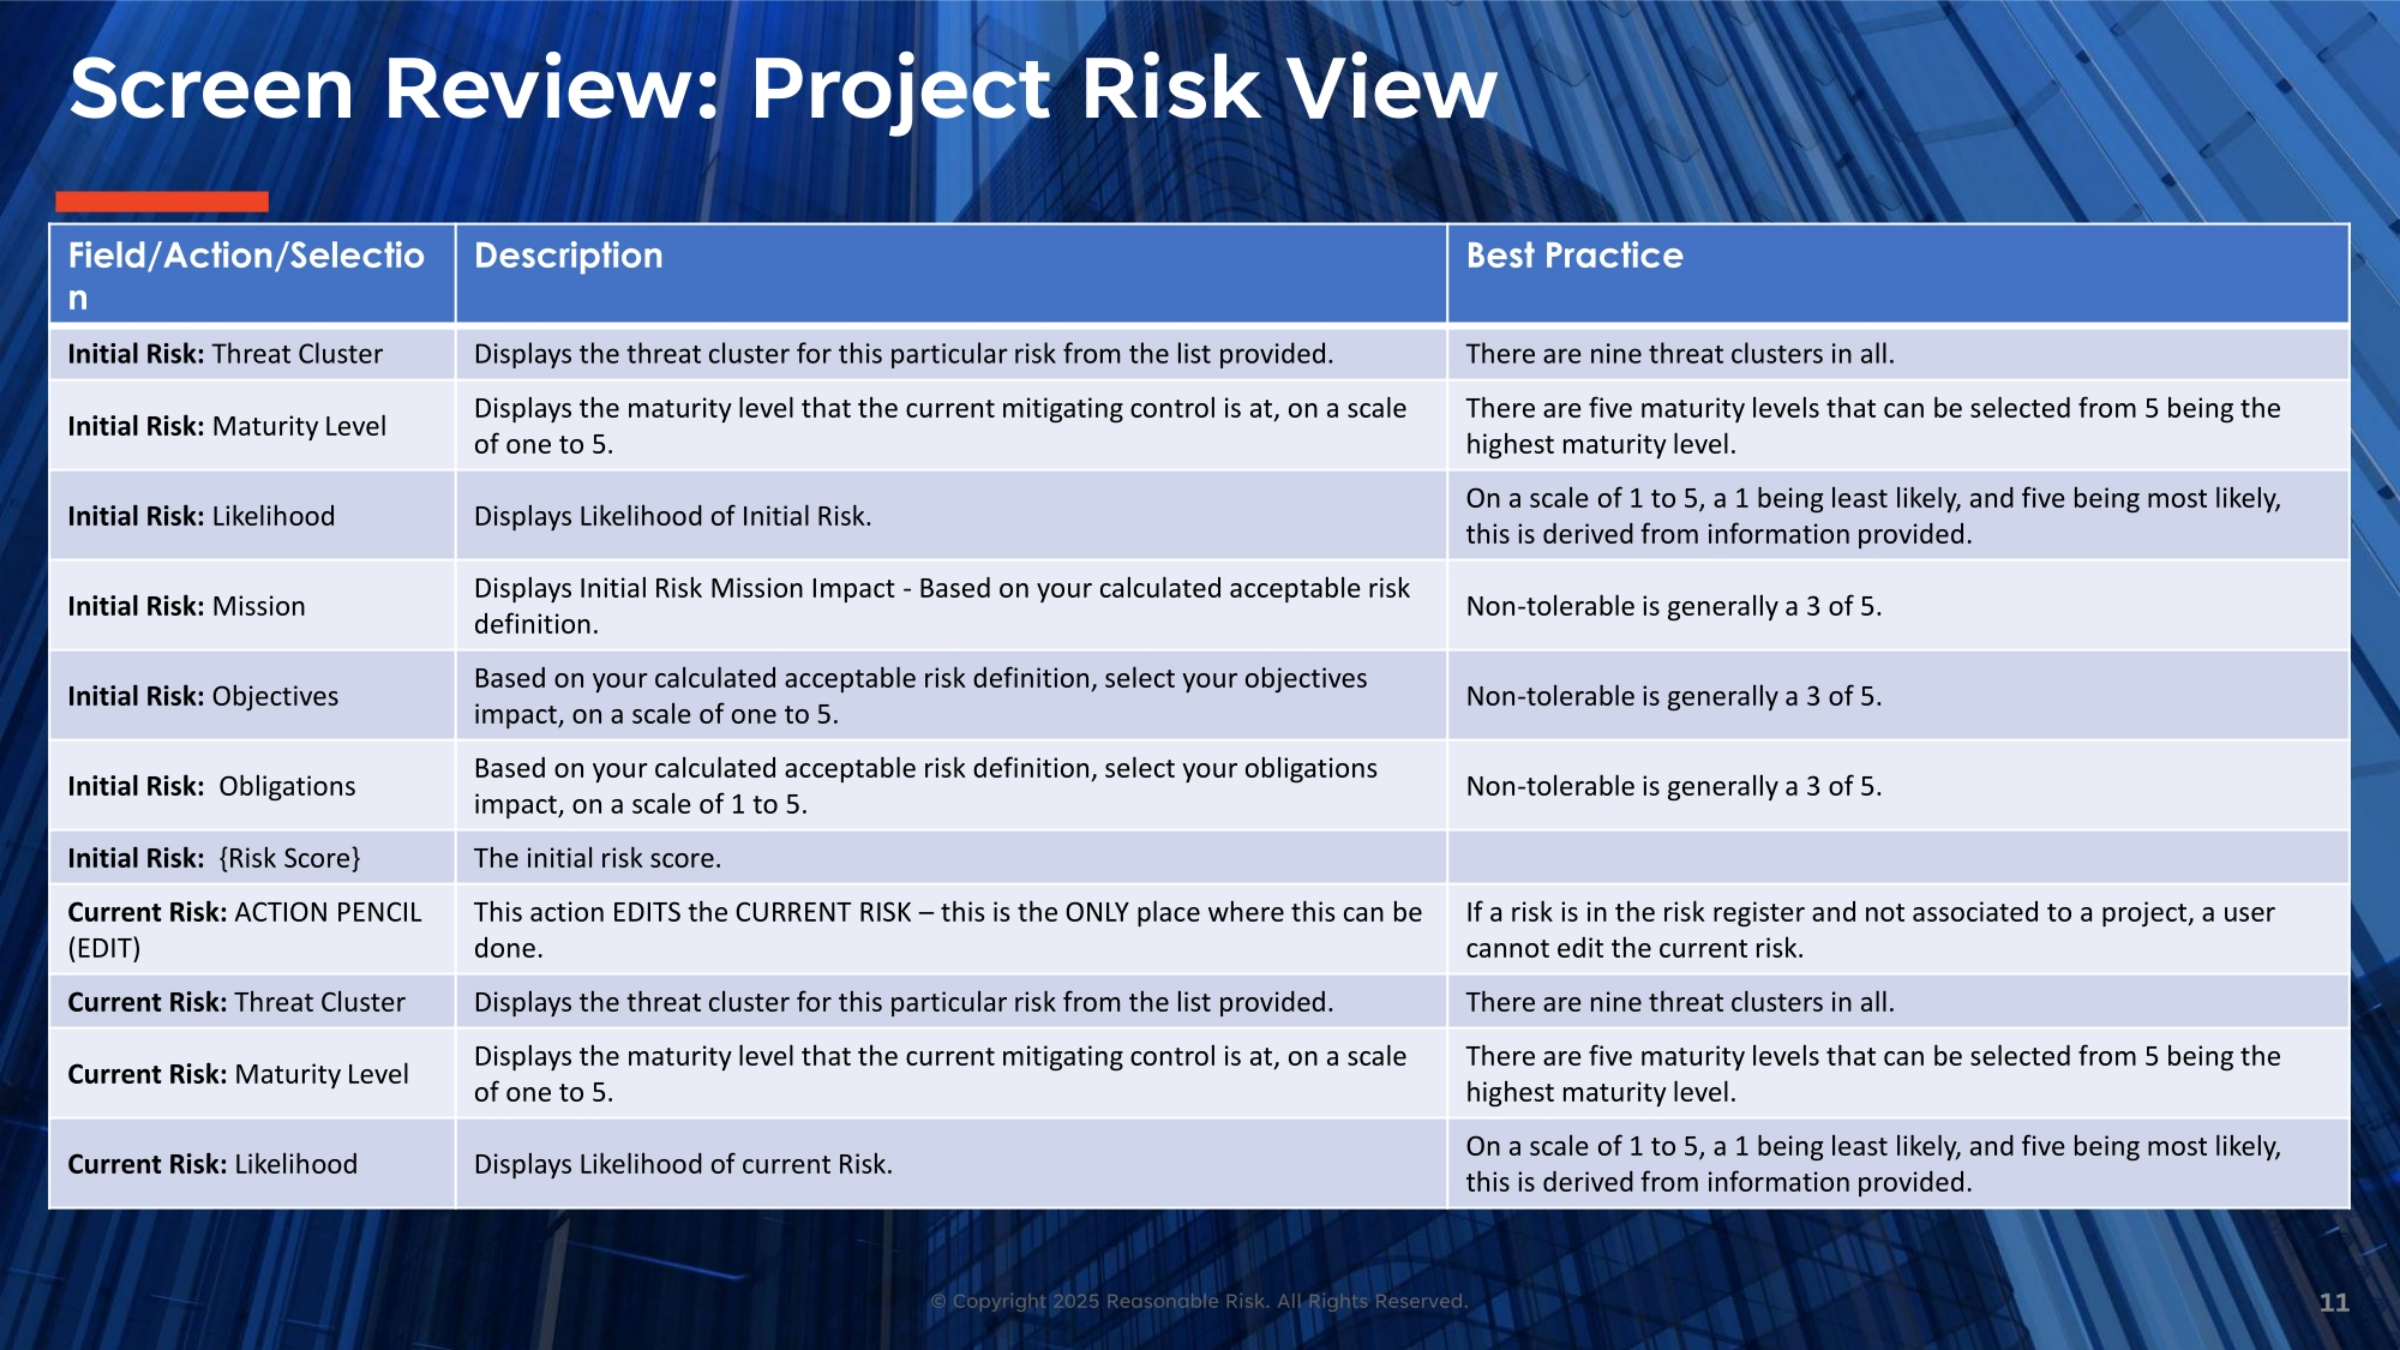
In the Project Risk View, we examine both Initial and Current Risk details. Initial Risk fields include Threat Cluster, with nine clusters available, and Maturity Level, which ranges from one to five, with five being the highest. Likelihood is rated on a scale of one to five, indicating how likely the risk is. Mission, Objectives, and Obligations Impact are based on your acceptable risk definition, with a score of three out of five generally considered non-tolerable. The Initial Risk Score is the calculated score. For Current Risk, the Action Pencil allows editing. Current Threat Cluster and Maturity Level are displayed, along with the Current Likelihood, which is also derived from provided information.
12. Screen Review: Project Risk View
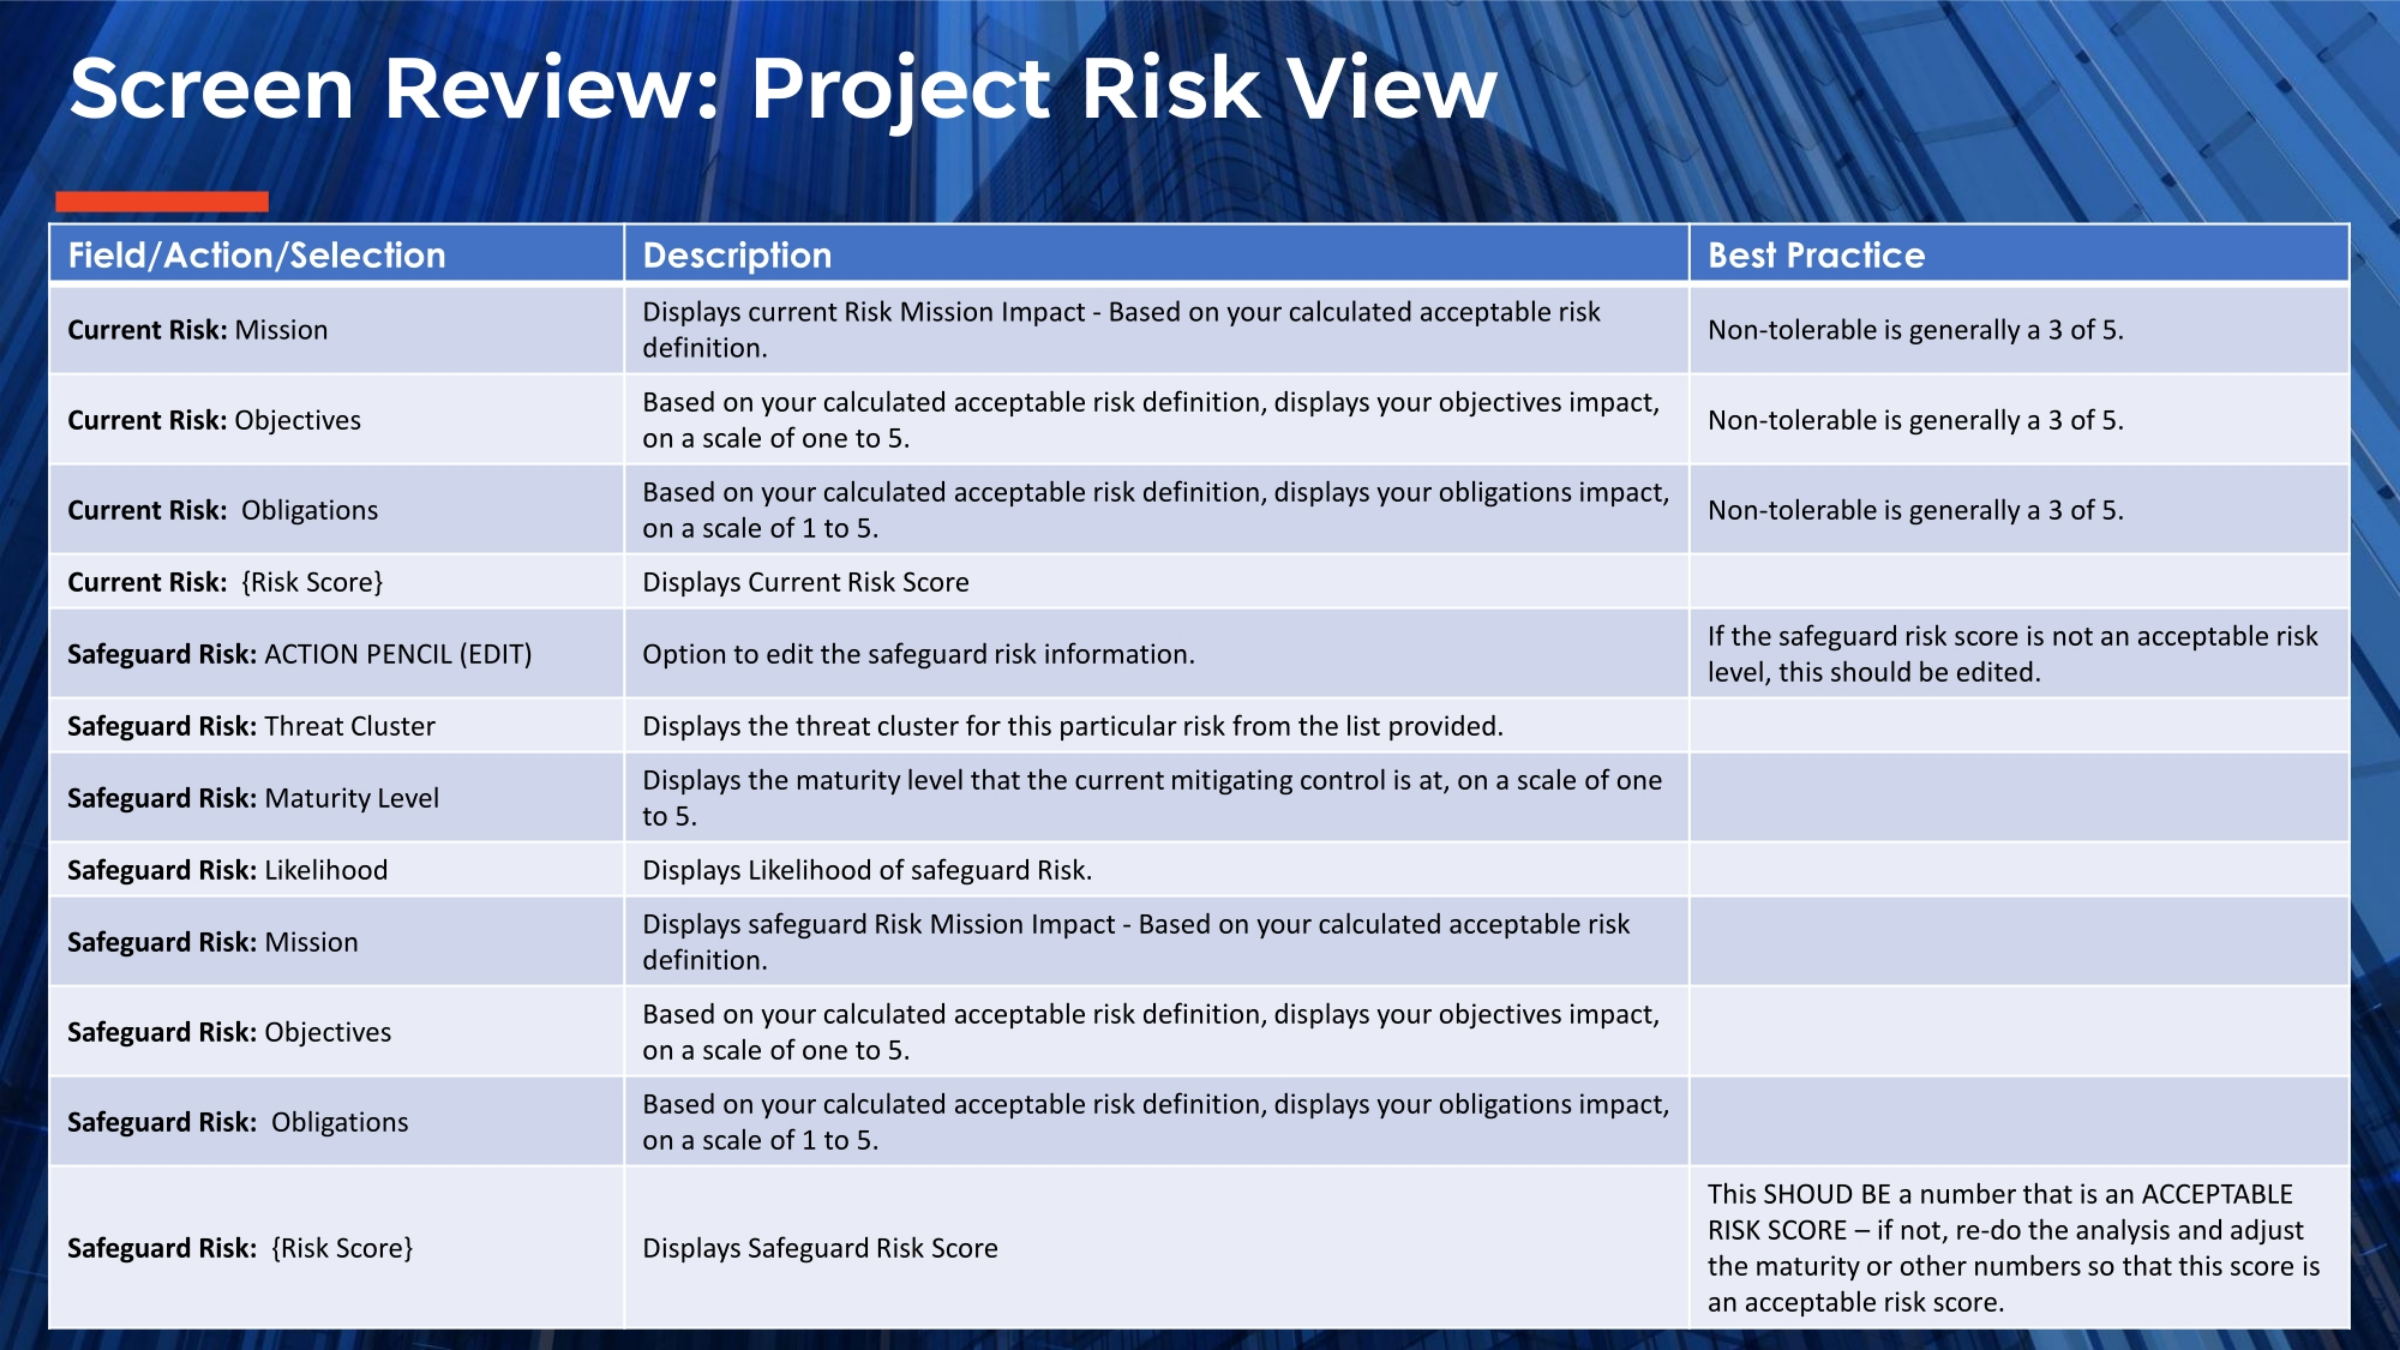
Continuing our review of the Project Risk View, the Current Risk section includes Mission, Objectives, and Obligations, all based on your acceptable risk definition, with a score of three out of five typically being non-tolerable. The Current Risk Score is also displayed. For Safeguard Risk, the Action Pencil allows editing of safeguard information. Safeguard Threat Cluster and Maturity Level are shown, along with Safeguard Likelihood. Safeguard Mission, Objectives, and Obligations Impact are also based on your acceptable risk definition. The Safeguard Risk Score should ideally be an acceptable number; if not, the analysis should be redone to adjust maturity or other factors to achieve an acceptable score.
13. Screen Visual: Project Risk View (example 1)
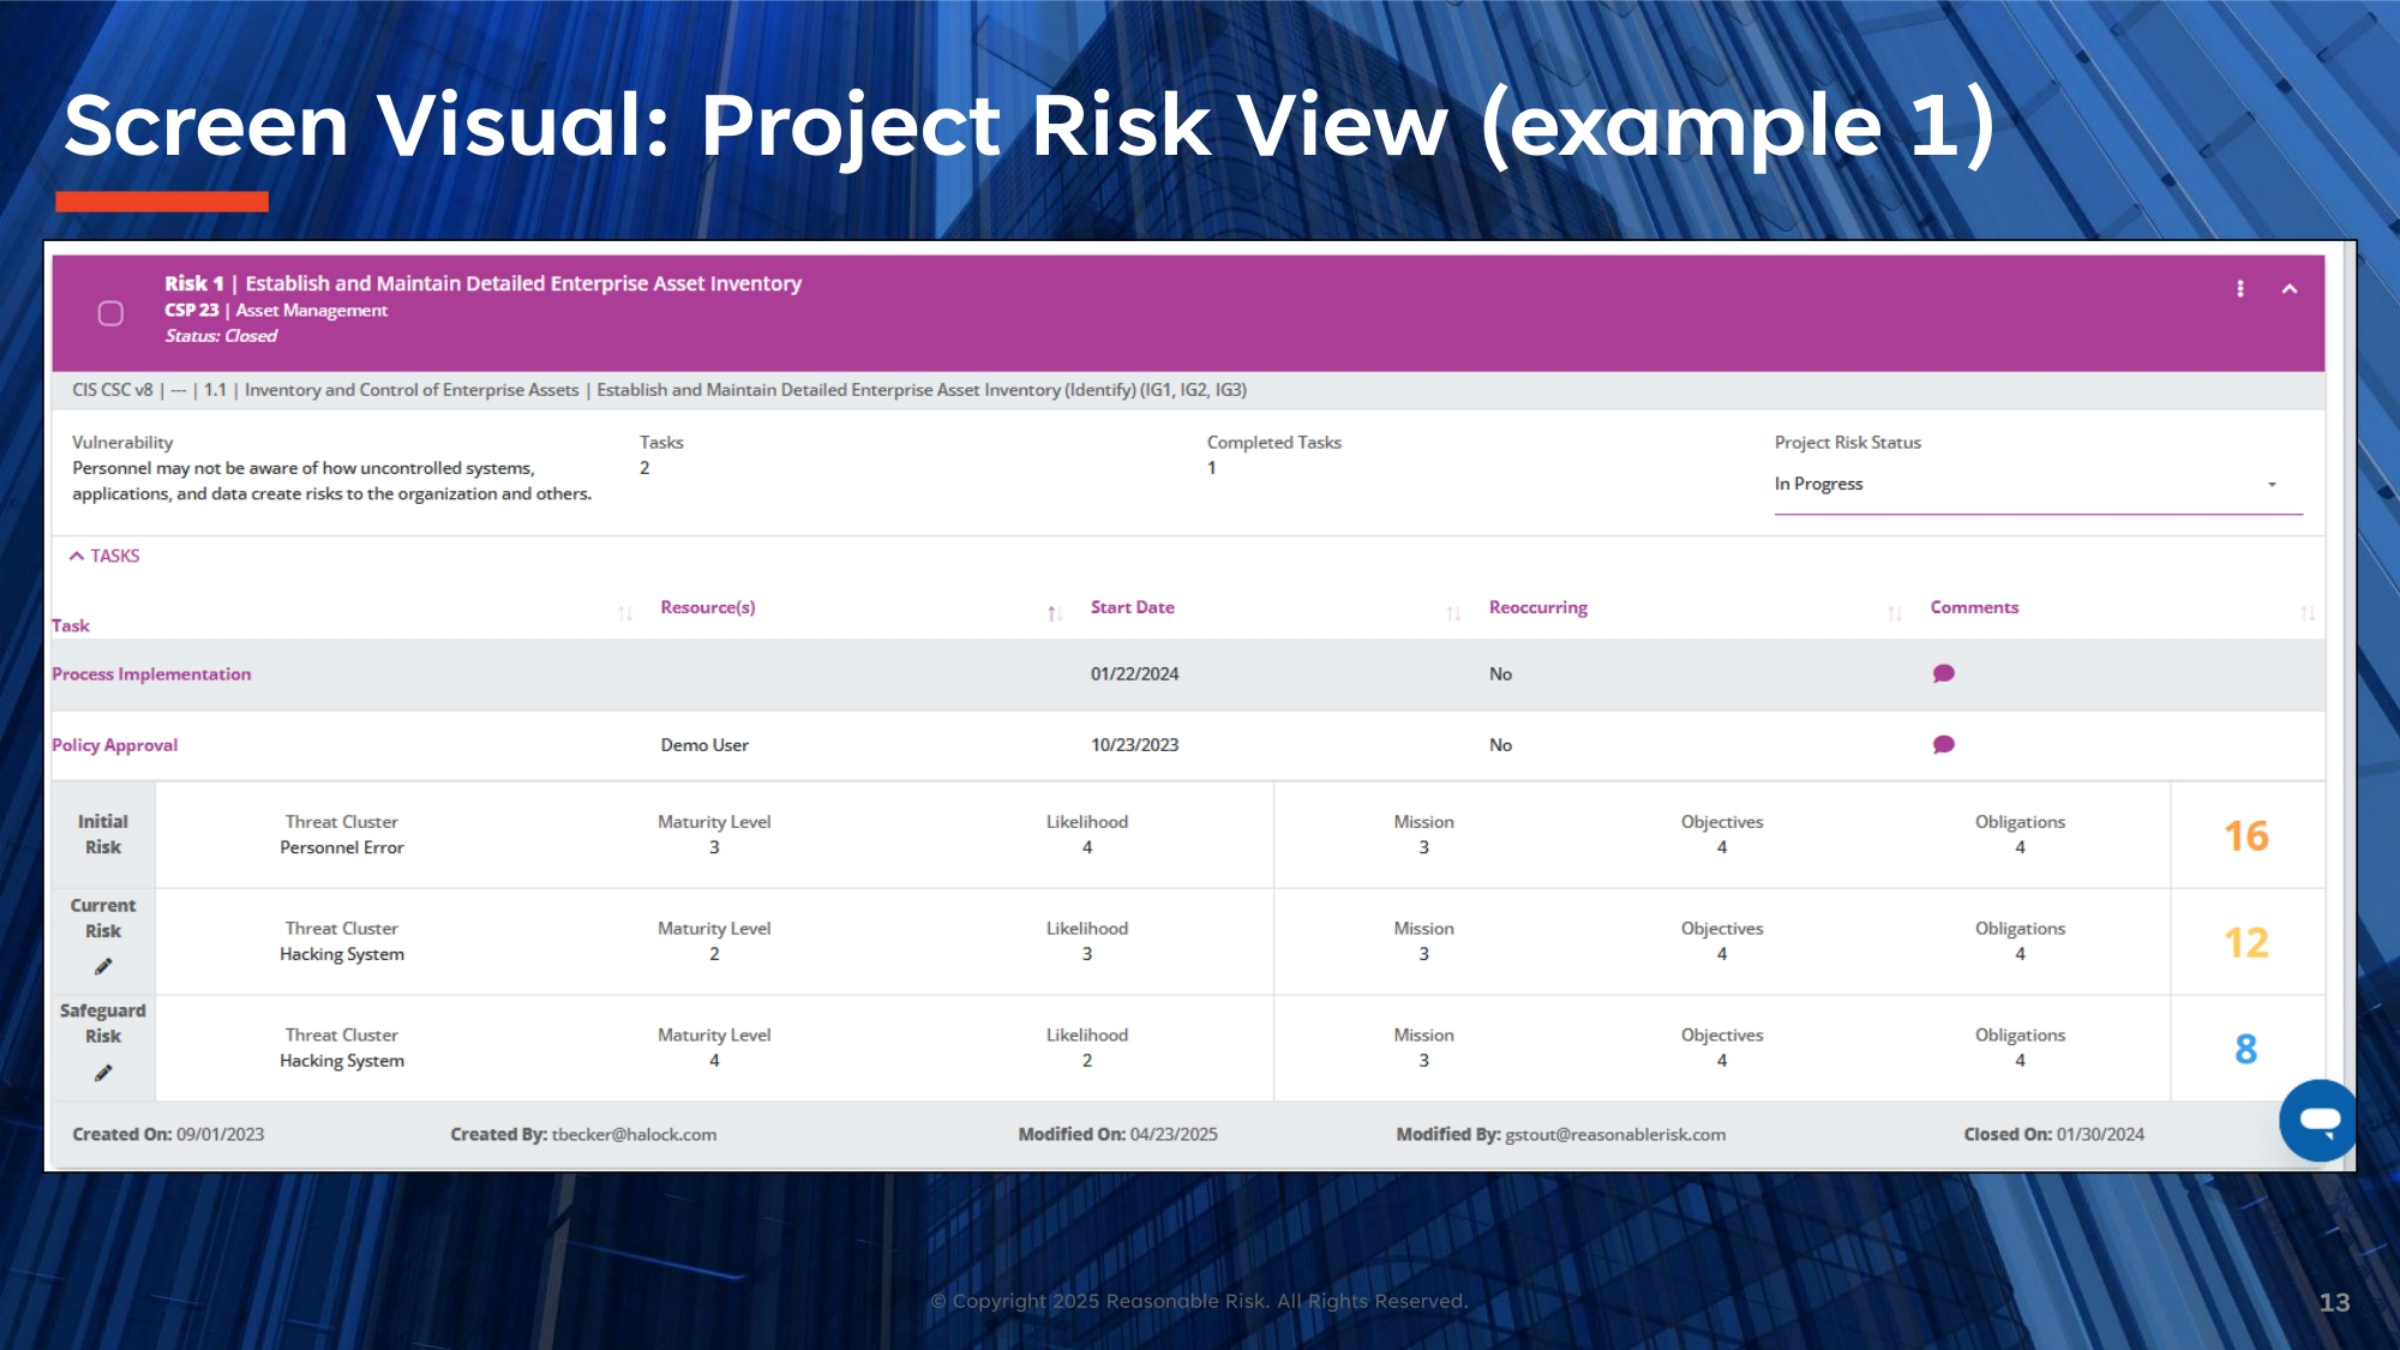
This screen visual provides an example of a Project Risk View, specifically for 'Risk 1: Establish and Maintain Detailed Enterprise Asset Inventory.' We can see its status is 'Closed,' indicating successful remediation. The vulnerability description highlights potential issues with uncontrolled systems. There were two tasks associated with this risk, and one has been completed. The initial risk score was 16, and after remediation, the current risk score is 12, with a safeguard risk score of 8, demonstrating a reduction in risk. This view clearly shows the progression from initial assessment to a closed, mitigated state.
14. Screen Visual: Project Risk View (example 2)
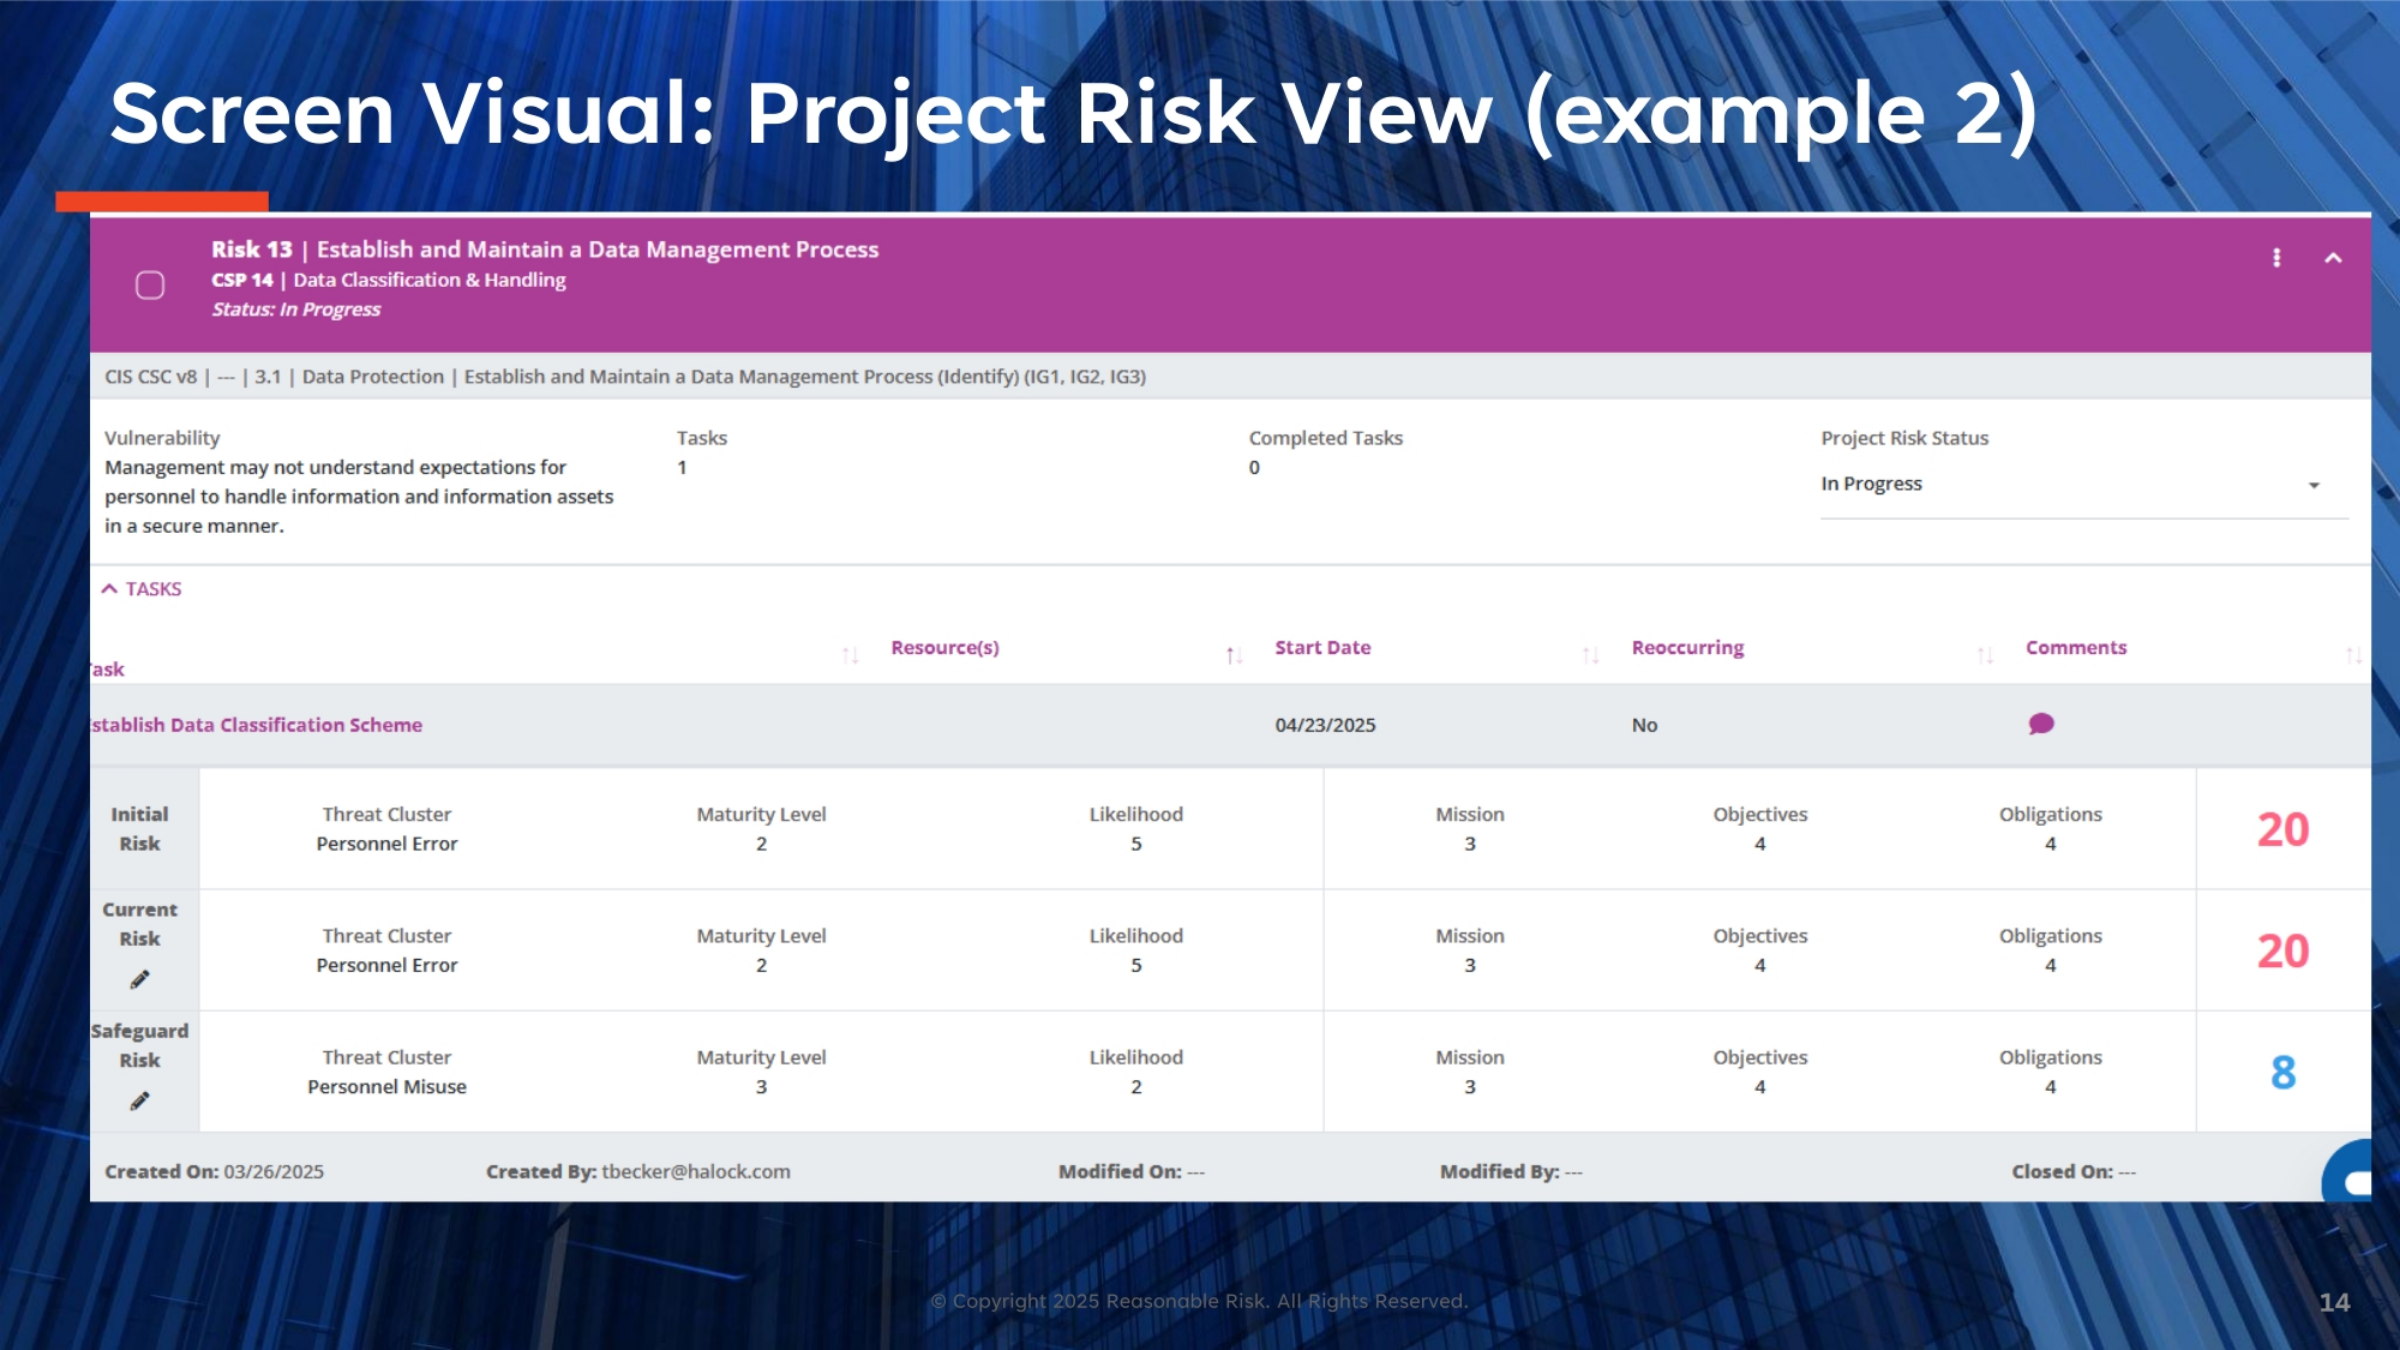
Here's another screen visual, 'Risk 13: Establish and Maintain a Data Management Process,' which is currently 'In Progress.' This example shows a vulnerability related to personnel understanding of secure information handling. There is one task associated with this risk, and zero tasks have been completed so far. The initial risk score was 20, and the current risk score remains 20, indicating that remediation efforts are still underway. The safeguard risk score is 8, representing the target state once controls are fully implemented. This view provides a snapshot of an active risk being managed.
15. Screen Narrative: Project Risk Filter
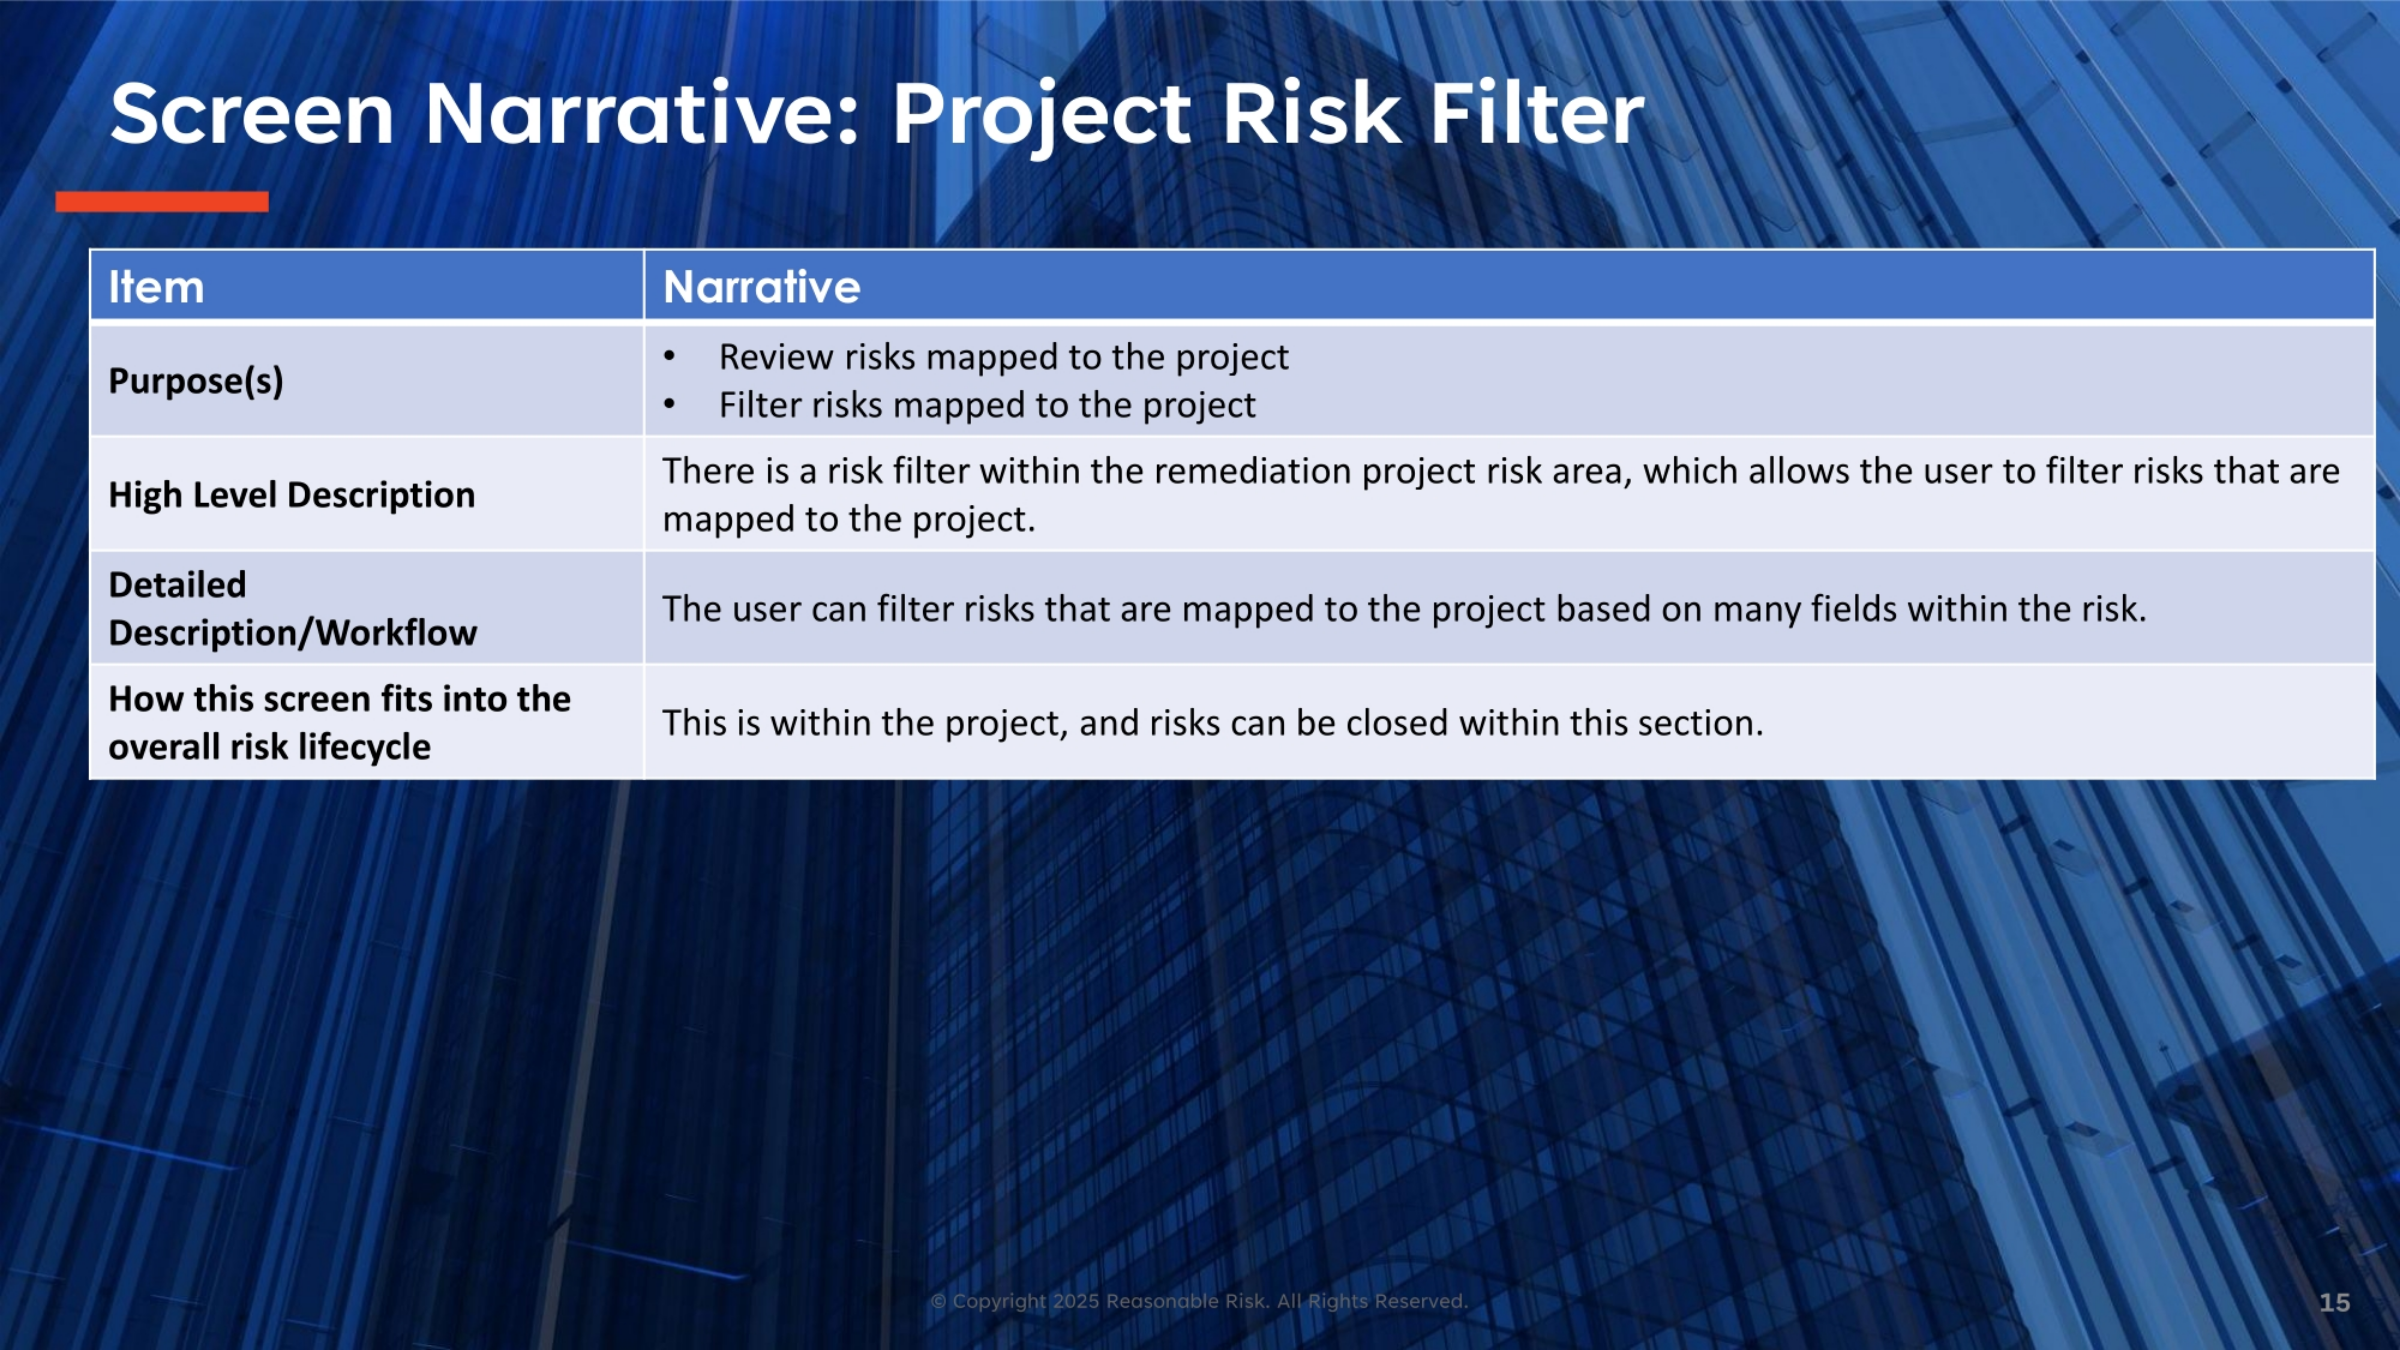
The Project Risk Filter serves two main purposes: reviewing risks mapped to a project and filtering those risks. This feature is located within the remediation project risk area, allowing users to refine their view of risks mapped to a specific project. Users can filter risks based on various fields within the risk details. This functionality is integral to managing risks within a project, as it enables efficient navigation and allows risks to be closed directly within this section, streamlining the remediation process.
16. Screen Review: Project Risk Filter
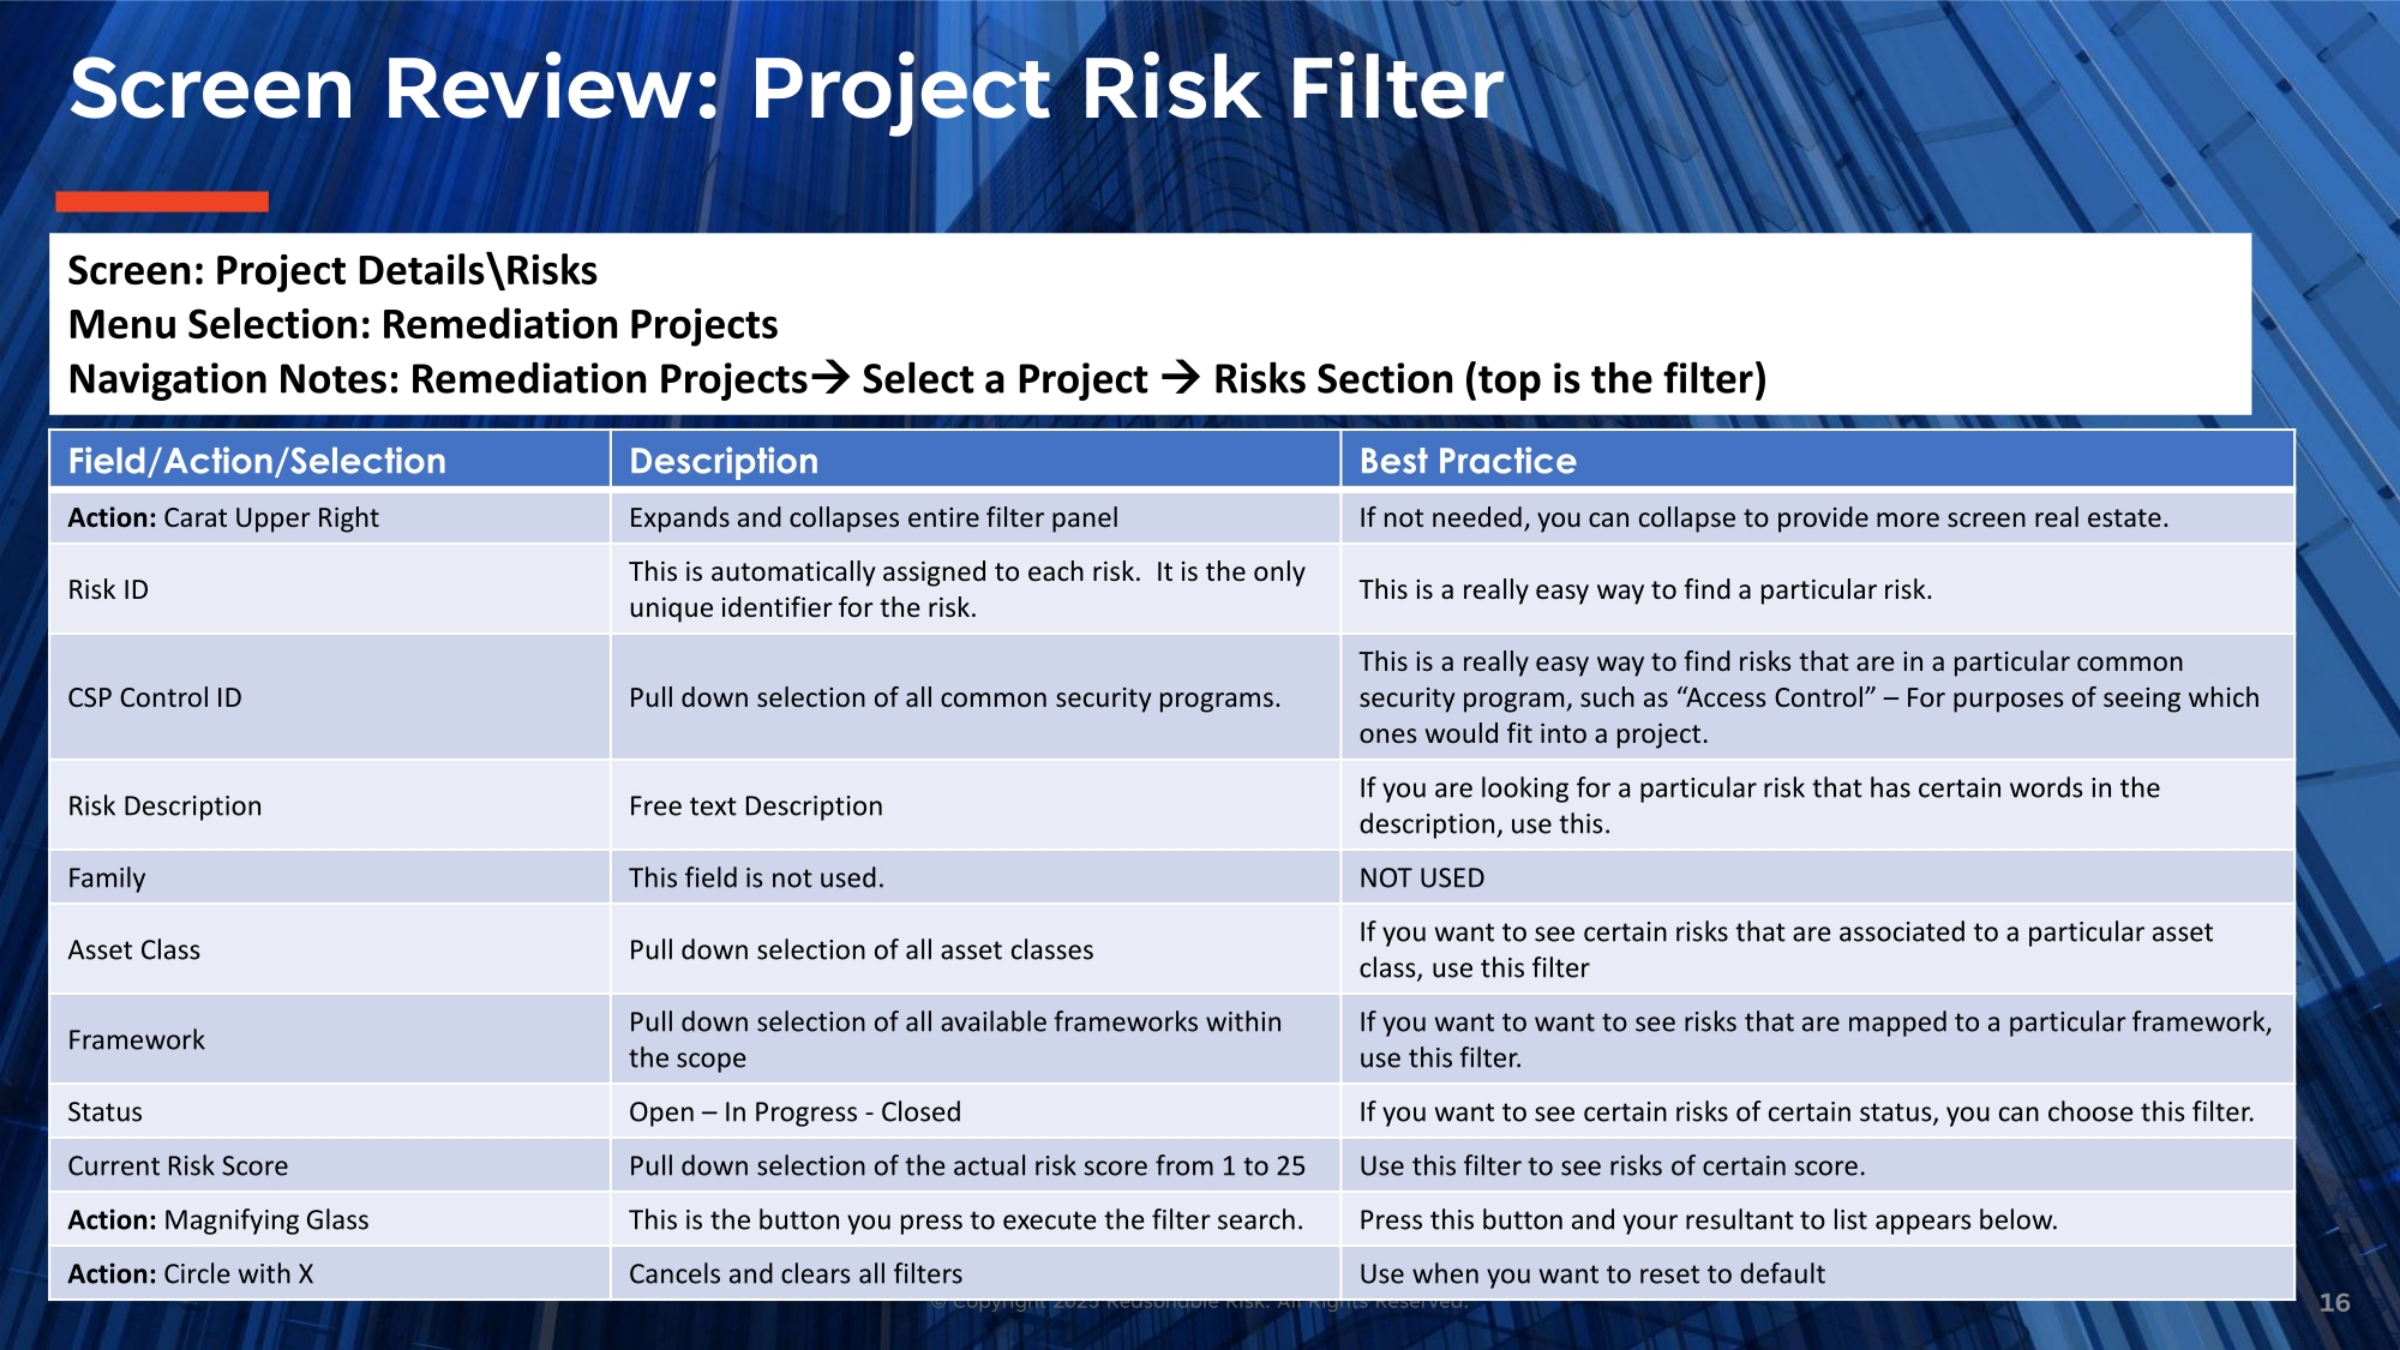
Reviewing the Project Risk Filter, the Carat allows you to expand or collapse the entire filter panel, optimizing screen real estate. Each Risk ID is unique and automatically assigned, making it easy to find specific risks. The CSP Control ID dropdown helps filter risks by common security programs, such as 'Access Control.' You can use the free text Risk Description field to search for risks containing specific words. The Asset Class and Framework dropdowns allow filtering by associated asset classes or frameworks. The Status filter lets you view risks that are 'Open,' 'In Progress,' or 'Closed.' You can also filter by Current Risk Score. The Magnifying Glass executes the search, and the Circle with X clears all filters, resetting to default.
17. Screen Narrative: Project Risk Action Bar
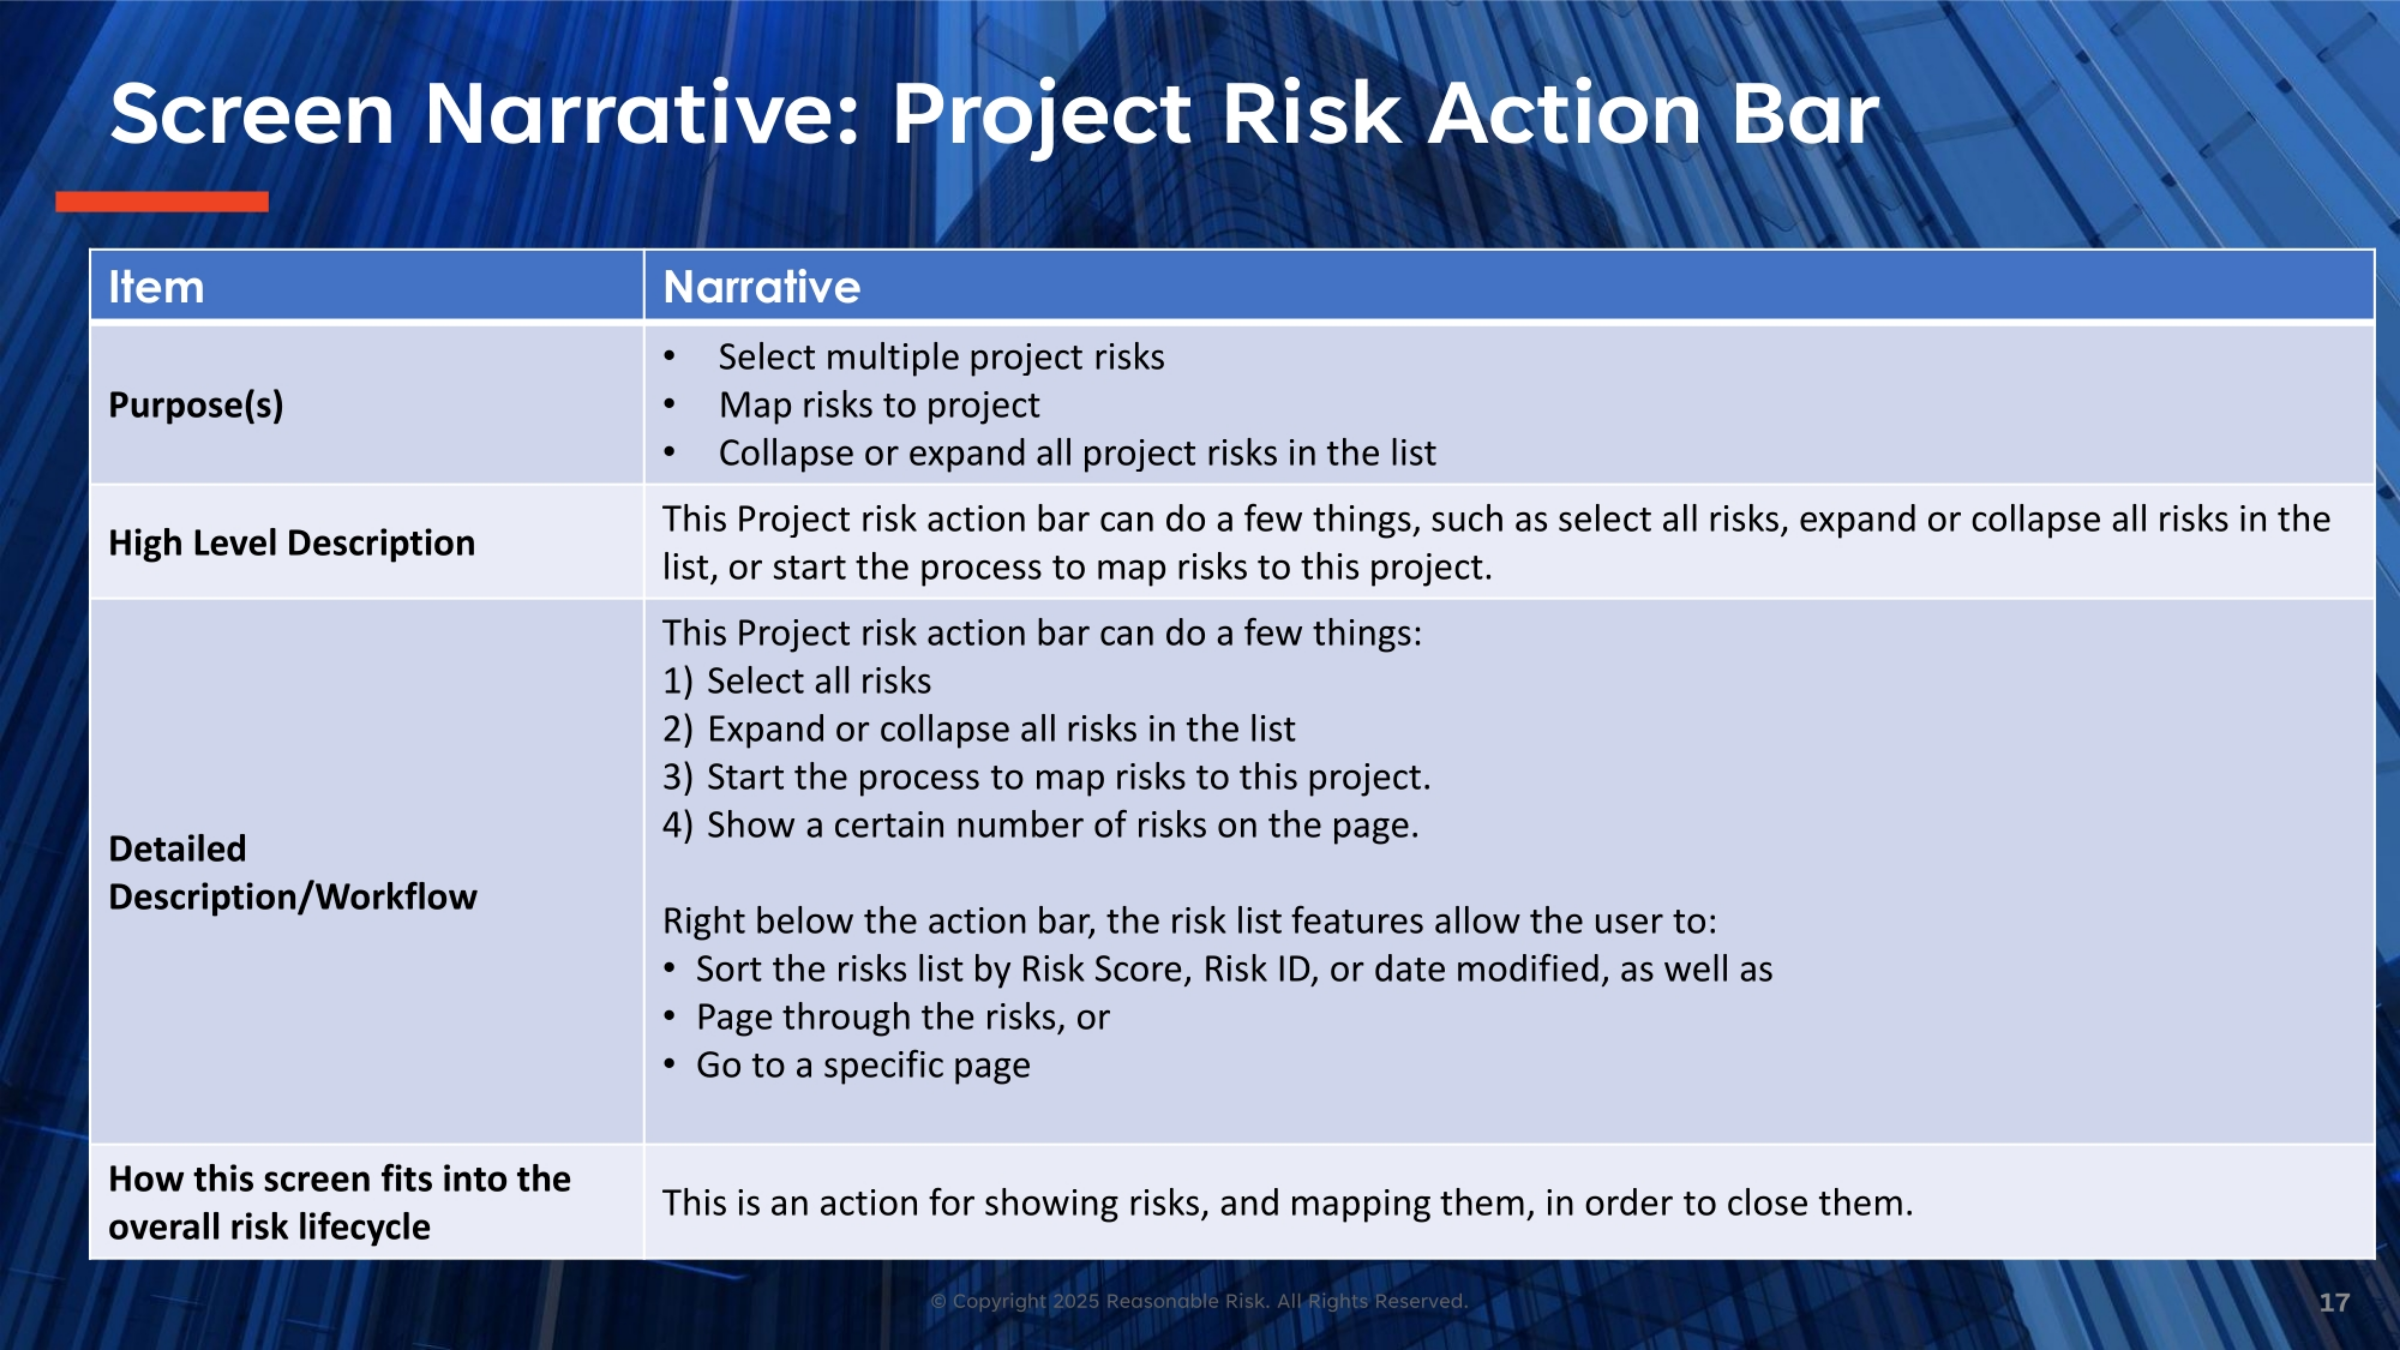
The Project Risk Action Bar provides several key functionalities. It allows you to select multiple project risks, map risks to a project, and collapse or expand all project risks in the list. This action bar enables you to select all risks, expand or collapse them, initiate the process to map risks to the current project, and control the number of risks displayed per page. Below the action bar, the risk list features allow users to sort risks by Risk Score, Risk ID, or modification date, page through risks, or navigate to a specific page. This action bar is essential for showing, mapping, and ultimately closing risks.
18. Screen Review: Project Risk Action Bar
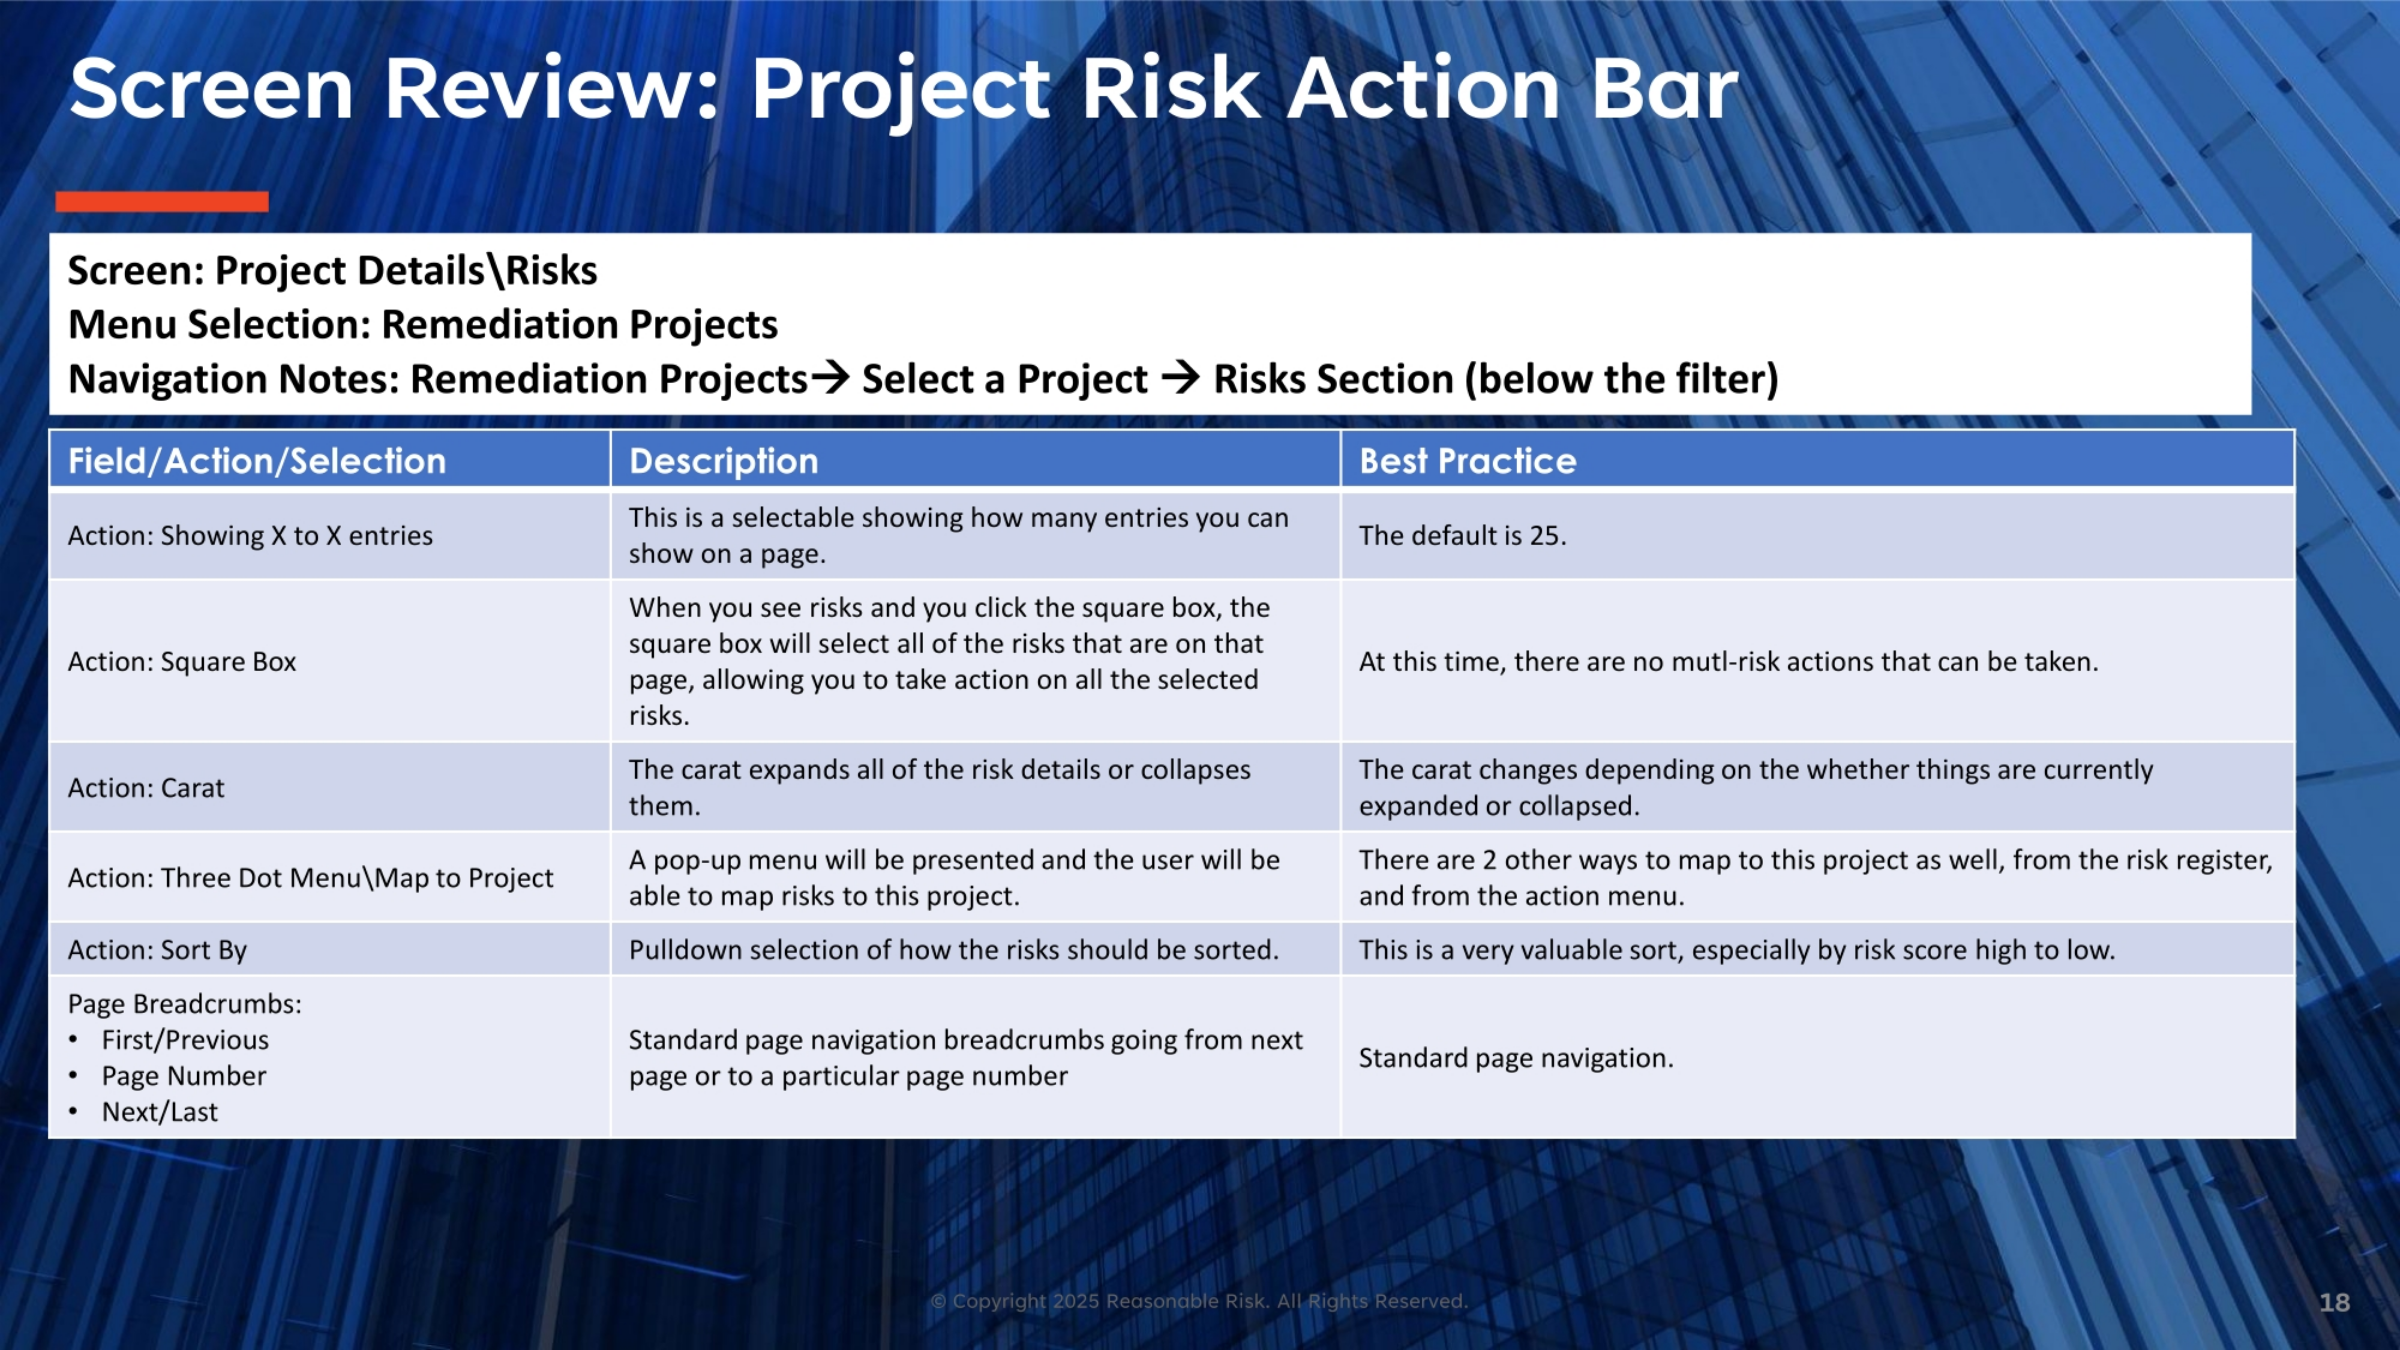
Examining the Project Risk Action Bar, the 'Showing X to X entries' option allows you to select how many entries are displayed per page, with 25 being the default. The Square Box enables you to select all risks on a given page to perform actions, though currently, multi-risk actions are not available. The Carat expands or collapses risk details. The Three Dot Menu, or 'Map to Project' option, presents a pop-up for mapping risks to the current project, or to a new one. Risks can also be mapped from the risk register or the action menu. The 'Sort By' pulldown is valuable for organizing risks, especially by risk score from high to low. Page Breadcrumbs provide standard navigation for moving between pages.
19. Screen Visual: Project Risk Filter & Action Bar
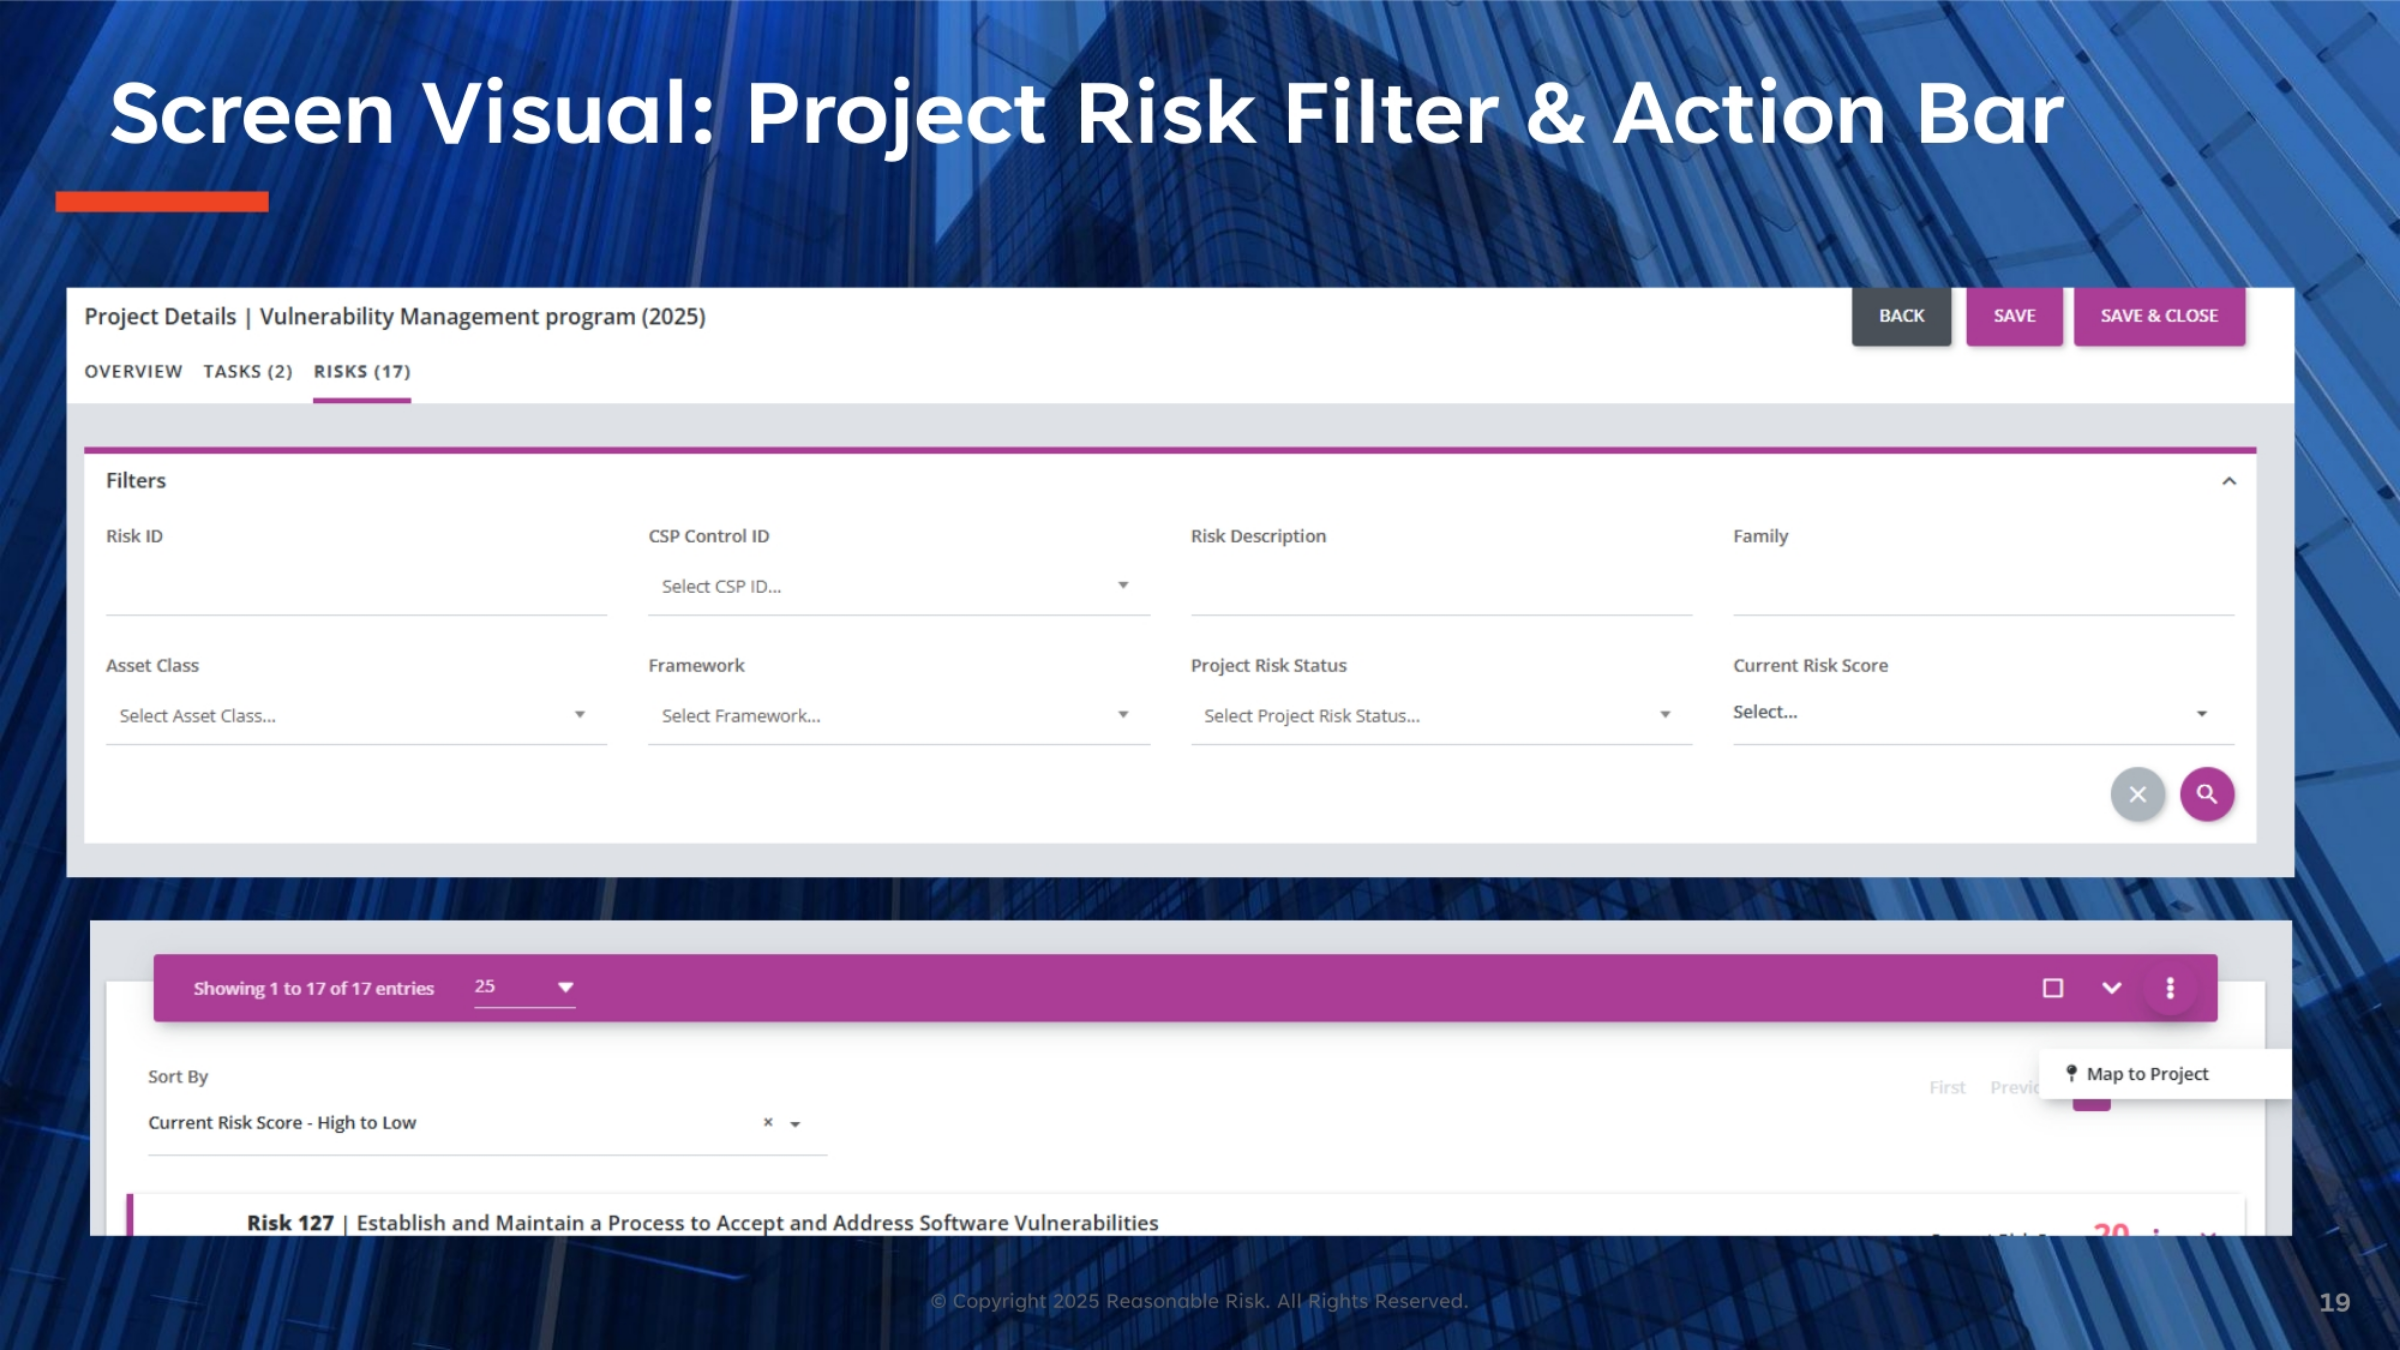
This screen visual demonstrates the Project Risk Filter and Action Bar in action, within the 'Vulnerability Management program.' You can see the filter panel at the top, allowing you to refine the list of risks by various criteria such as Risk ID, CSP Control ID, or Project Risk Status. Below the filters, the action bar provides options for sorting, such as 'Current Risk Score - High to Low,' and navigation. The example shows 'Risk 127: Establish and Maintain a Process to Accept and Address Software Vulnerabilities,' illustrating how these tools help manage and prioritize risks effectively.
20. Screen Narrative: Map Risks to Project
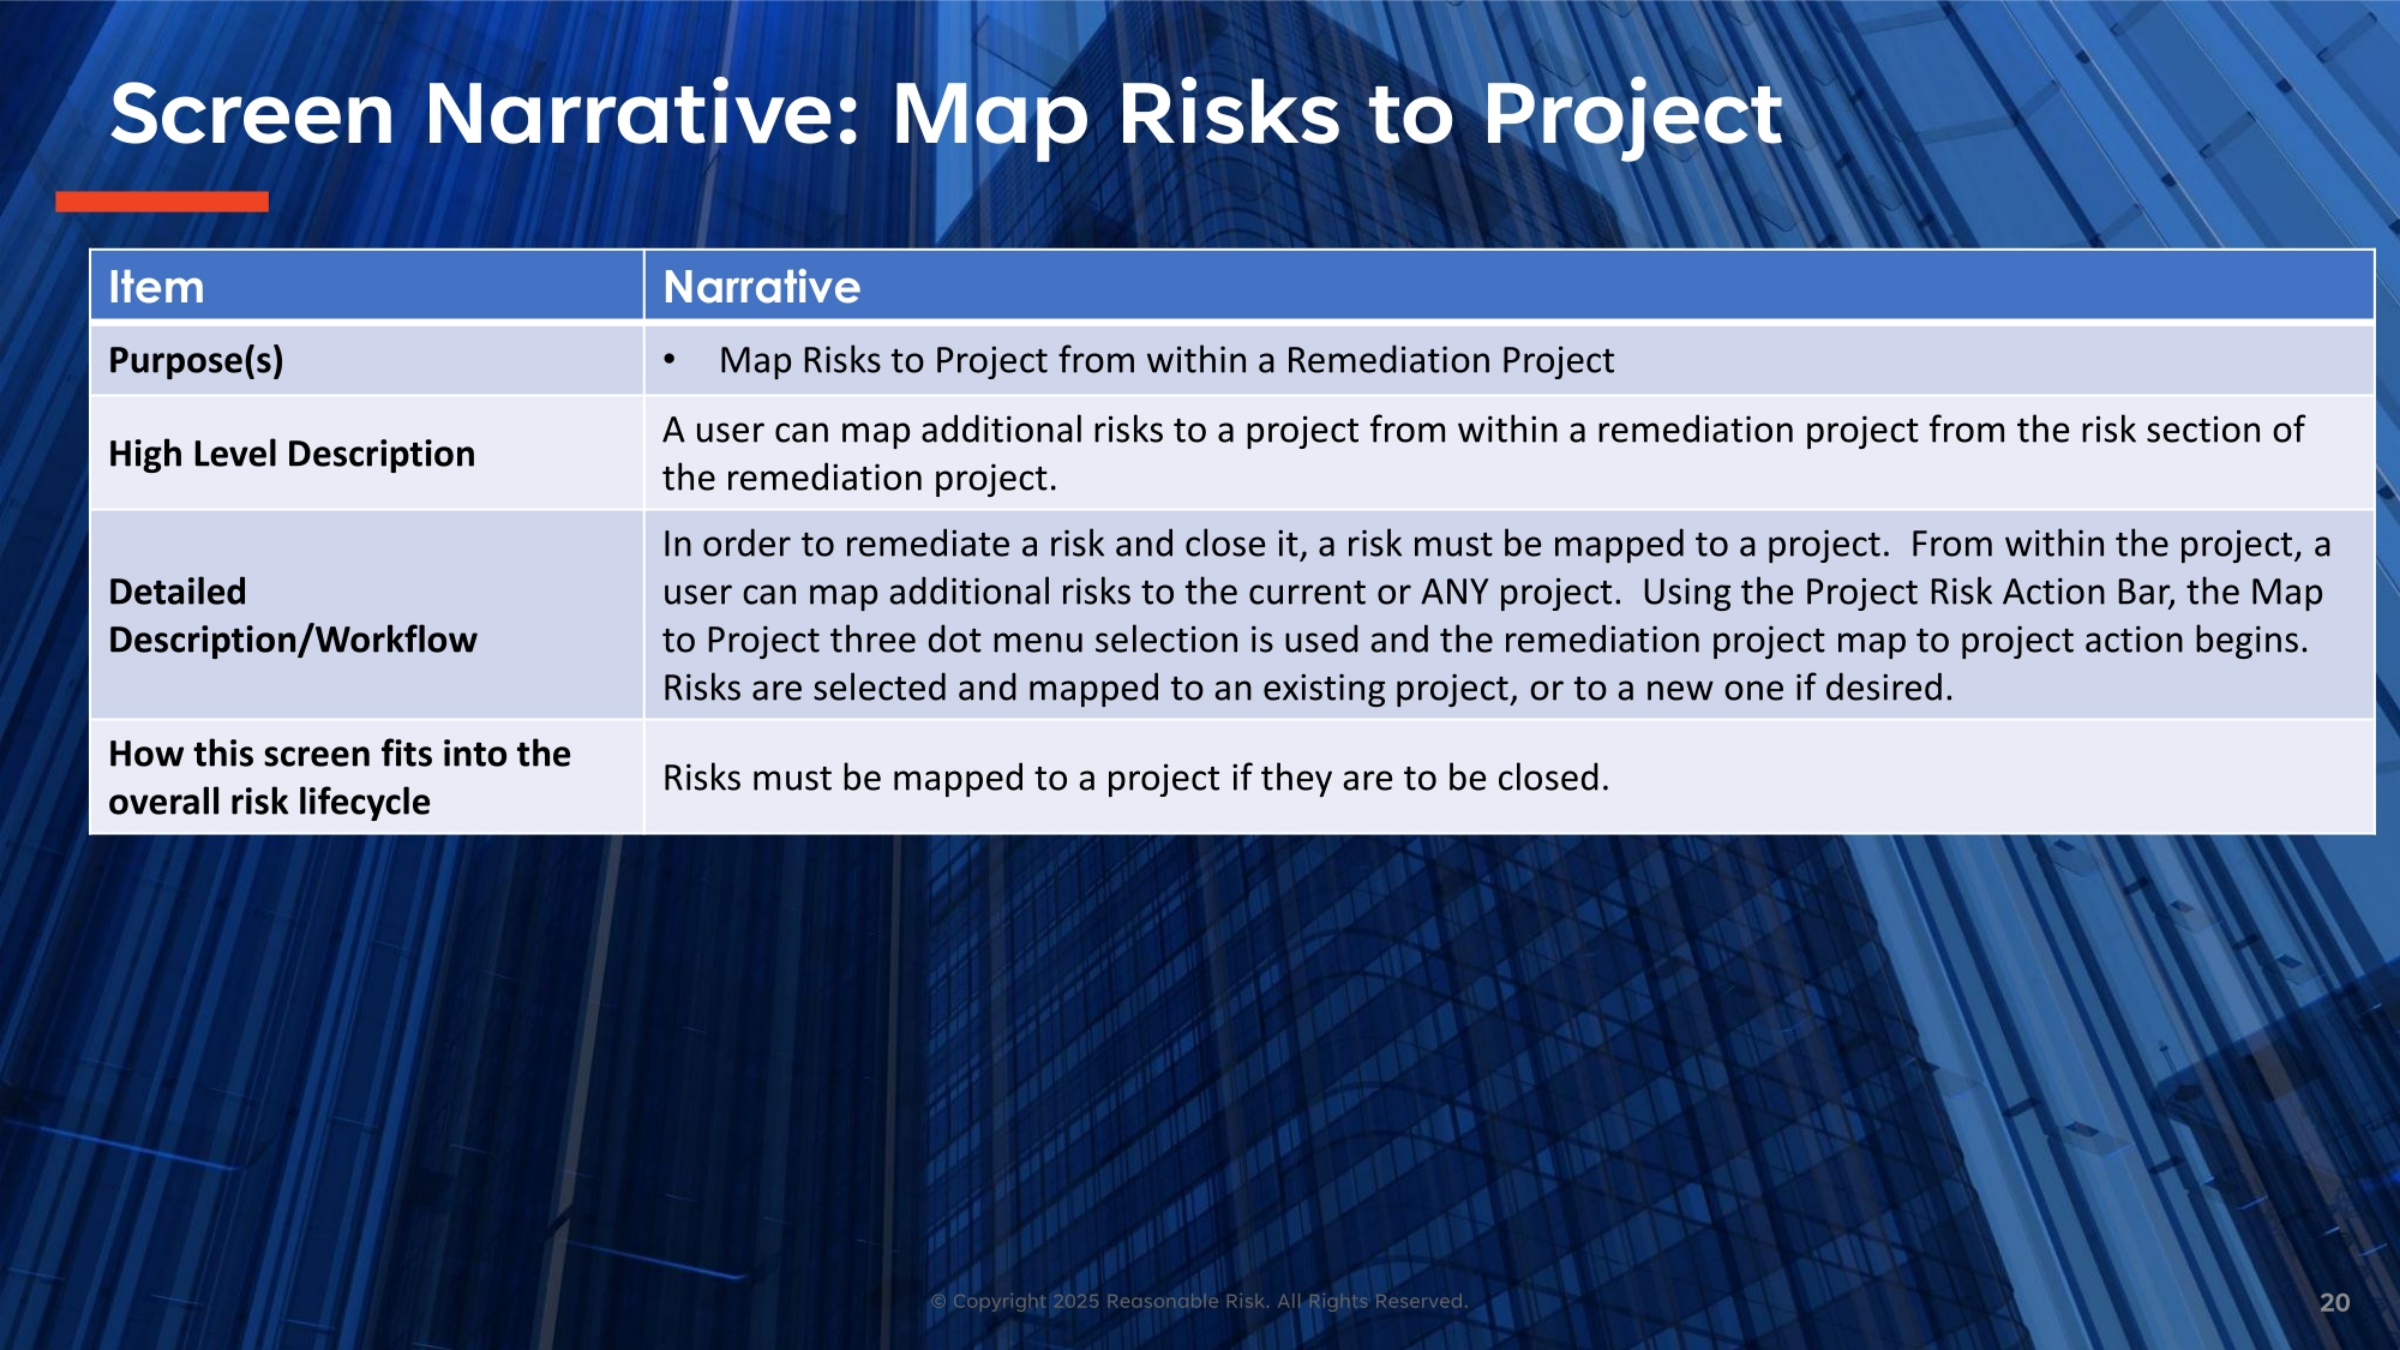
The primary purpose of this screen is to map risks to a project from within a Remediation Project. Users can add additional risks to a project from the risk section of the remediation project. To remediate and close a risk, it must first be mapped to a project. From within the project, you can map additional risks to the current project or any other project. This is done using the 'Map to Project' option within the Project Risk Action Bar's three-dot menu, initiating the mapping process. Risks must be mapped to a project to be eligible for closure.
21. Map Risks to Project: Overview
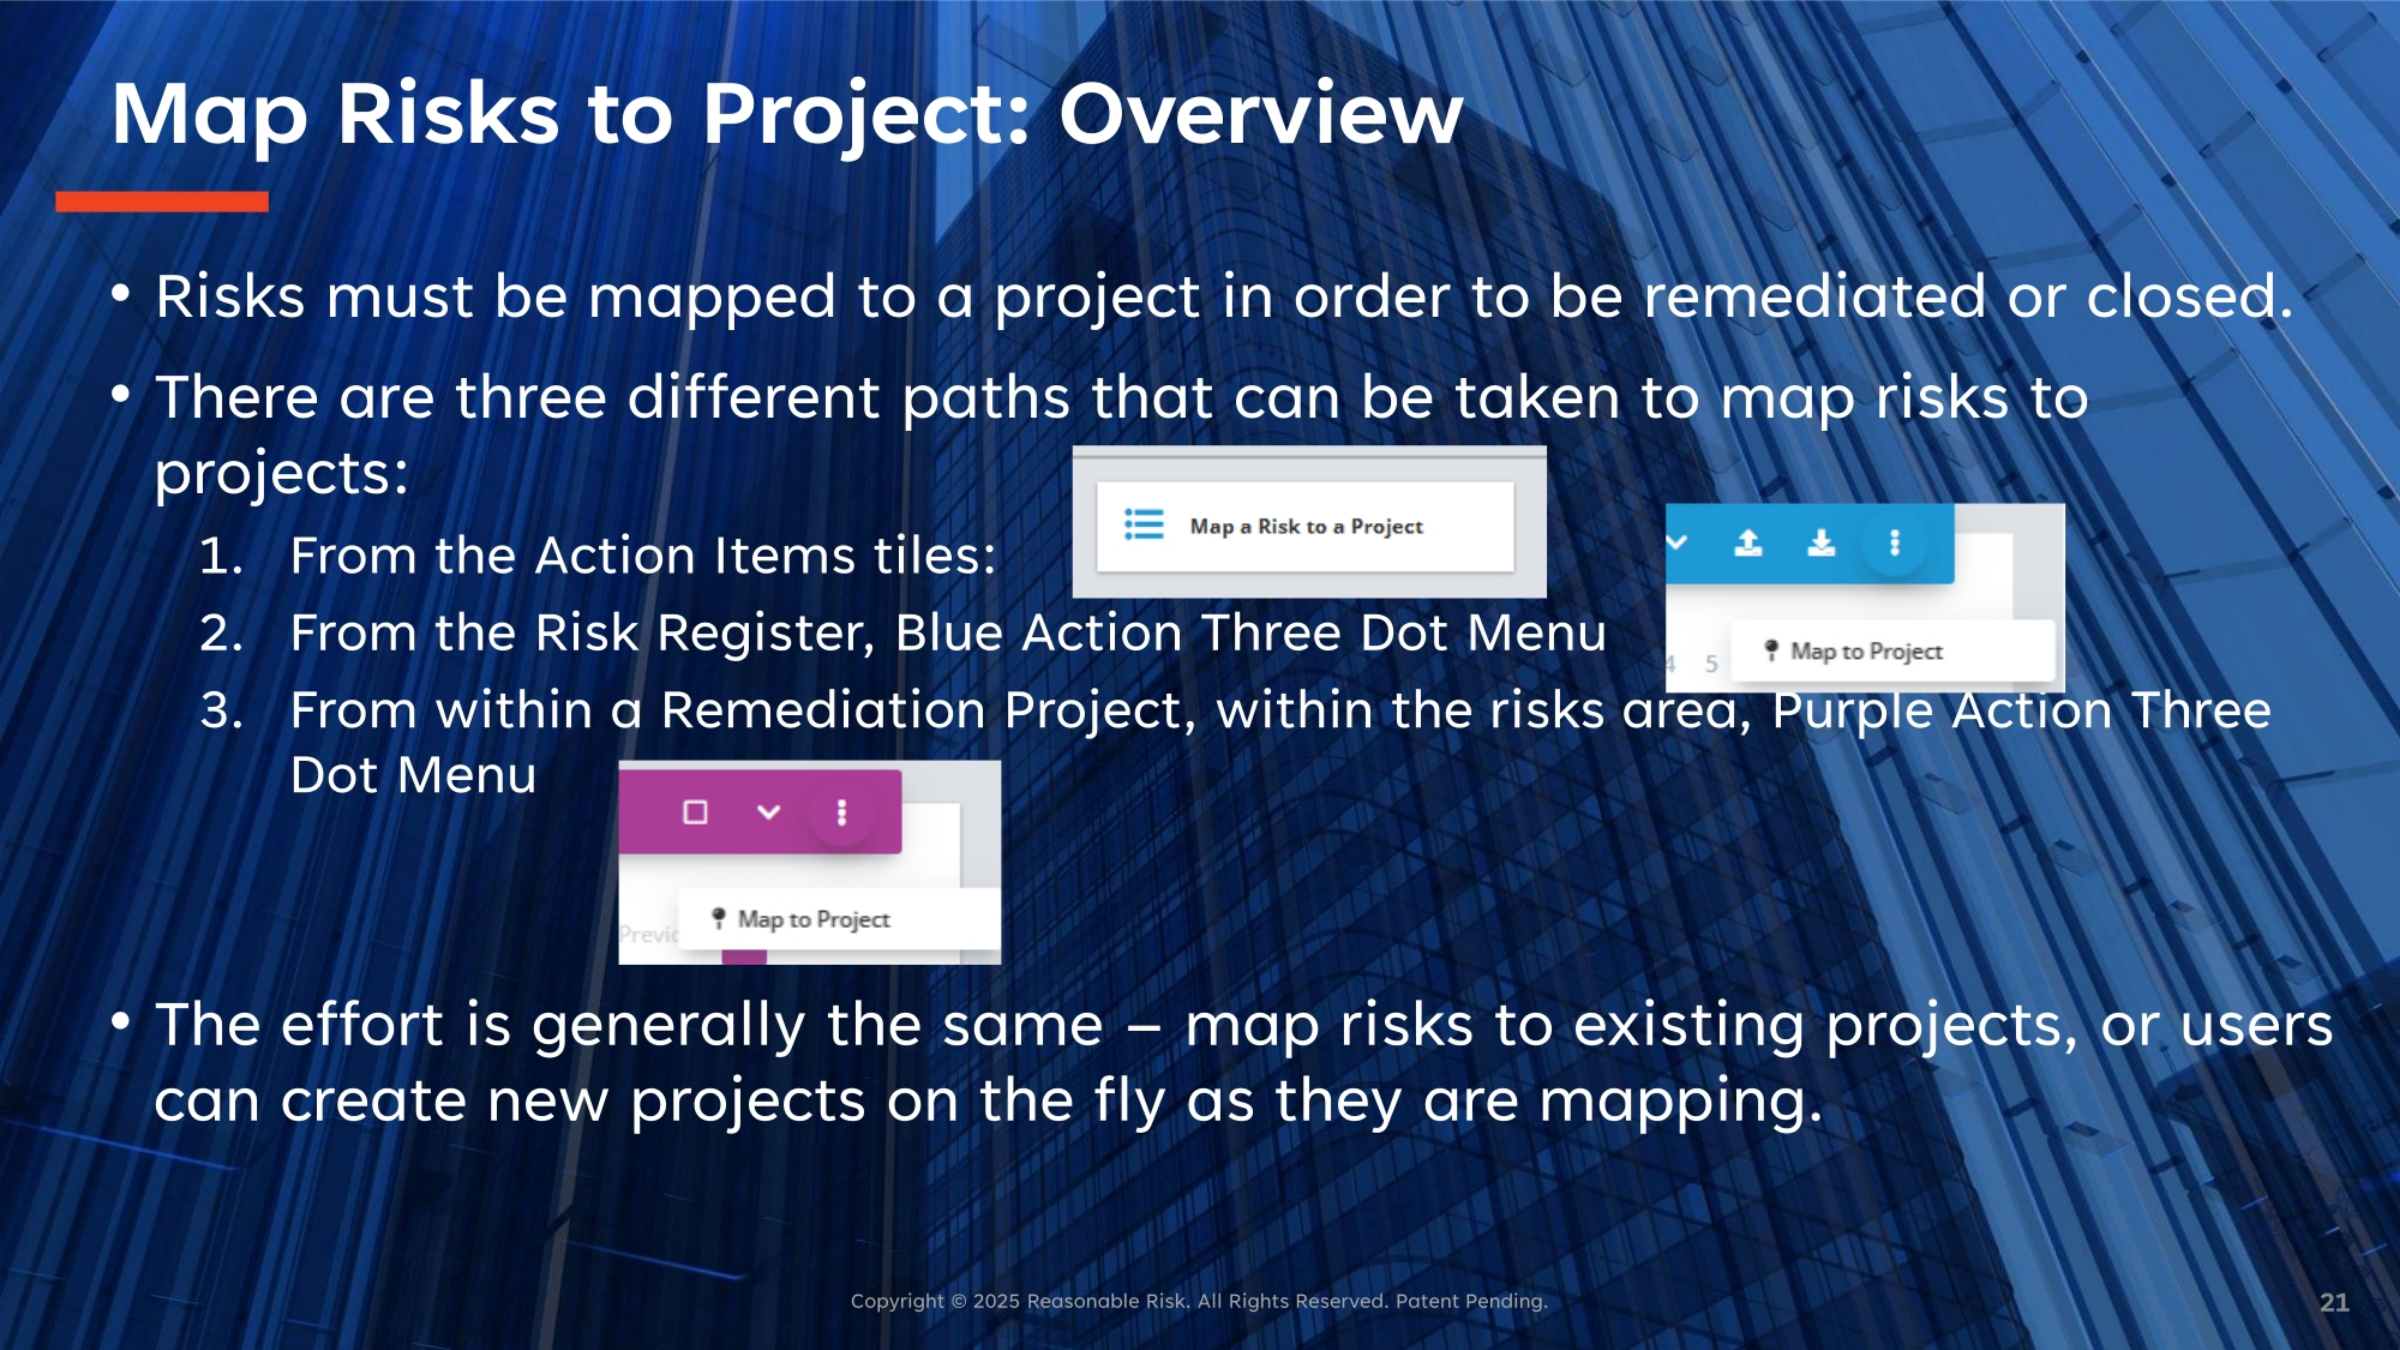
Risks are crucial to manage and must be mapped to a project for proper remediation or closure. There are three distinct paths to achieve this: directly from the Action Items tiles, via the Risk Register's Blue Action Three Dot Menu, or from within a Remediation Project's risks area using the Purple Action Three Dot Menu. The process remains consistent across all methods, allowing users to map risks to existing projects or create new ones as needed during the mapping process.
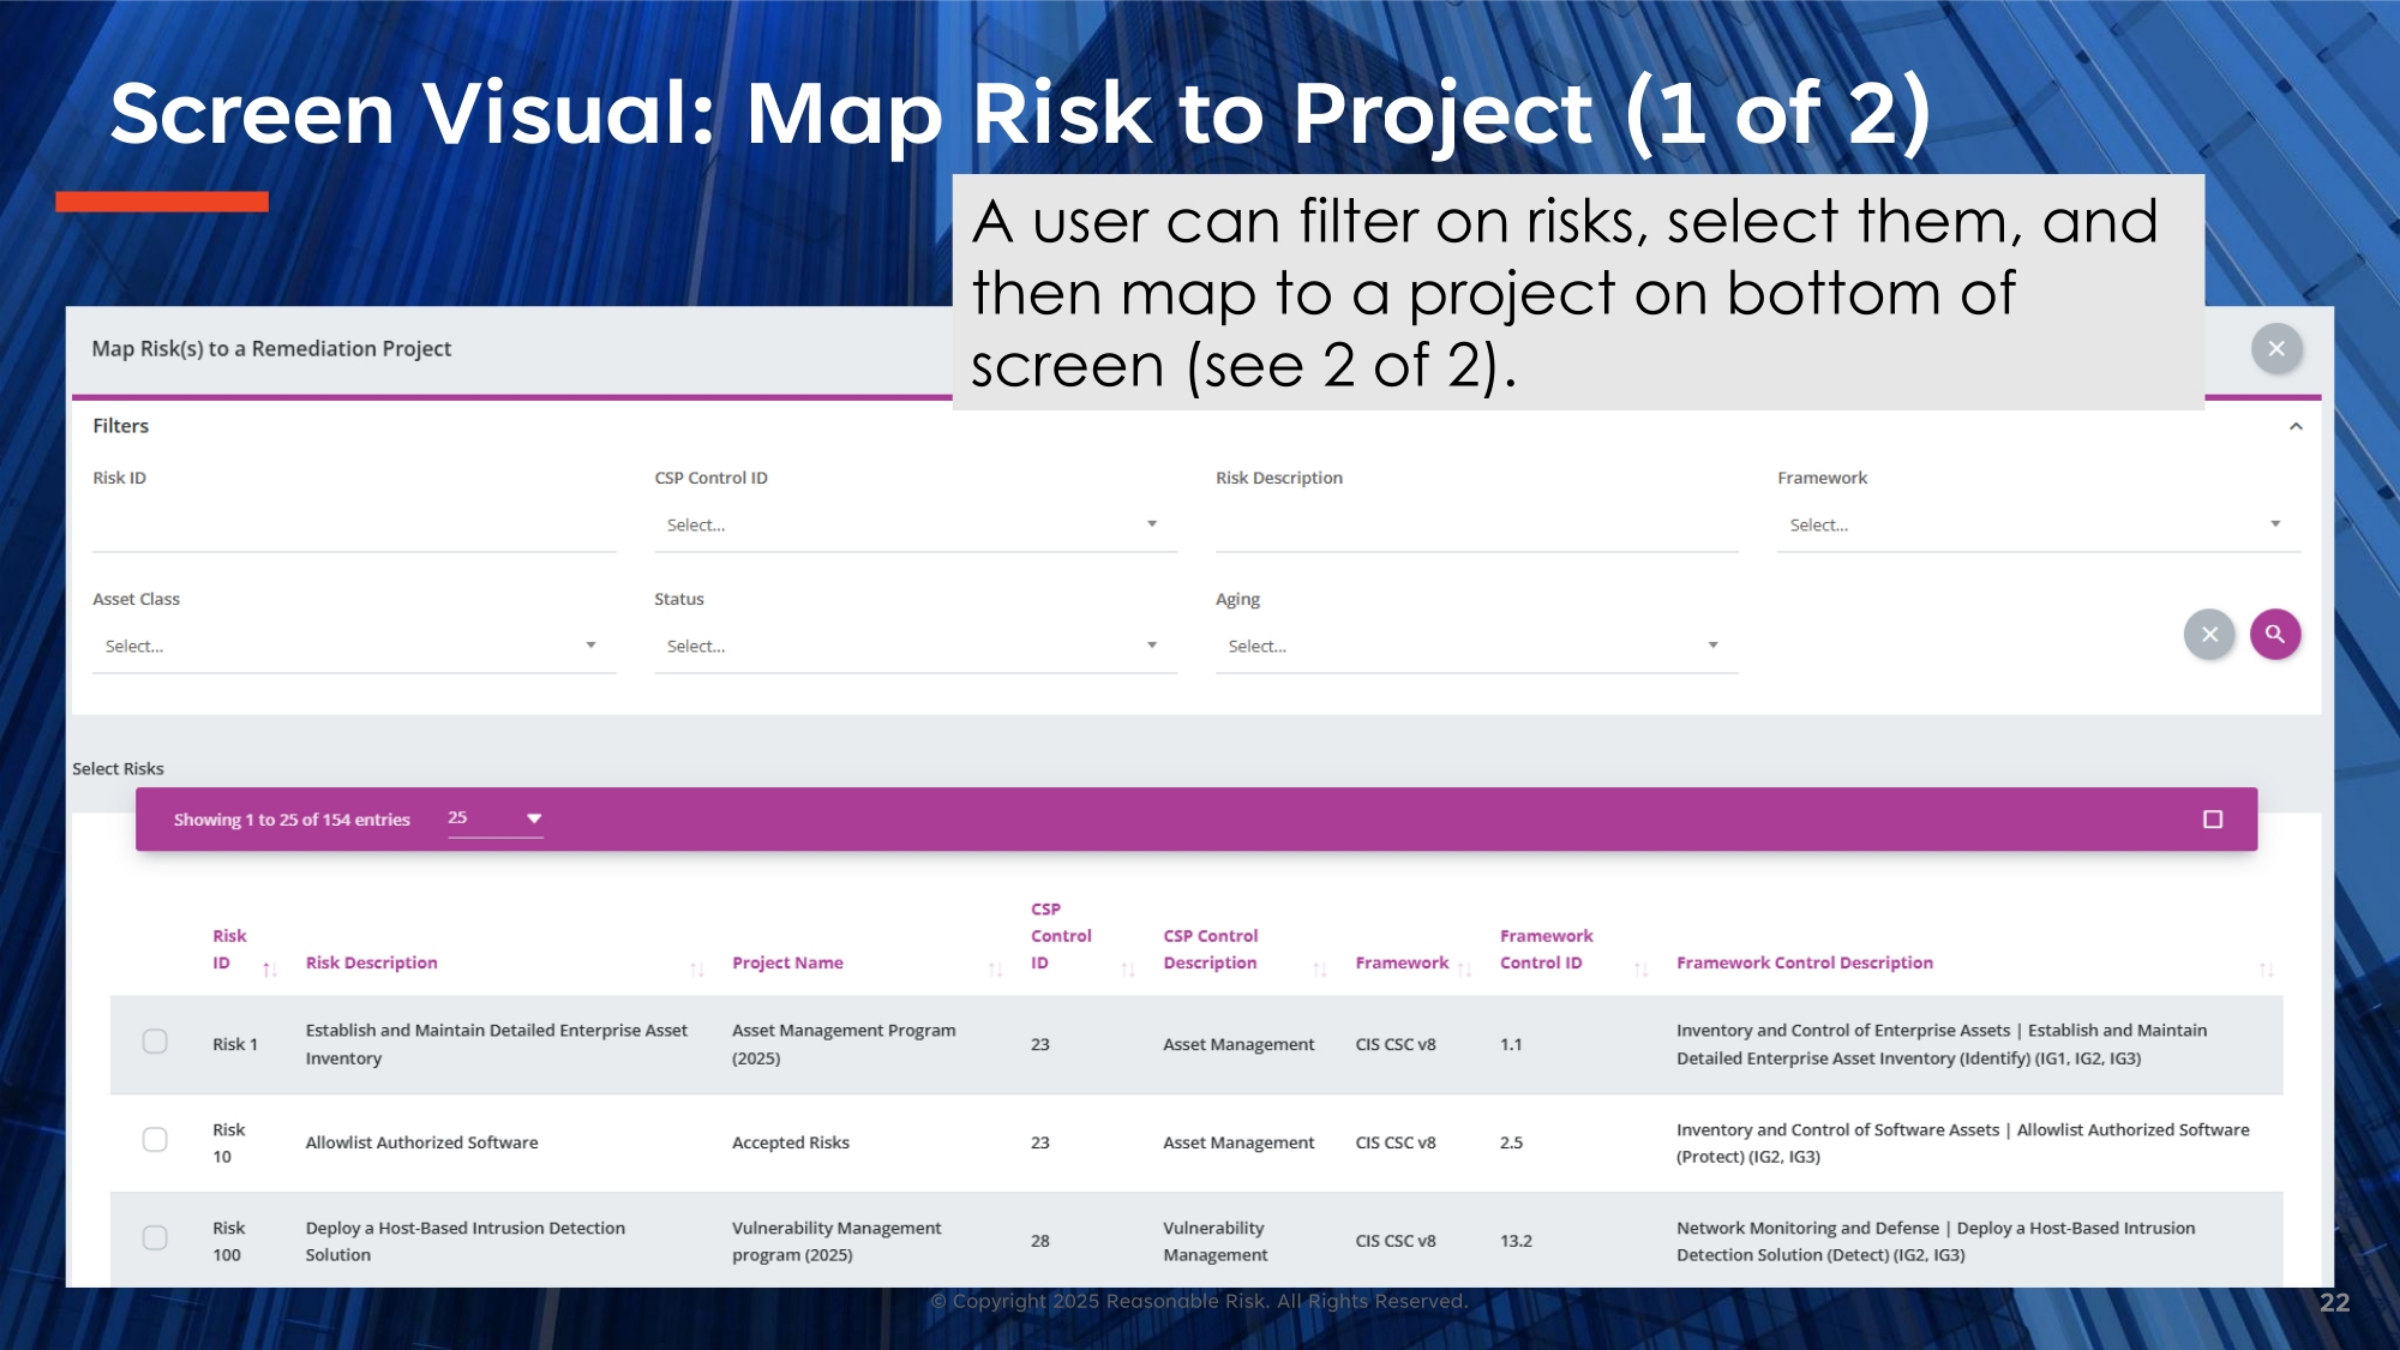
22. Screen Visual: Map Risk to Project (1 of 2)
This screen visual illustrates the initial phase of mapping risks to a project. Users can efficiently filter through a list of risks, select the relevant ones, and then proceed to map them. The mapping action itself is performed using options located at the bottom of the screen, which we will explore in more detail on the subsequent visual.
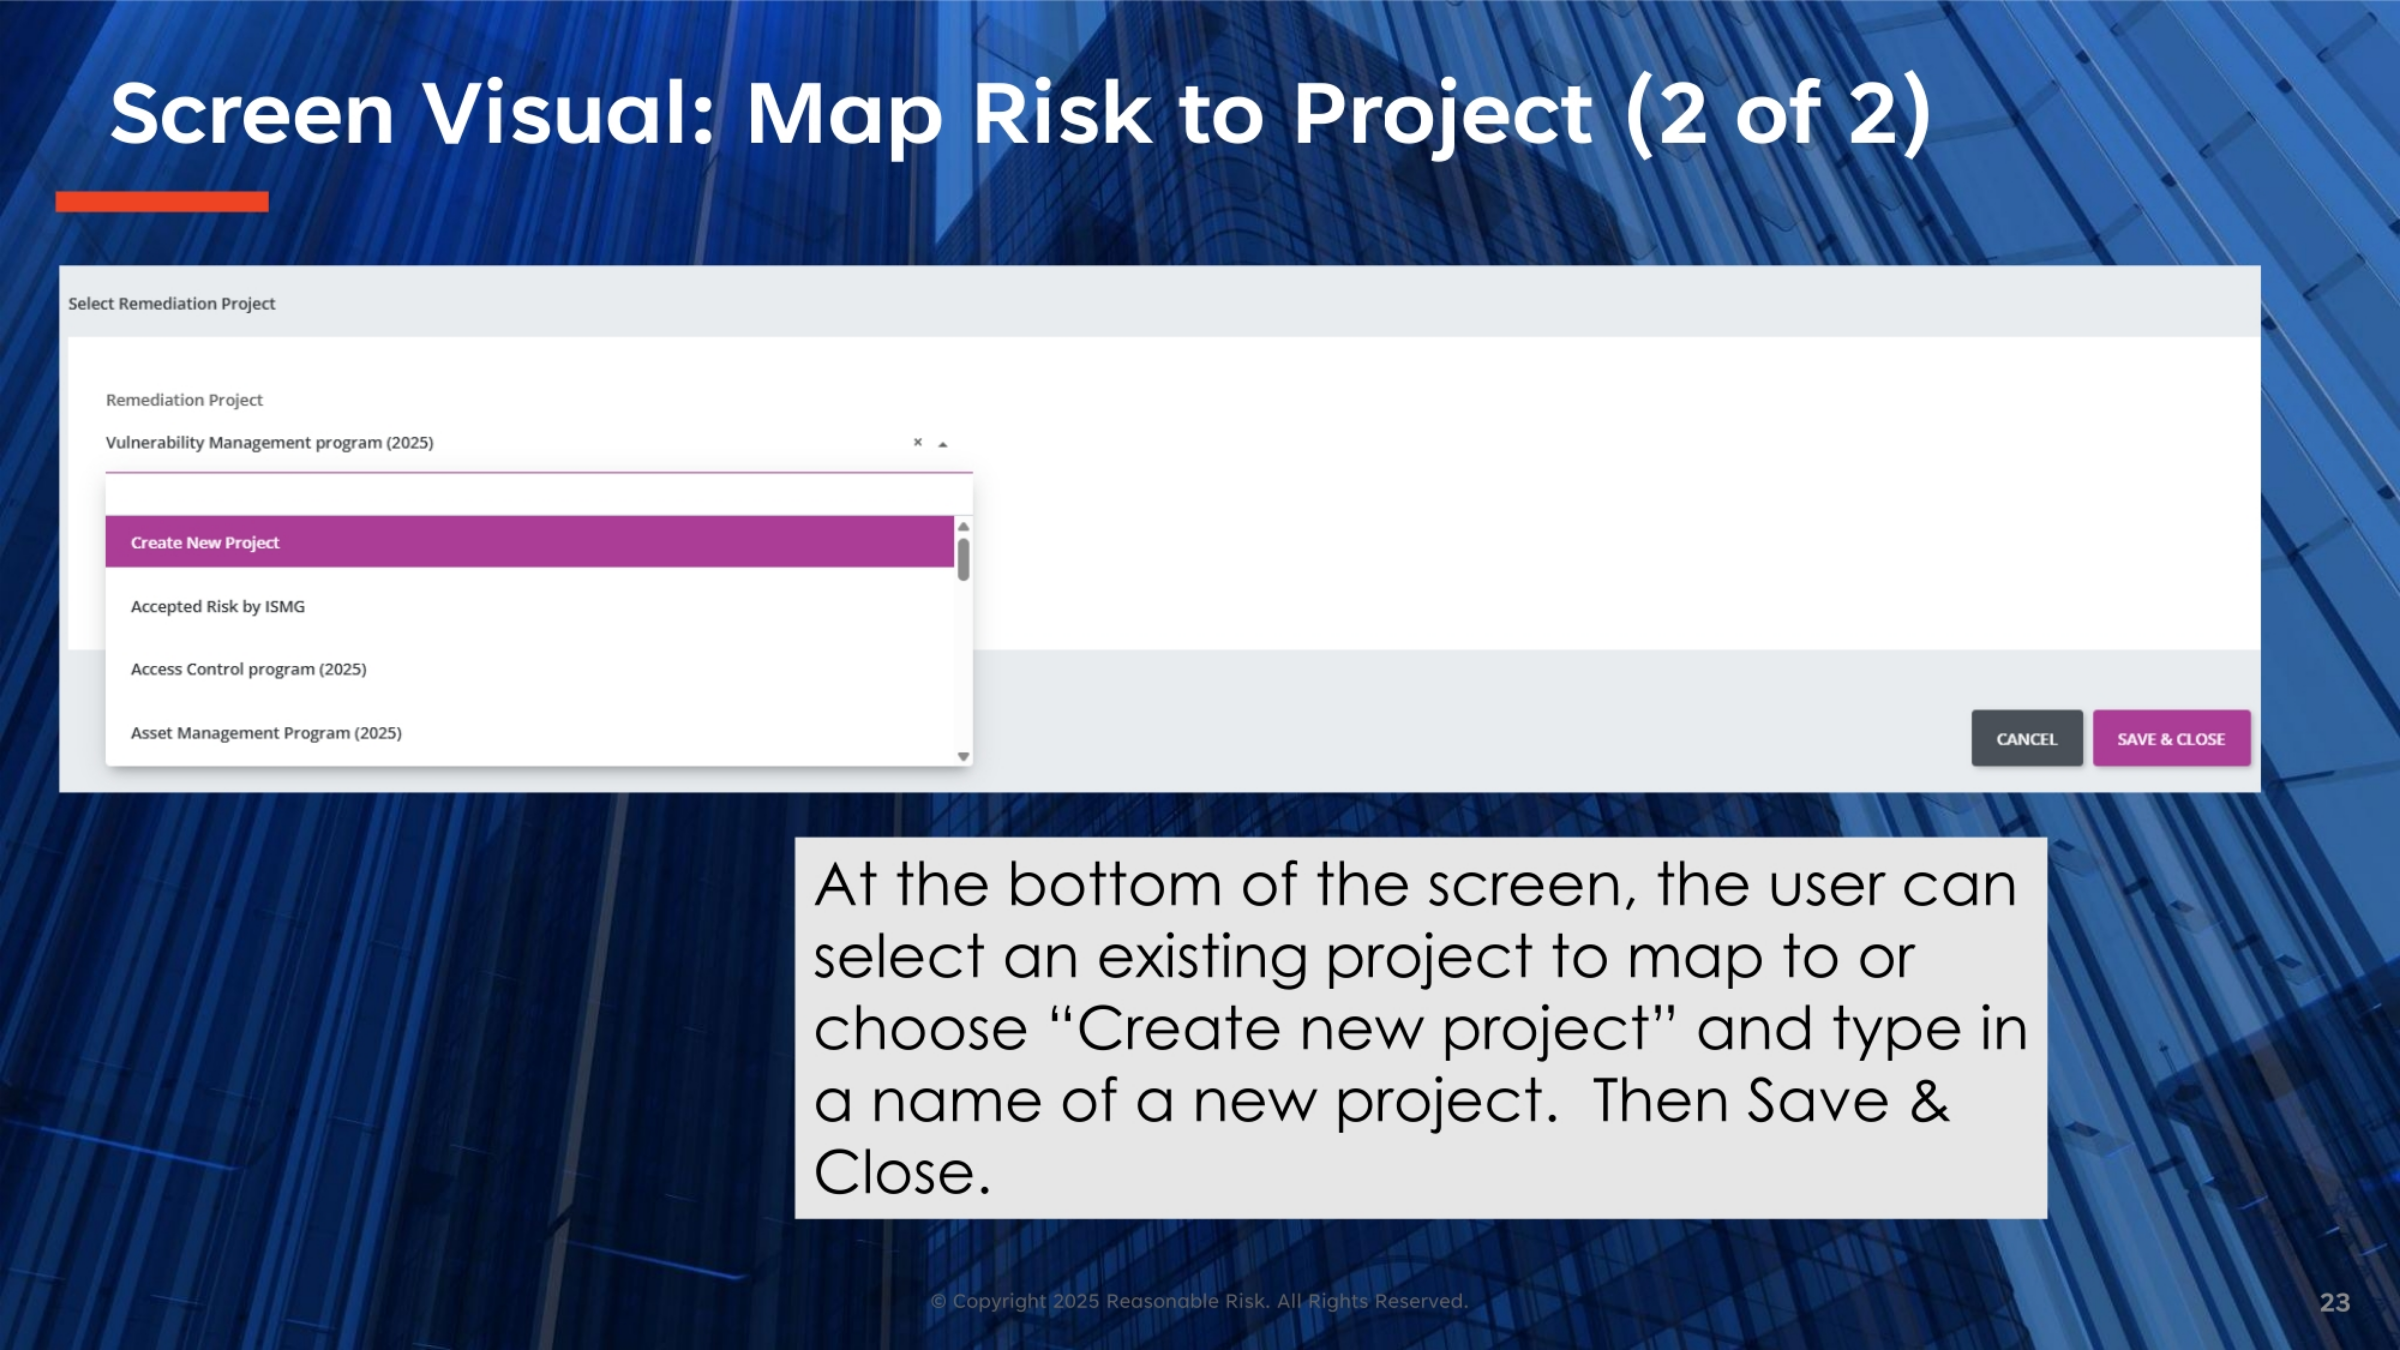
23. Screen Visual: Map Risk to Project (2 of 2)
Continuing with the risk mapping process, this visual shows the next step. Users can either select an existing remediation project from a dropdown menu or choose to create a brand new project on the fly. After making their selection and, if applicable, naming a new project, the final step is to click 'Save & Close' to complete the mapping.
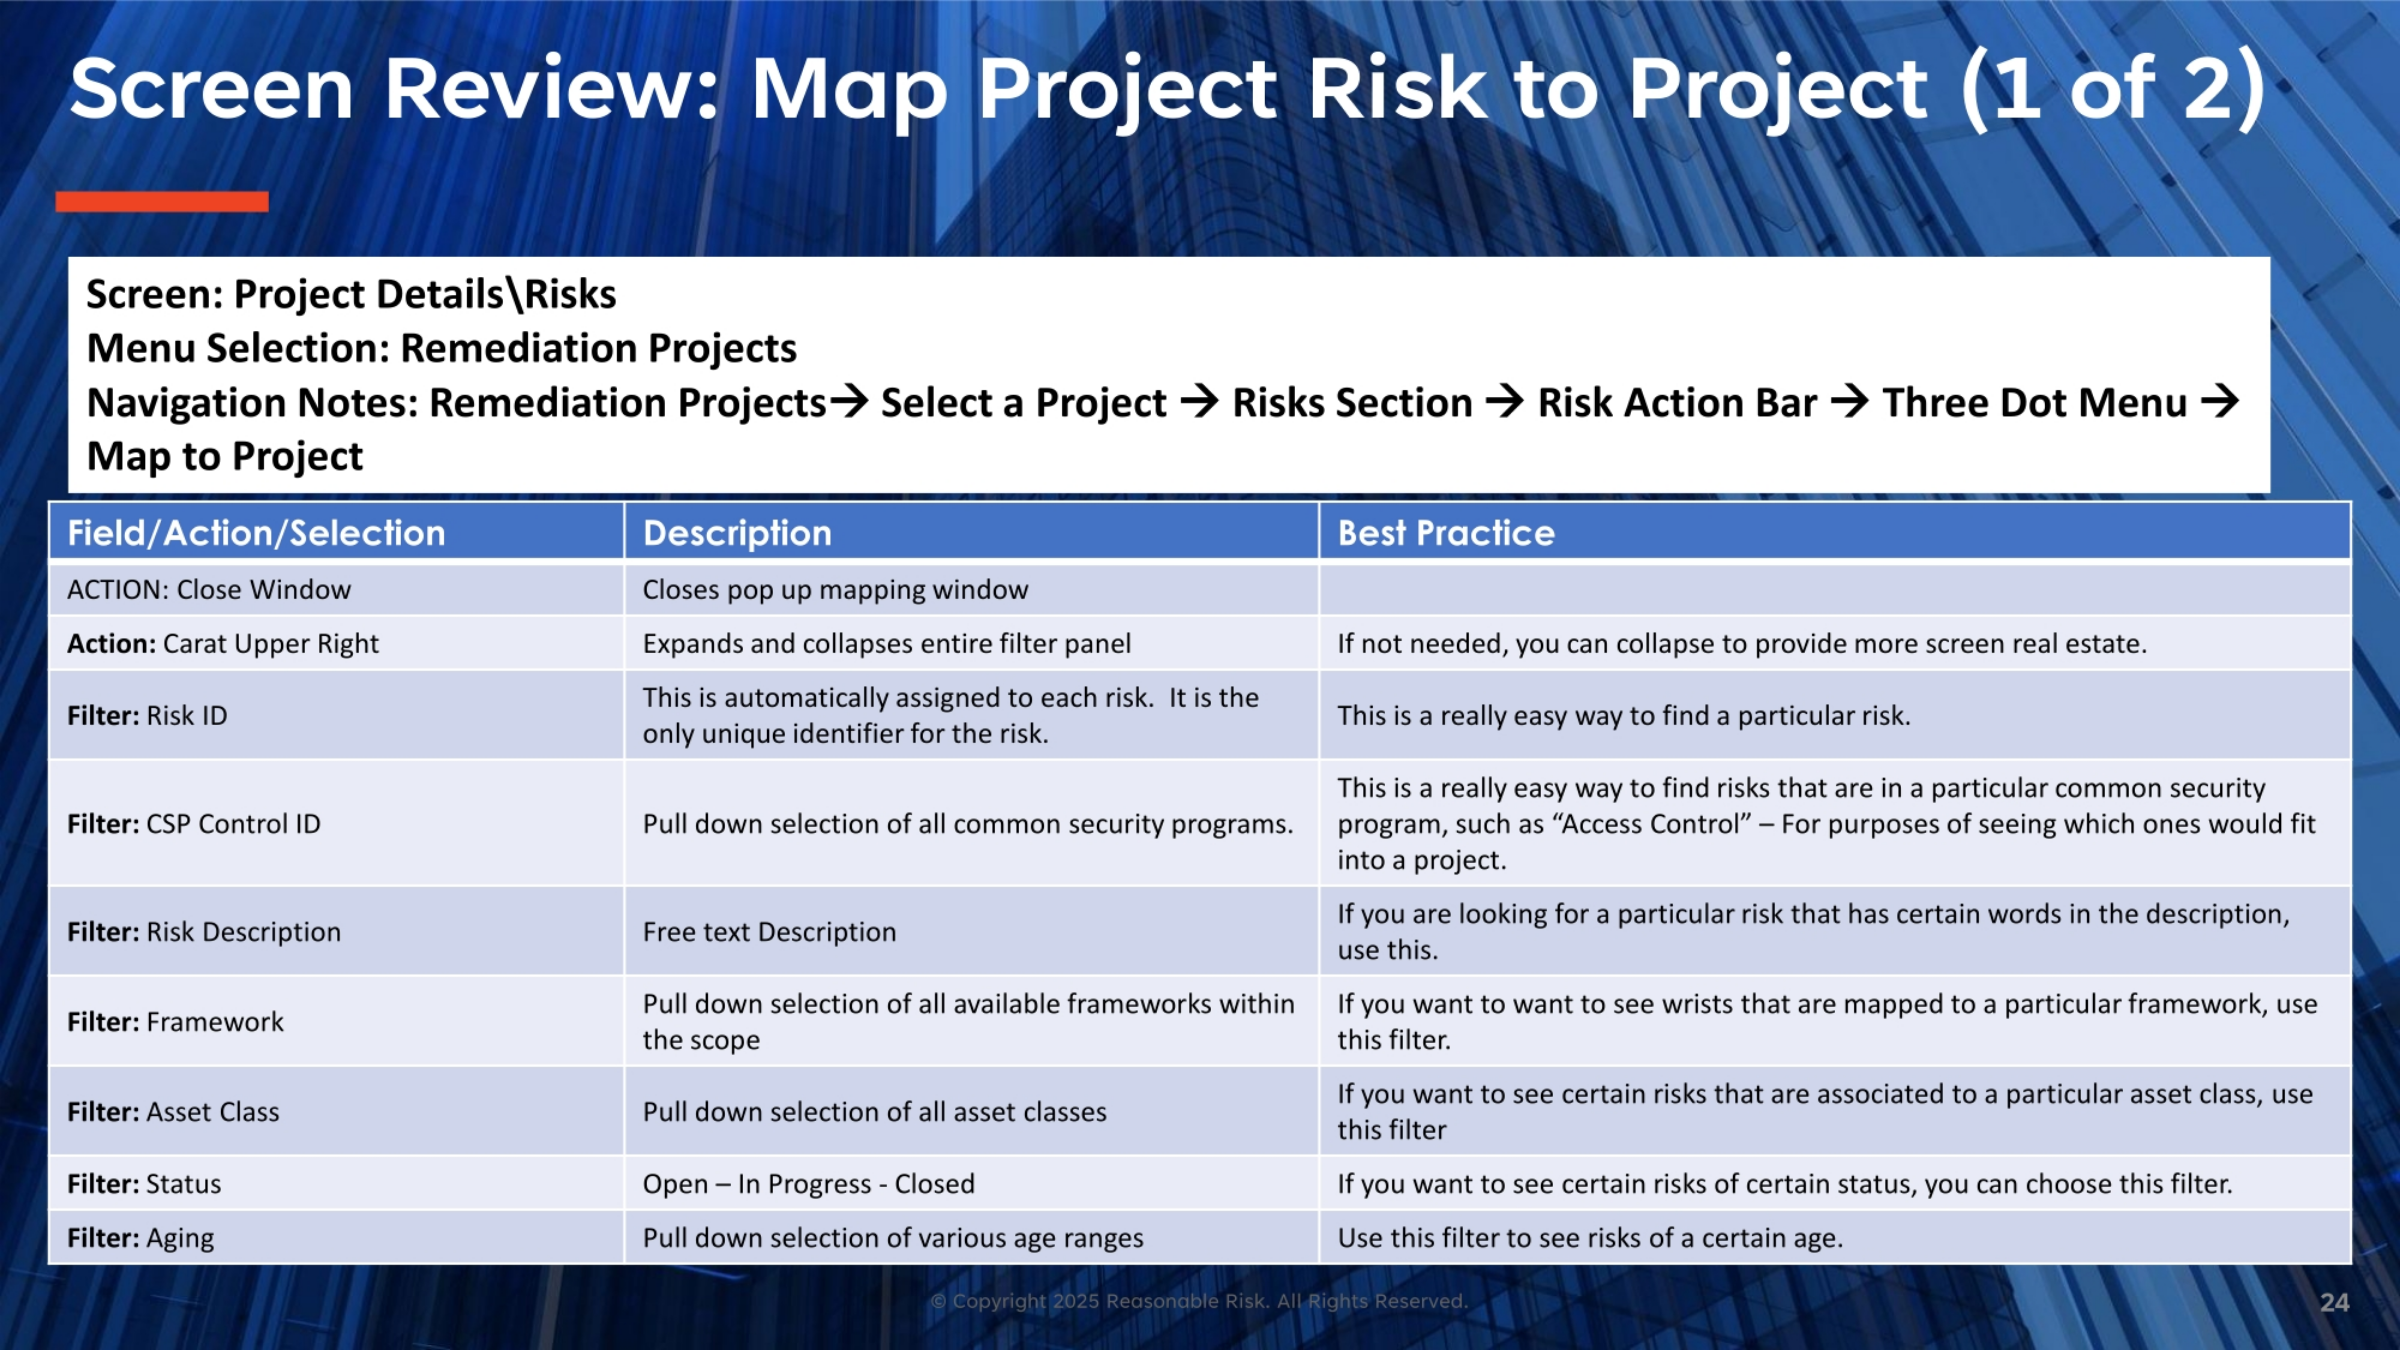
24. Screen Review: Map Project Risk to Project (1 of 2)
This section provides a detailed review of the screen used to map project risks. The navigation path guides users from Remediation Projects to selecting a specific project, then to the Risks Section, the Risk Action Bar, the Three Dot Menu, and finally, to the 'Map to Project' option. We'll examine various fields and actions, including closing the window, expanding filter panels, and filtering by Risk ID, CSP Control ID, Risk Description, Framework, Asset Class, Status, and Aging. Each filter offers a best practice for efficient risk identification and management.
25. Screen Review: Map Project Risk to Project (2 of 2)
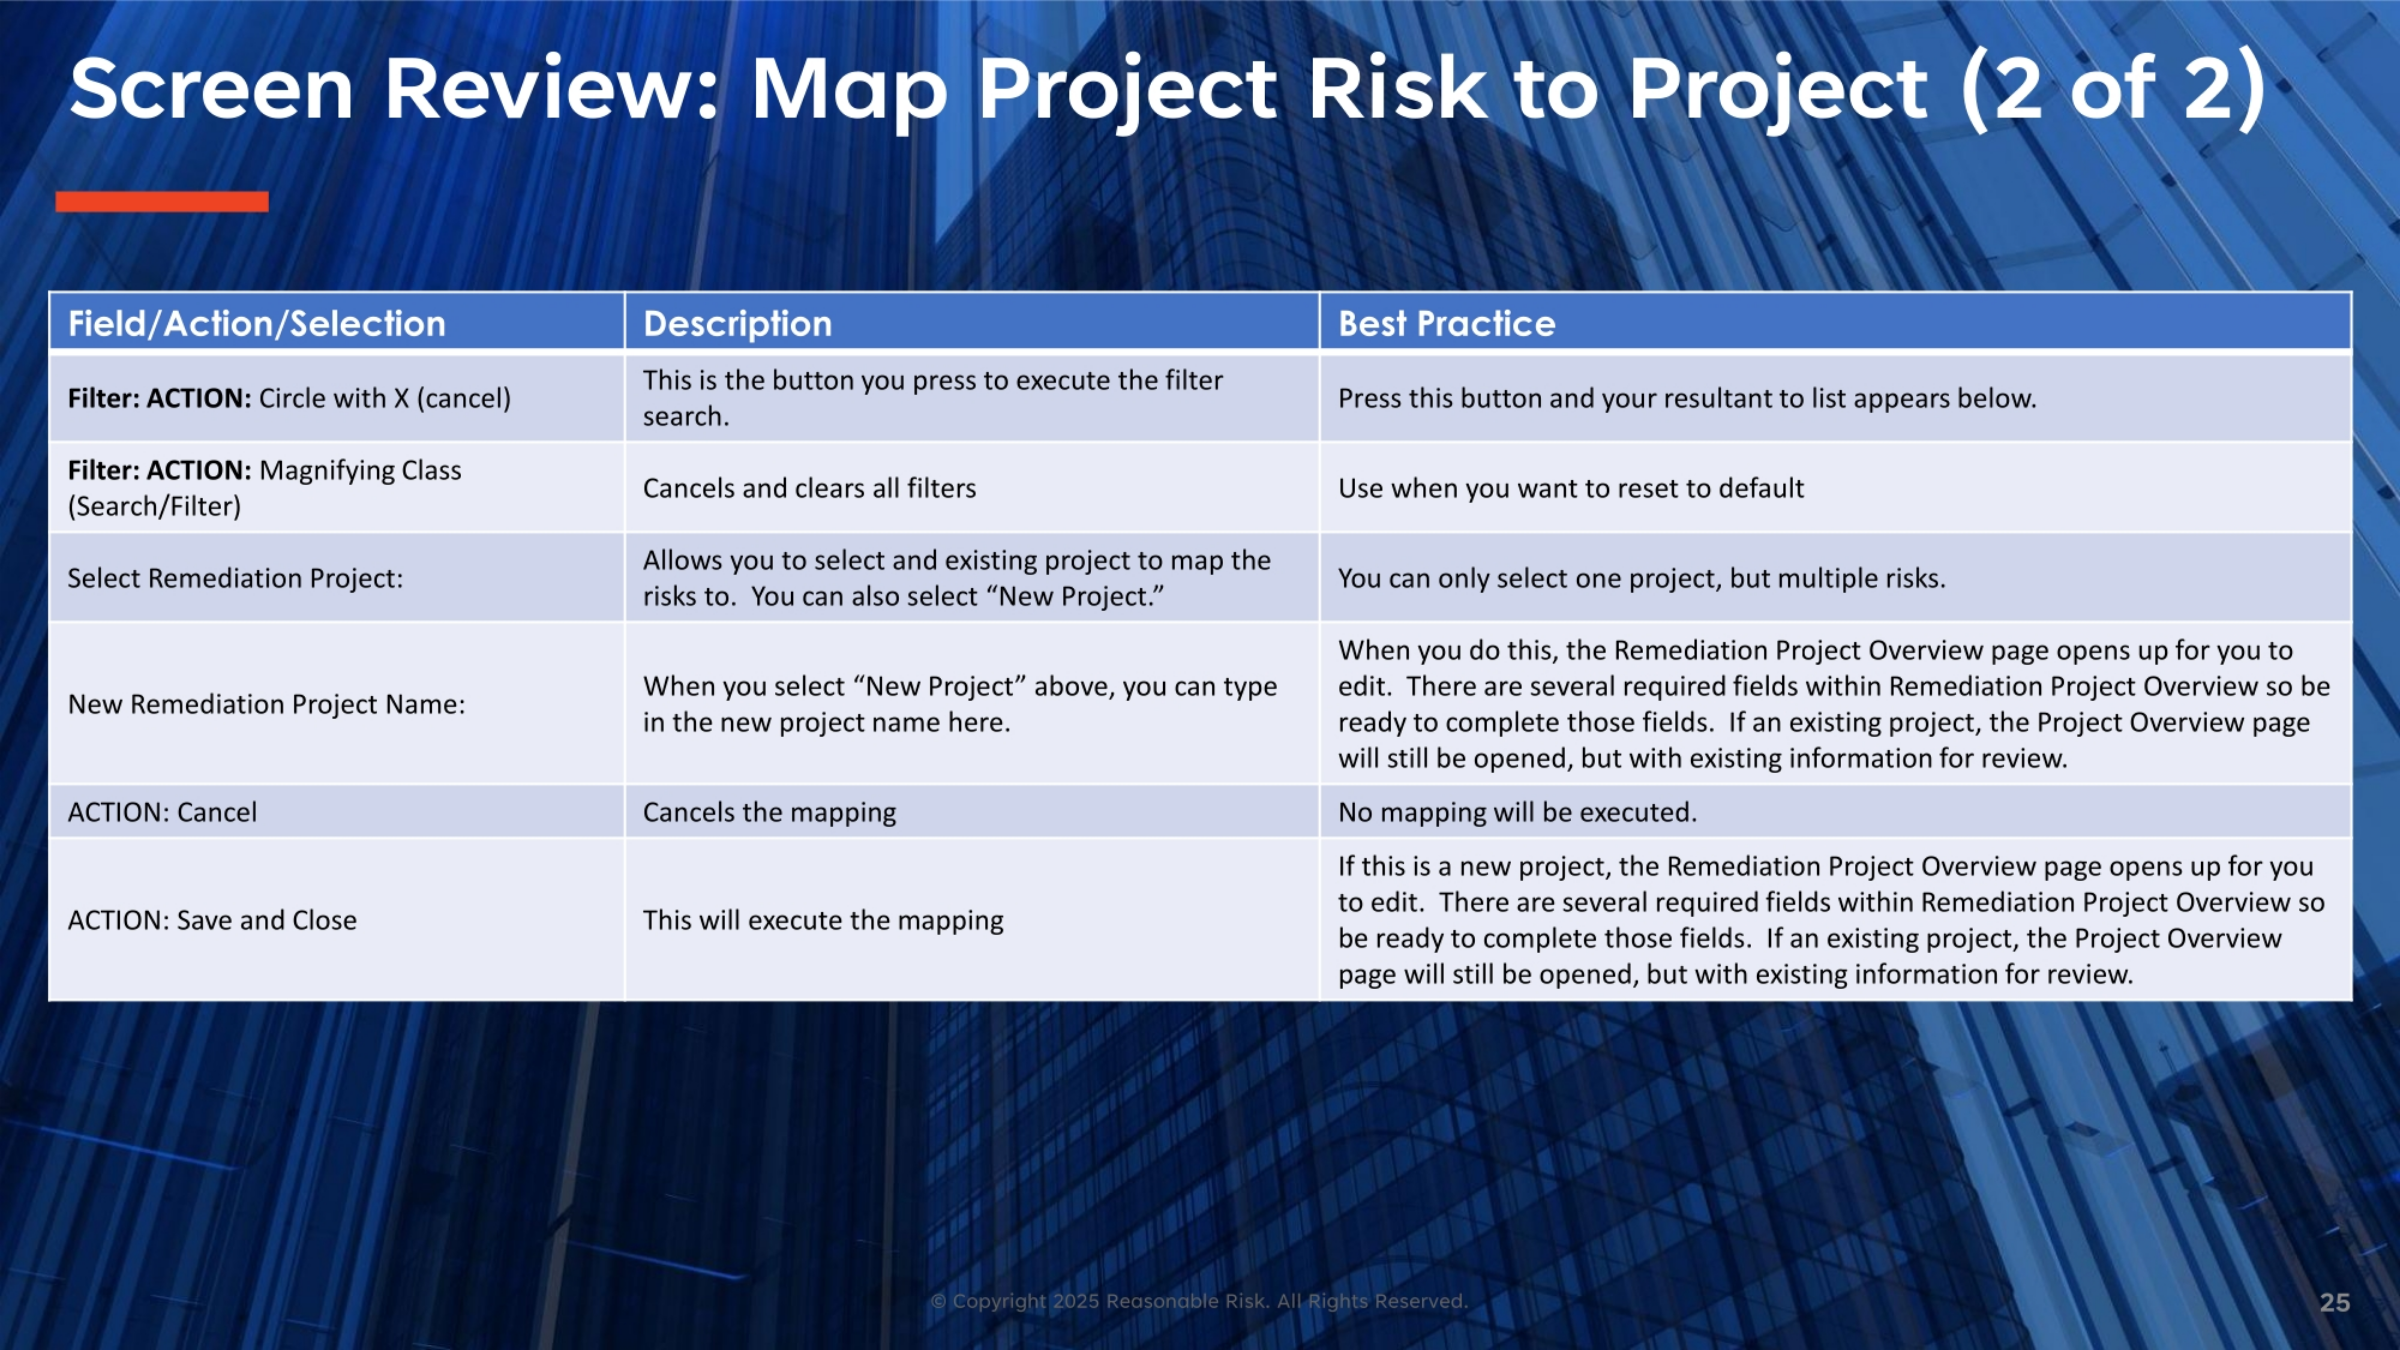
Continuing our screen review, we explore additional actions and filters for mapping project risks. This includes the filter action to execute a search and the magnifying glass icon to clear all filters and reset to default. The 'Select Remediation Project' field allows choosing an existing project or creating a new one. If a new project is selected, a field appears to type in the new project name. Finally, the 'Cancel' action stops the mapping, while 'Save and Close' executes it, updating the current risk score and opening the Remediation Project Overview page for new projects.
26. Screen Visual: Map Risks to Project
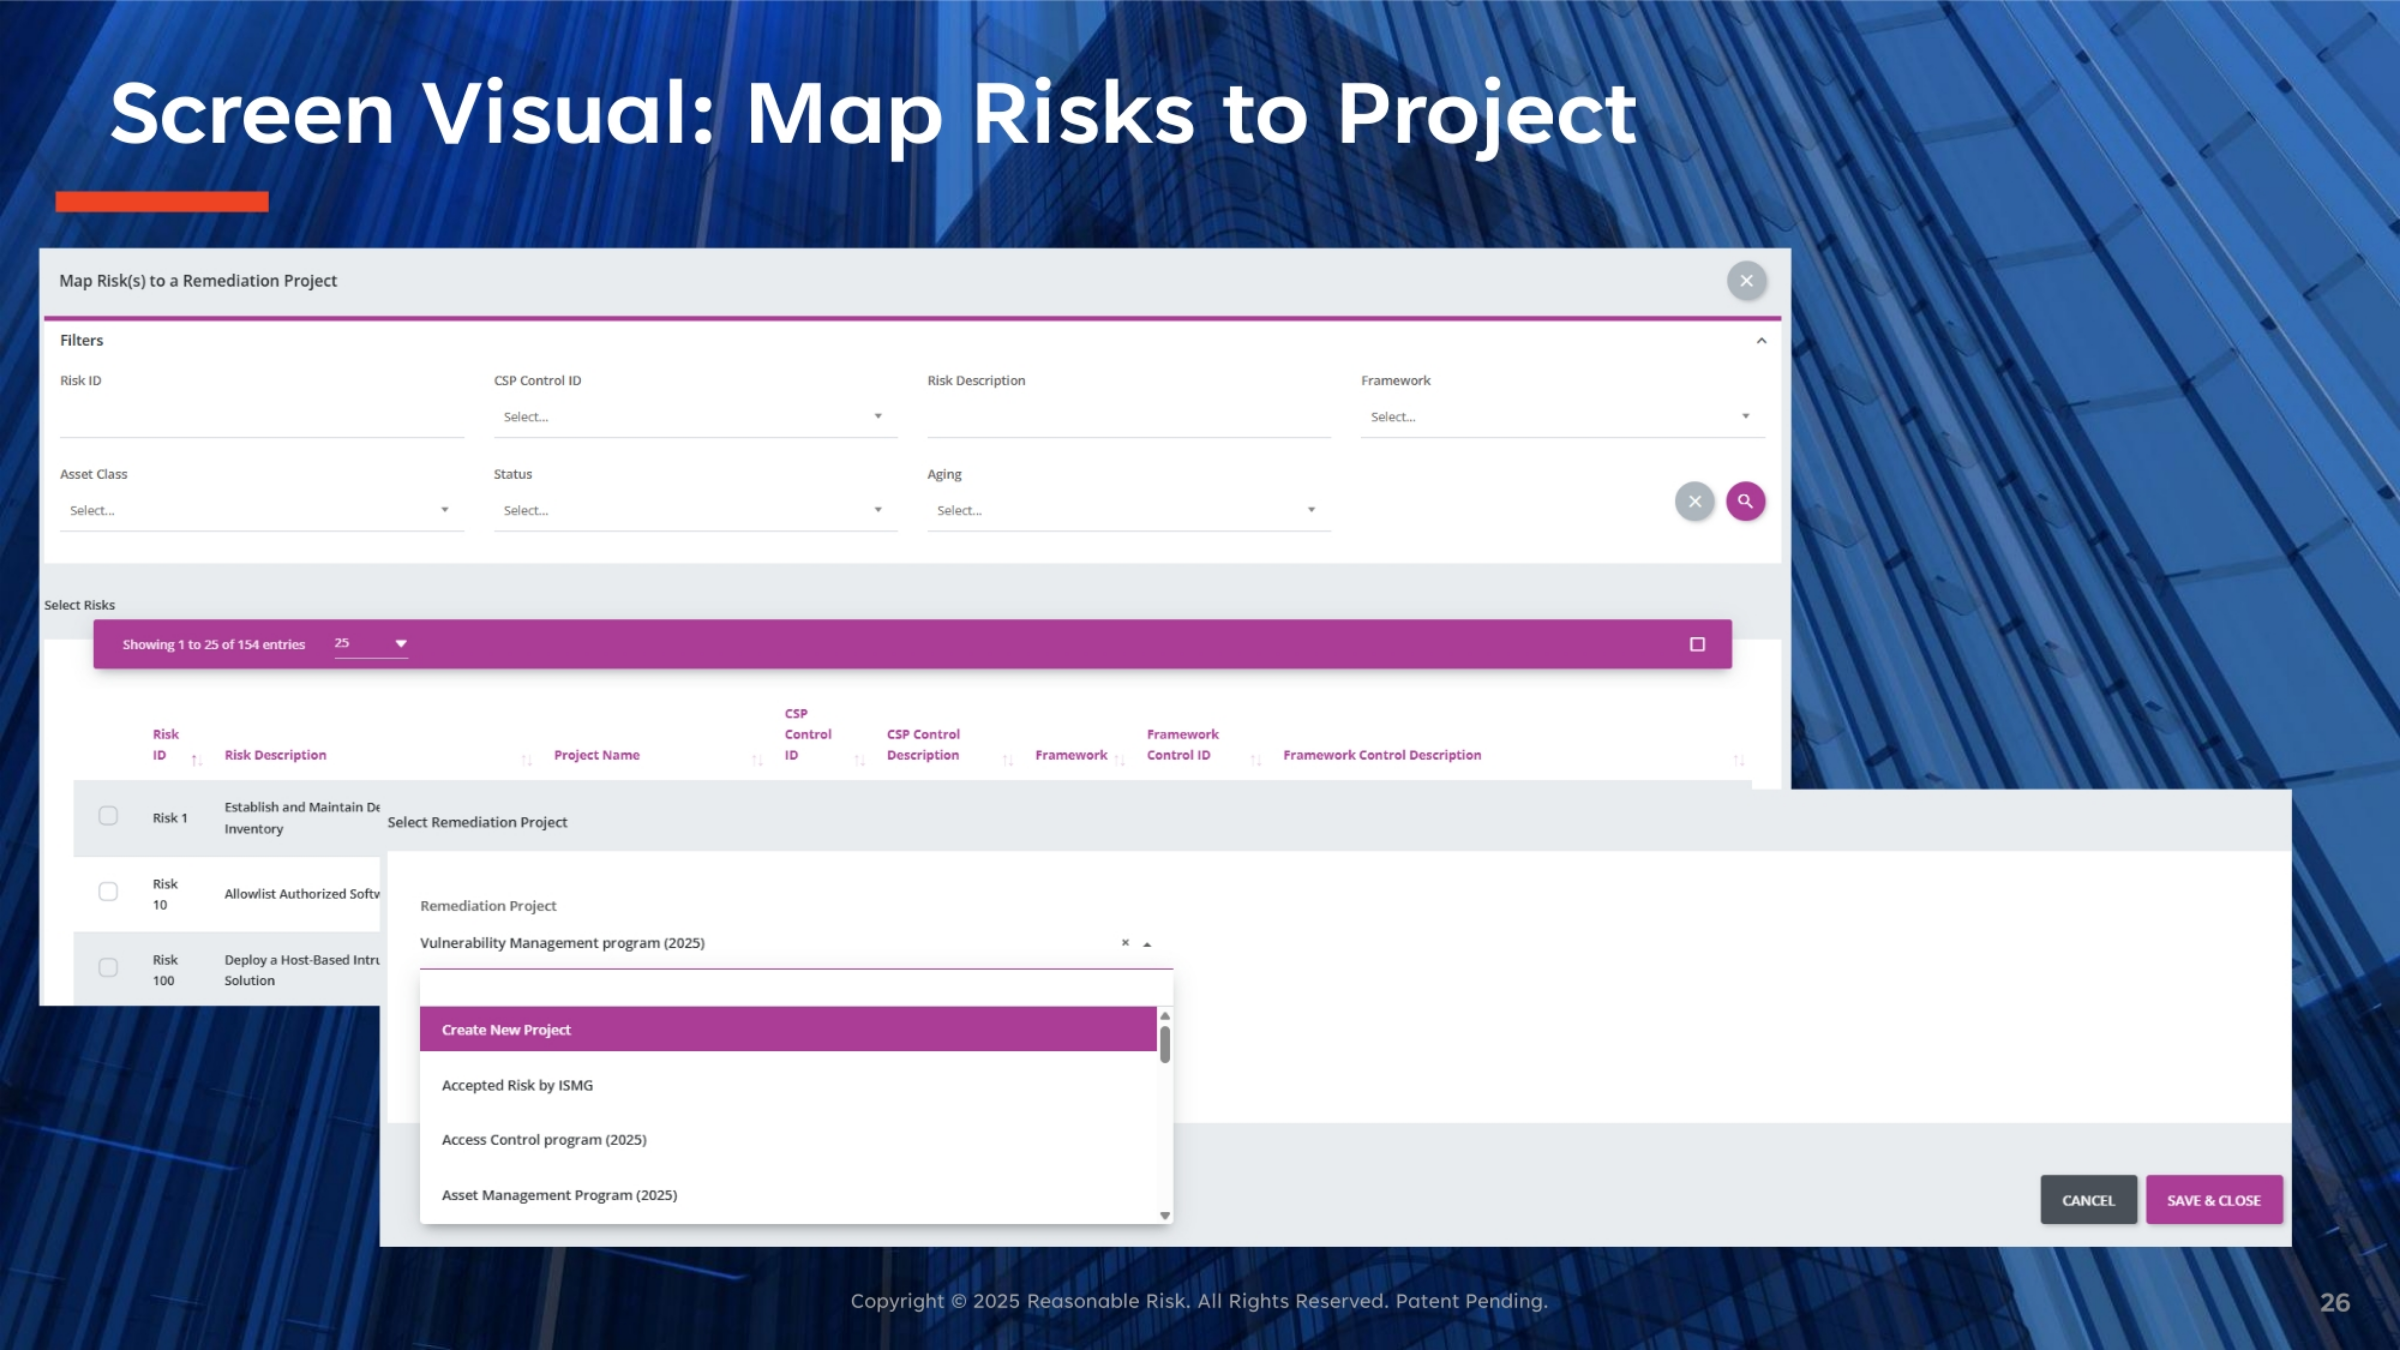
This visual offers a comprehensive view of the risk mapping process, integrating both the filtering and selection of risks with the project selection interface. Users can apply various filters, such as Risk ID, Asset Class, Status, and Aging, to refine their risk list. Once the desired risks are selected, the interface allows for choosing an existing remediation project or creating a new one, culminating in the 'Save & Close' action to finalize the mapping.
27. Screen Review: Edit Current Risk Score
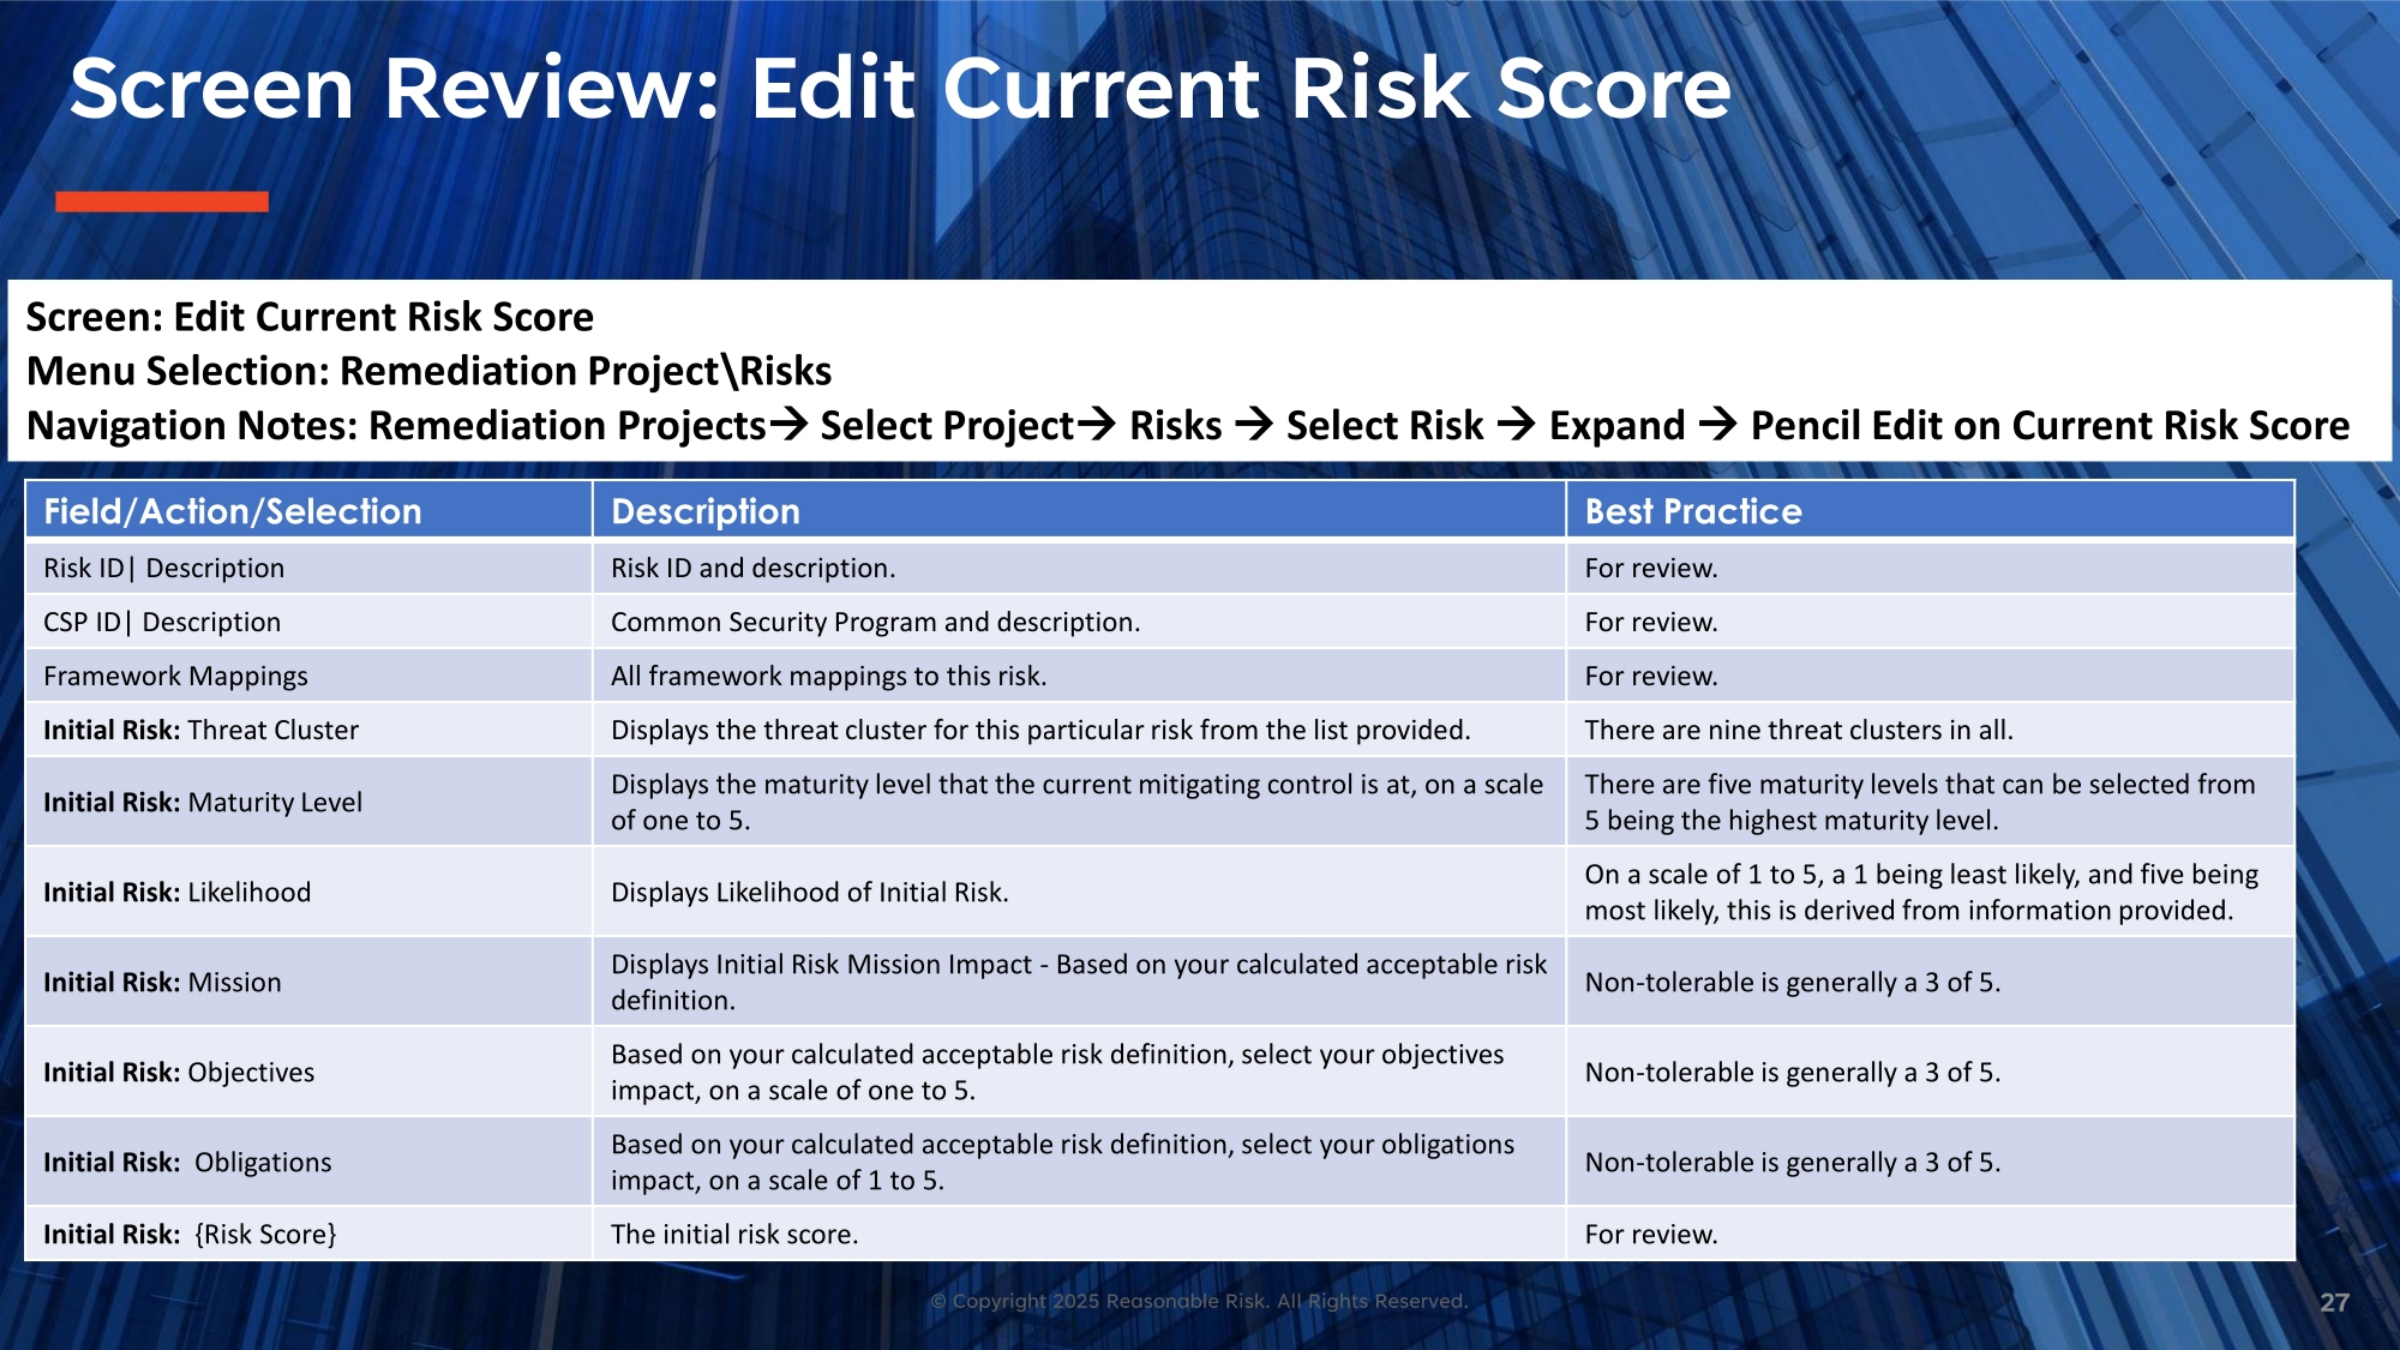
We are now reviewing the screen for editing the current risk score. The navigation path takes us from Remediation Projects to selecting a project, then to Risks, selecting a specific risk, expanding it, and using the pencil icon to edit the current risk score. Key fields include Risk ID, CSP ID, Framework Mappings, Initial Risk Threat Cluster, Maturity Level, Likelihood, Mission, Objectives, and Obligations. Each field provides details for review, with specific guidance on maturity levels and likelihood derived from provided information.
28. Screen Review: Edit Current Risk Score
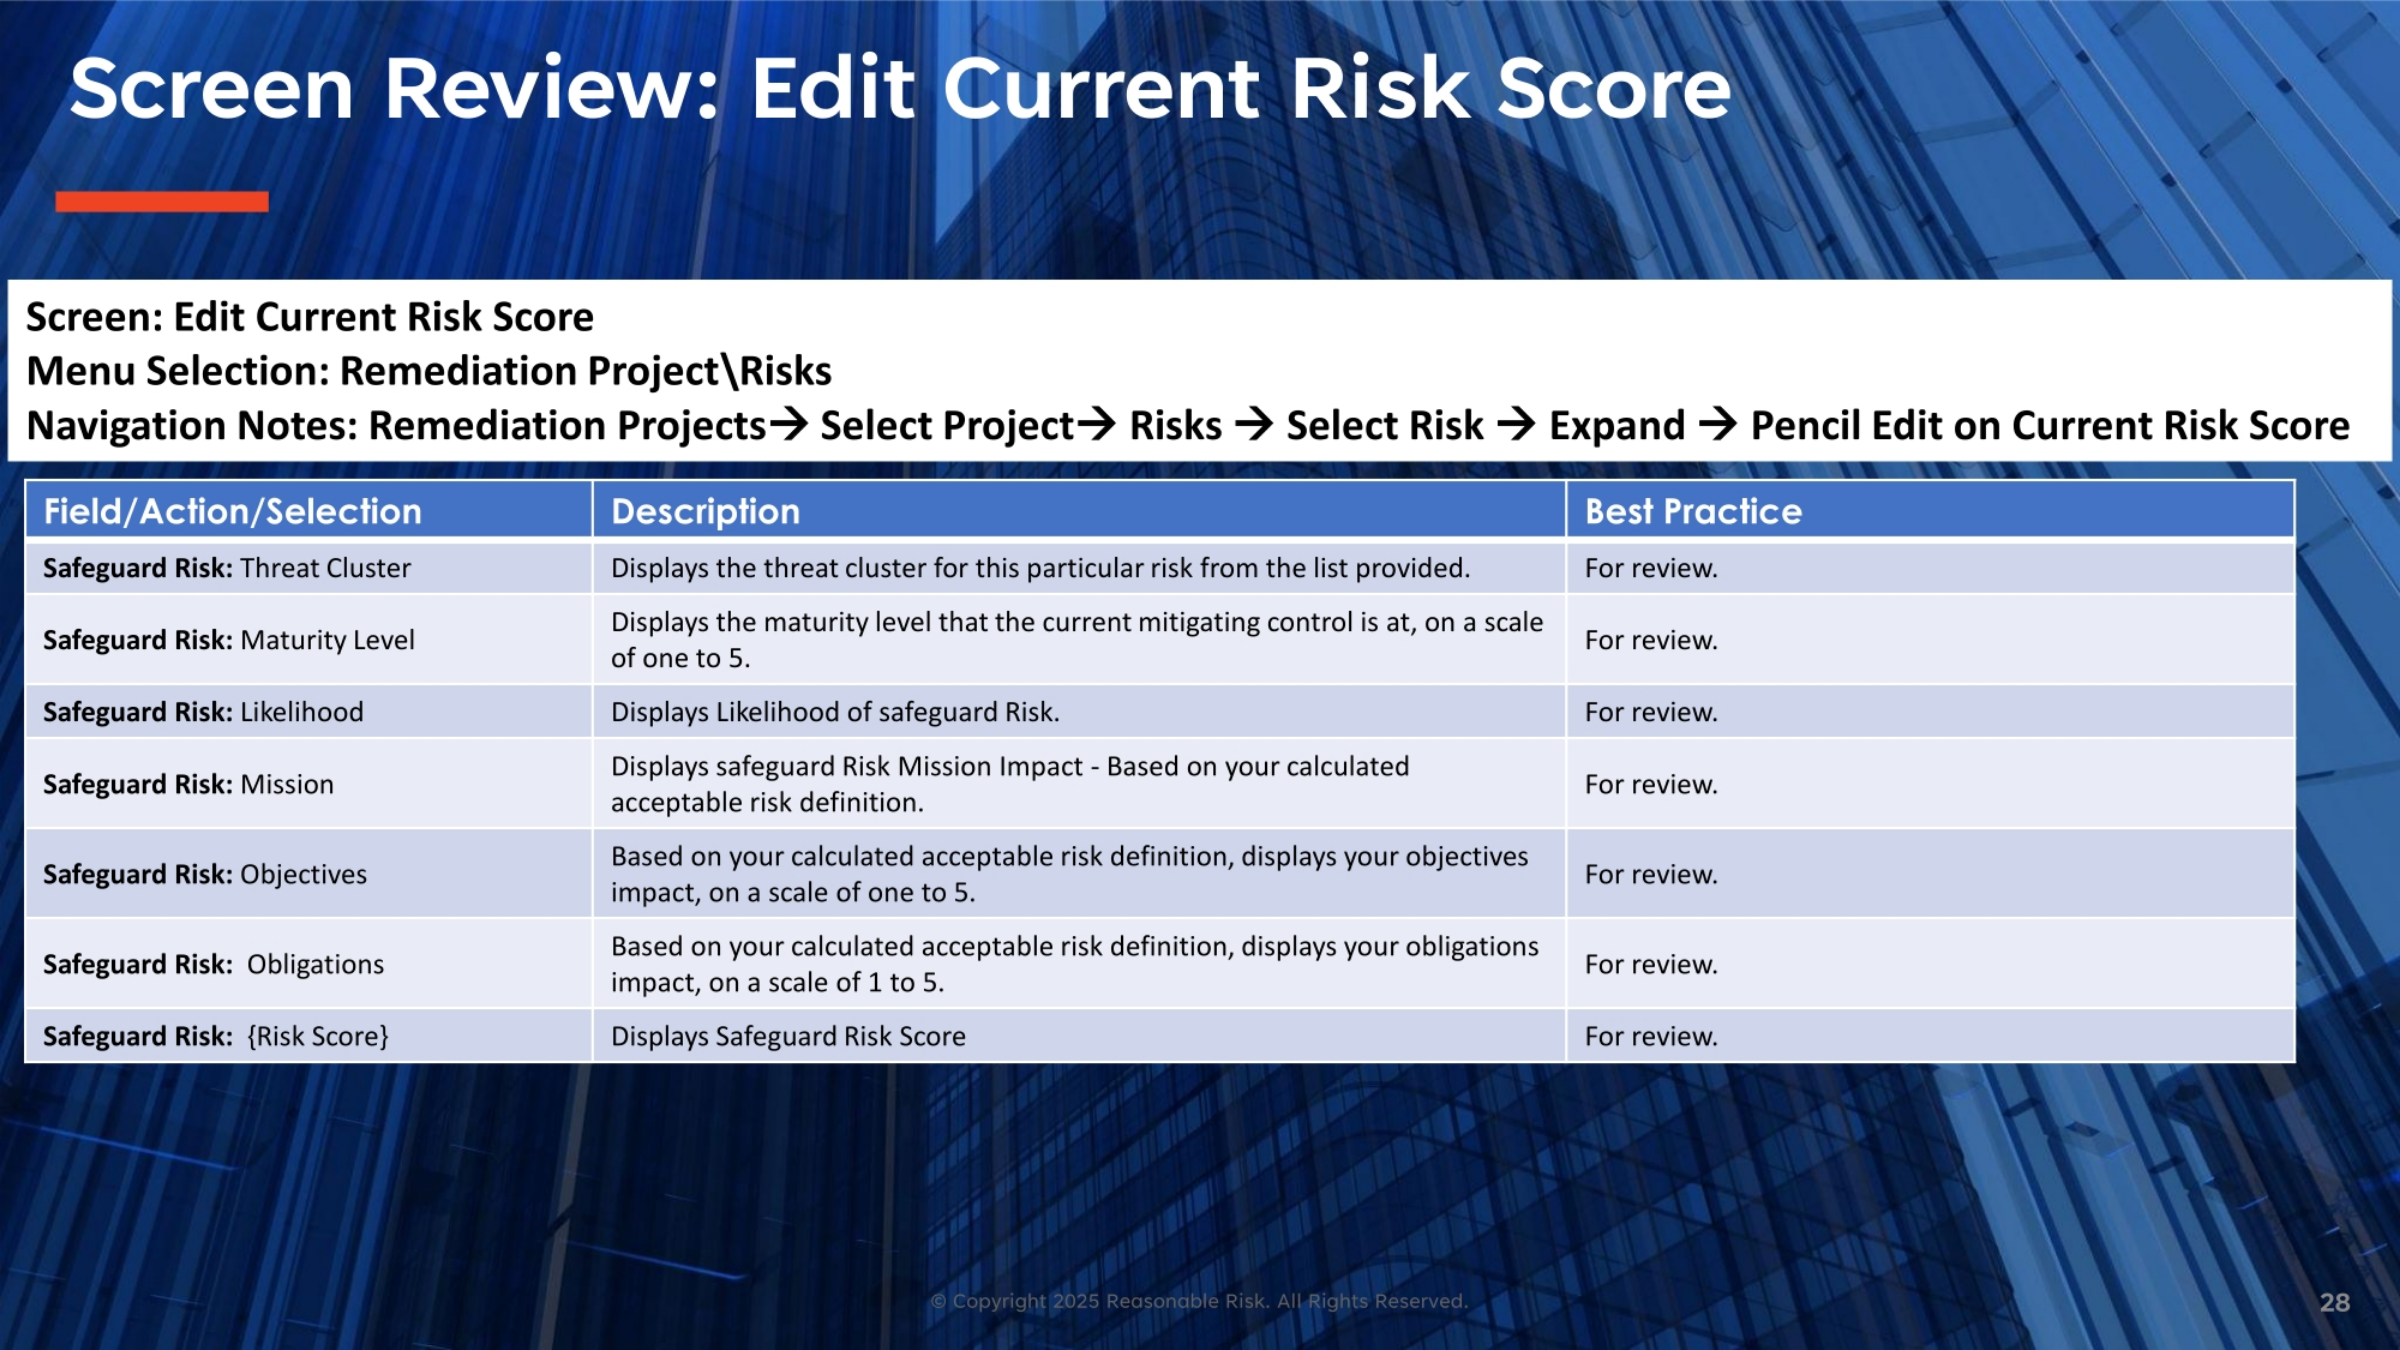
This continues our review of editing the current risk score, specifically focusing on the 'Safeguard Risk' attributes. We examine fields such as Safeguard Risk Threat Cluster, Maturity Level, Likelihood, Mission, Objectives, and Obligations. These fields display information based on calculated acceptable risk definitions and are primarily for review. The Safeguard Risk Score itself is also displayed, providing an overall assessment of the risk after safeguards are considered.
29. Screen Review: Edit Current Risk Score
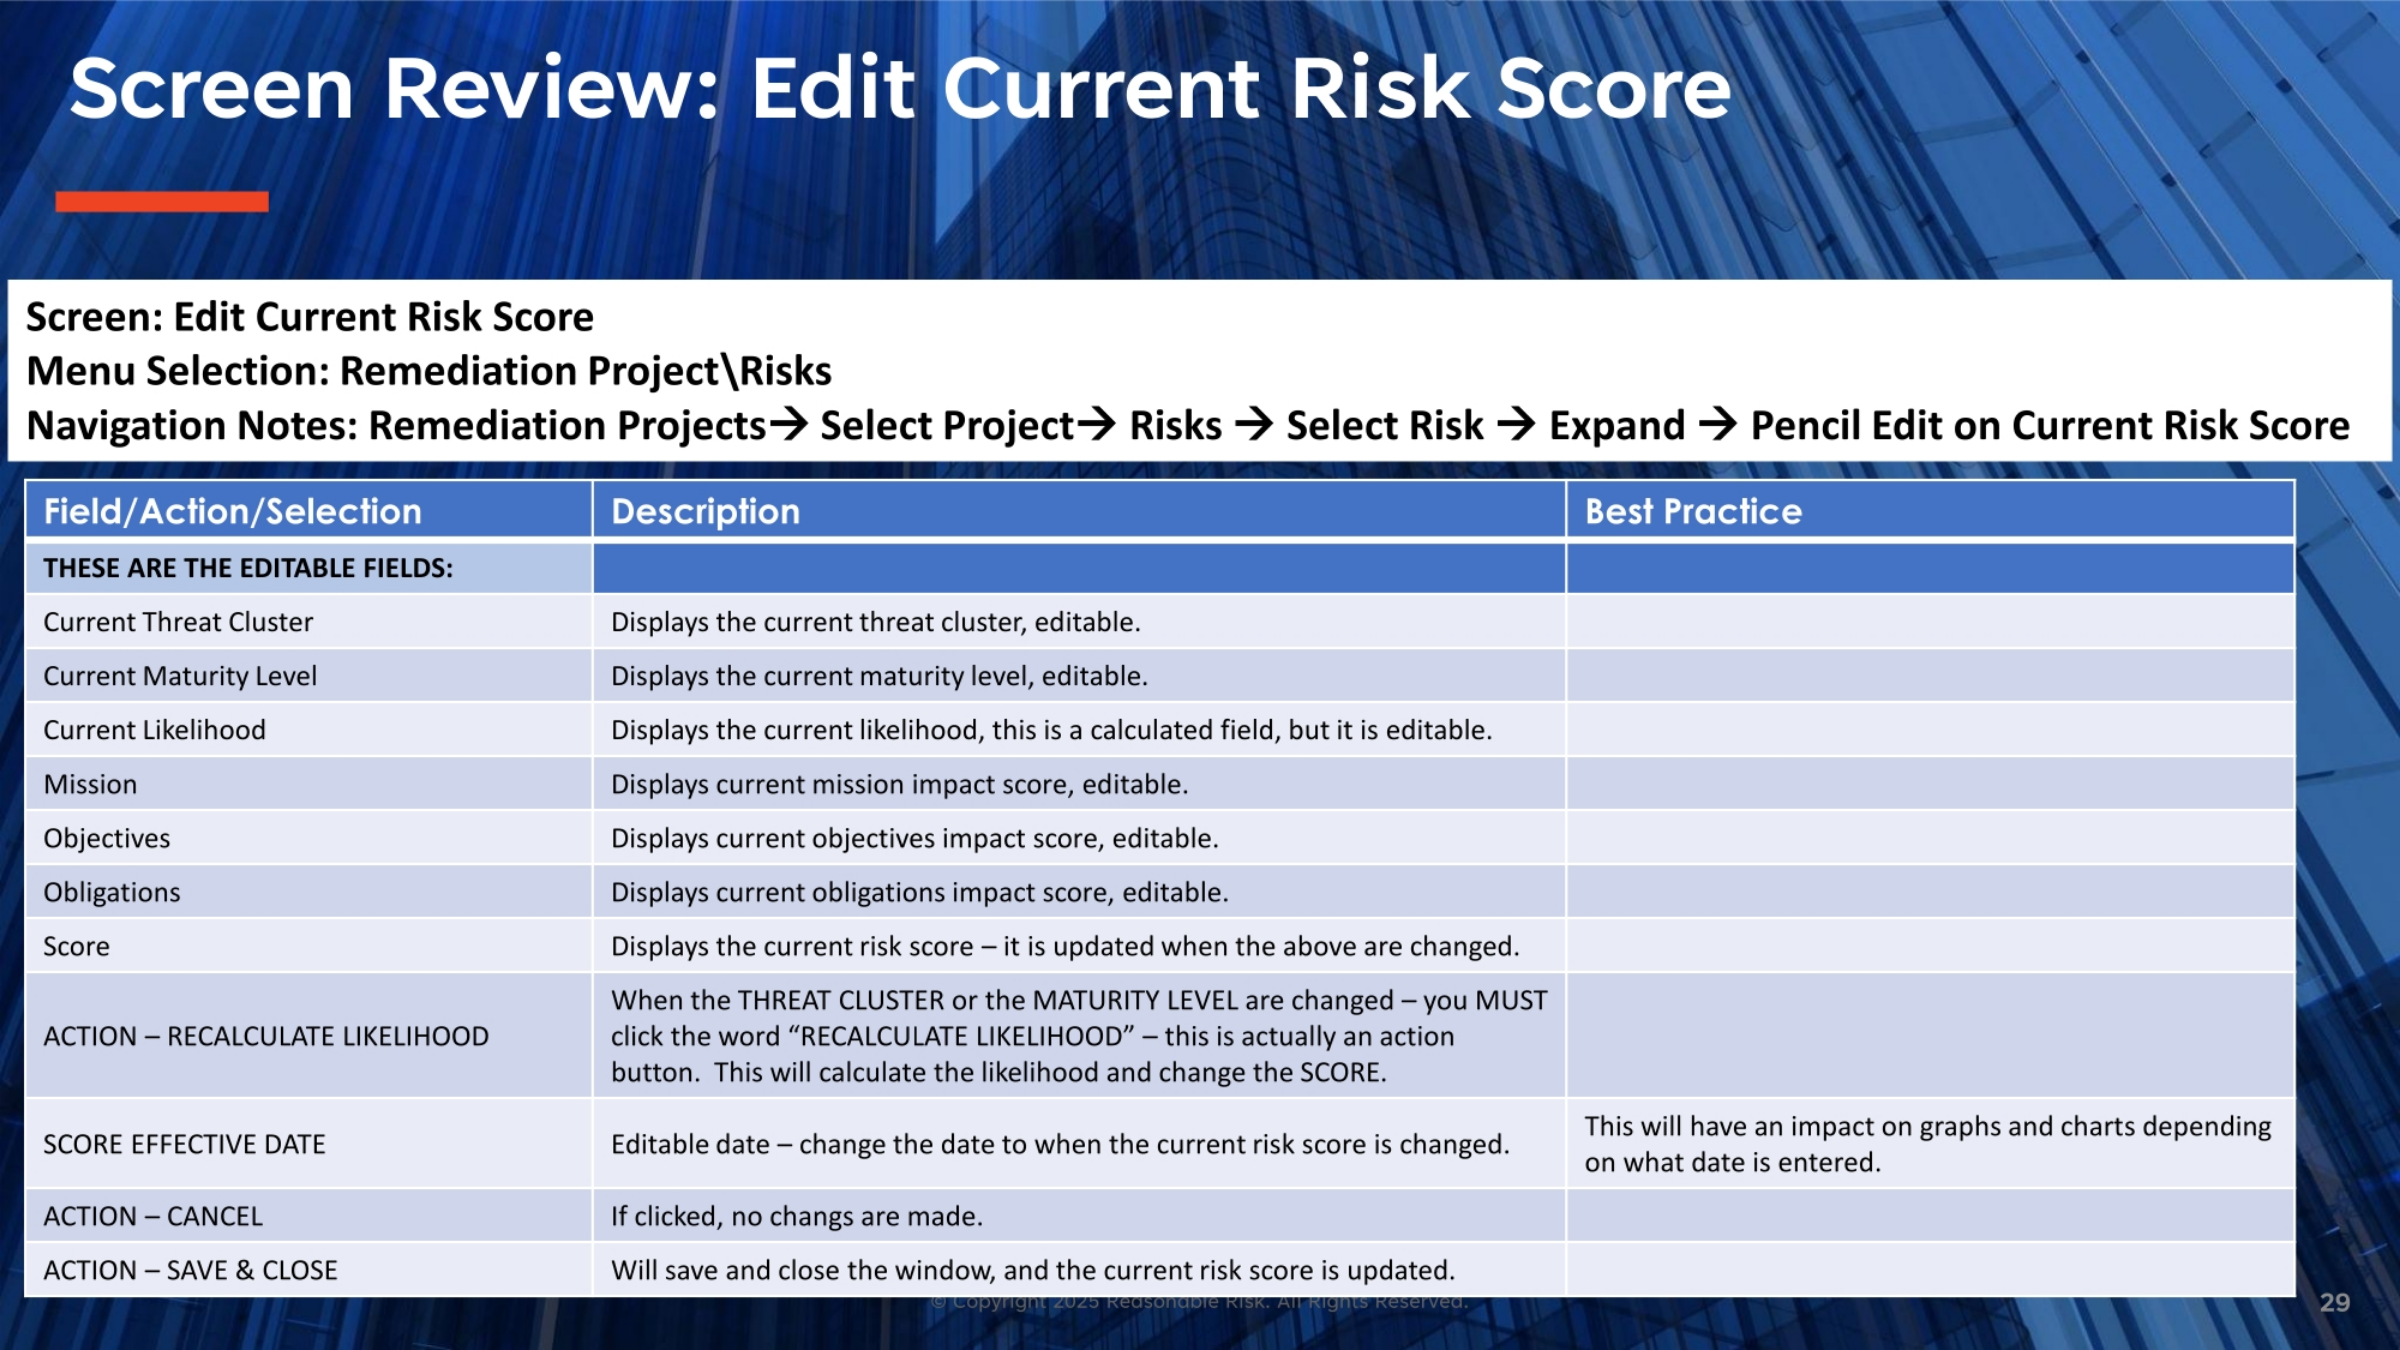
This section details the editable fields within the 'Edit Current Risk Score' screen. Users can modify the Current Threat Cluster, Current Maturity Level, Mission, Objectives, and Obligations. While Current Likelihood is a calculated field, it can also be edited. The score updates automatically when changes are made to the threat cluster or maturity level. A crucial action is 'Recalculate Likelihood,' which is an action button that recalculates likelihood and updates the score when the threat cluster or maturity level are changed. The 'Score Effective Date' is editable and impacts graphs and charts. 'Cancel' discards changes, while 'Save and Close' updates the risk score and closes the window.
30. Screen Review: Edit Safeguard Risk Score
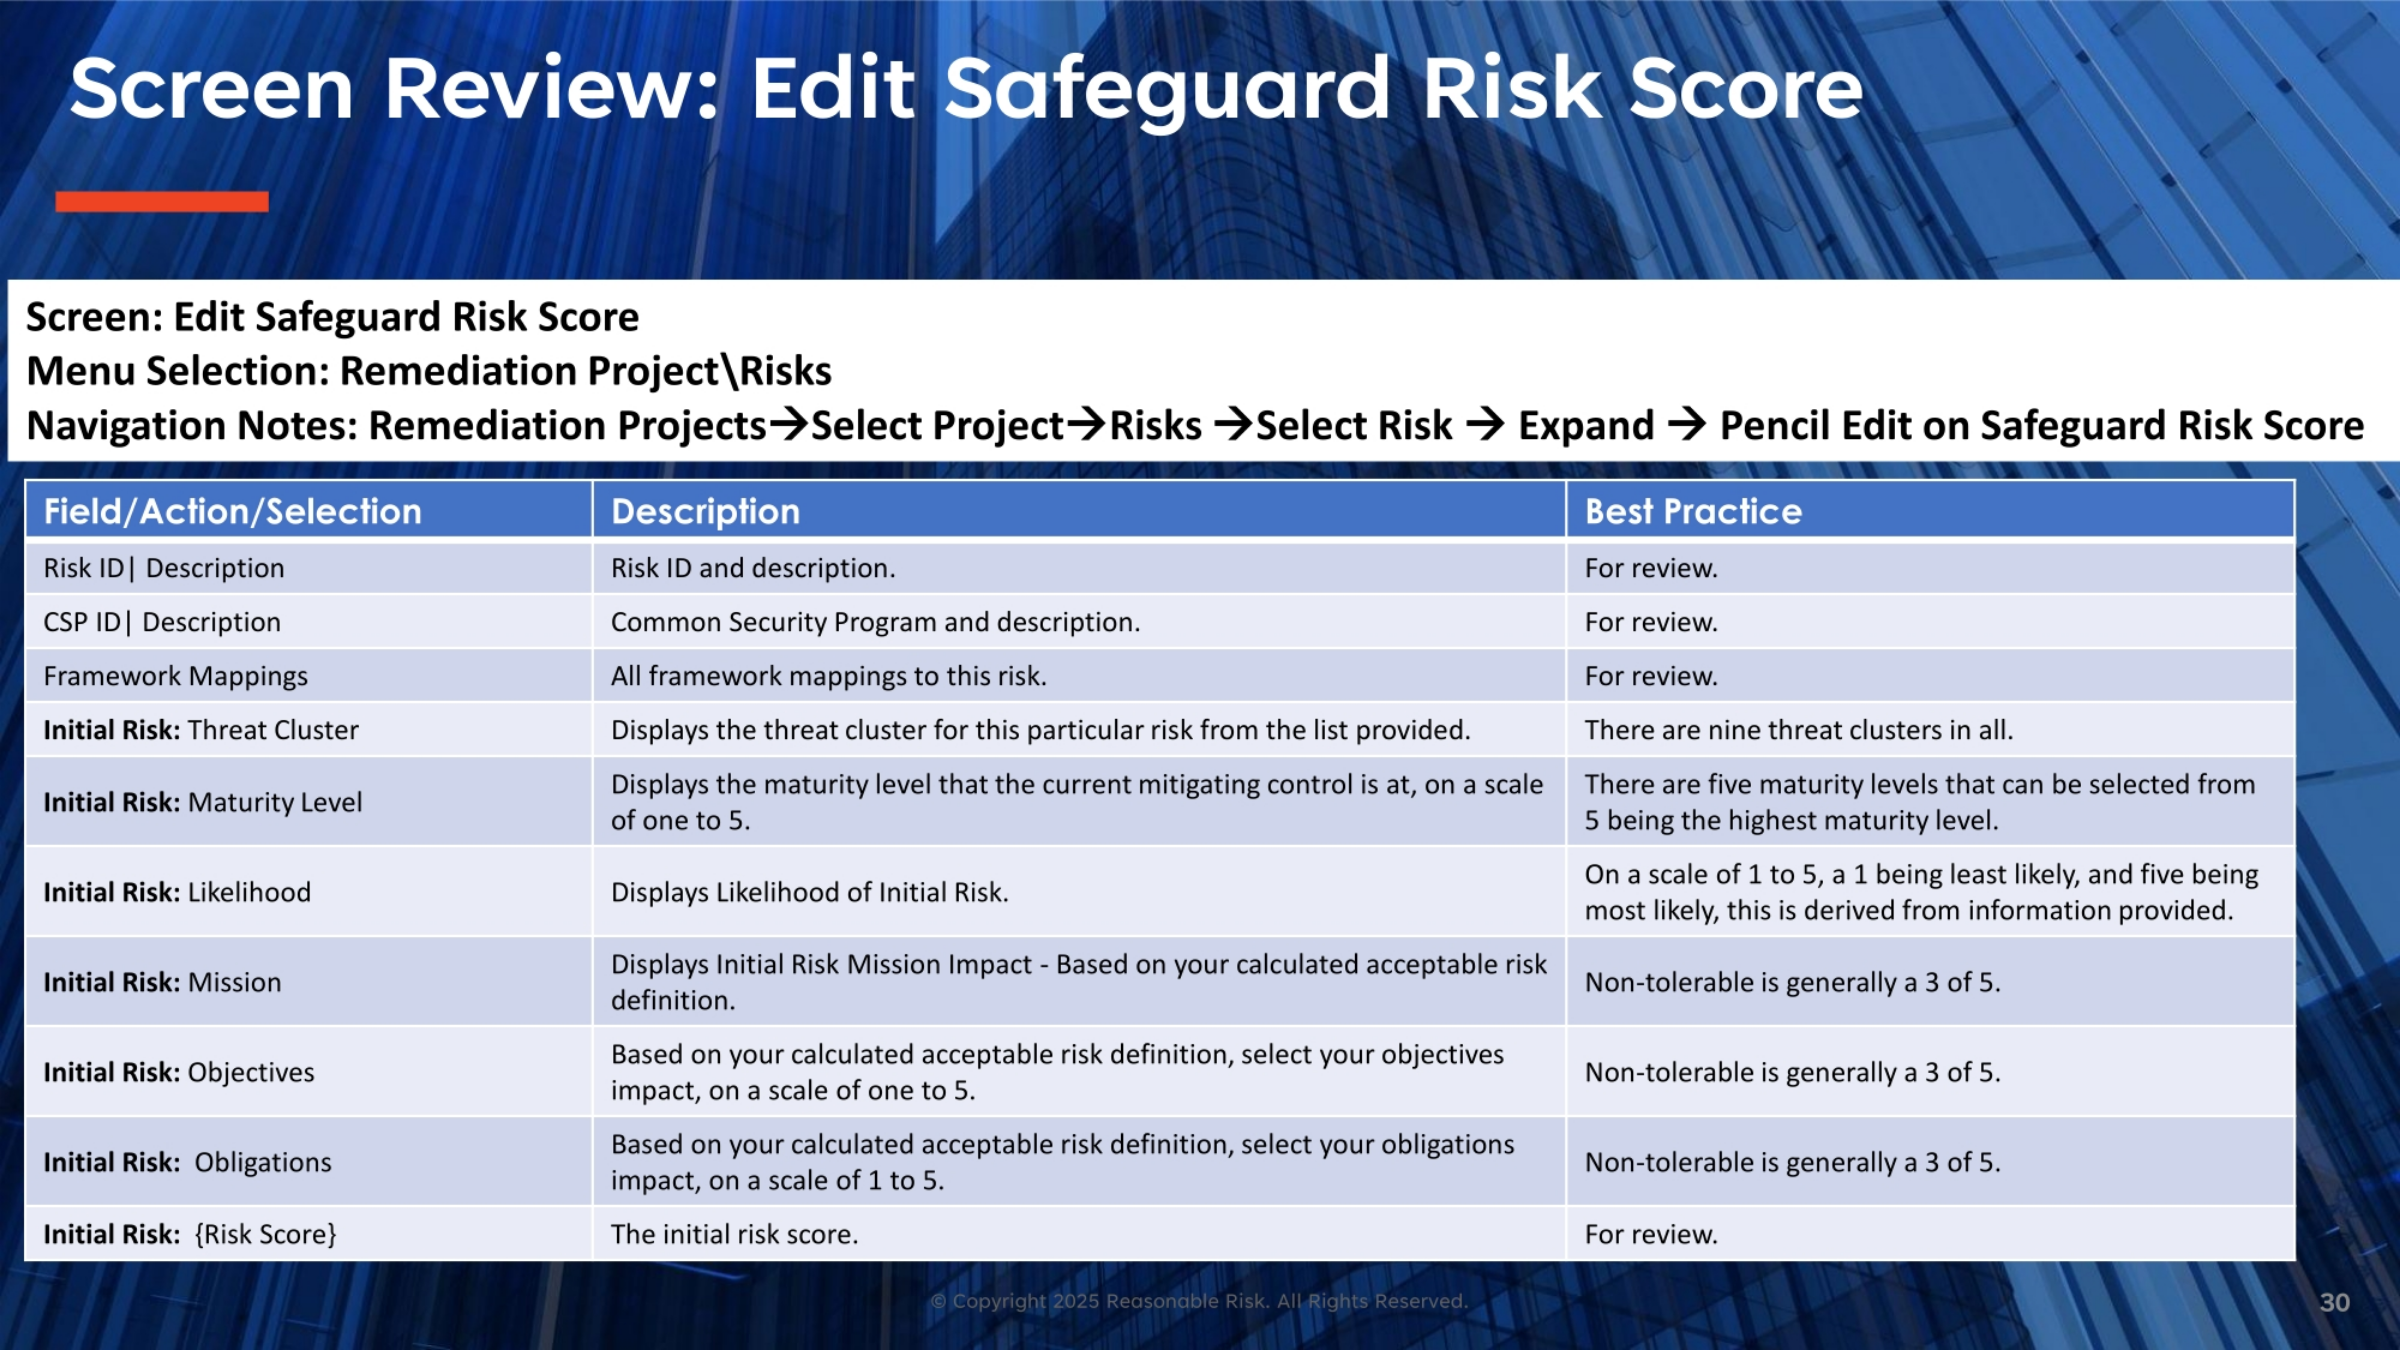
We are now reviewing the screen for editing the safeguard risk score. The navigation path is similar to editing the current risk score, leading to the 'Pencil Edit on Safeguard Risk Score' option. This screen presents fields like Risk ID, CSP ID, Framework Mappings, Initial Risk Threat Cluster, Maturity Level, Likelihood, Mission, Objectives, and Obligations. These fields are primarily for review, providing context for the safeguard risk. The maturity level and likelihood are displayed on a scale of one to five, with five being the highest maturity and likelihood.
31. Screen Review: Edit Safeguard Risk Score
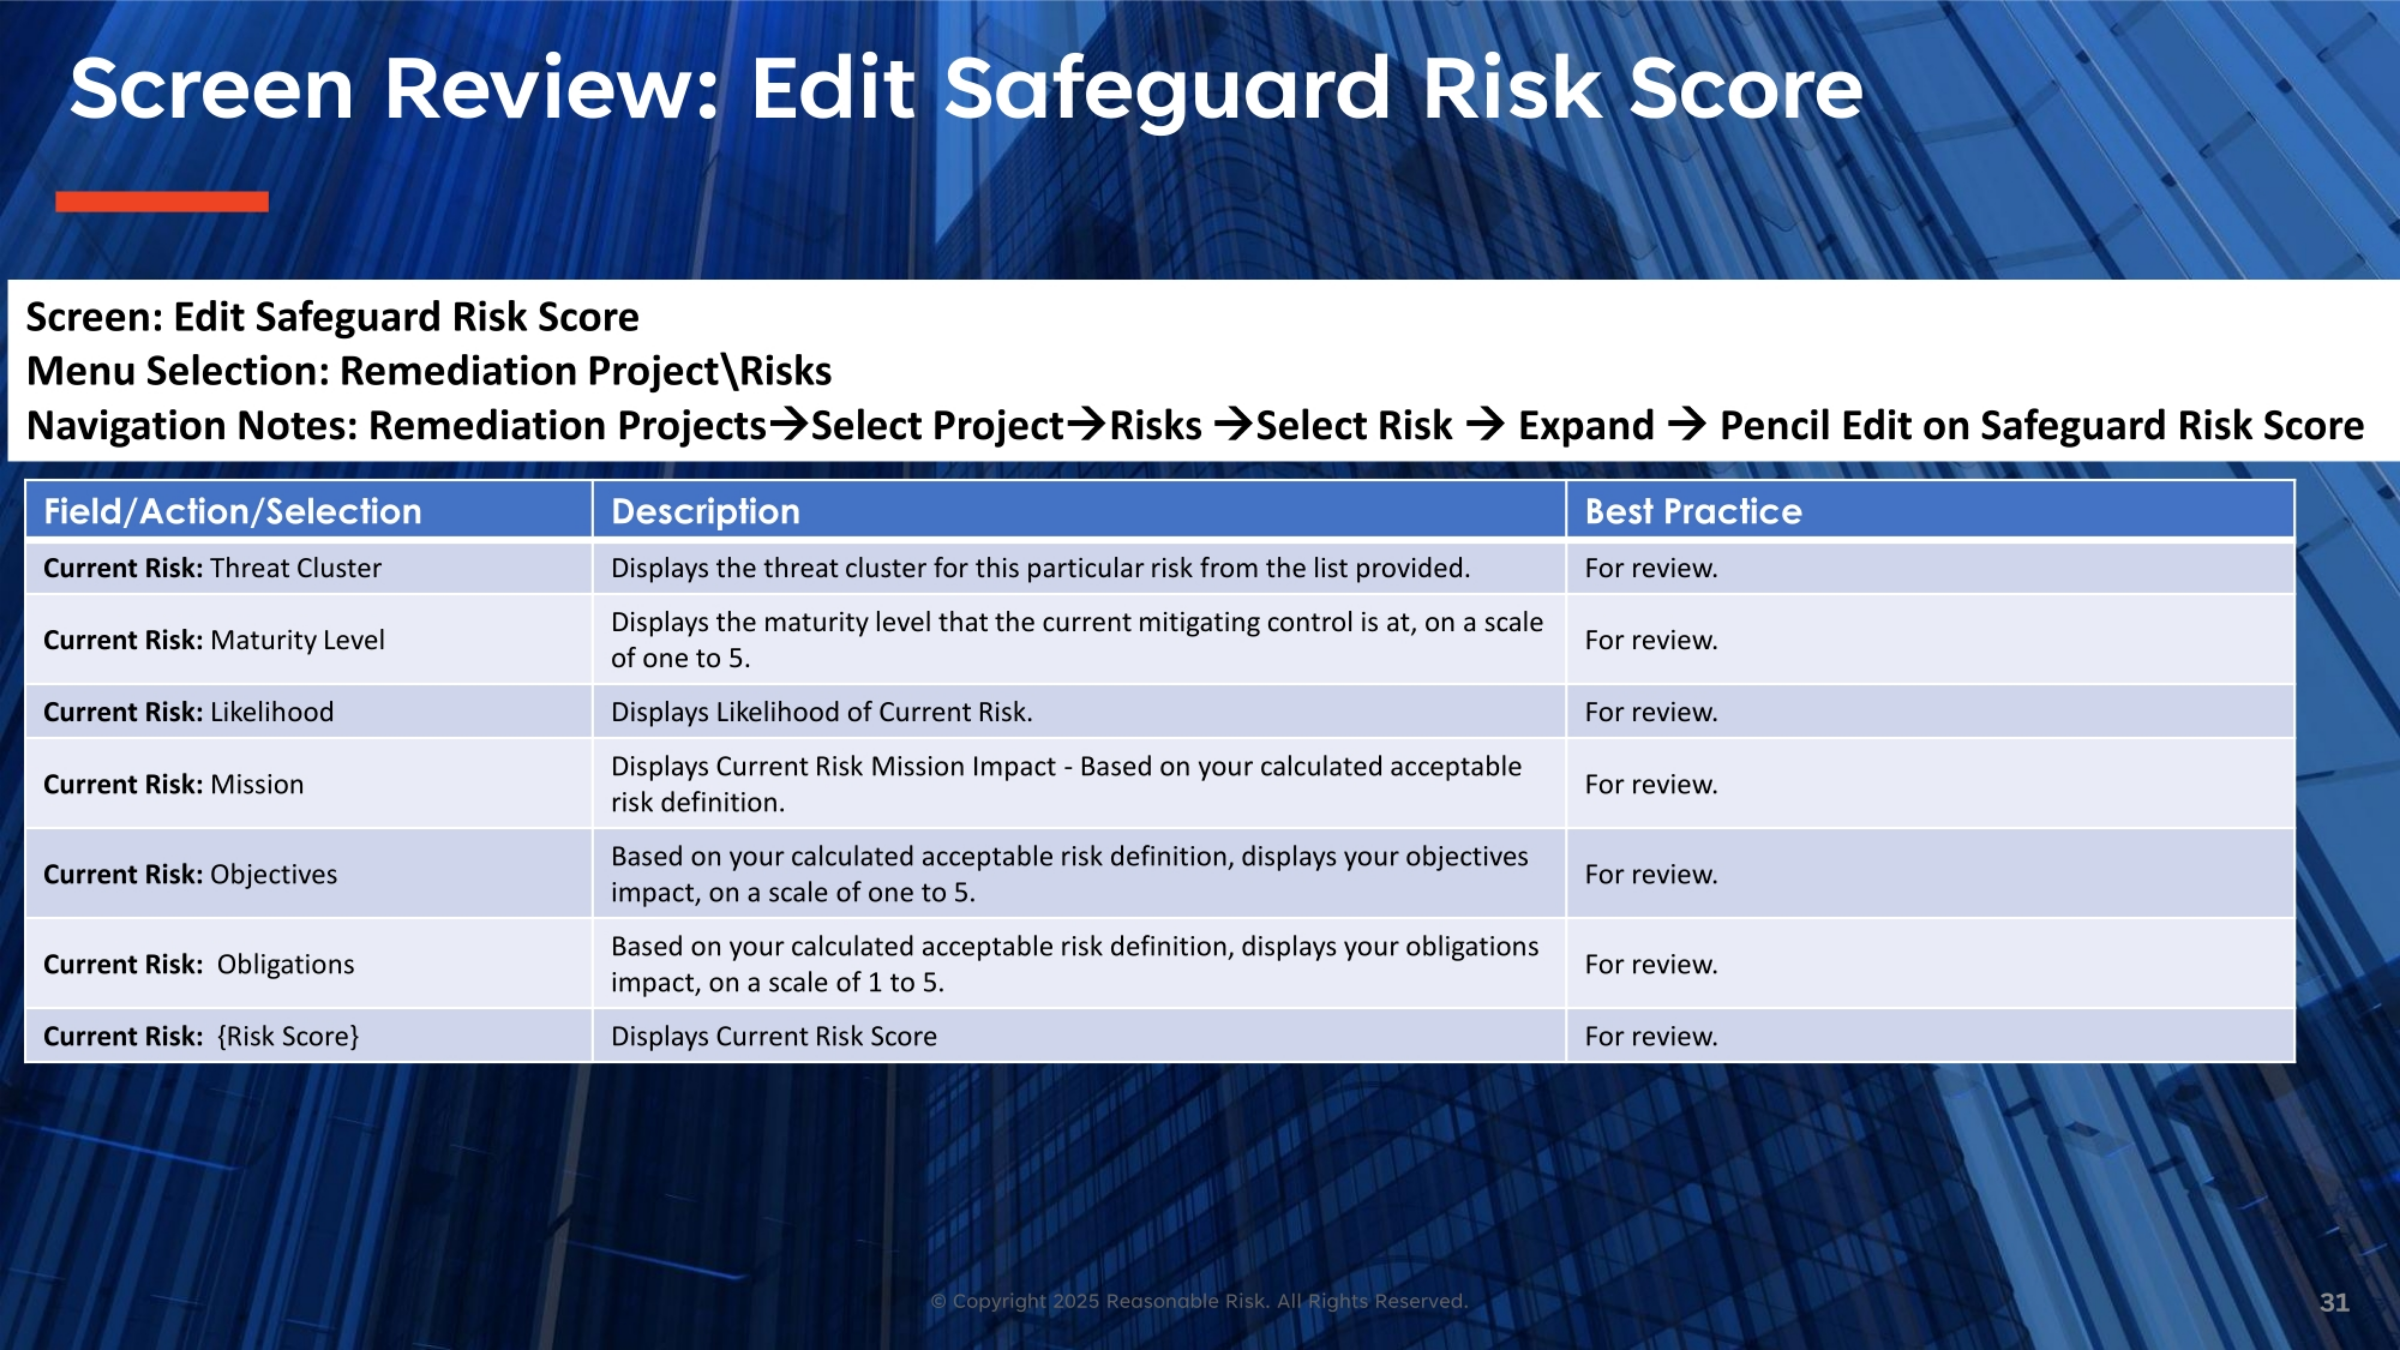
Continuing our review of the 'Edit Safeguard Risk Score' screen, we focus on the current risk attributes after safeguards are applied. Fields such as Current Risk Threat Cluster, Maturity Level, Likelihood, Mission, Objectives, and Obligations are displayed. These fields reflect the impact of current mitigating controls and are presented for review. The Current Risk Score is also displayed, providing an overview of the risk's status with safeguards in place.
32. Screen Review: Edit Safeguard Risk Score
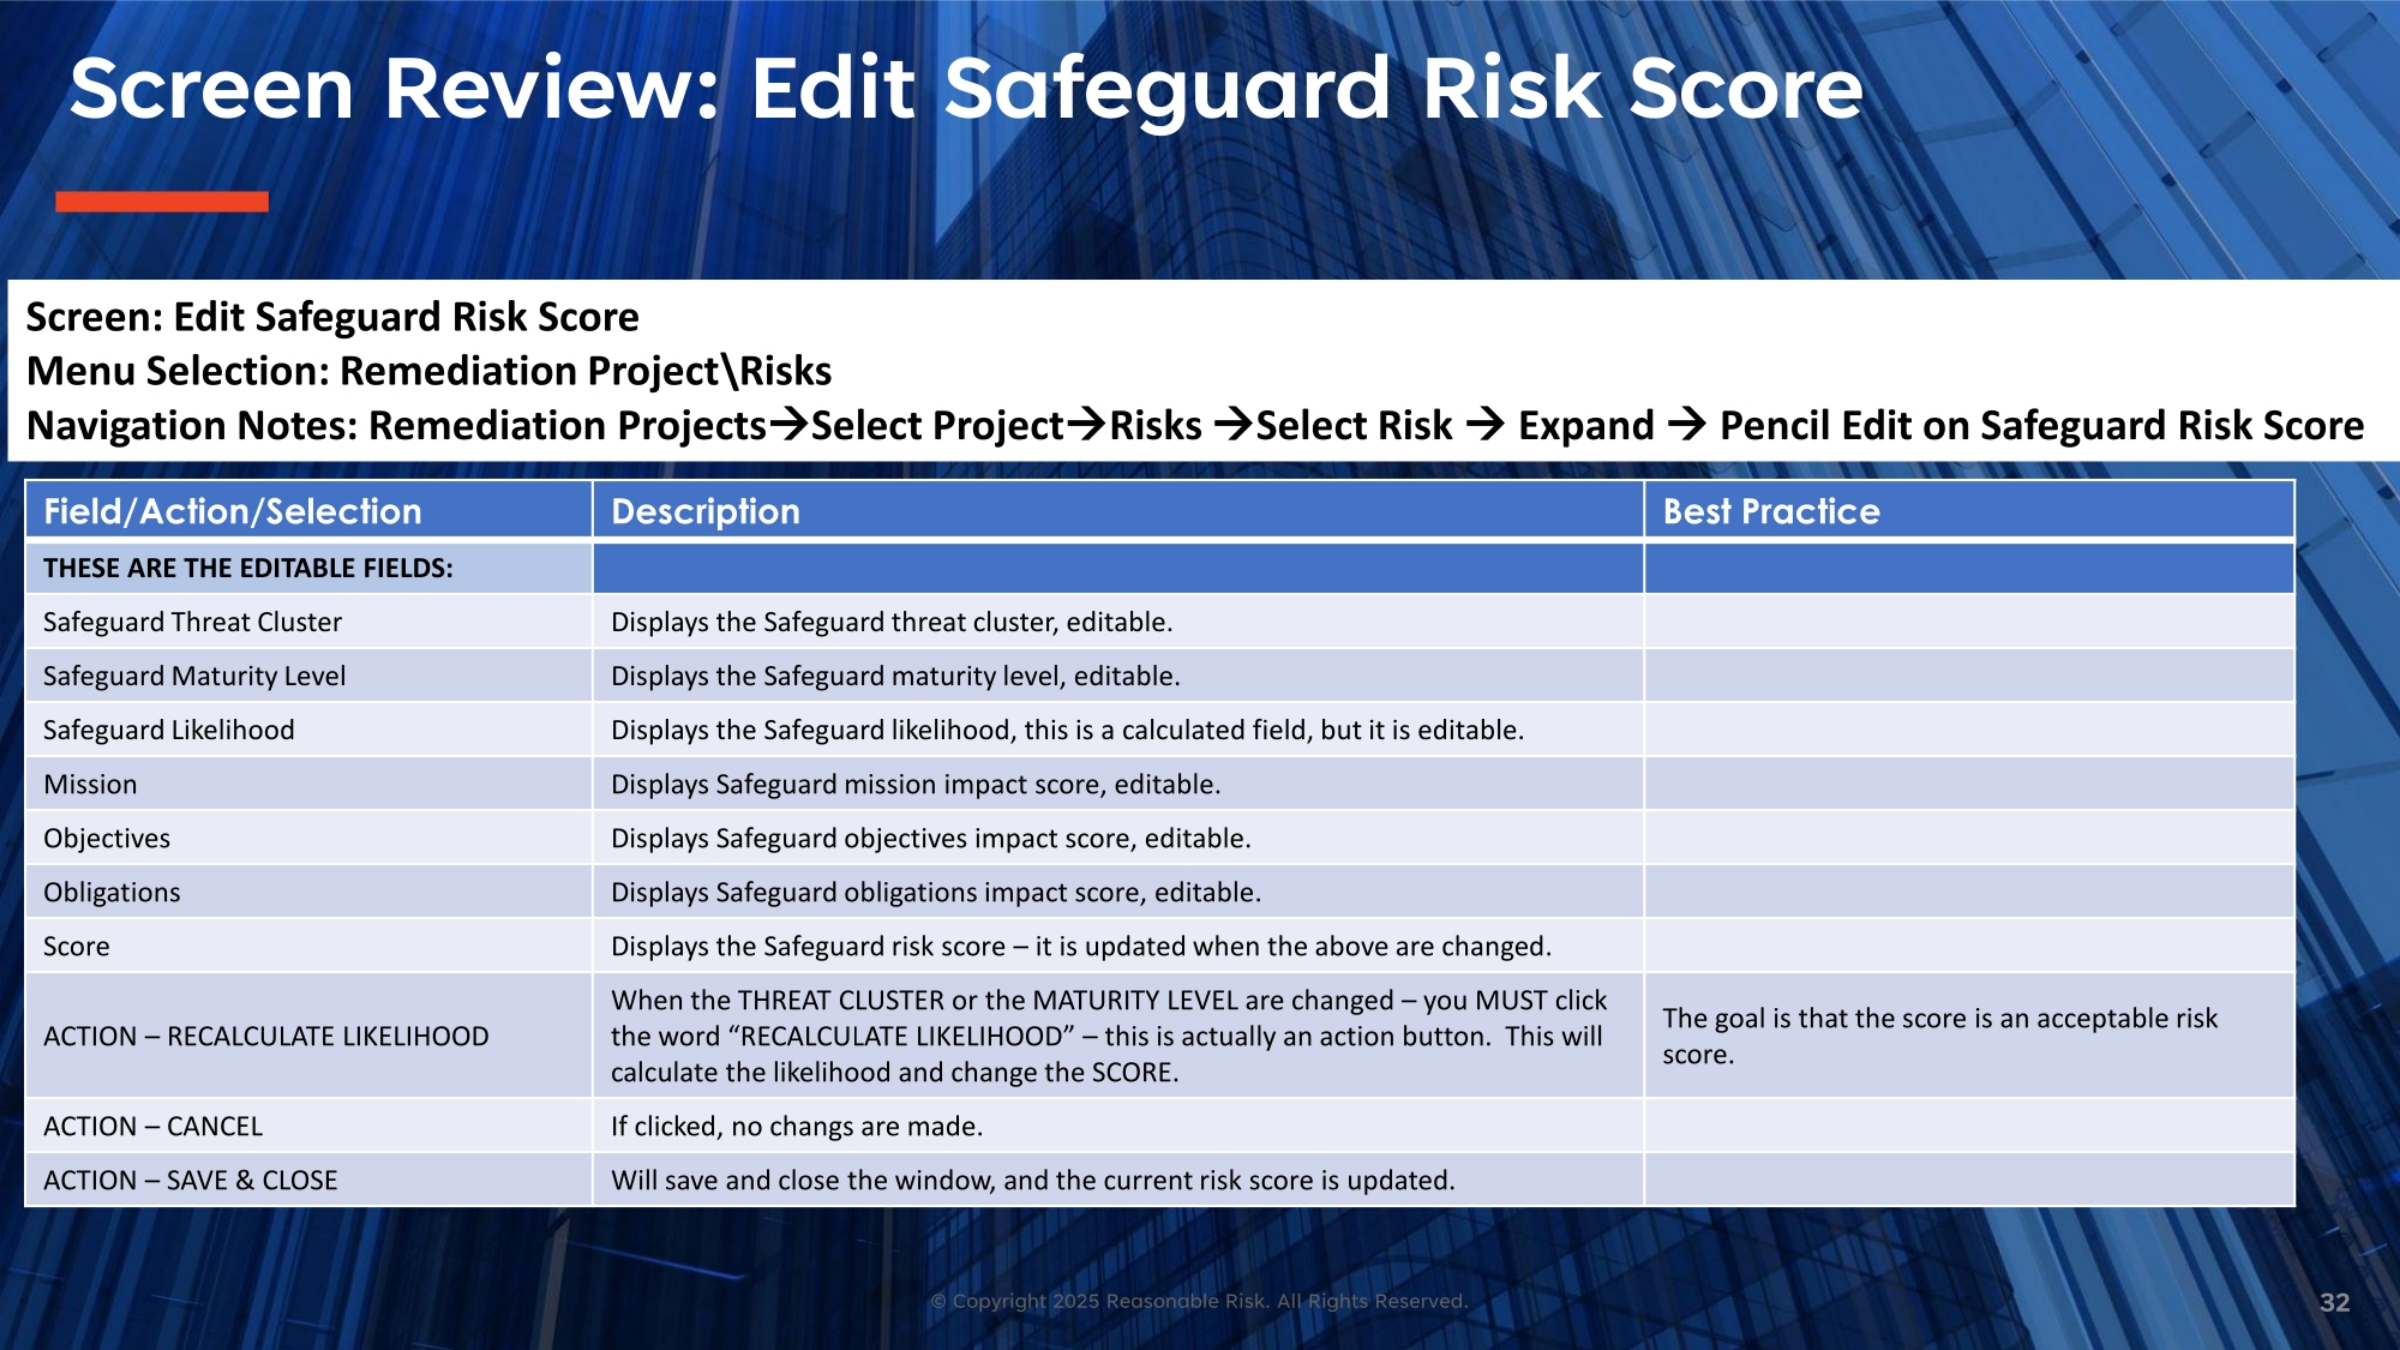
This section highlights the editable fields within the 'Edit Safeguard Risk Score' screen. Users can modify the Safeguard Threat Cluster, Maturity Level, Mission, Objectives, and Obligations. Safeguard Likelihood is a calculated field that can also be edited. The Safeguard Risk Score automatically updates when changes are made to the threat cluster or maturity level. The 'Recalculate Likelihood' action button is essential for updating the likelihood and score after changes. The goal of these edits is to achieve an acceptable risk score. 'Cancel' discards changes, and 'Save and Close' updates the safeguard risk score and closes the window.
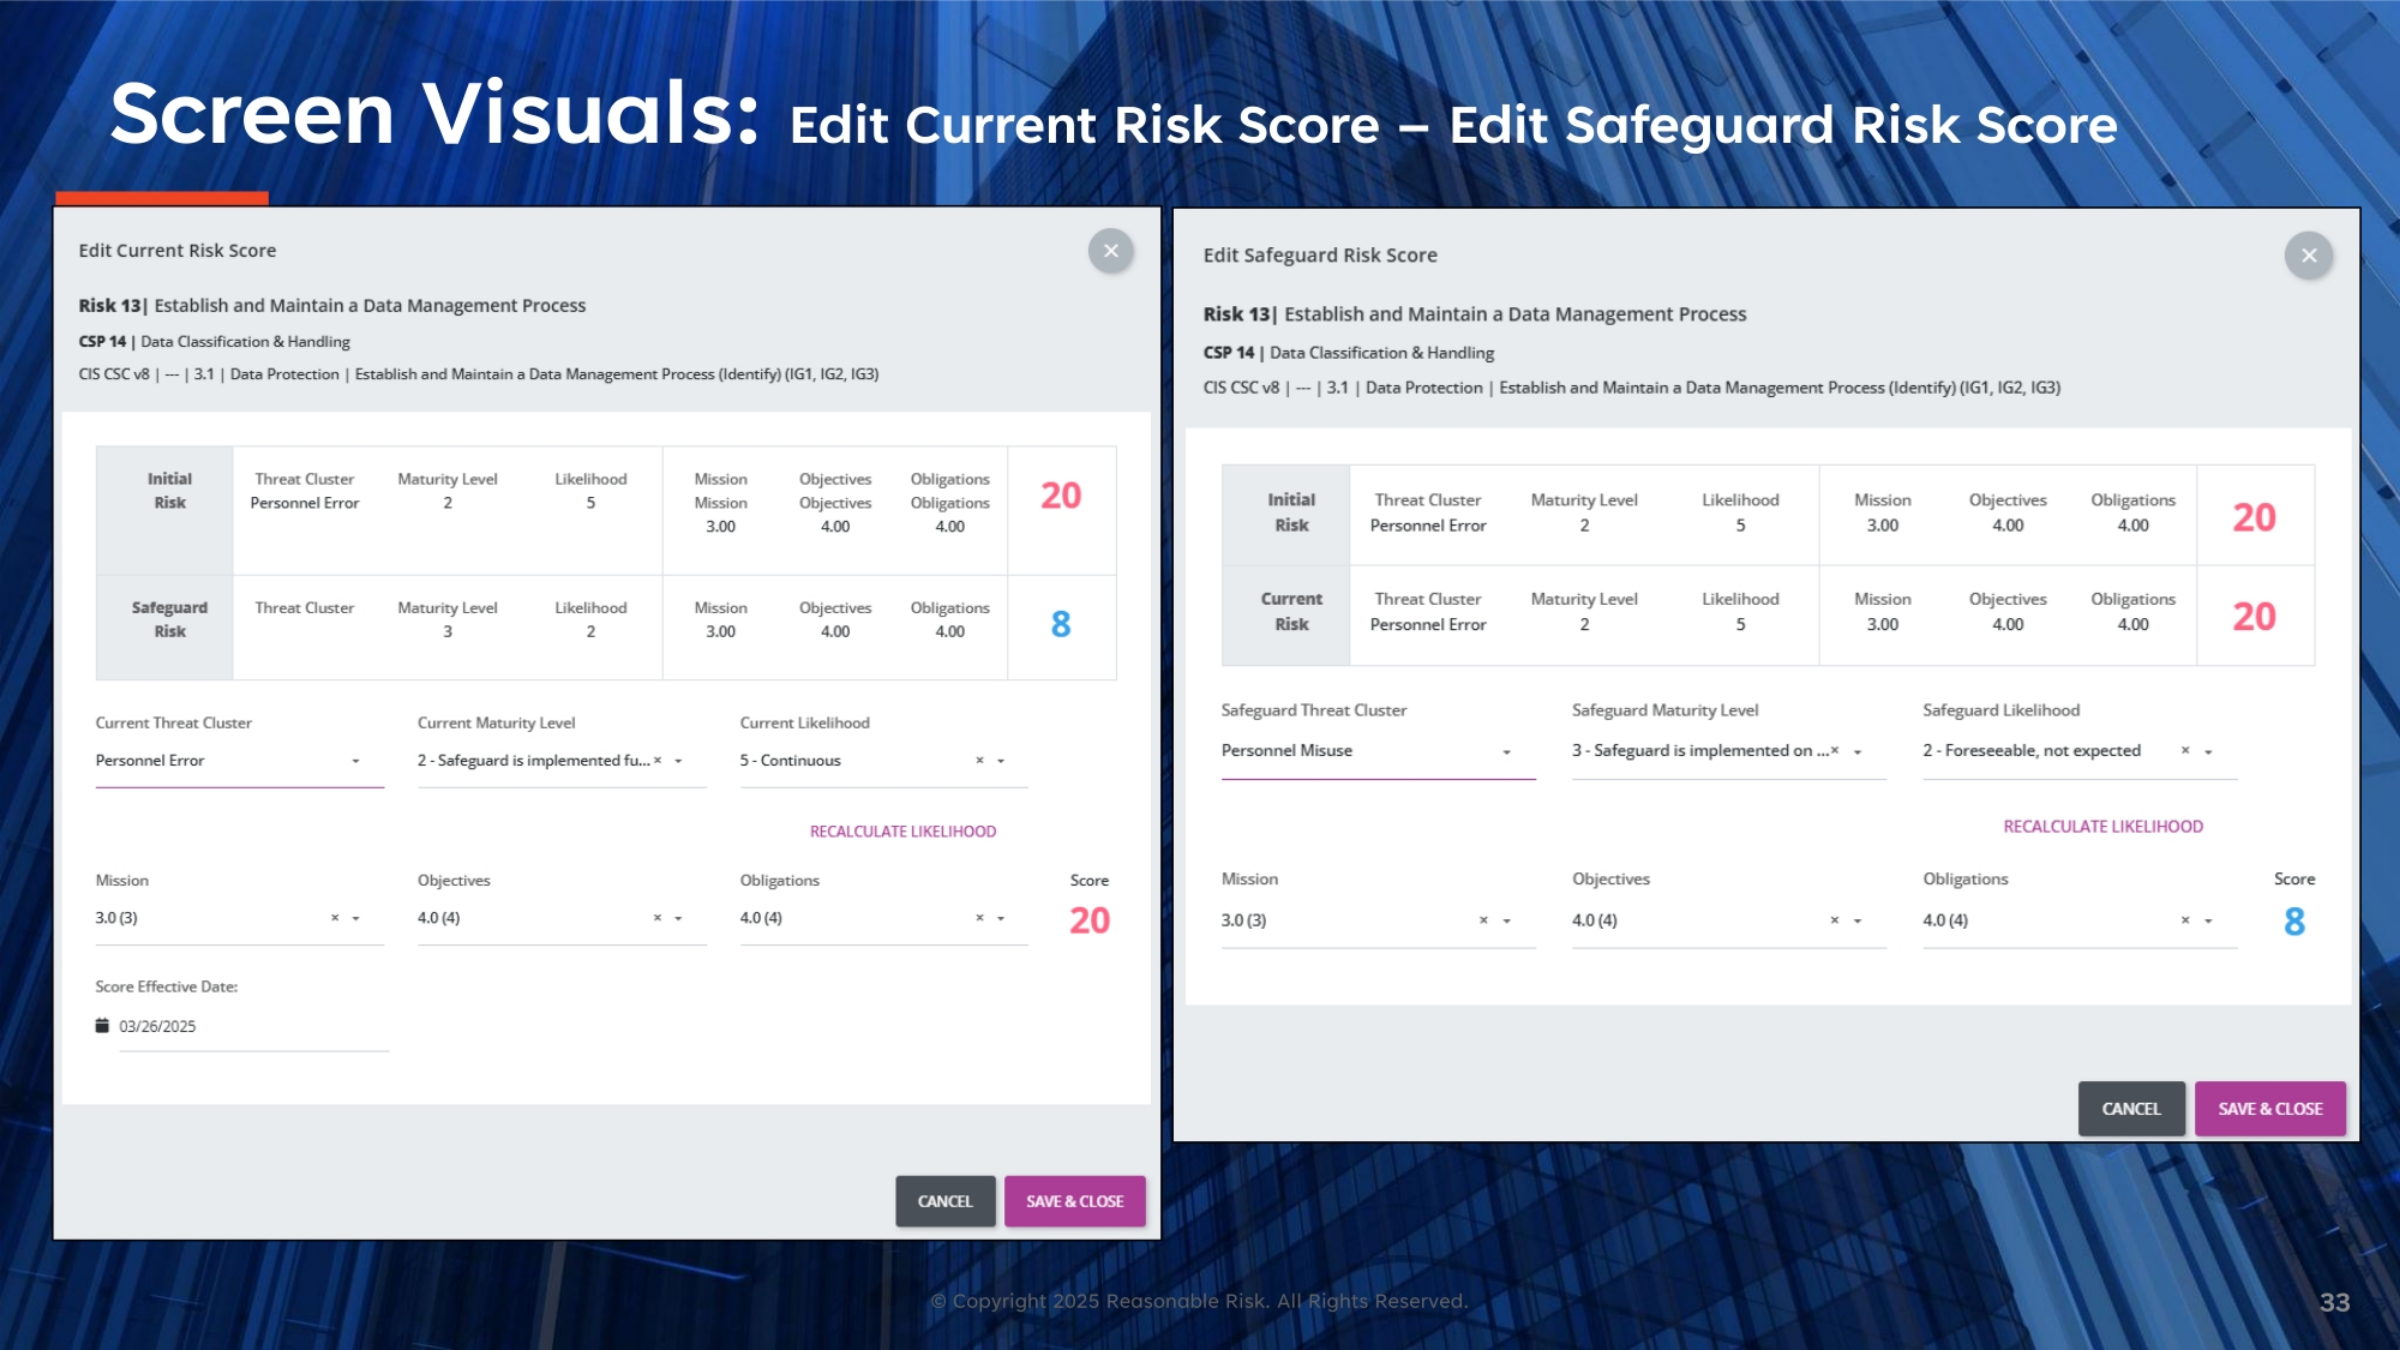
33. Screen Visuals: Edit Current Risk Score – Edit Safeguard Risk Score
This visual provides a side-by-side comparison of the 'Edit Current Risk Score' and 'Edit Safeguard Risk Score' screens. It illustrates how initial risk parameters like Threat Cluster, Maturity Level, Likelihood, Mission, Objectives, and Obligations contribute to the initial risk score. On the right, the safeguard risk screen shows how these parameters are adjusted after safeguards are implemented, leading to a potentially lower safeguard risk score. The visual highlights the 'Recalculate Likelihood' button and the 'Save & Close' actions on both screens.
34. Add/Edit Safeguard Risks & Closing Risks
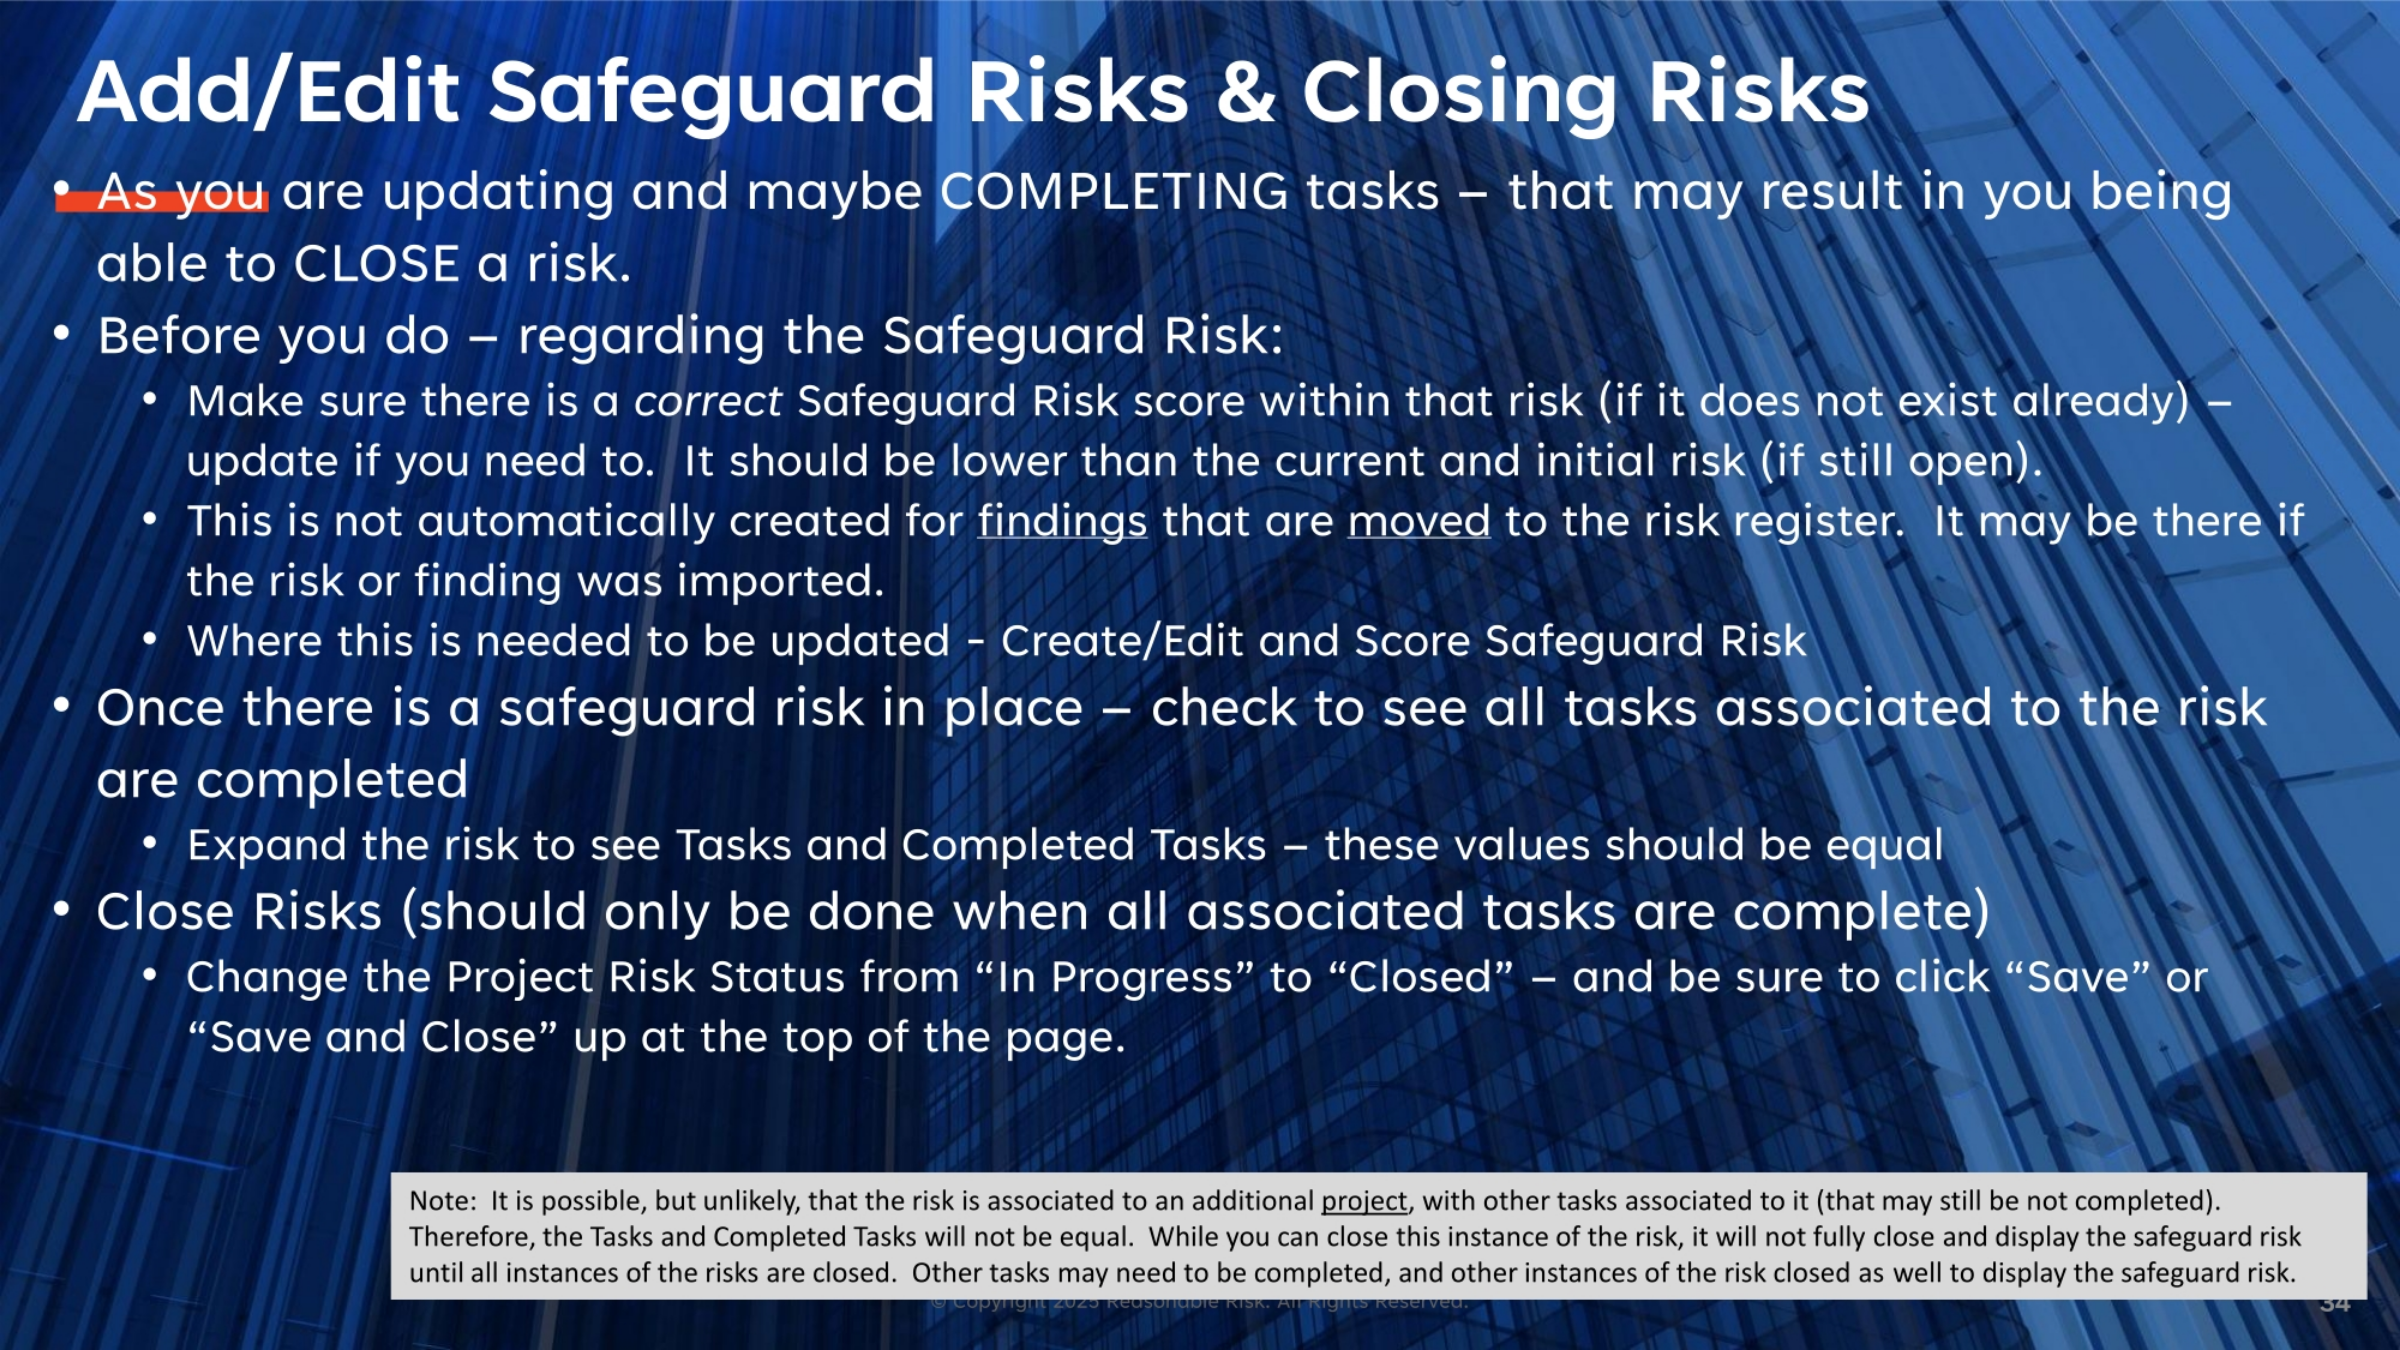
This section covers the process of adding, editing, and ultimately closing risks. When updating or completing tasks, it may become possible to close a risk. Before closing, ensure the safeguard risk score is correct and lower than the initial risk. Safeguard risks may need to be created or edited, especially if findings were imported. Once a safeguard risk is in place, verify that all associated tasks are completed by expanding the risk to compare 'Tasks' and 'Completed Tasks.' To close a risk, change the Project Risk Status from 'In Progress' to 'Closed' and then click 'Save' or 'Save and Close'.
35. Demonstrate
Let's demonstrate mapping, creating, reviewing, closing, and disassociating risks from projects.
This training module provided a comprehensive overview of Remediation Project Risks within the Reasonable Risk framework, detailing the risk lifecycle, Project Risk View, Filter, and Action Bar. Mastering the essential processes for mapping, managing, and closing risks within the project management system is crucial for maintaining project integrity and achieving successful remediation outcomes.
Comments
0 comments
Please sign in to leave a comment.