This training module provides essential insights into managing remediation projects within the Reasonable Risk platform. We will explore the lifecycle, objectives, and practical application of remediation projects to effectively mitigate risks.
1. Focus Area: Remediation Projects
Welcome to the Reasonable Risk training module focused on remediation projects. This session will guide you through the essential aspects of managing and executing projects designed to address identified risks effectively. We'll cover everything from project creation to closure, ensuring you have a comprehensive understanding of the process.
2. Agenda: Remediation Projects
Our agenda today focuses entirely on remediation projects.
3. Reasonable Risk Lifecycle and Modules
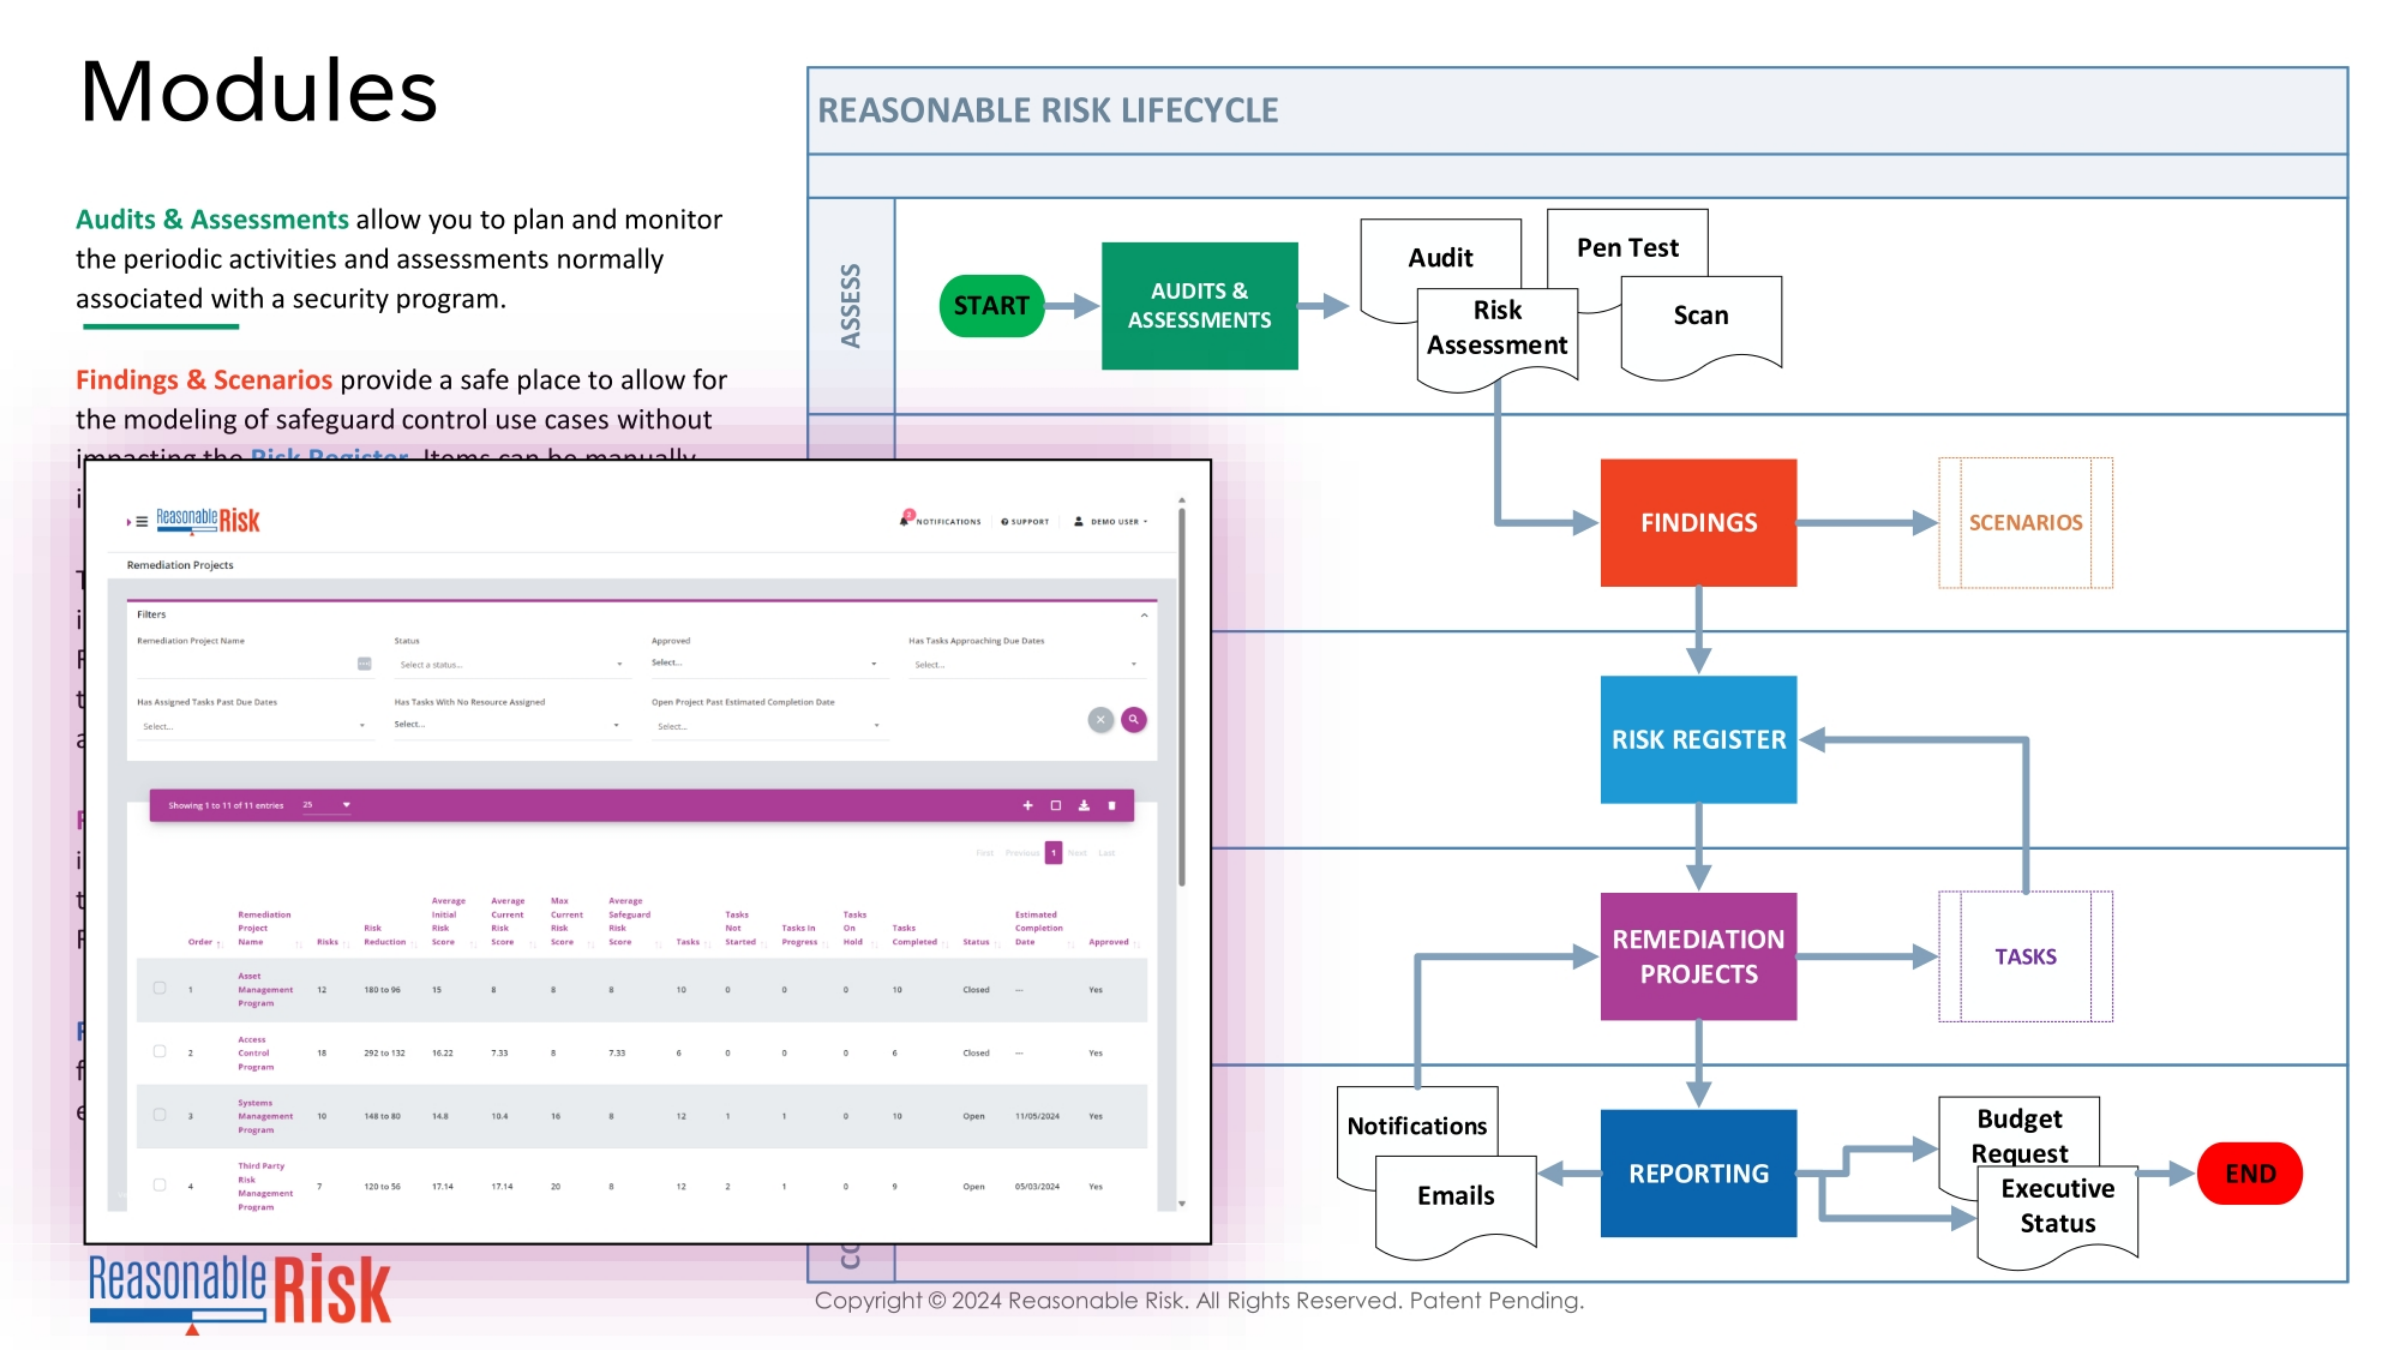
The Reasonable Risk lifecycle begins with Audits and Assessments, which help plan and monitor security program activities. Findings and Scenarios then provide a safe environment to model safeguard control use cases without impacting the live risk register. These findings lead to the Risk Register, which then feeds into Remediation Projects. These projects are crucial for addressing identified risks, with tasks driving the remediation efforts. Notifications, emails, and reporting keep stakeholders informed, ultimately leading to budget requests and executive status updates, bringing the lifecycle to a close.
4. Objectives for Remediation Projects
Our key objectives for this module are to review and understand the projects listing and search bar, providing efficient navigation. We will also delve into the Project Overview to grasp its core functionalities. Furthermore, we'll explore Project Task Dates and Project Costs, crucial for planning and resource allocation. Finally, we'll learn how to approve projects with an approved project date, create new projects, and understand the process for closing projects effectively.
5. Remediation Projects: Core Concepts
To effectively remediate risks, they must be mapped to a specific project. This concept was previously introduced in the Risk Register module. A remediation project serves as a structured collection of risks and associated tasks, all managed to bring those risks down to an acceptable level. The information gathered within these projects is vital for executive status presentations, providing clear updates on progress. Moreover, the dates associated with tasks, which are linked to risks, directly influence the roadmap graph, indicating when the overall risk level is projected to become acceptable.
6. Categorizing Risks for Remediation Projects
When initiating remediation efforts, teams often categorize risks into logical groups. This can be based on common security programs like Access Control or Third-Party management, or by specific risk levels, such as high-priority pen test findings. Another effective approach is to group projects by timing, aligning with quarterly goals or specific 'sprints,' like Q4 2025 Risks. We'll explore various project type options later in this presentation. The fundamental principle remains: projects must be created, and risks must be accurately associated with them to ensure effective remediation.
7. Remediation Projects Workflow and Status
Projects are initiated when risks are first mapped to them. Once created, tasks are established to support these projects, allowing for the determination of time durations and budget requirements. These metrics then roll up to an overall project summary. A best practice involves running a 'Budget Request' presentation to review projects for approval and budget allocation. Following this, key fields like 'Approved' status and 'Approved Completion Date' are updated. The project's overall schedule, scope, and status, typically starting as 'Good,' can also be adjusted. By default, projects are 'OPEN' and change to 'CLOSED' upon completion, automatically closing all associated risks.
8. Remediation Projects Workflow: Creation and Approval
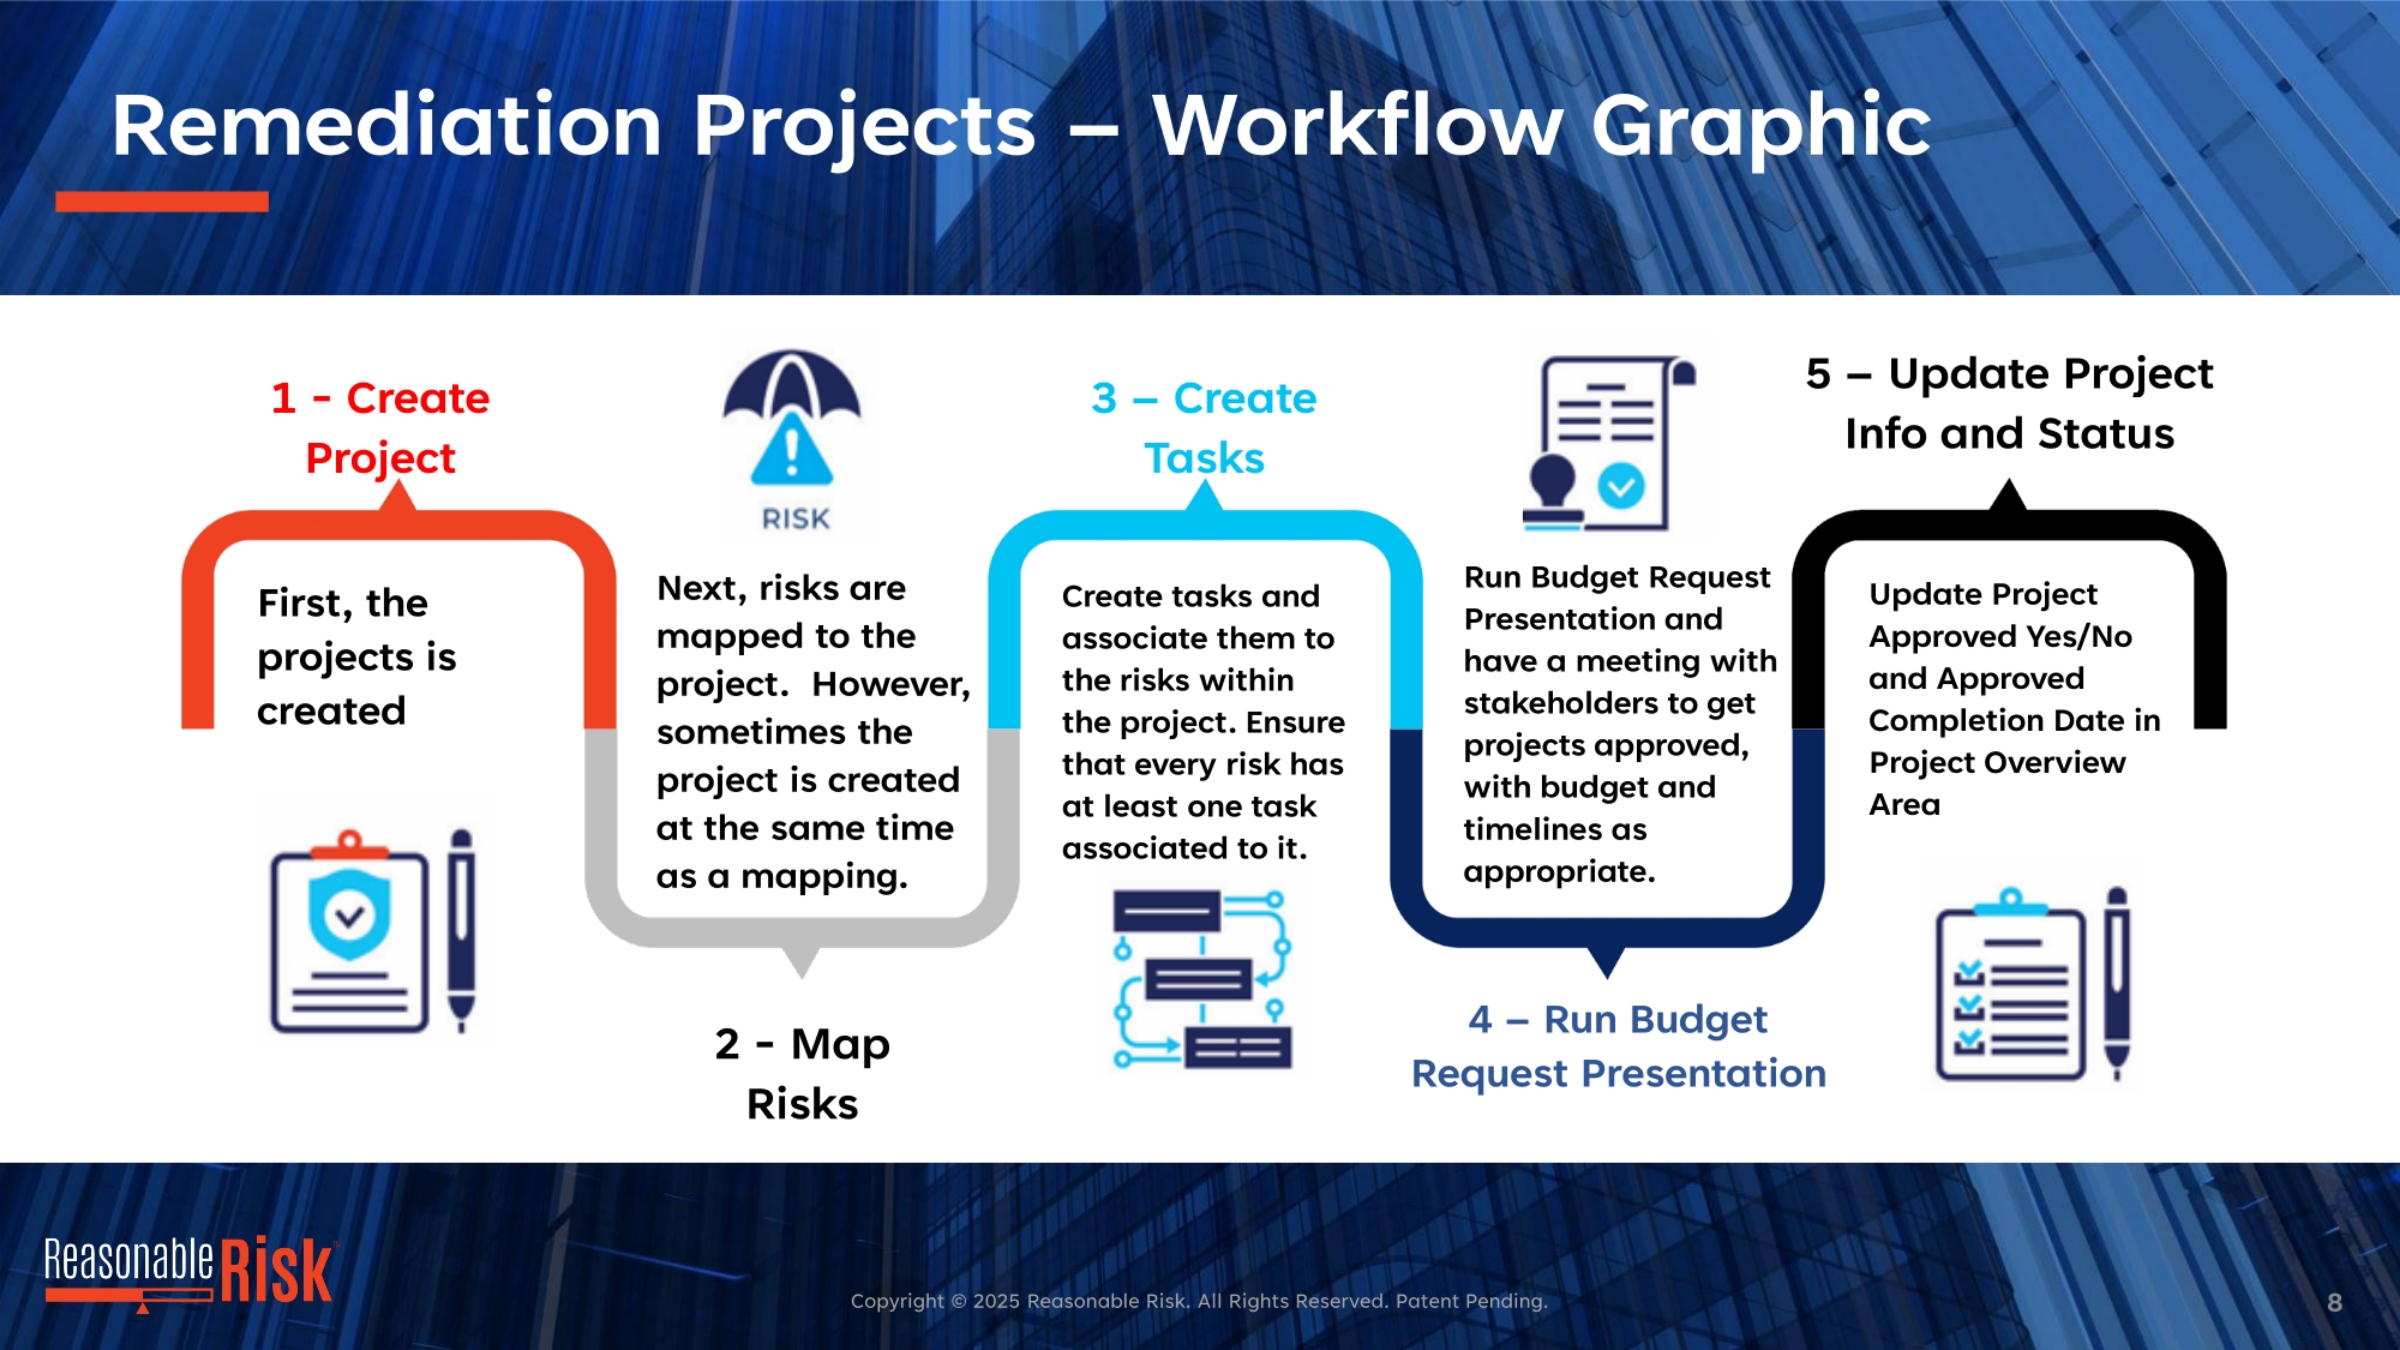
The remediation project workflow begins with creating the project itself. Next, risks are mapped to this project, though sometimes the project is created simultaneously with the mapping. Following this, tasks are created and associated with the risks within the project, ensuring every risk has at least one task. The fourth step involves running the Budget Request Presentation. This crucial meeting with stakeholders aims to secure project approval, along with appropriate budget and timelines. Finally, the project information and status are updated, specifically the 'Approved Yes/No' and 'Approved Completion Date' in the Project Overview area.
9. Remediation Projects Workflow: Execution and Closure
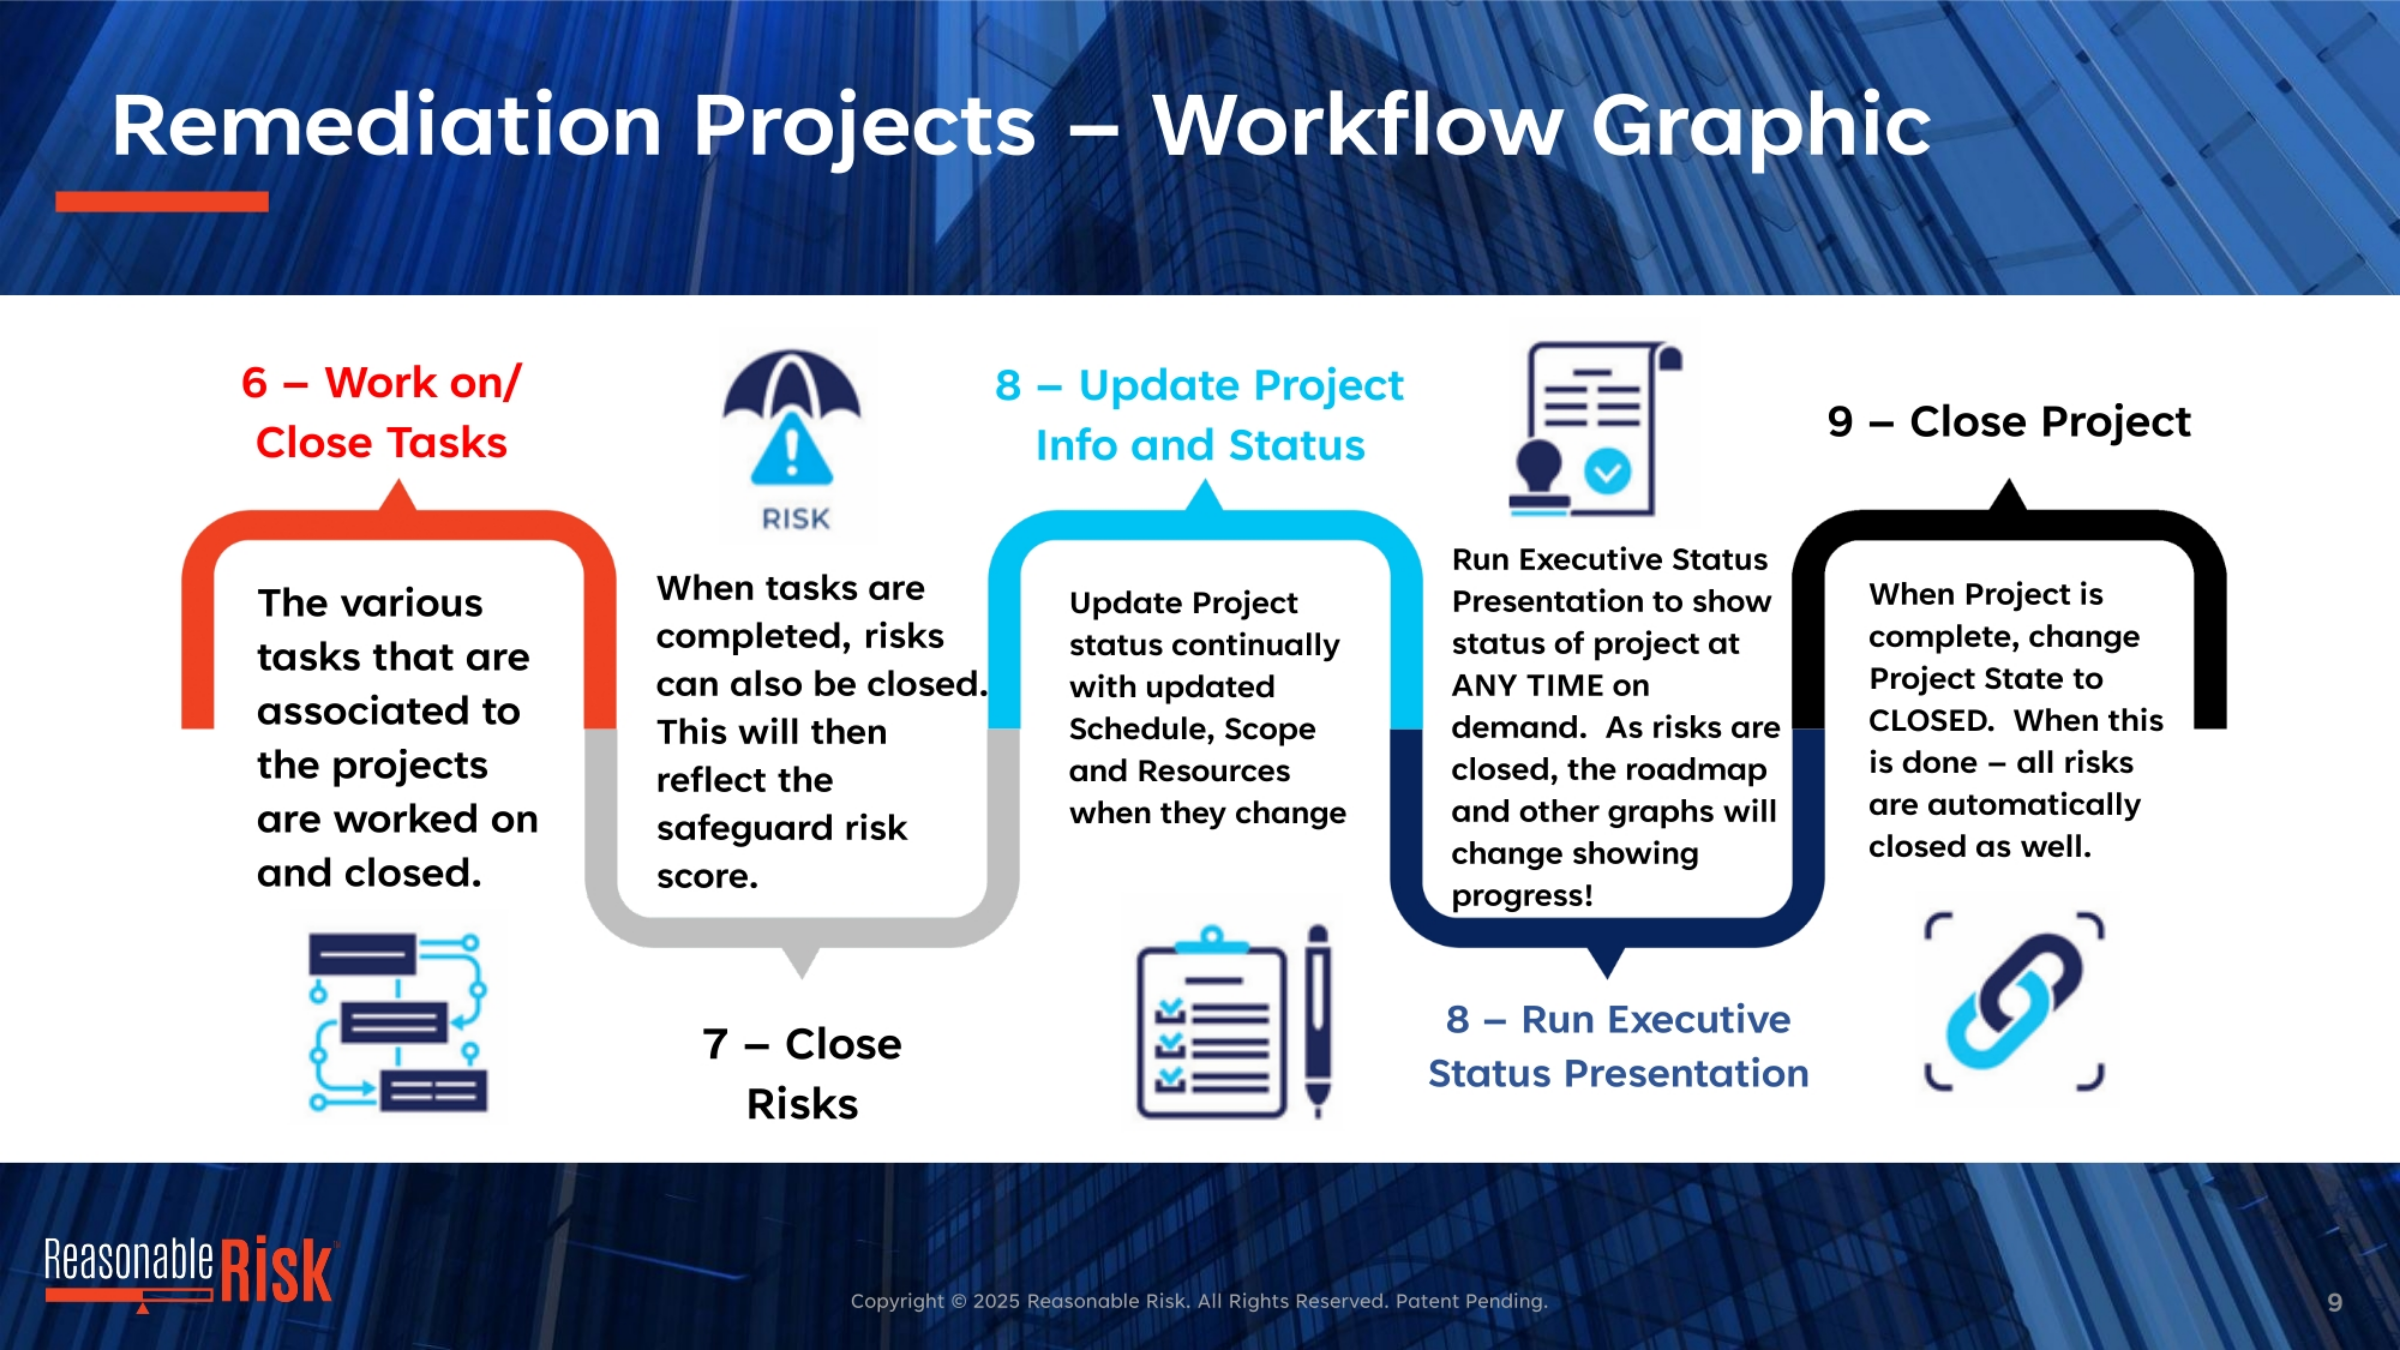
Continuing the workflow, the sixth step involves actively working on and closing the various tasks associated with the projects. As tasks are completed, the corresponding risks can also be closed, which directly impacts the safeguard risk score. Project status is continually updated with changes to the schedule, scope, and resources. Running the Executive Status Presentation allows for on-demand project status visibility, reflecting progress as risks are closed and graphs update. The final step is to close the project once all work is complete. This action automatically closes all associated risks as well, signifying successful remediation.
10. Remediation Projects Screen Narrative
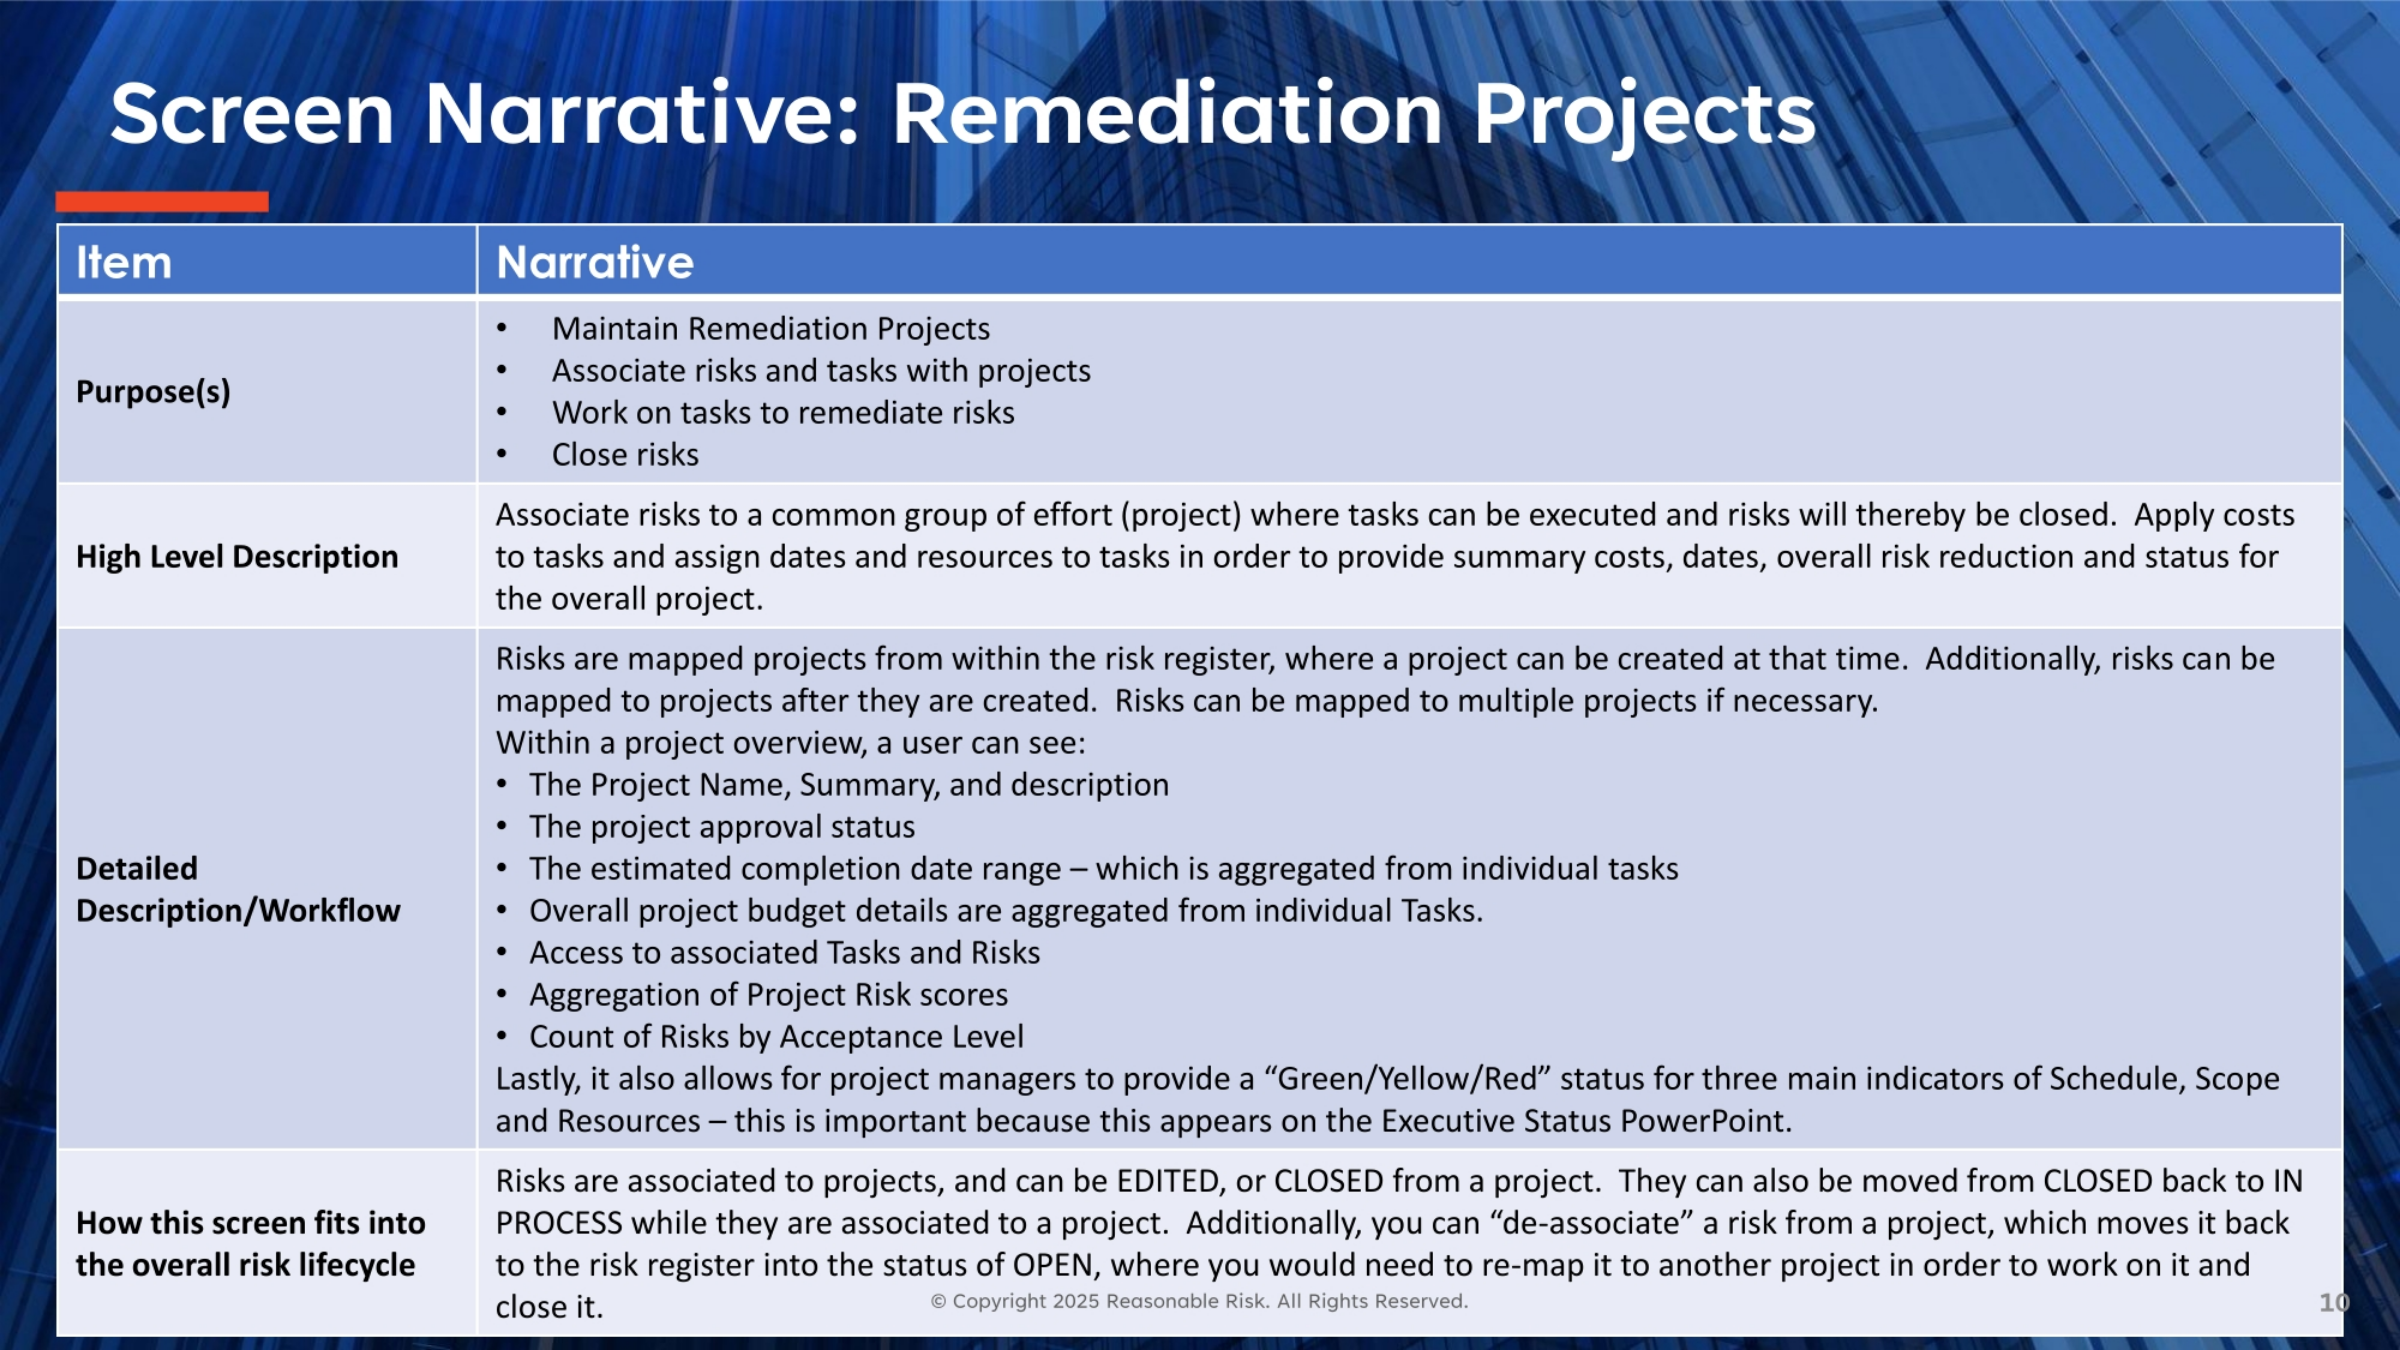
The primary purpose of this screen is to maintain remediation projects, associating risks and tasks to them, facilitating work on tasks to remediate risks, and ultimately closing risks. At a high level, it links risks to a common project effort where tasks are executed, leading to risk closure. It allows for applying costs, assigning dates, and allocating resources to tasks, providing summary costs, dates, overall risk reduction, and project status. This screen is integral to the overall risk lifecycle, enabling project managers to track progress, manage approvals, and provide status updates for executive reporting.
11. Remediation Project Overview Screen Visual
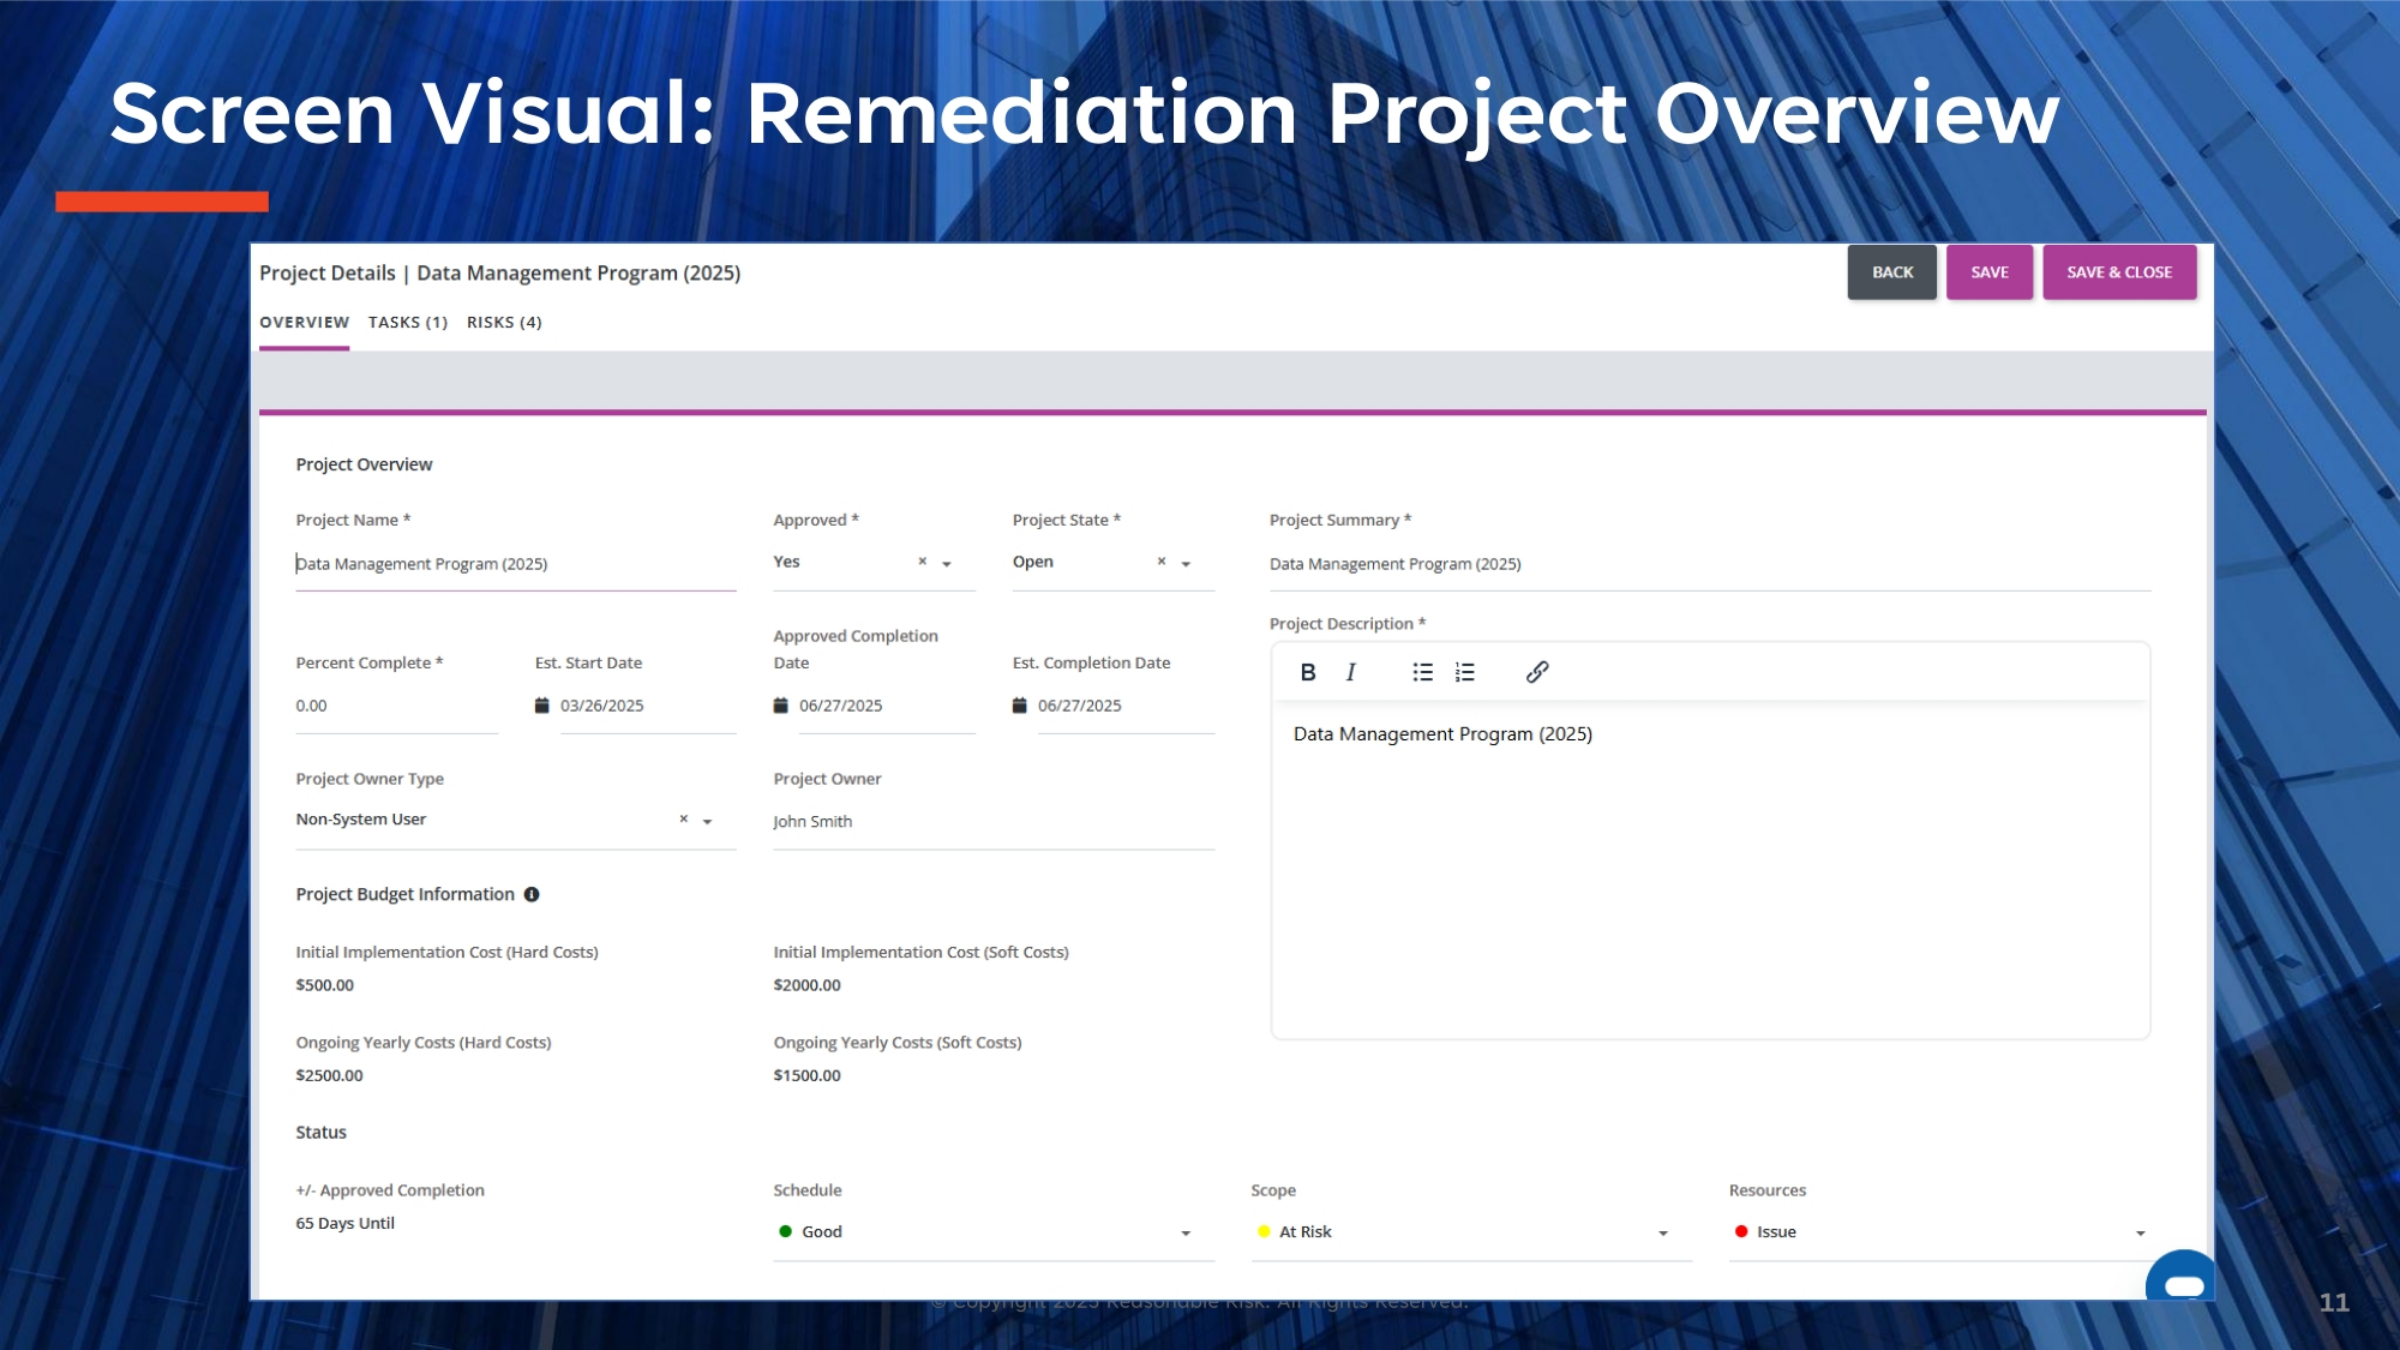
This screen visual provides a detailed overview of a remediation project, specifically the 'Data Management Program (2025)'. Key fields include the project name, its approval status, and current state, whether open or closed. We can see the project summary and a detailed description. Important dates such as the estimated start and completion dates, along with the approved completion date, are clearly displayed. Budget information, including initial and ongoing hard and soft costs, is aggregated. The status section visually indicates the schedule, scope, and resources, using indicators like 'Good,' 'At Risk,' or 'Issue' to provide a quick health check.
12. Project Overview Fields: Part 1
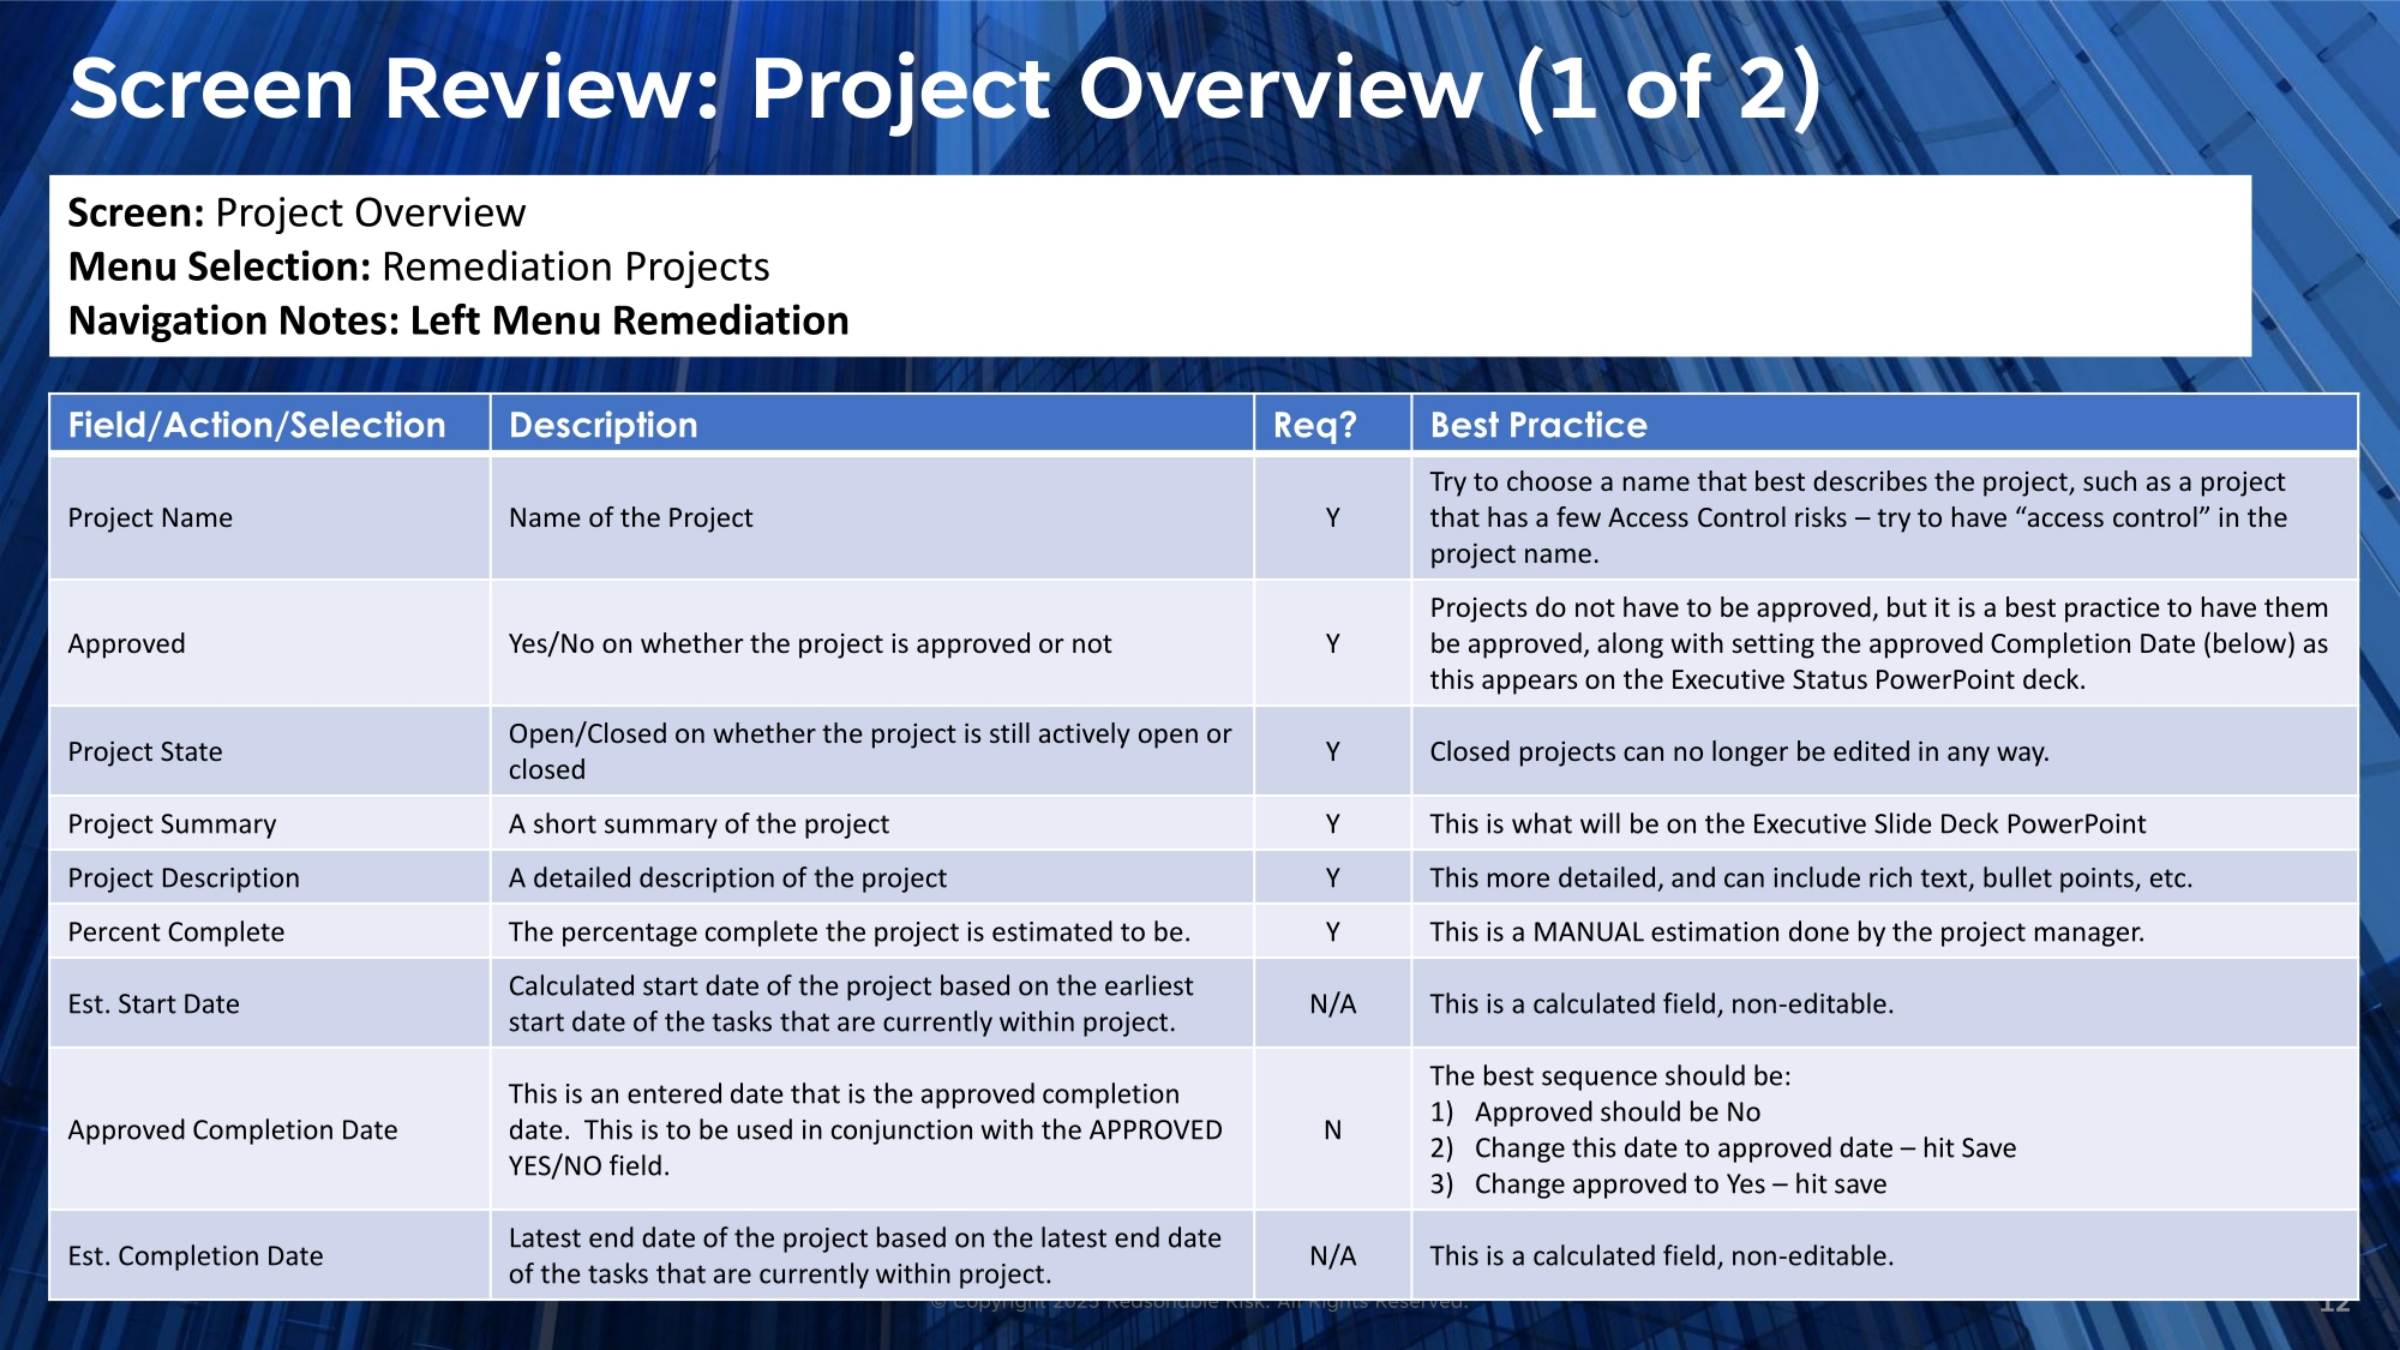
Let's review the Project Overview fields. The 'Project Name' should clearly describe the project, often including keywords like 'Access Control' if relevant. The 'Approved' field indicates whether the project has received formal approval, a best practice for executive status. 'Project State' defines if a project is 'Open' or 'Closed,' with closed projects becoming uneditable. The 'Project Summary' provides a concise overview for executive slide decks, while the 'Project Description' offers more detailed information. 'Percent Complete' is a manual estimate. 'Est. Start Date' and 'Est. Completion Date' are calculated fields based on tasks, while 'Approved Completion Date' is an entered date linked to project approval.
13. Project Overview Fields: Part 2
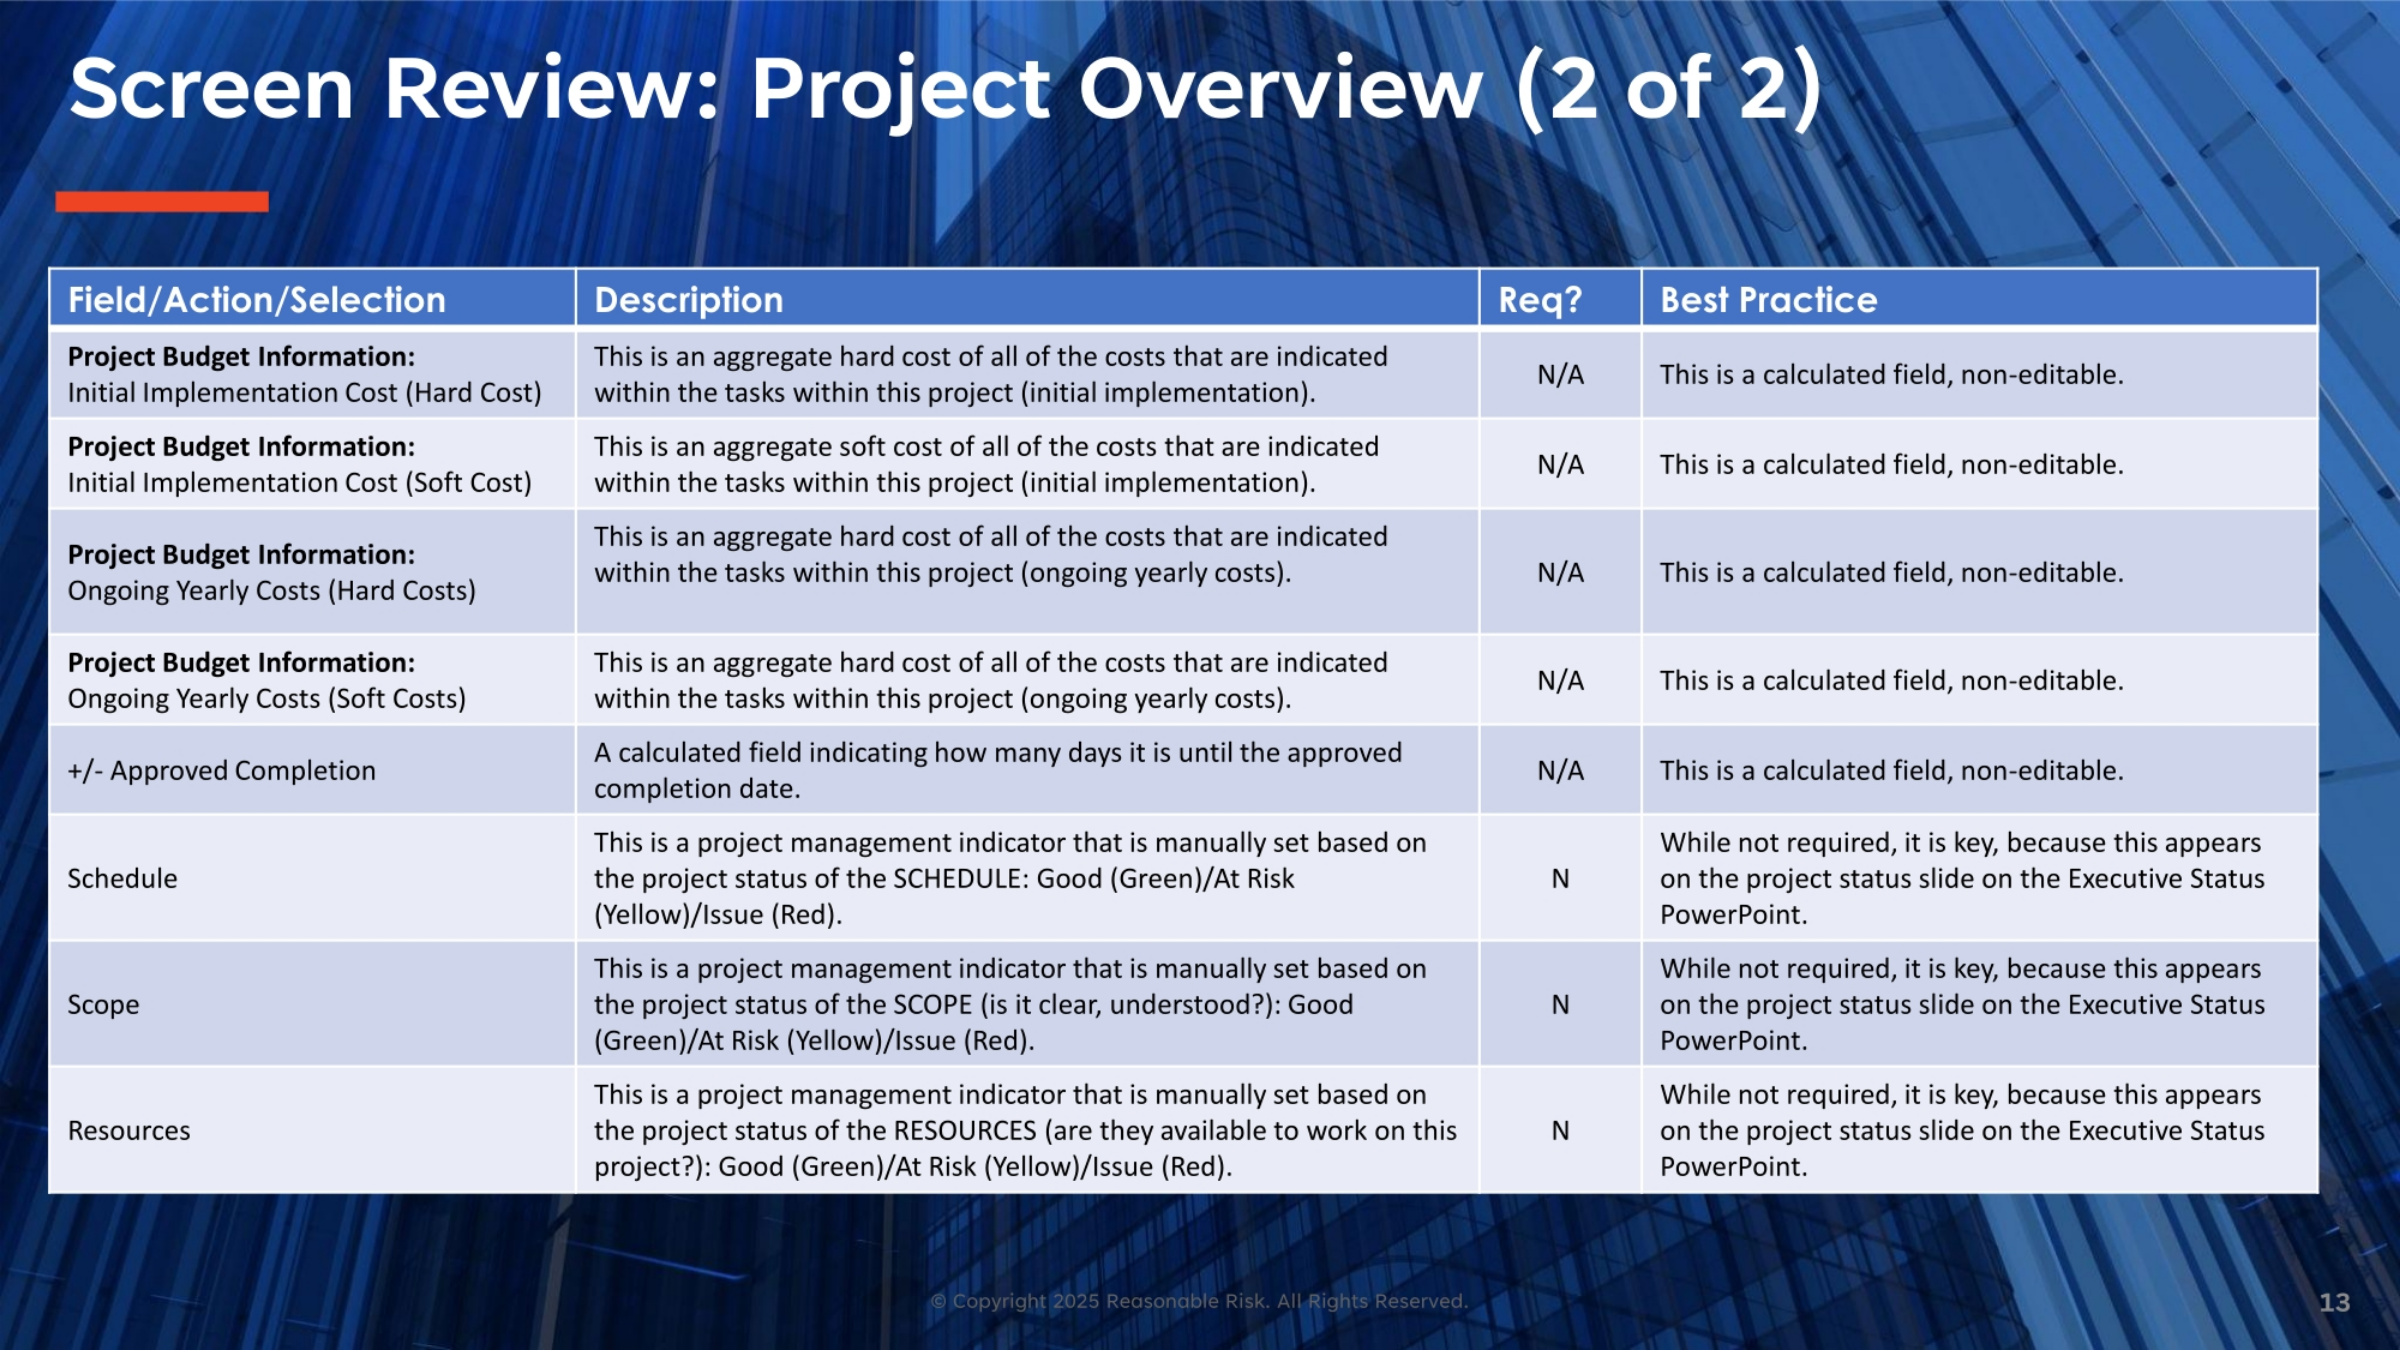
Continuing our review of the Project Overview, the budget information fields, including 'Initial Implementation Cost' and 'Ongoing Yearly Costs' for both hard and soft costs, are all calculated aggregate fields derived from the tasks within the project. These fields are non-editable directly. The '+/- Approved Completion' field is also calculated, showing the number of days until the approved completion date. Finally, the 'Schedule,' 'Scope,' and 'Resources' indicators are manually set by the project manager. These are crucial for providing a 'Good,' 'At Risk,' or 'Issue' status, as they appear prominently on the Executive Status PowerPoint slide, offering a quick visual health check of the project.
14. Advanced Project Types: Common Security & Framework
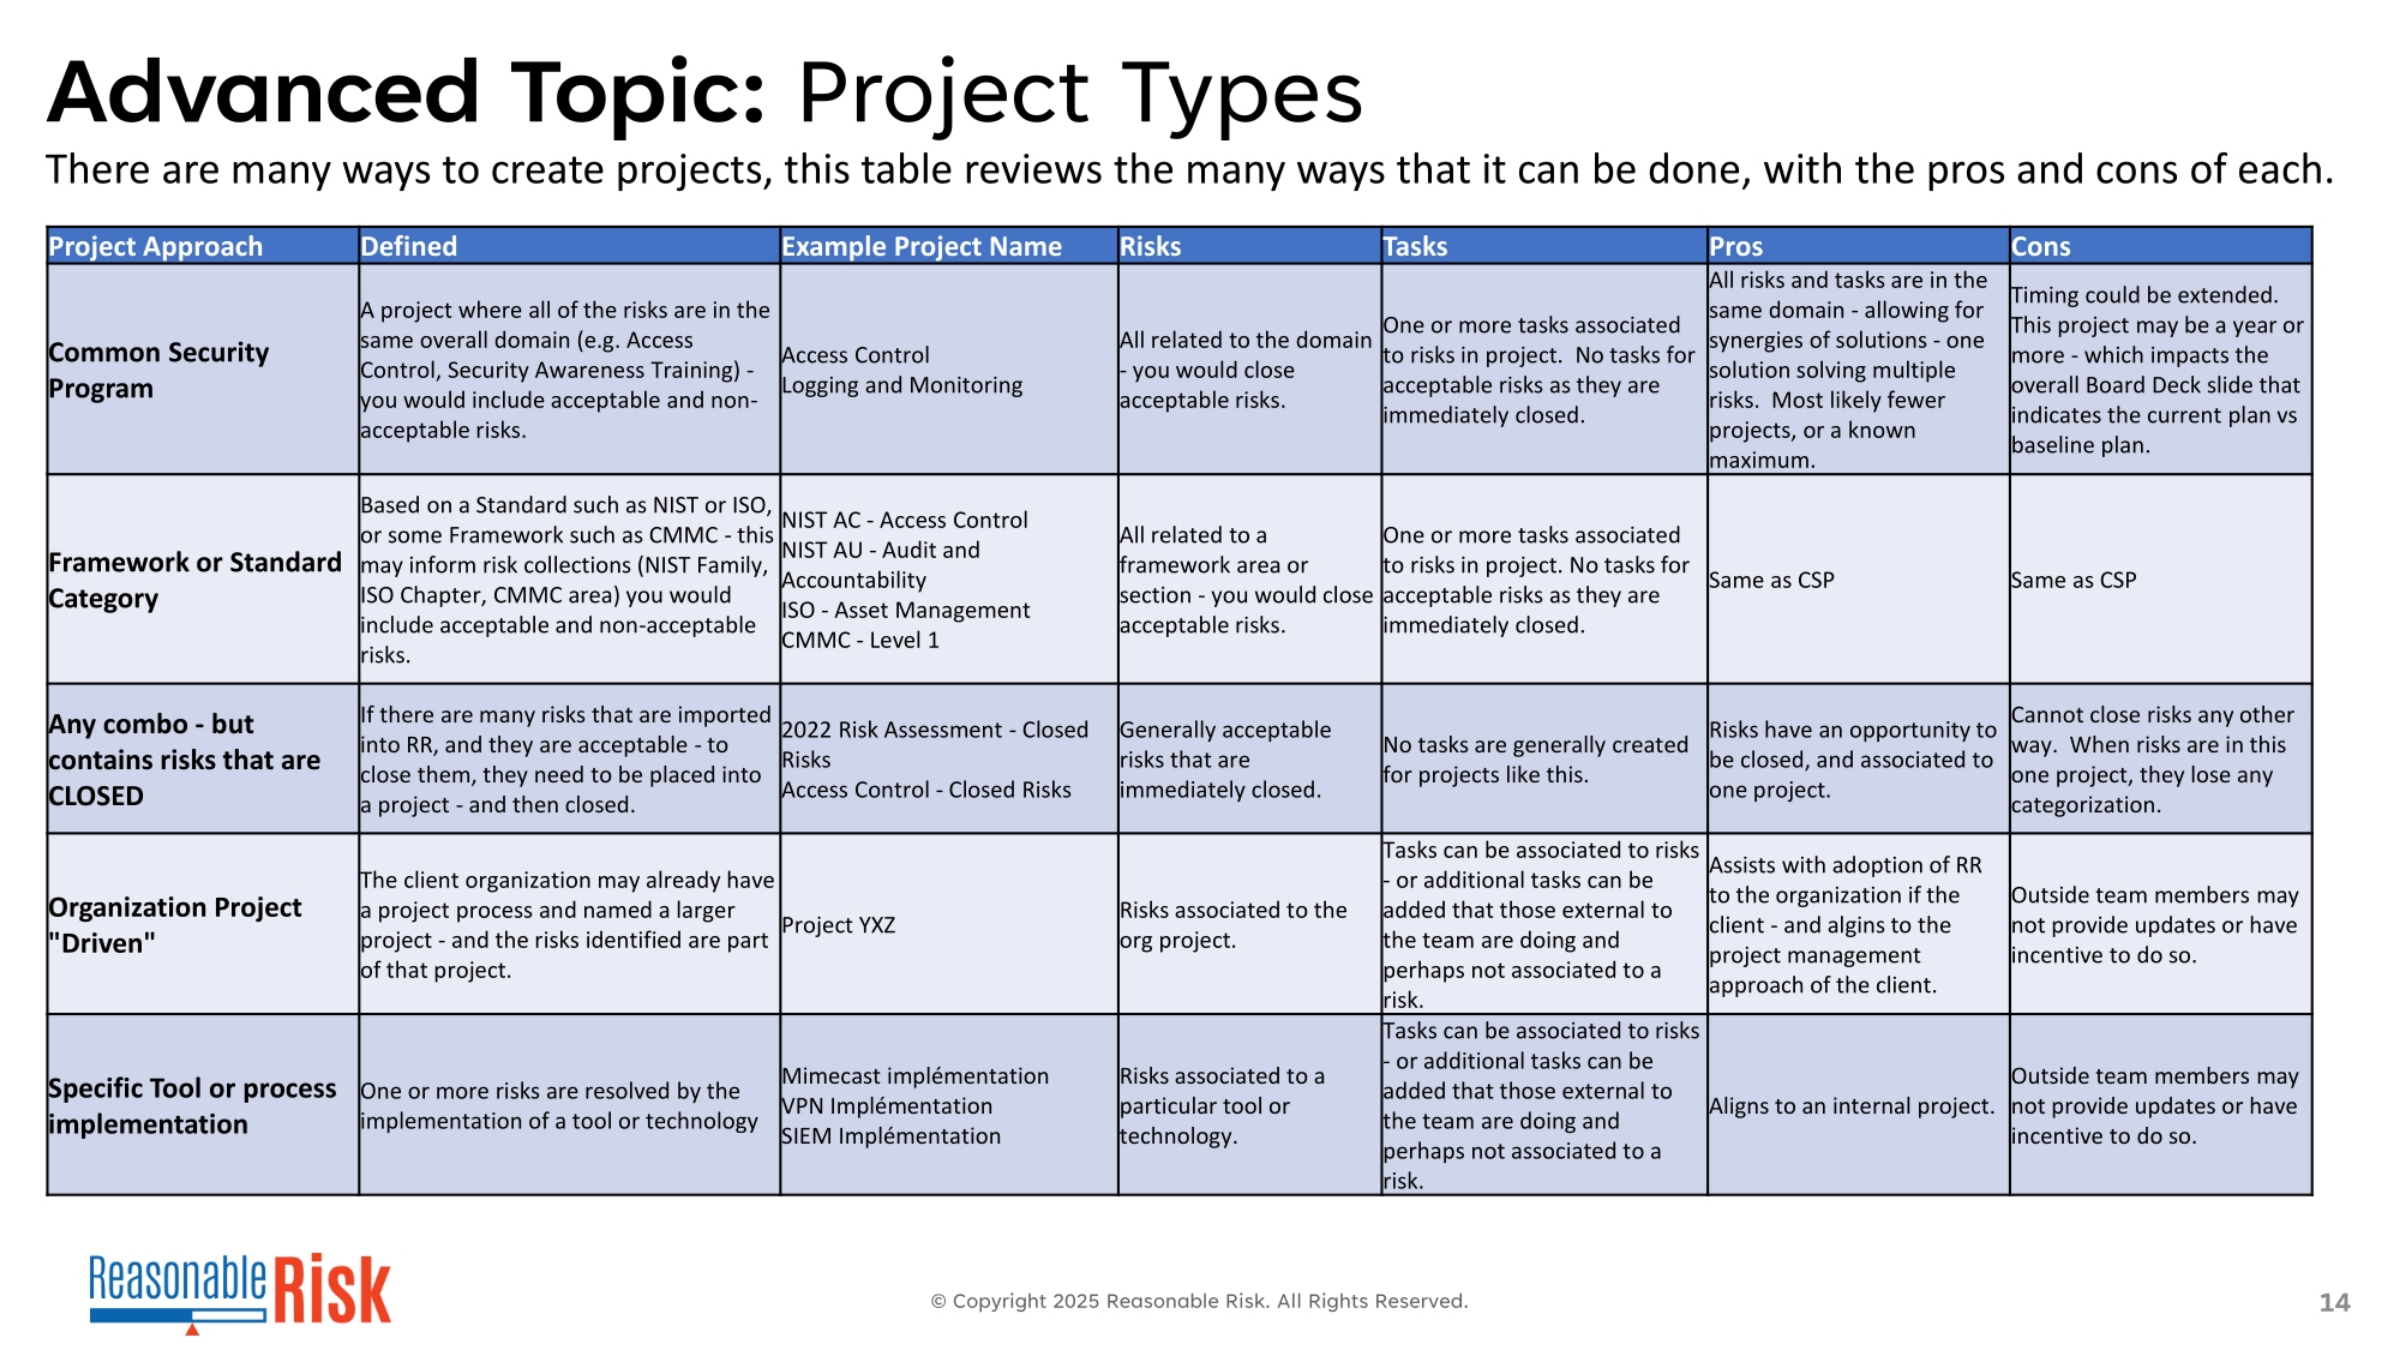
There are various approaches to creating projects. The 'Common Security Program' approach groups all risks within a single domain, like Access Control, allowing for synergistic solutions. While efficient, it can extend timing. The 'Framework or Standard Category' method aligns projects with standards such as NIST or ISO, similarly grouping related risks. For risks imported into Reasonable Risk that are already acceptable, the 'Any Combo - Closed Risks' approach allows them to be closed by placing them in a project. Lastly, 'Organization Project Driven' projects integrate risks into existing client project structures, aligning with their project management approach, though external team member updates might be a challenge.
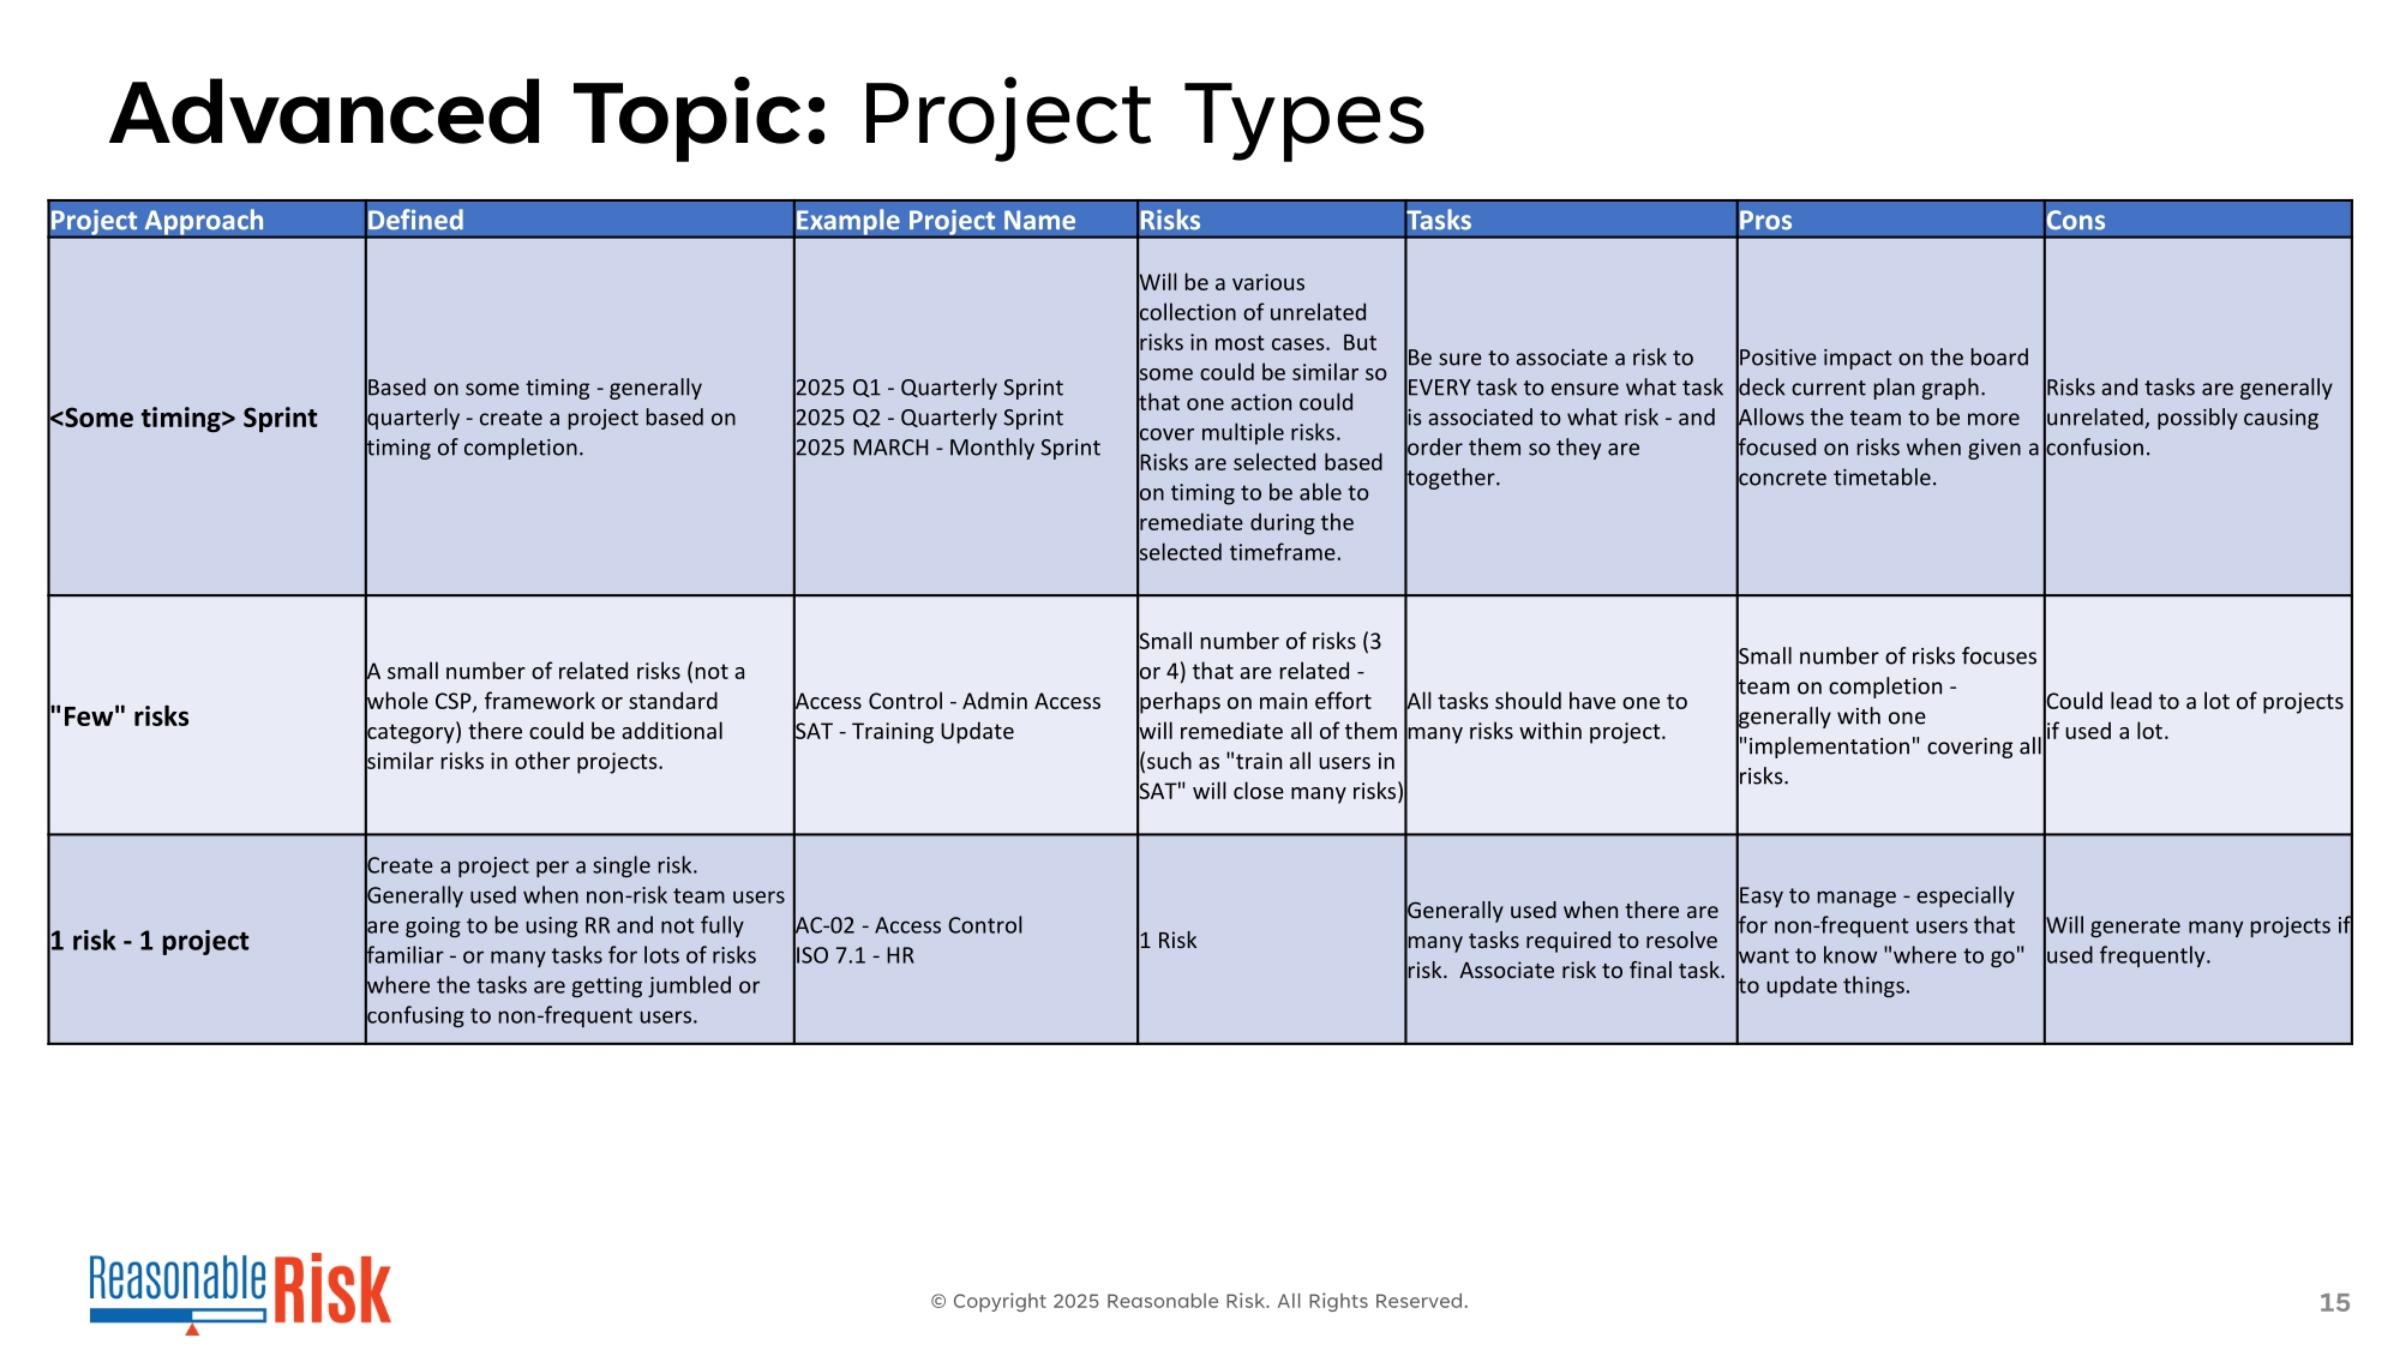
15. Advanced Project Types: Timing, Few Risks, One-to-One
Further project types include '
16. Advanced Project Types: Tickets, Risk Score, Owner
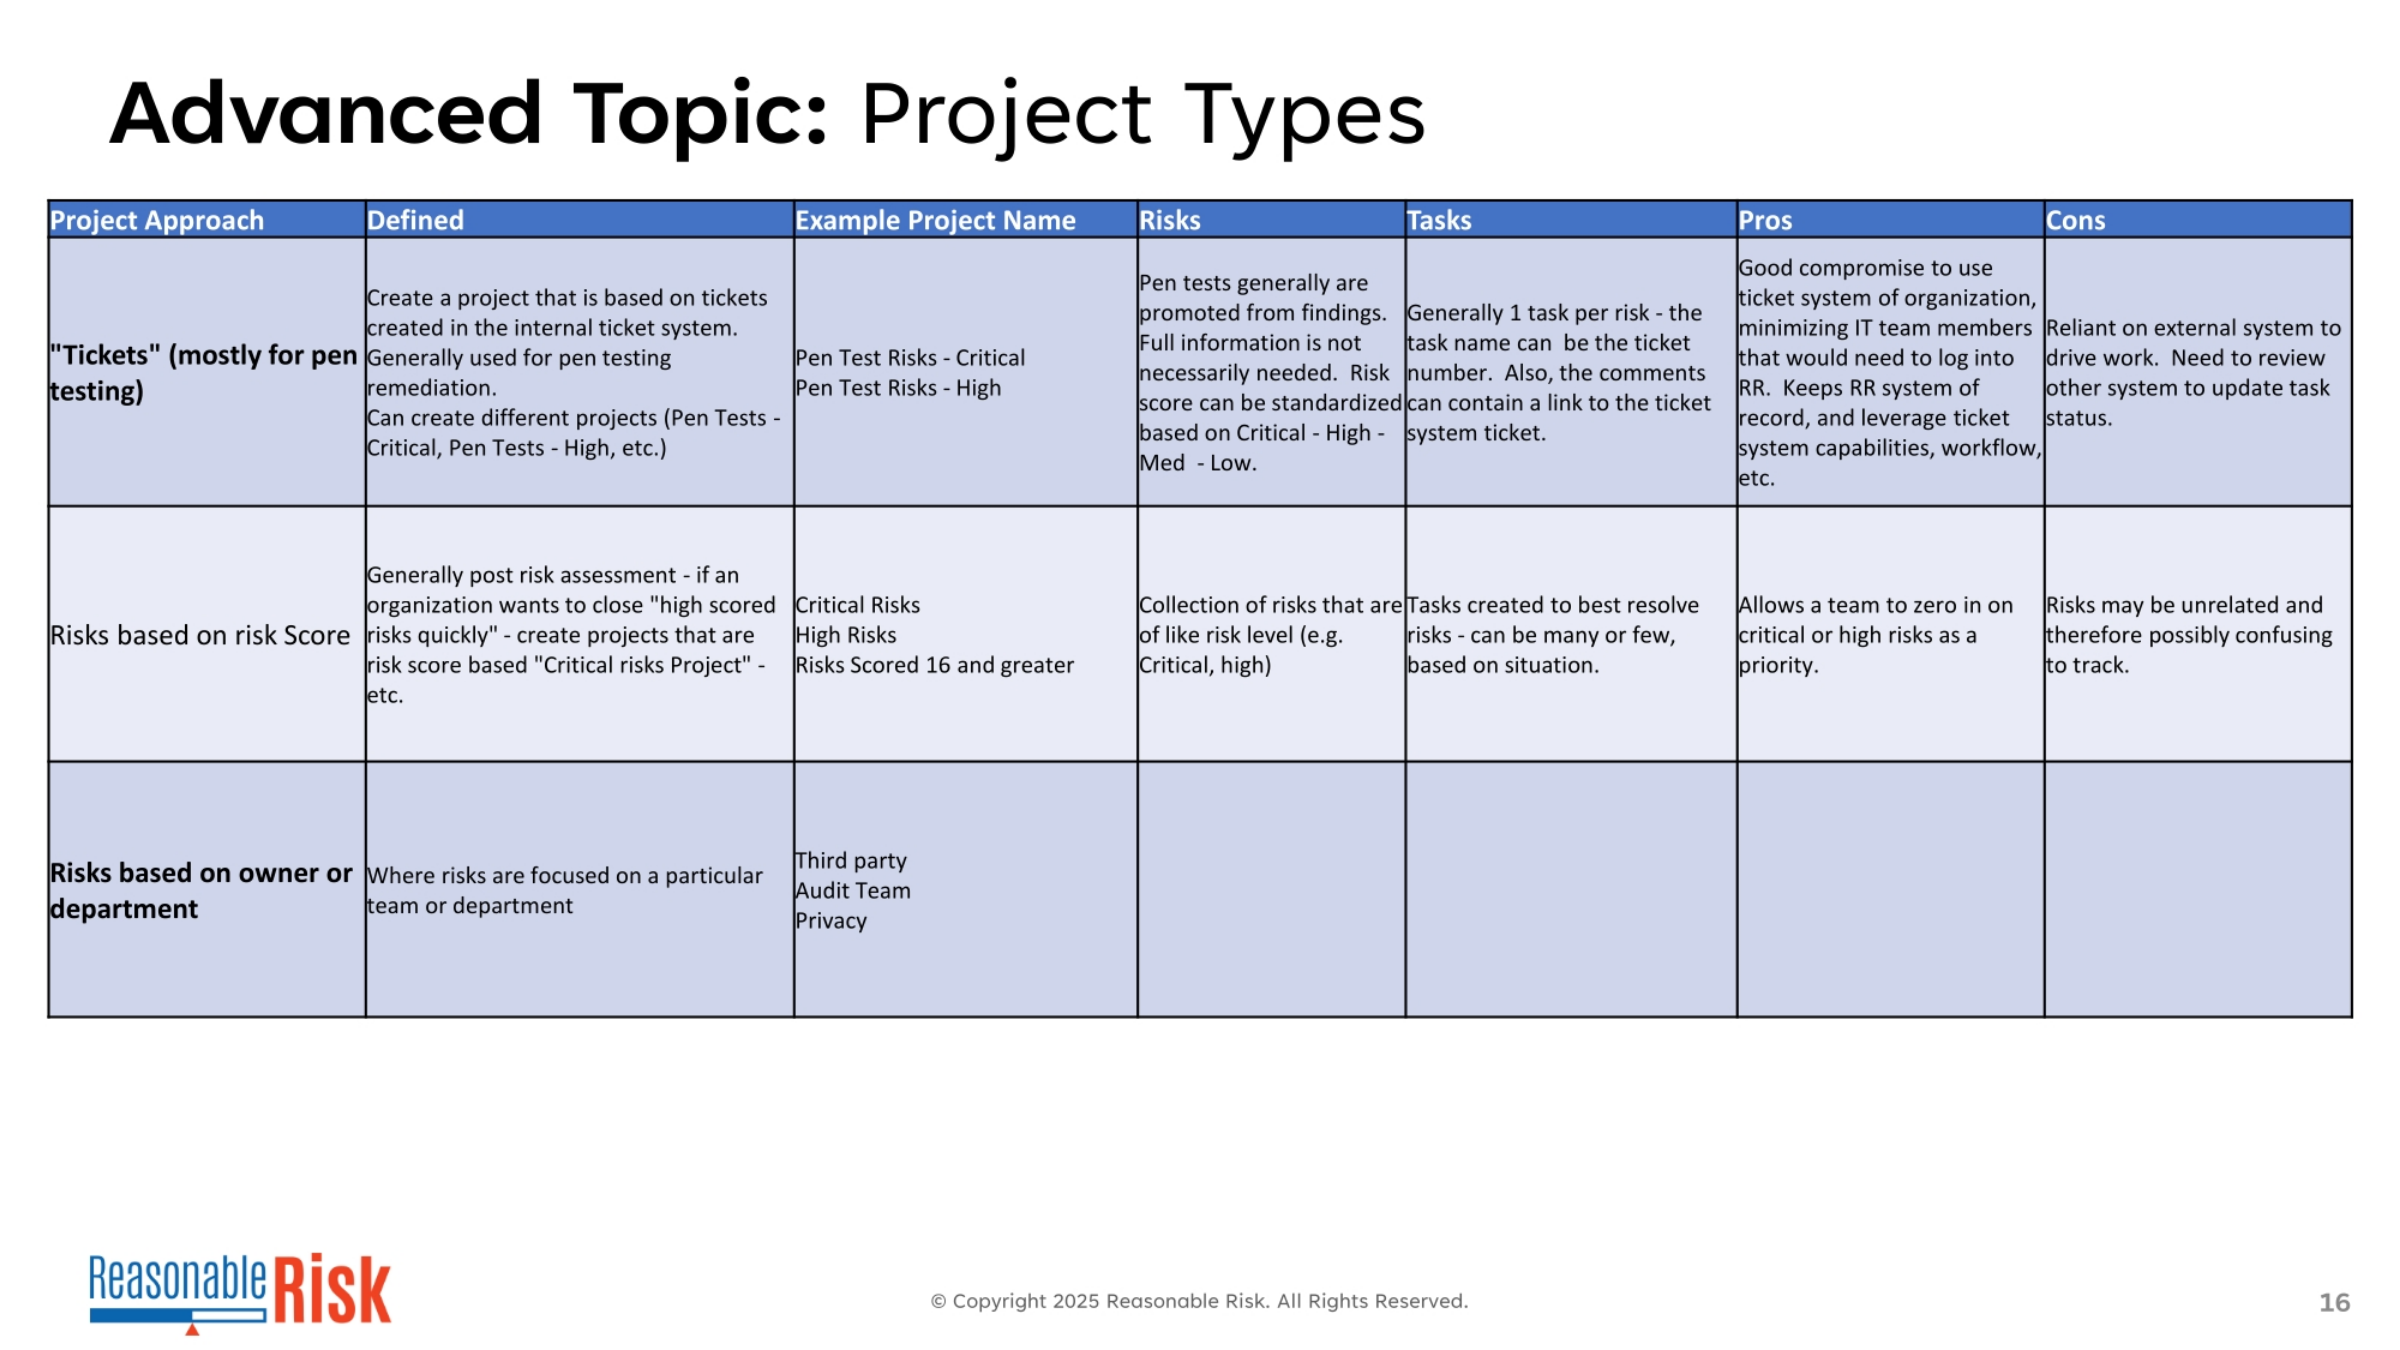
Rounding out our project types, 'Tickets' are projects based on internal ticket system entries, primarily for pen testing remediation. This approach leverages existing ticket system capabilities, minimizing the need for IT teams to log into Reasonable Risk, but relies on external systems for status updates. 'Risks based on risk Score' projects are created to quickly close high-scored risks, allowing teams to prioritize critical issues. However, risks within these projects might be unrelated, making tracking potentially confusing. Finally, 'Risks based on owner or department' focuses projects on specific teams or departments, such as a Third-Party Audit Team or Privacy team, streamlining accountability.
17. Remediation Project Filter and List Narrative
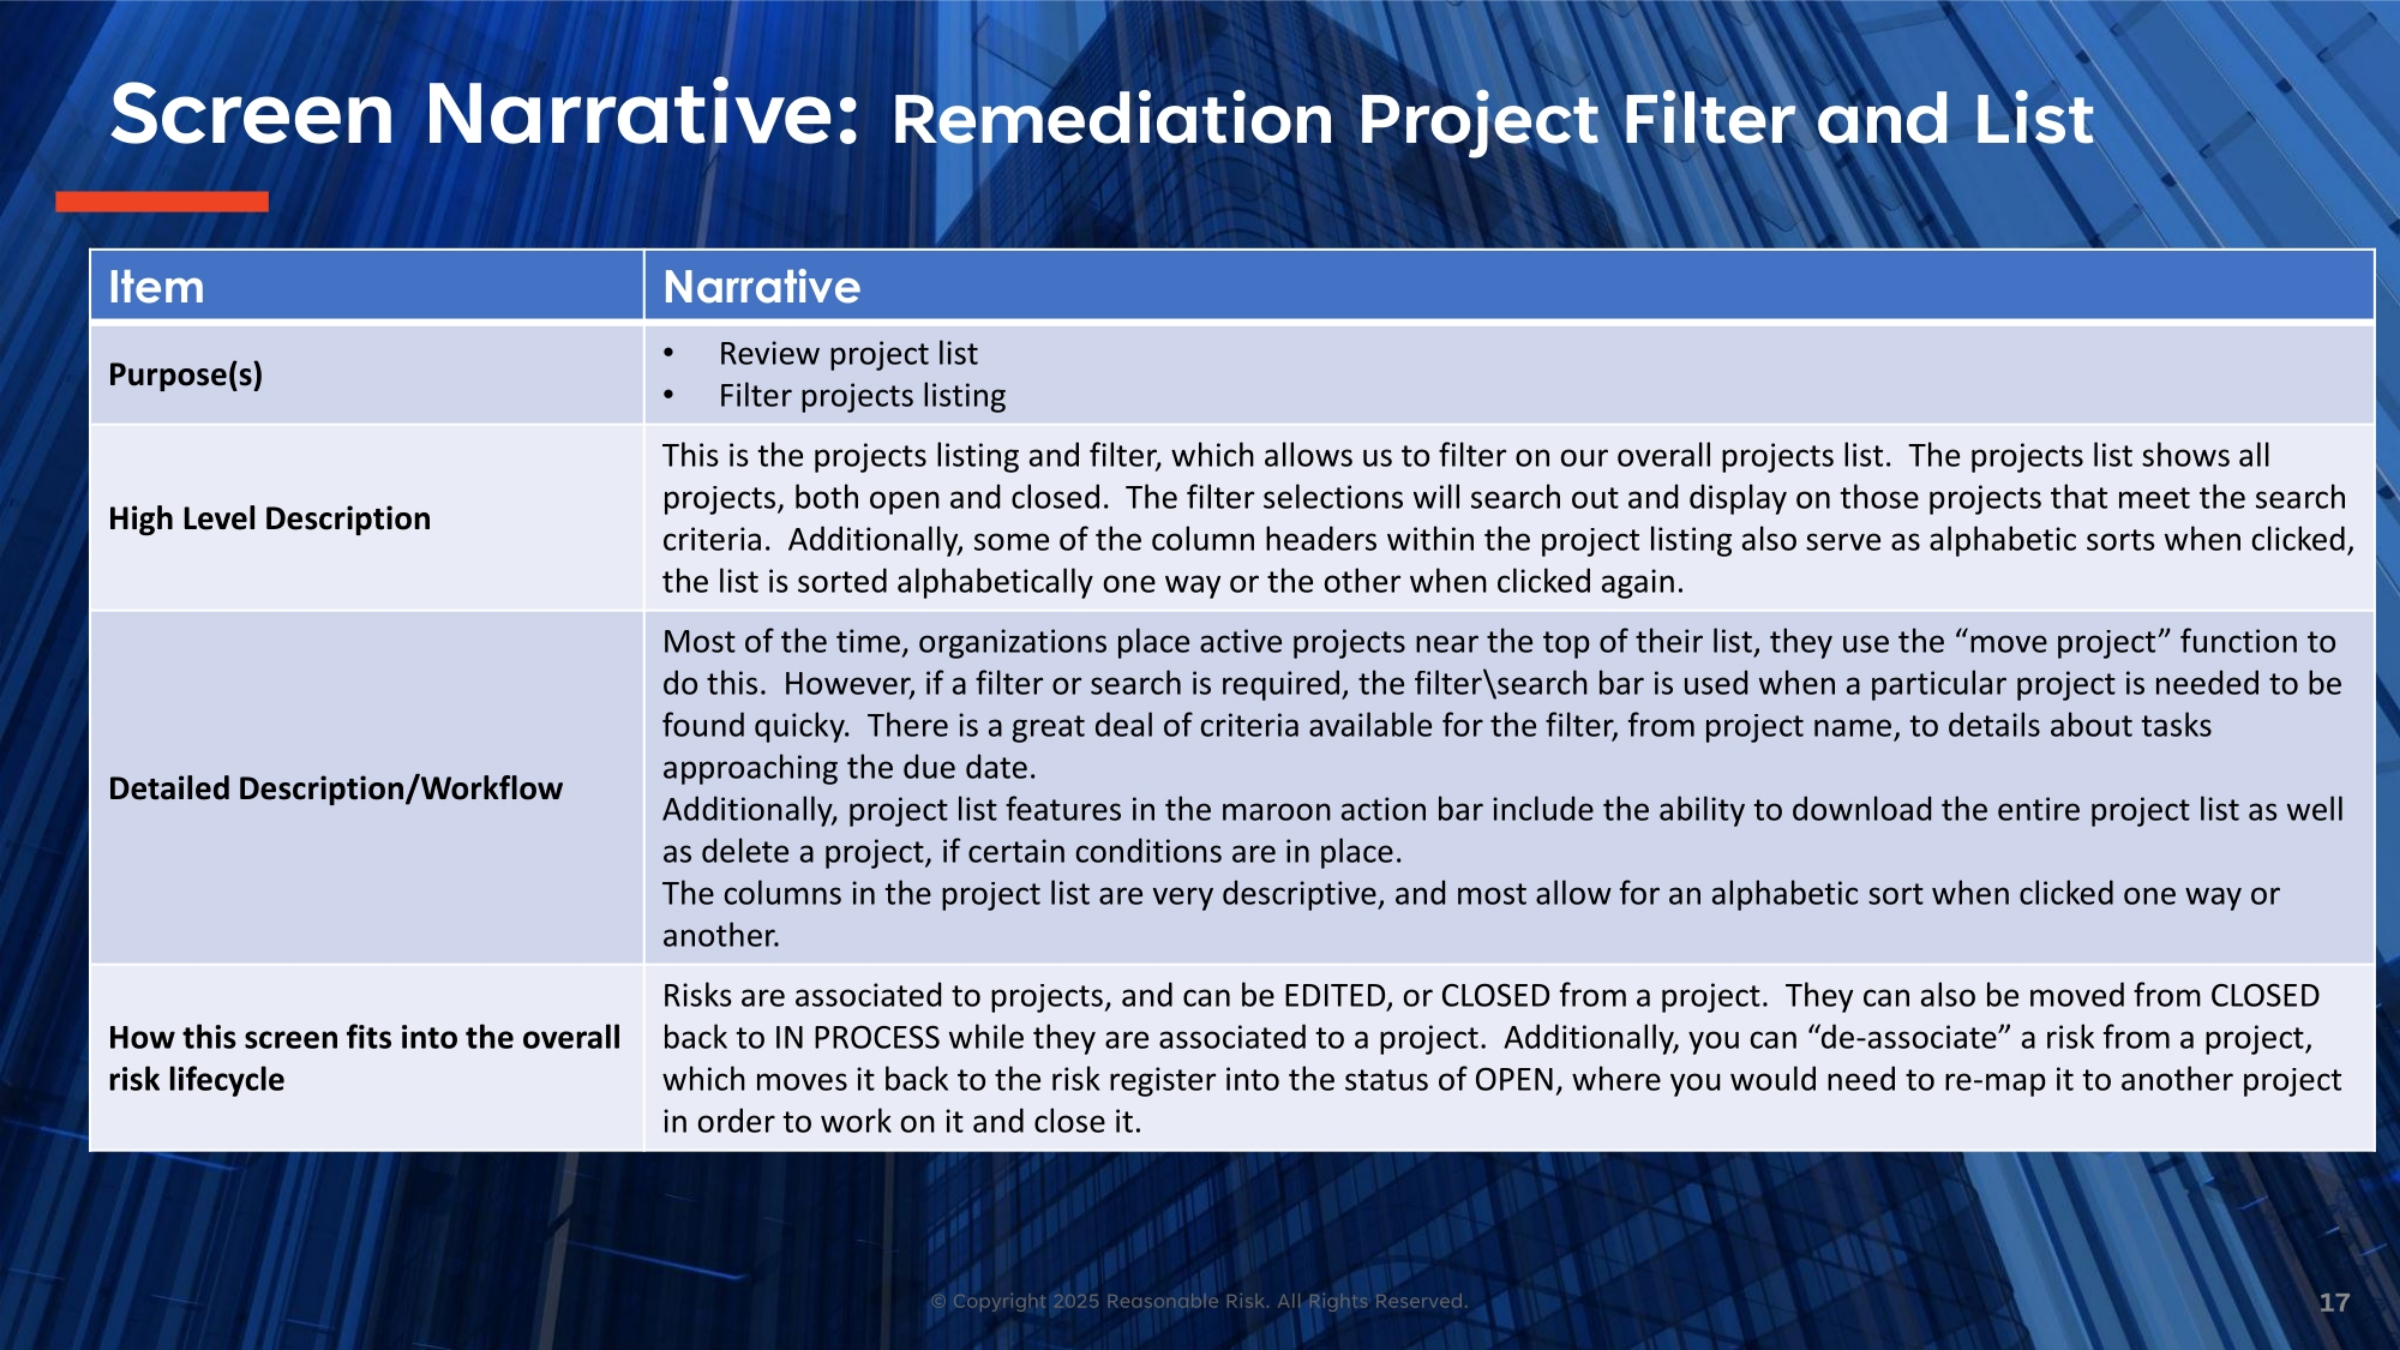
This screen offers a comprehensive listing and filtering capability for all remediation projects, both open and closed. Users can filter and search based on various criteria, including project name and task due dates, to quickly locate specific projects. Column headers also function as alphabetical sorts, enhancing navigation. Organizations often use the 'move project' function to prioritize active projects. The action bar provides features like downloading the project list or deleting projects under specific conditions. This screen is crucial for managing risks throughout their lifecycle, allowing projects to be edited, closed, or even de-associated and returned to an open status in the risk register for re-mapping.
18. Remediation Project Filter Fields
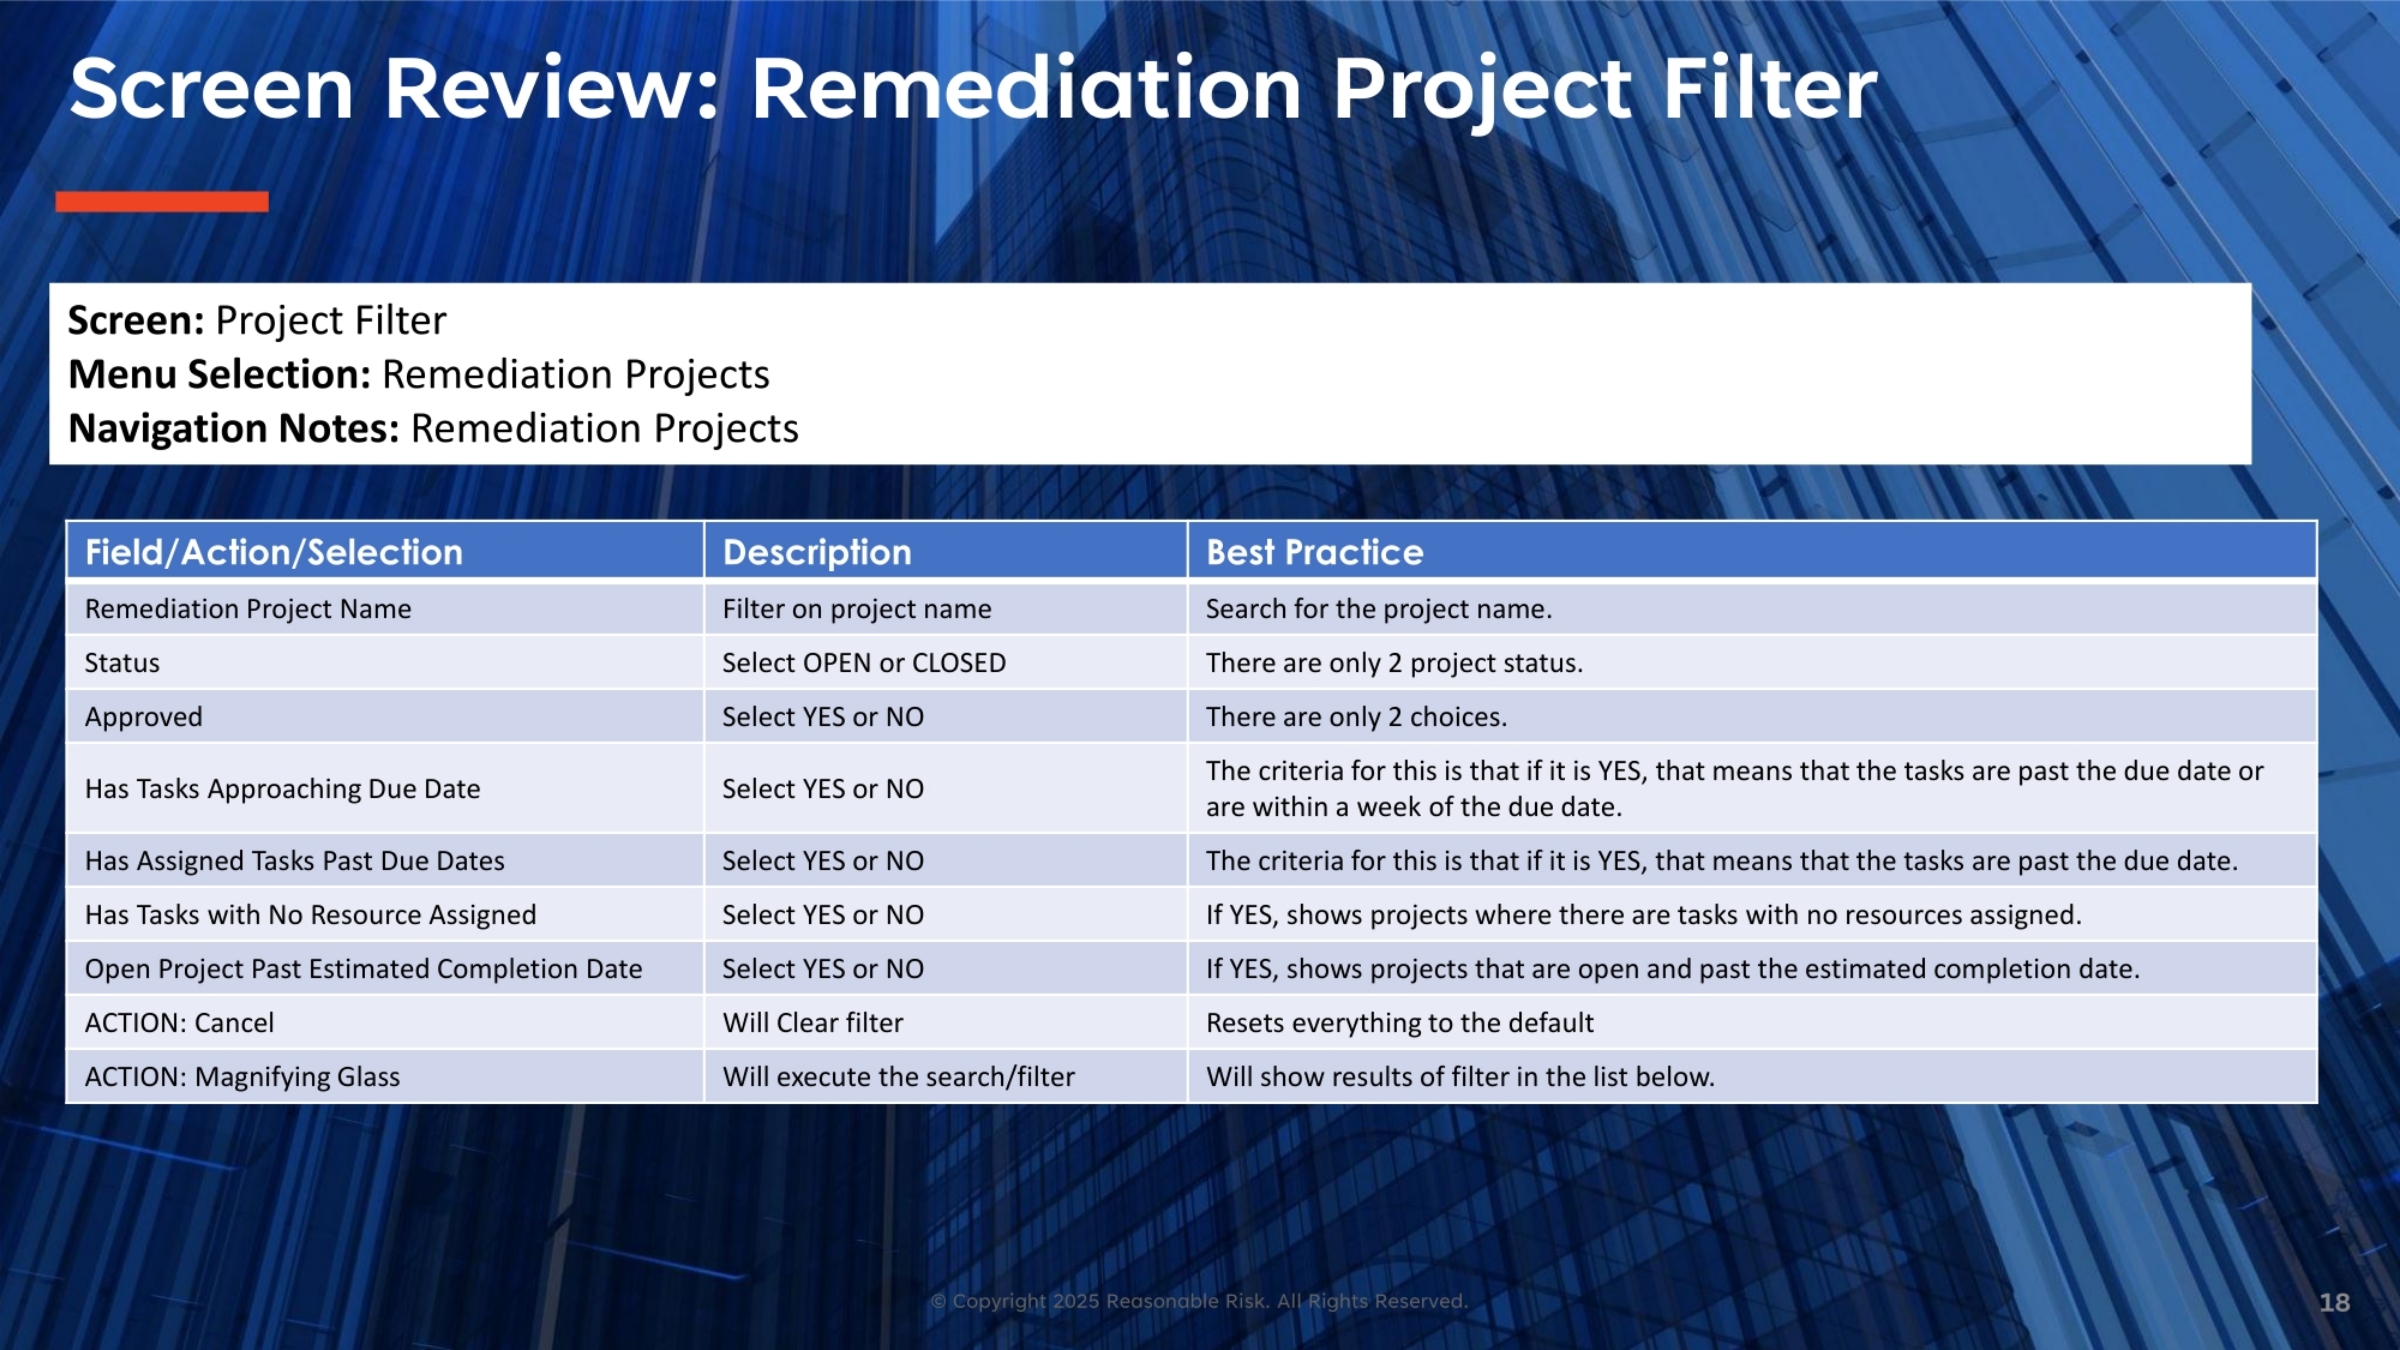
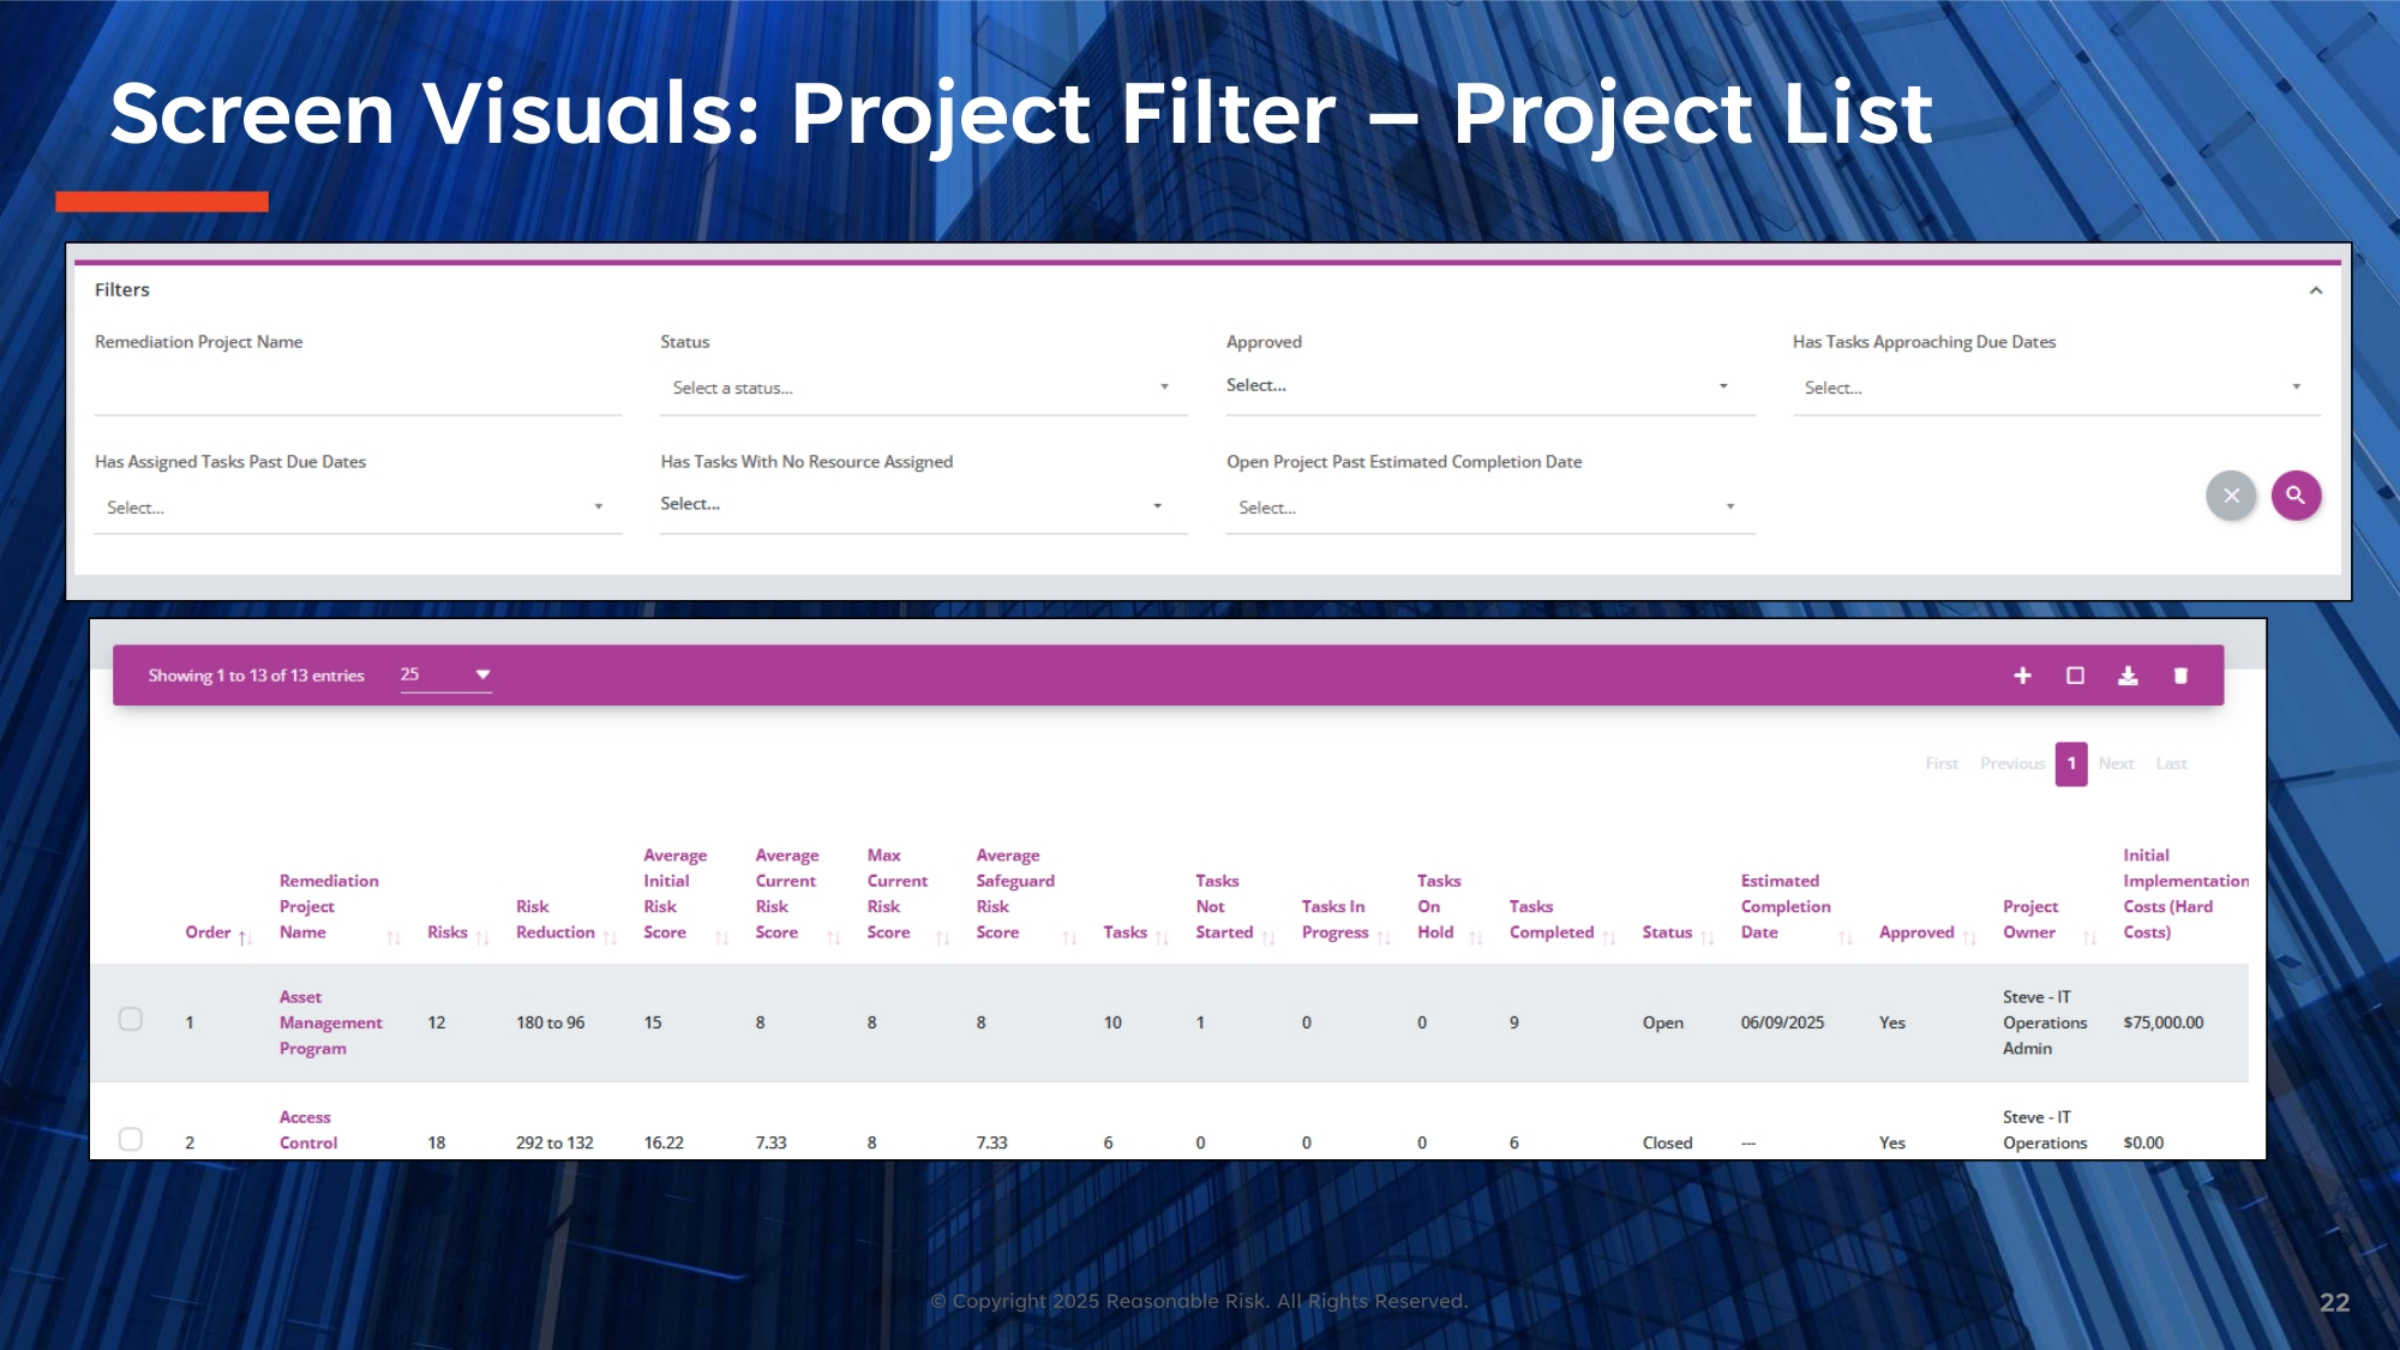
Let's review the Remediation Project Filter fields. You can filter by 'Remediation Project Name' to search for specific projects. The 'Status' field allows selection between 'OPEN' or 'CLOSED' projects, while 'Approved' offers 'YES' or 'NO' choices. Crucially, filters like 'Has Tasks Approaching Due Date' and 'Has Assigned Tasks Past Due Dates' help identify projects with urgent or overdue tasks. 'Has Tasks with No Resource Assigned' highlights unallocated work, and 'Open Project Past Estimated Completion Date' shows delayed projects. The 'Cancel' action clears all filters, and the 'Magnifying Glass' executes the search, displaying results in the list below.
19. Project Action Bar and List: Part 1
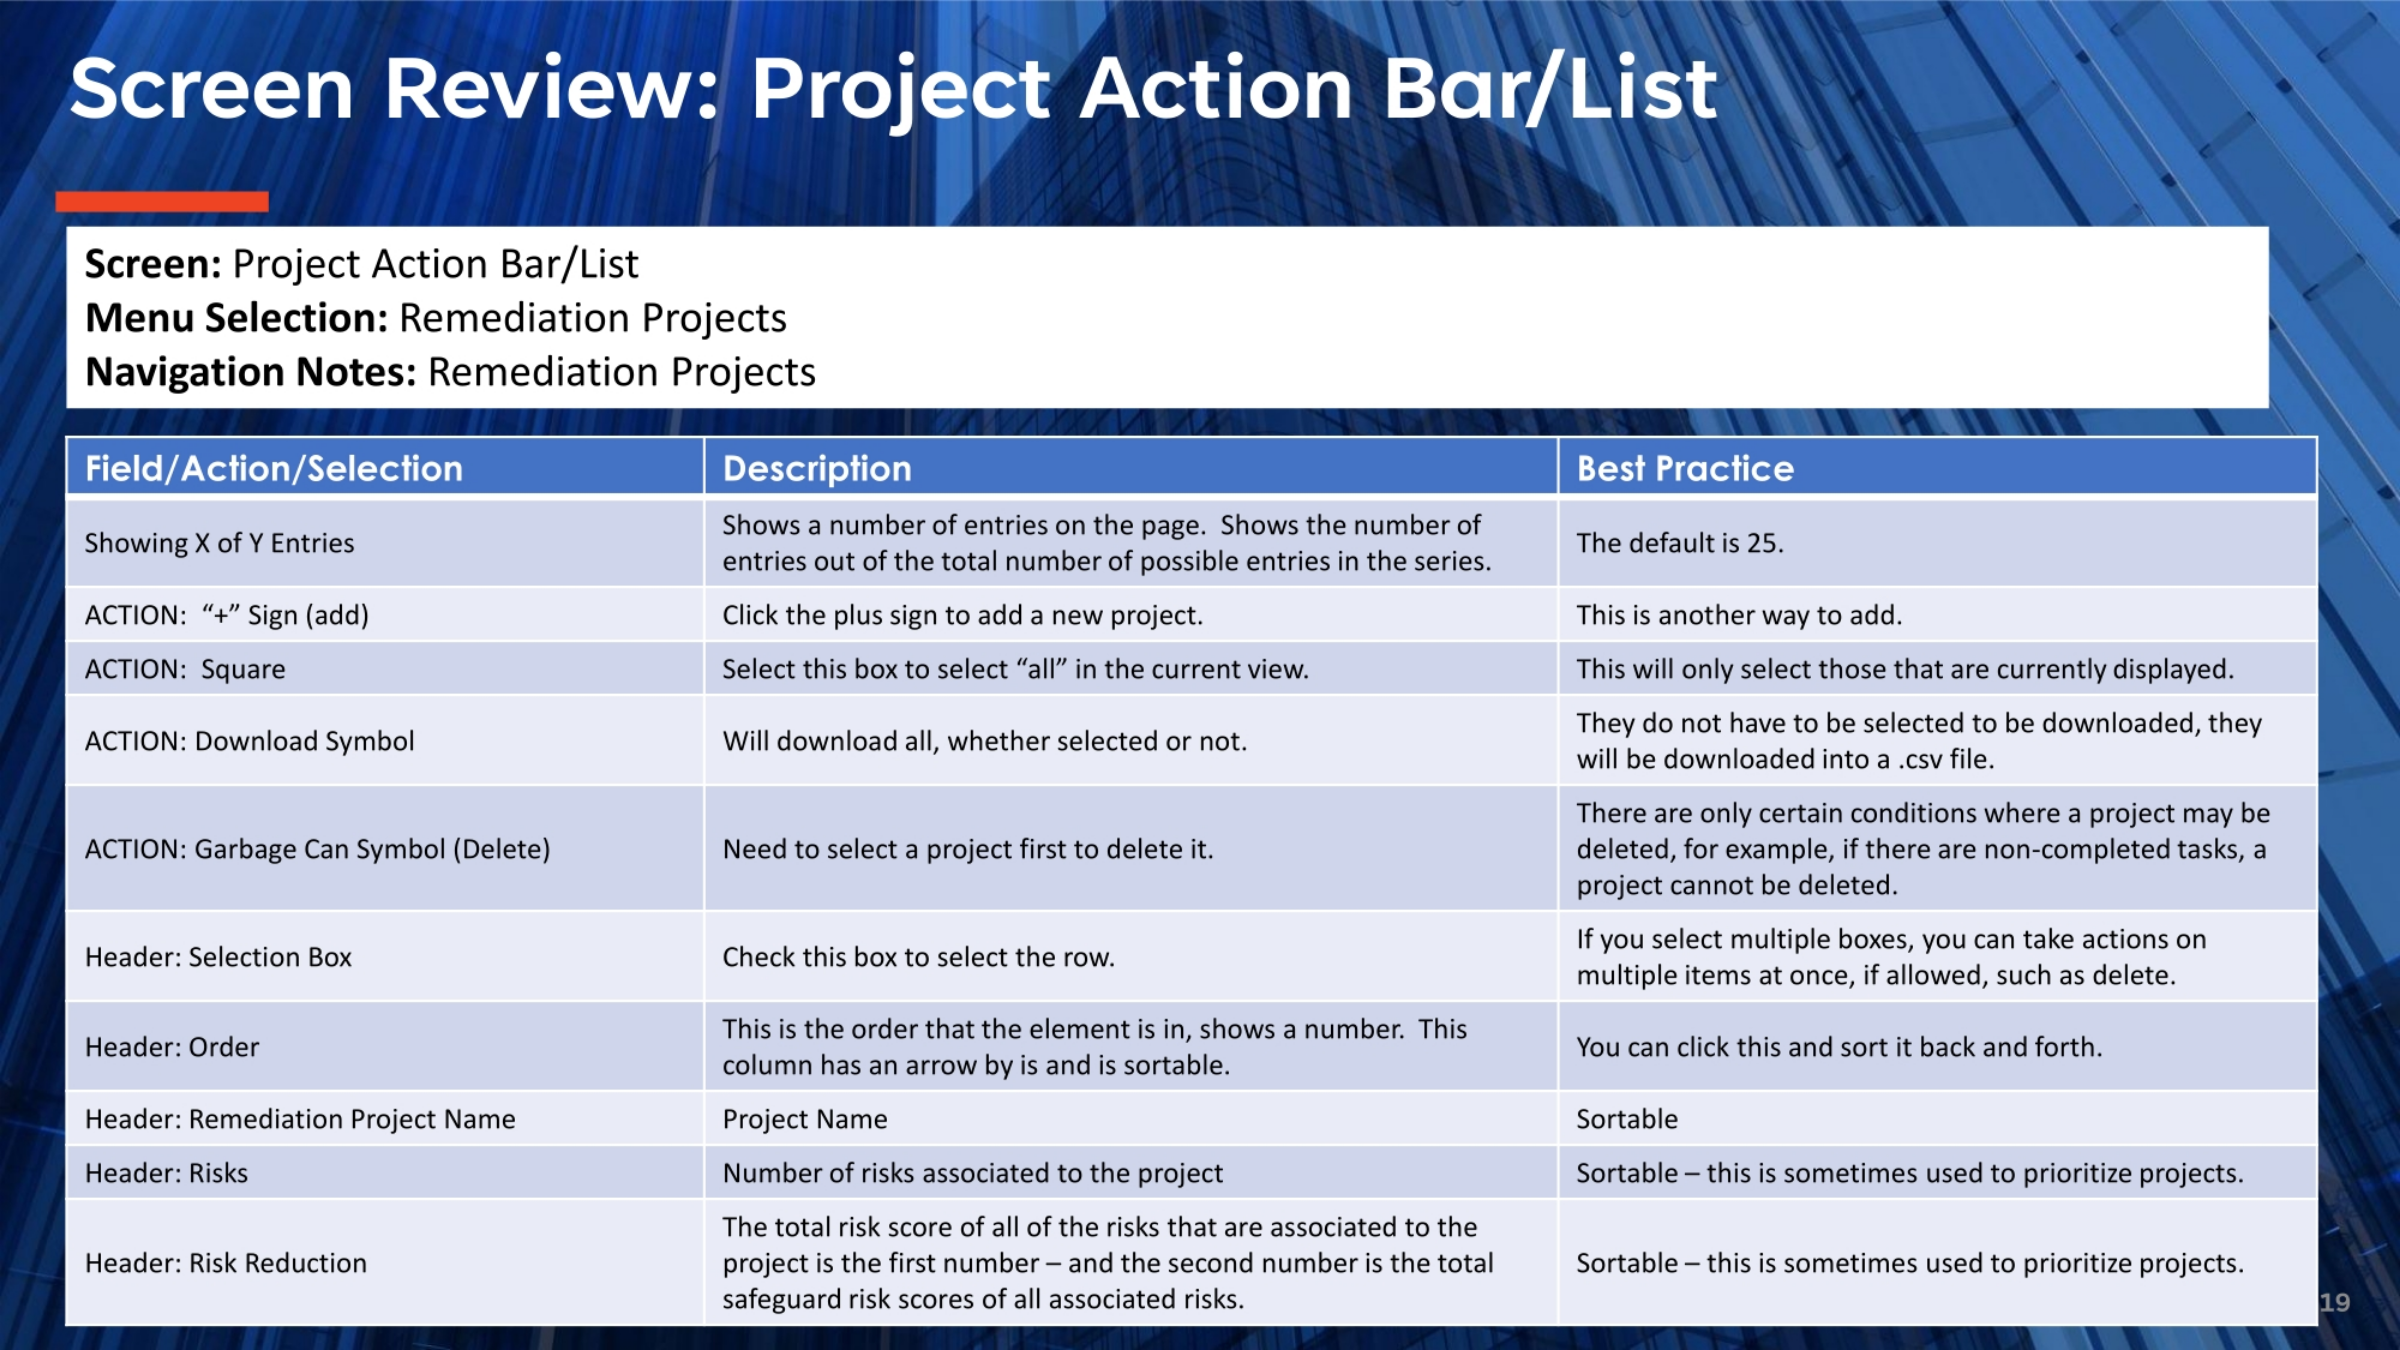
The Project Action Bar and List provide essential functionalities for managing projects. The 'Showing X of Y Entries' indicates the number of projects displayed. The '+' sign allows for adding new projects, while the 'Square' icon selects all currently displayed entries. The 'Download Symbol' enables downloading all projects into a CSV file, regardless of selection. The 'Garbage Can Symbol' facilitates project deletion, though only under specific conditions, such as the absence of non-completed tasks. The 'Selection Box' allows for individual row selection, enabling actions on multiple items. Headers like 'Order,' 'Remediation Project Name,' 'Risks,' and 'Risk Reduction' are all sortable, often used for prioritizing projects.
20. Project Action Bar and List: Part 2
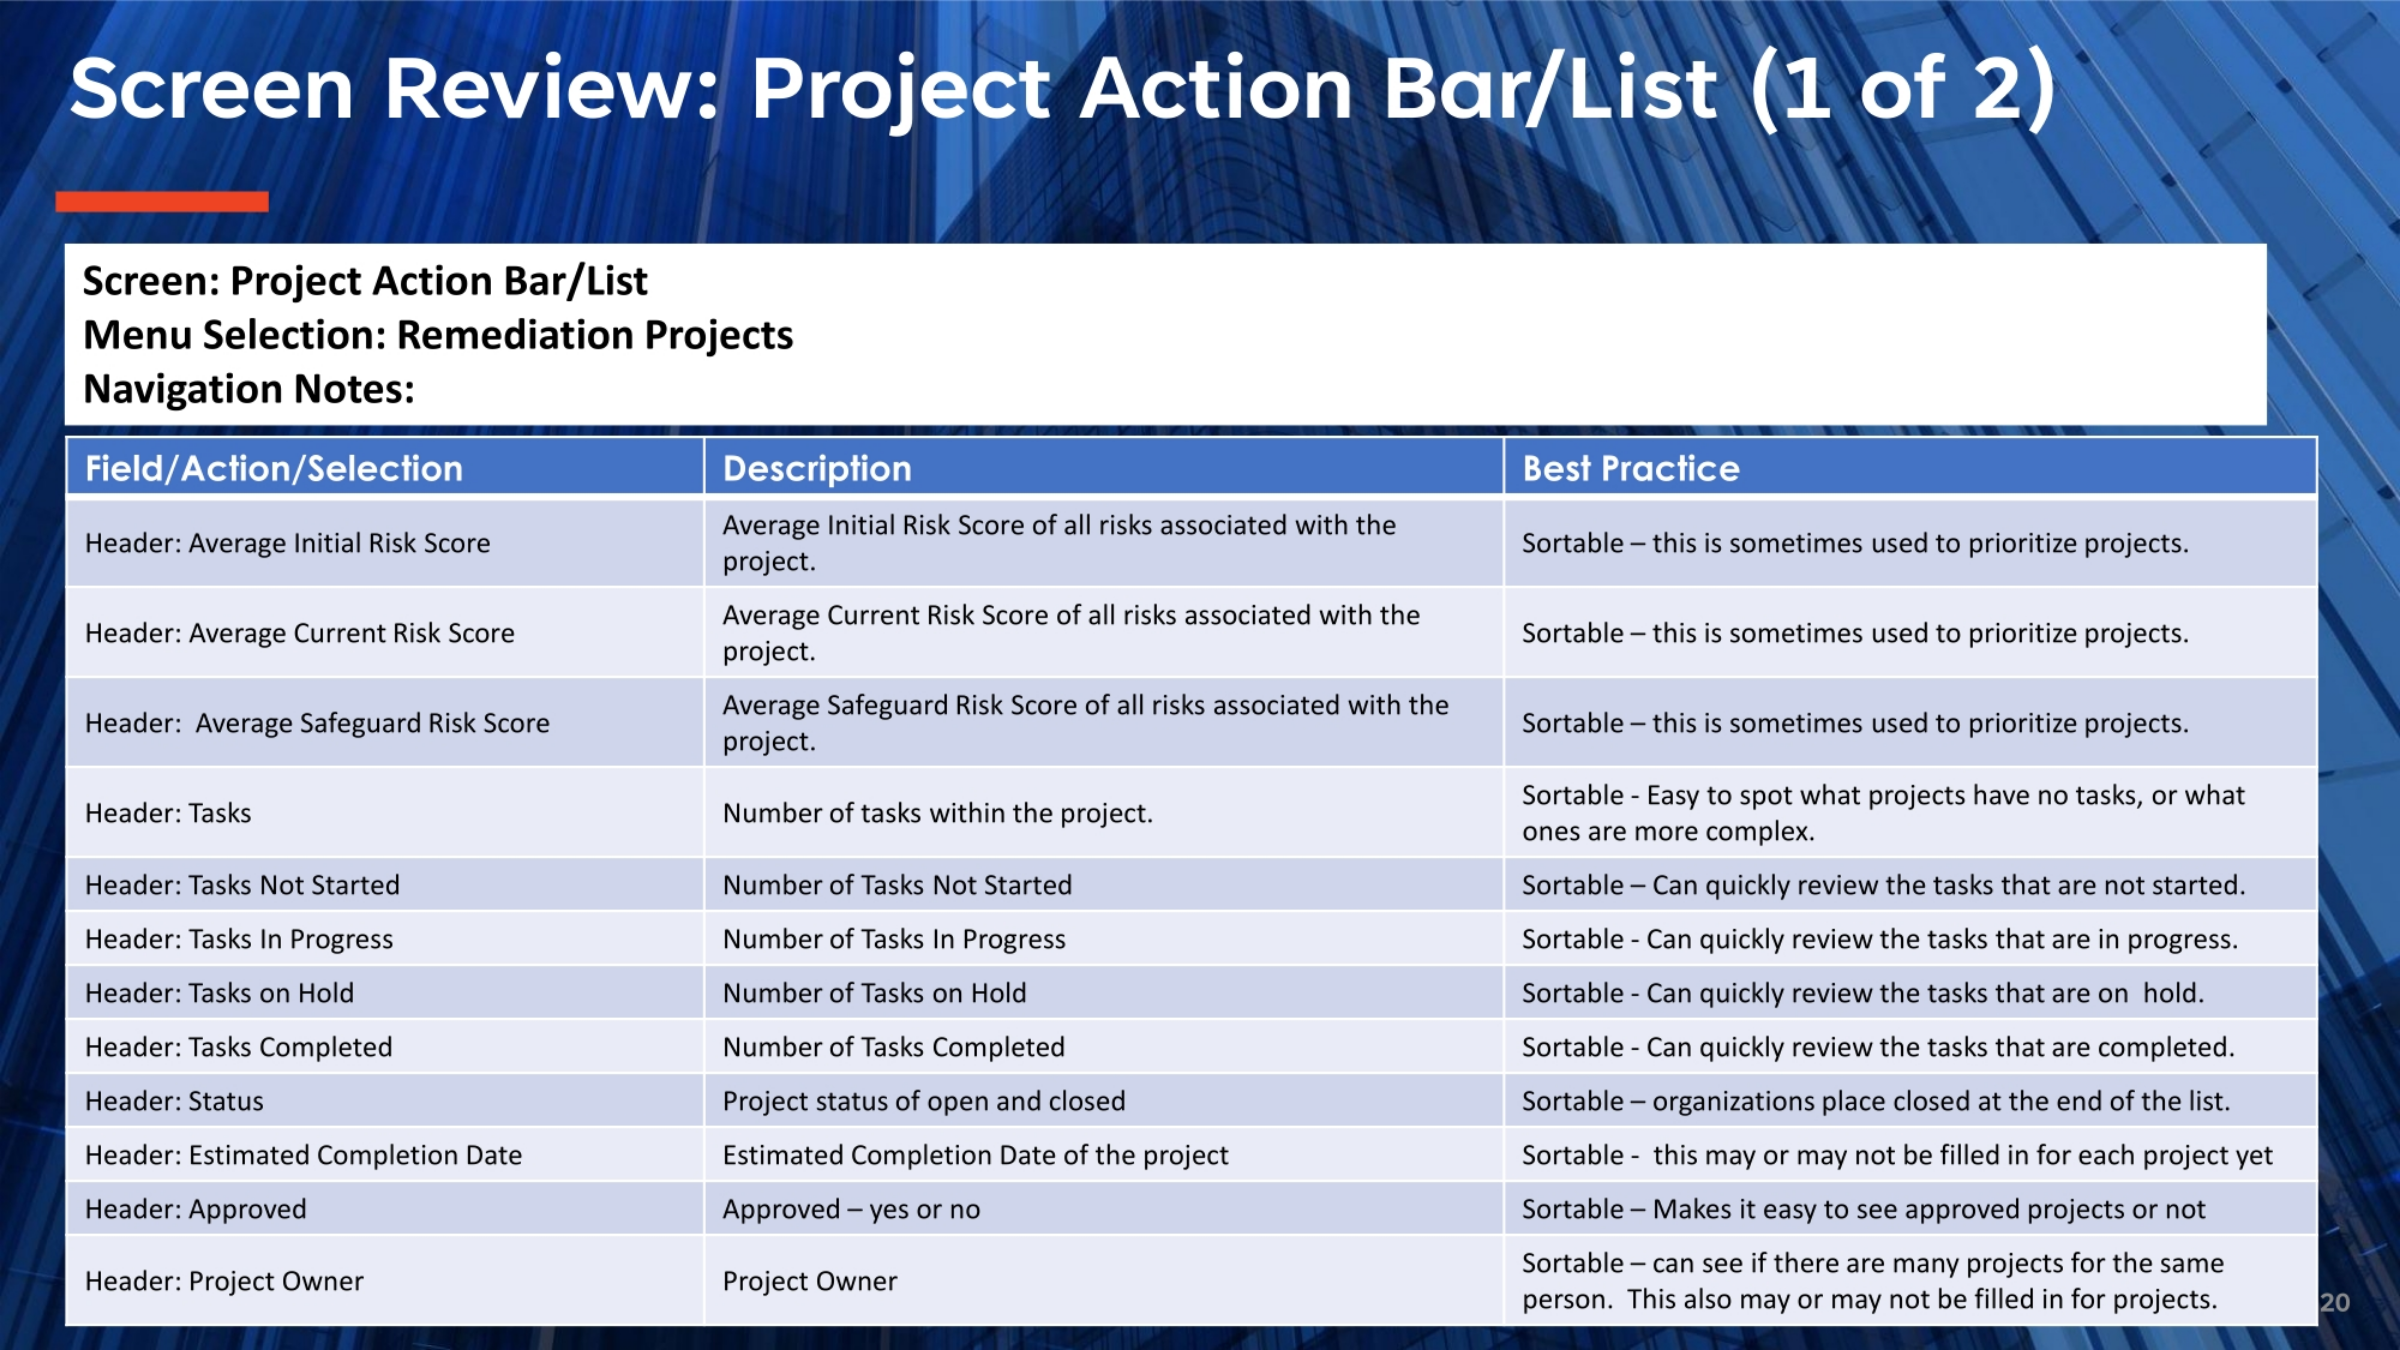
Continuing with the Project Action Bar and List, several headers provide valuable insights and sorting capabilities. 'Average Initial Risk Score,' 'Average Current Risk Score,' and 'Average Safeguard Risk Score' are all sortable, helping prioritize projects based on risk levels. The 'Tasks' header, along with 'Tasks Not Started,' 'Tasks In Progress,' 'Tasks on Hold,' and 'Tasks Completed,' allows for quick review of task statuses and project complexity. 'Status' indicates if a project is open or closed, while 'Estimated Completion Date' and 'Approved' status are also sortable. Finally, 'Project Owner' helps identify projects managed by specific individuals, aiding in workload distribution and oversight.
21. Project Action Bar and List: Part 3
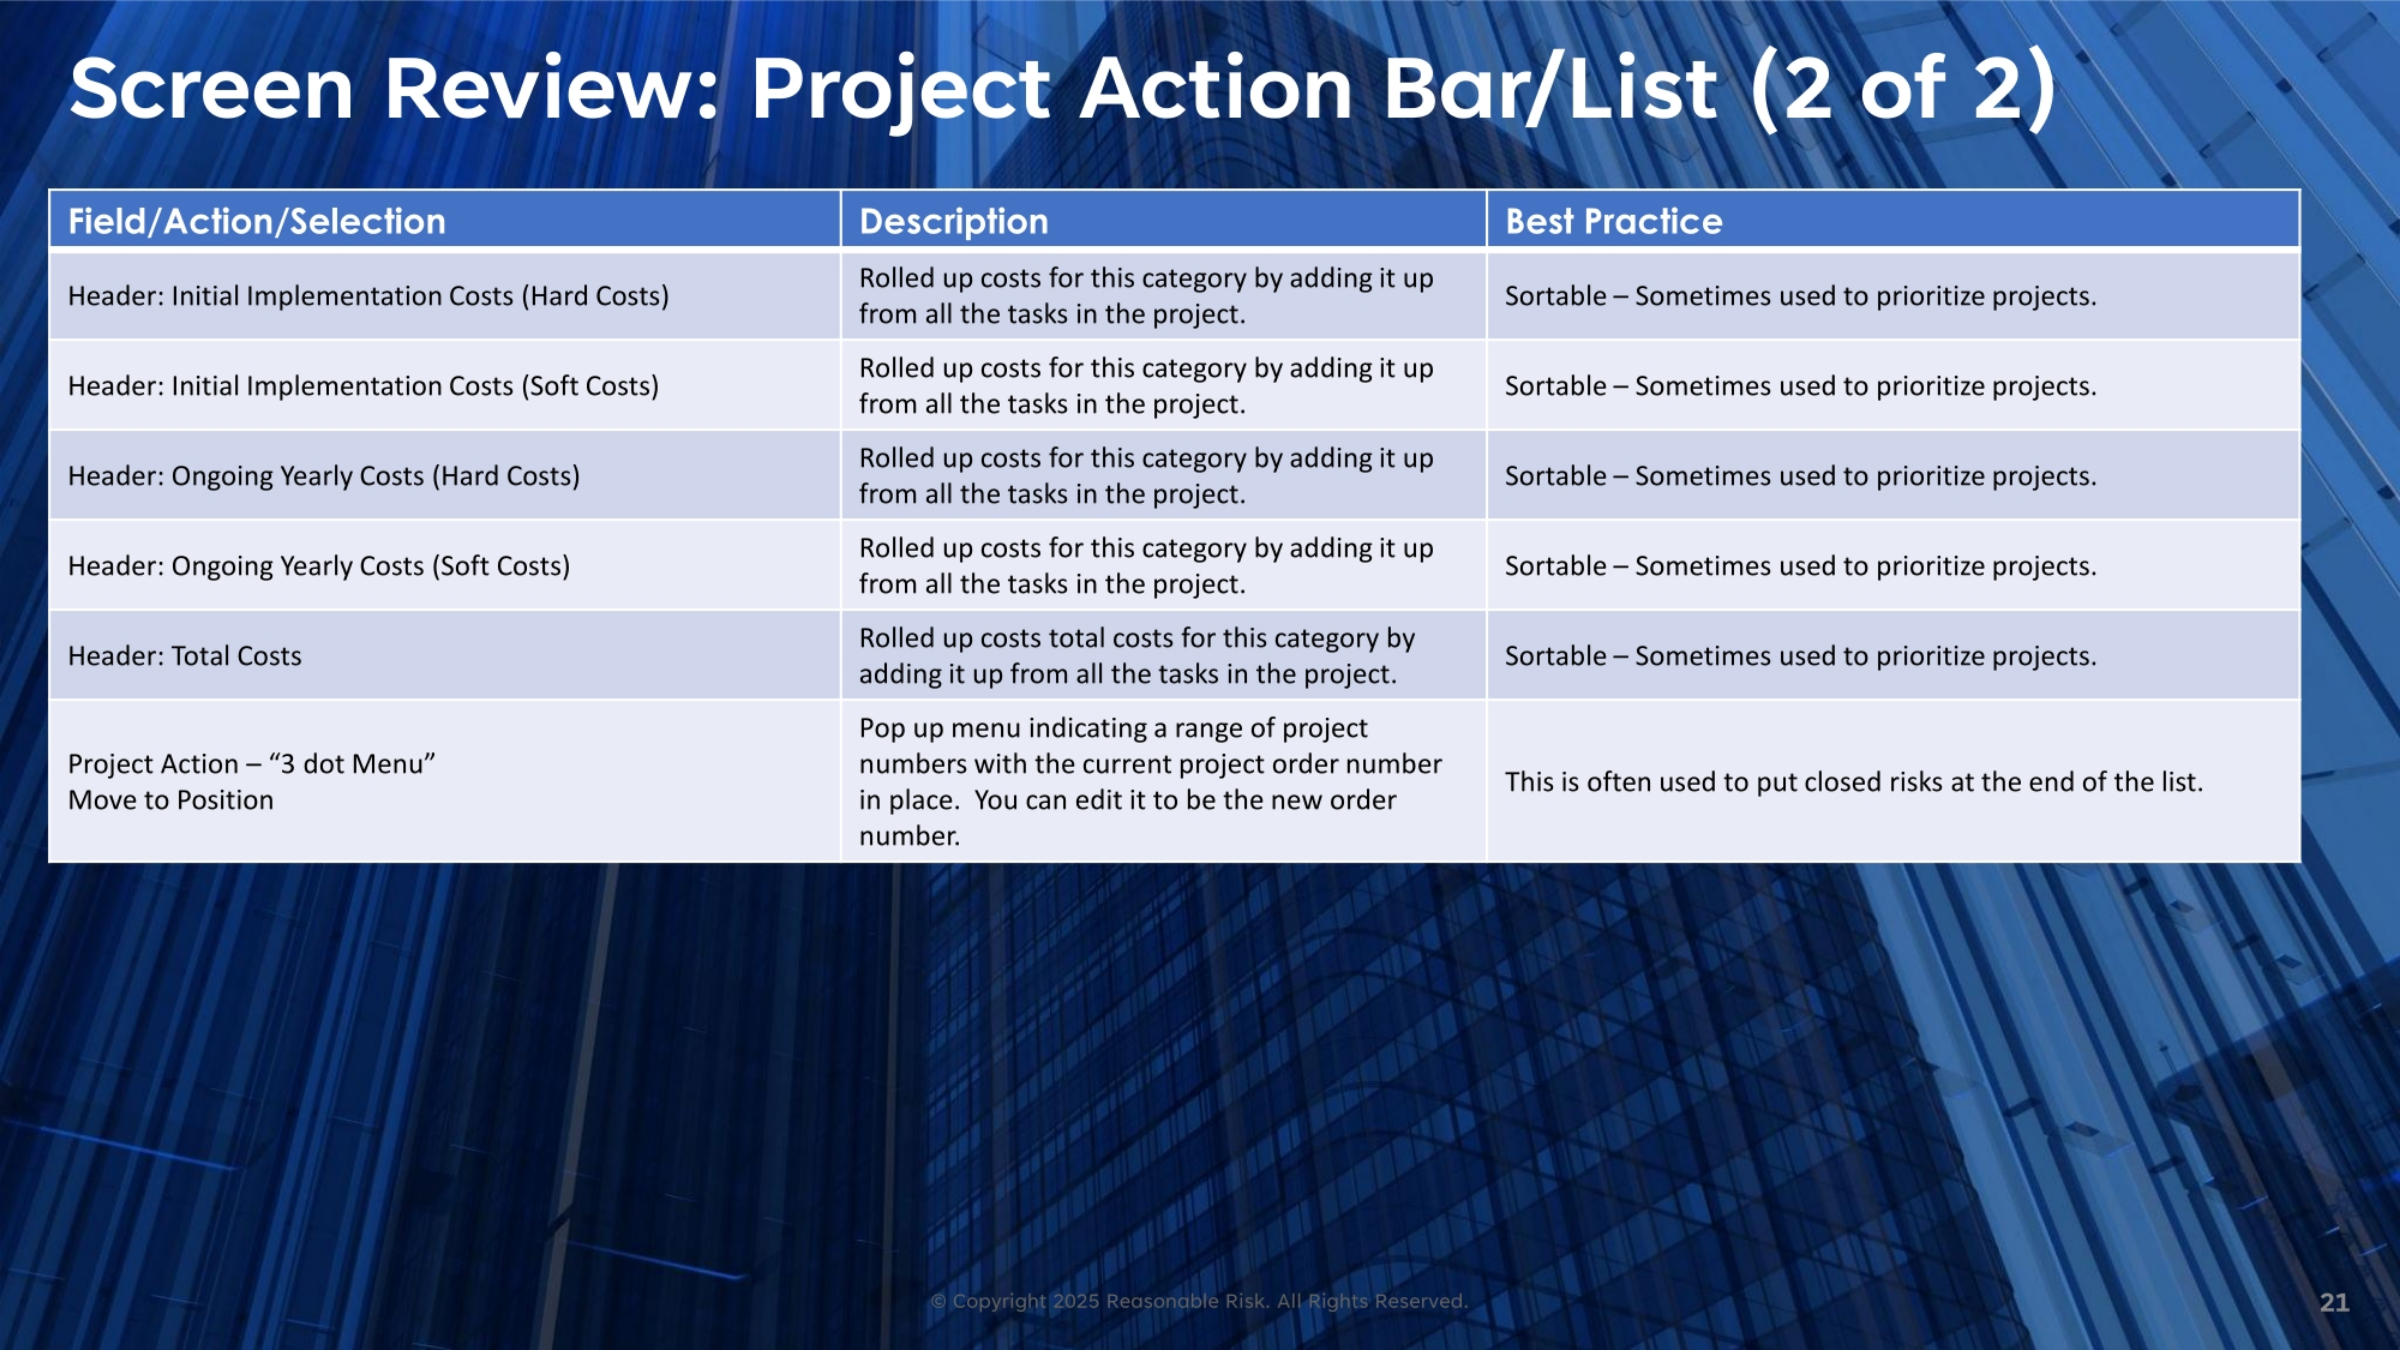
The final section of the Project Action Bar and List focuses on cost and project ordering. Headers for 'Initial Implementation Costs' and 'Ongoing Yearly Costs,' both hard and soft, are sortable and represent aggregated costs rolled up from all tasks within the project. The 'Total Costs' header provides a comprehensive sum of all these expenses. These cost metrics are often used to prioritize projects based on their financial implications. Additionally, the '3 dot Menu' for 'Move to Position' allows users to reorder projects within the list. This feature is particularly useful for placing closed risks at the end of the list, maintaining a clear and organized view of active projects.
22. Project Filter and List Screen Visual
This screen visual demonstrates the Project Filter and Project List in action. At the top, you can see the various filter options, including 'Remediation Project Name,' 'Status,' 'Approved,' and filters related to task due dates and resource assignments. These filters allow users to narrow down the displayed projects based on specific criteria. Below the filter section, the project list is presented in a table format. Each row represents a project, displaying details such as the project name, risk reduction, various risk scores, task counts, status, estimated completion date, approval status, project owner, and initial implementation costs. The sortable headers enable efficient organization and analysis of the project data.
23. Demonstration Topics
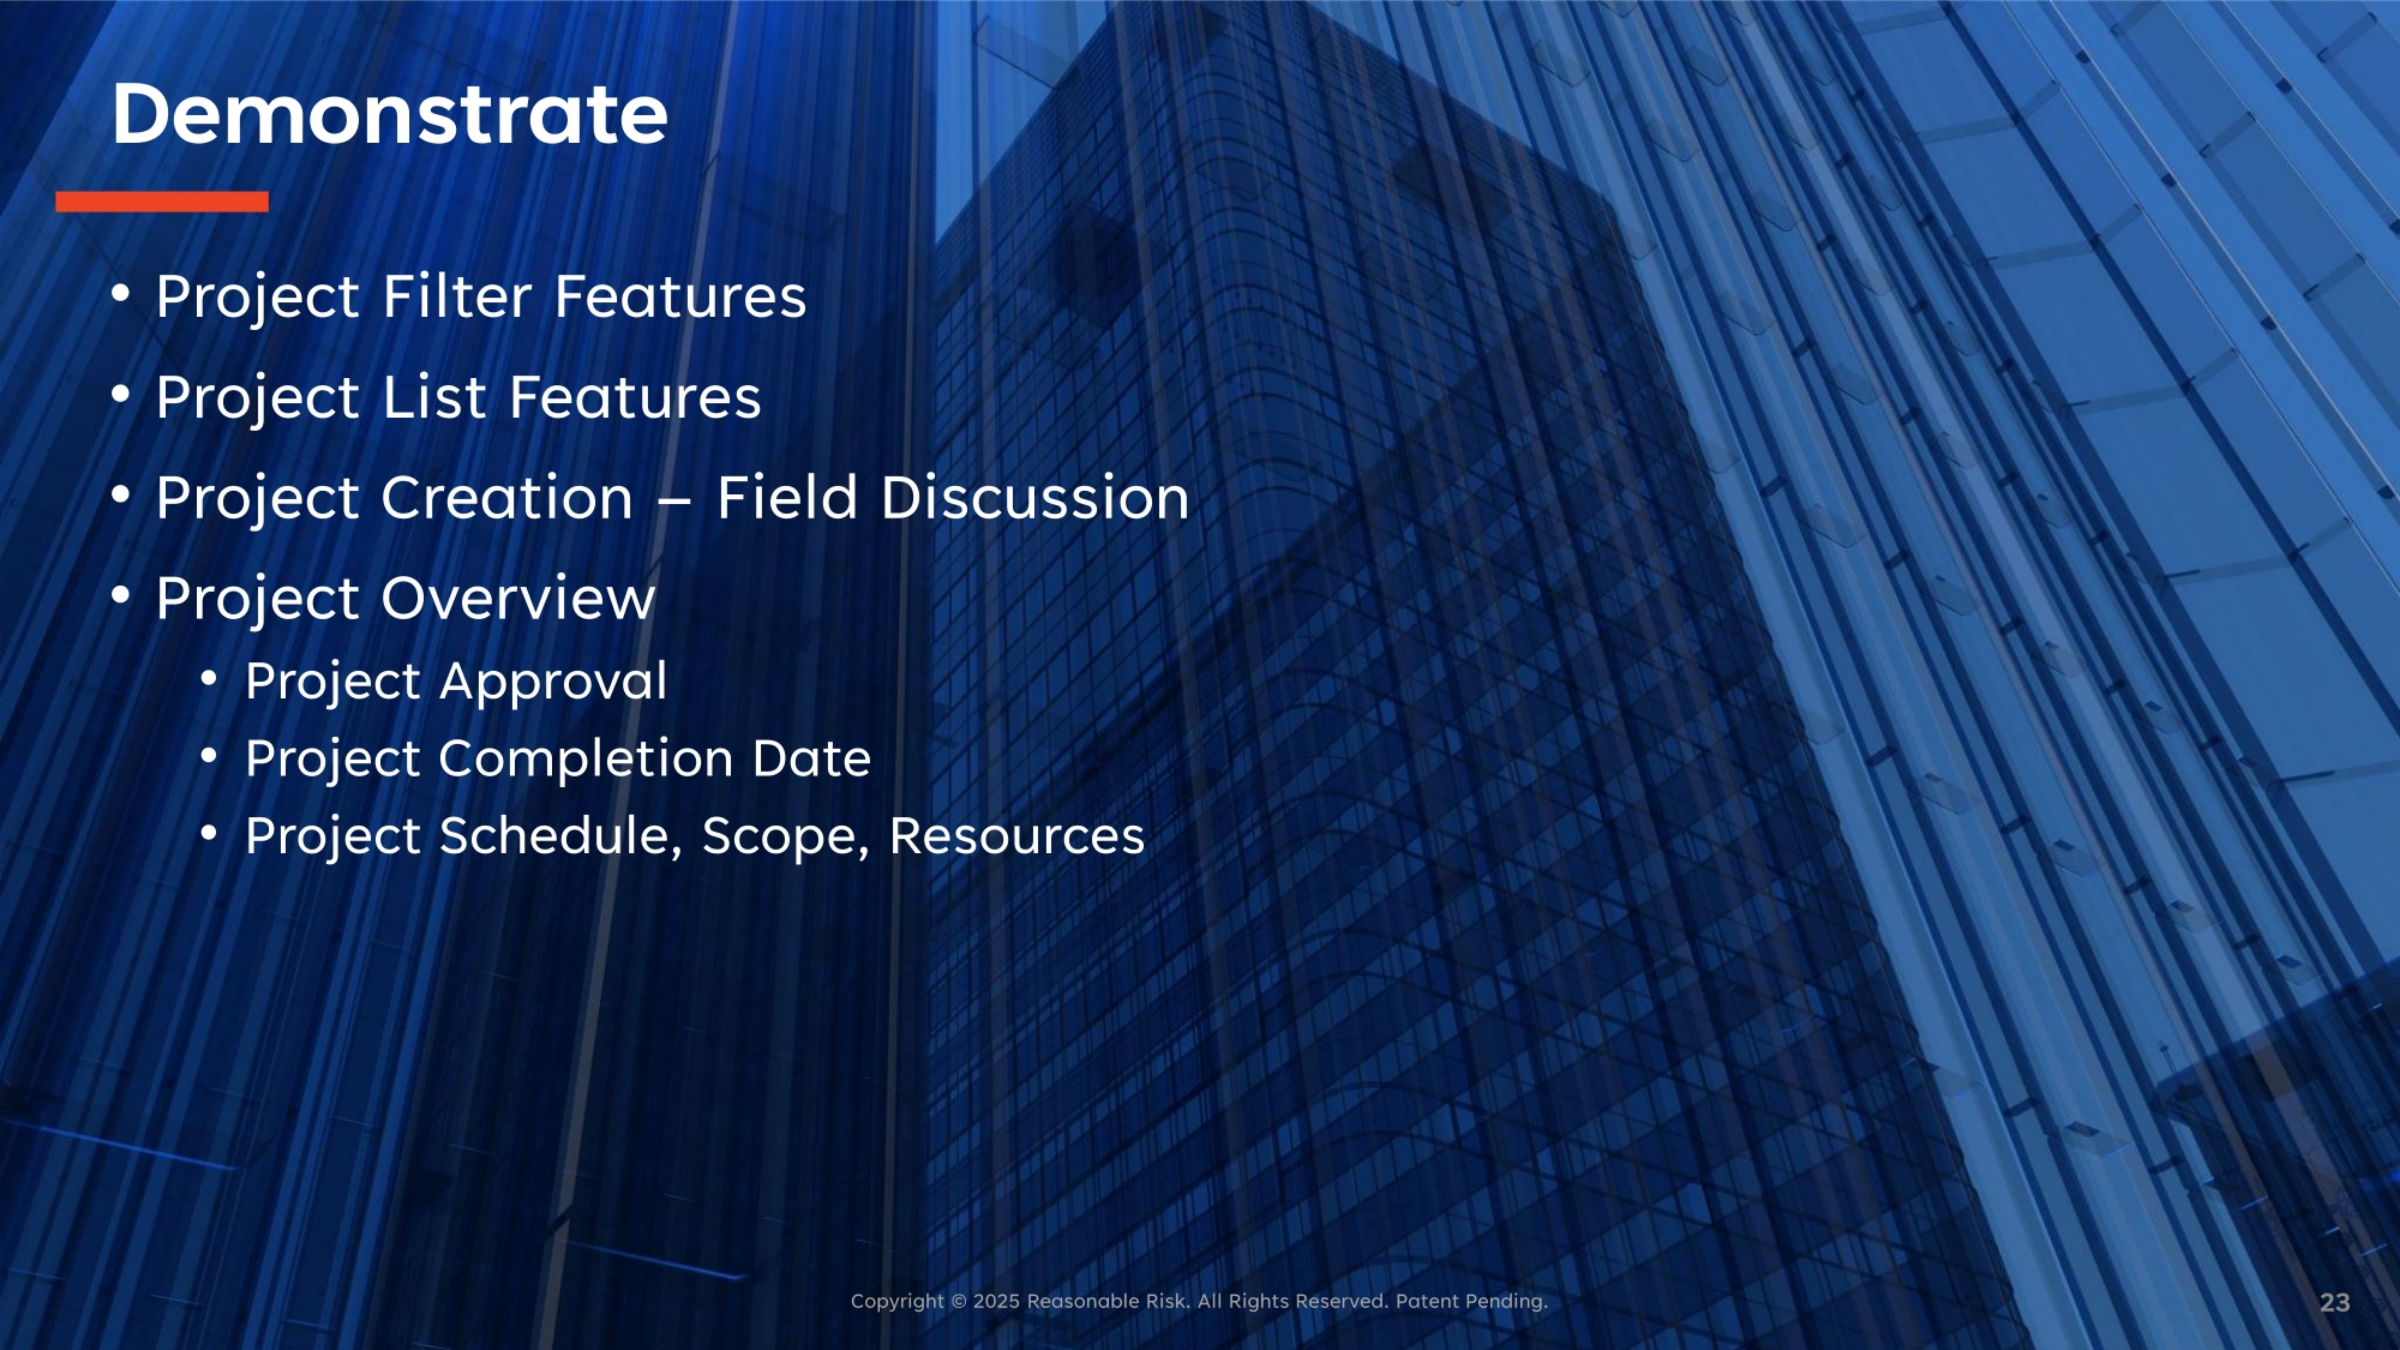
To conclude this module, we will demonstrate several key functionalities. This includes exploring the Project Filter Features to efficiently locate projects and the Project List Features for managing and viewing project details. We'll also walk through Project Creation, discussing the various fields involved. A comprehensive Project Overview will be provided, highlighting Project Approval processes, setting the Project Completion Date, and managing Project Schedule, Scope, and Resources. This demonstration will bring together the theoretical knowledge with practical application, ensuring a clear understanding of how to utilize the Reasonable Risk platform for remediation projects.
In summary, effective remediation project management is crucial for mitigating risks and maintaining a robust security posture. By understanding the project lifecycle, utilizing the platform's features for project creation, task management, and status tracking, organizations can efficiently address identified risks and ensure compliance.
Comments
0 comments
Please sign in to leave a comment.