This training module offers a comprehensive exploration of effective risk management, detailing the entire risk lifecycle and key processes for handling risks. We will delve into identifying, tracking, and mapping risks to projects for remediation, utilizing available tools to ensure a robust and responsive risk posture within your organization.
1. Focus Area: Risks and Risk Register
Welcome to the Reasonable Risk training module. Today, our focus area is on understanding risks and how to effectively utilize the Risk Register. We'll cover key concepts and practical applications to enhance your risk management capabilities.
2. Agenda Topic - Risks and Risk Register
Our agenda for today centers on Risks and the Risk Register.
3. Modules
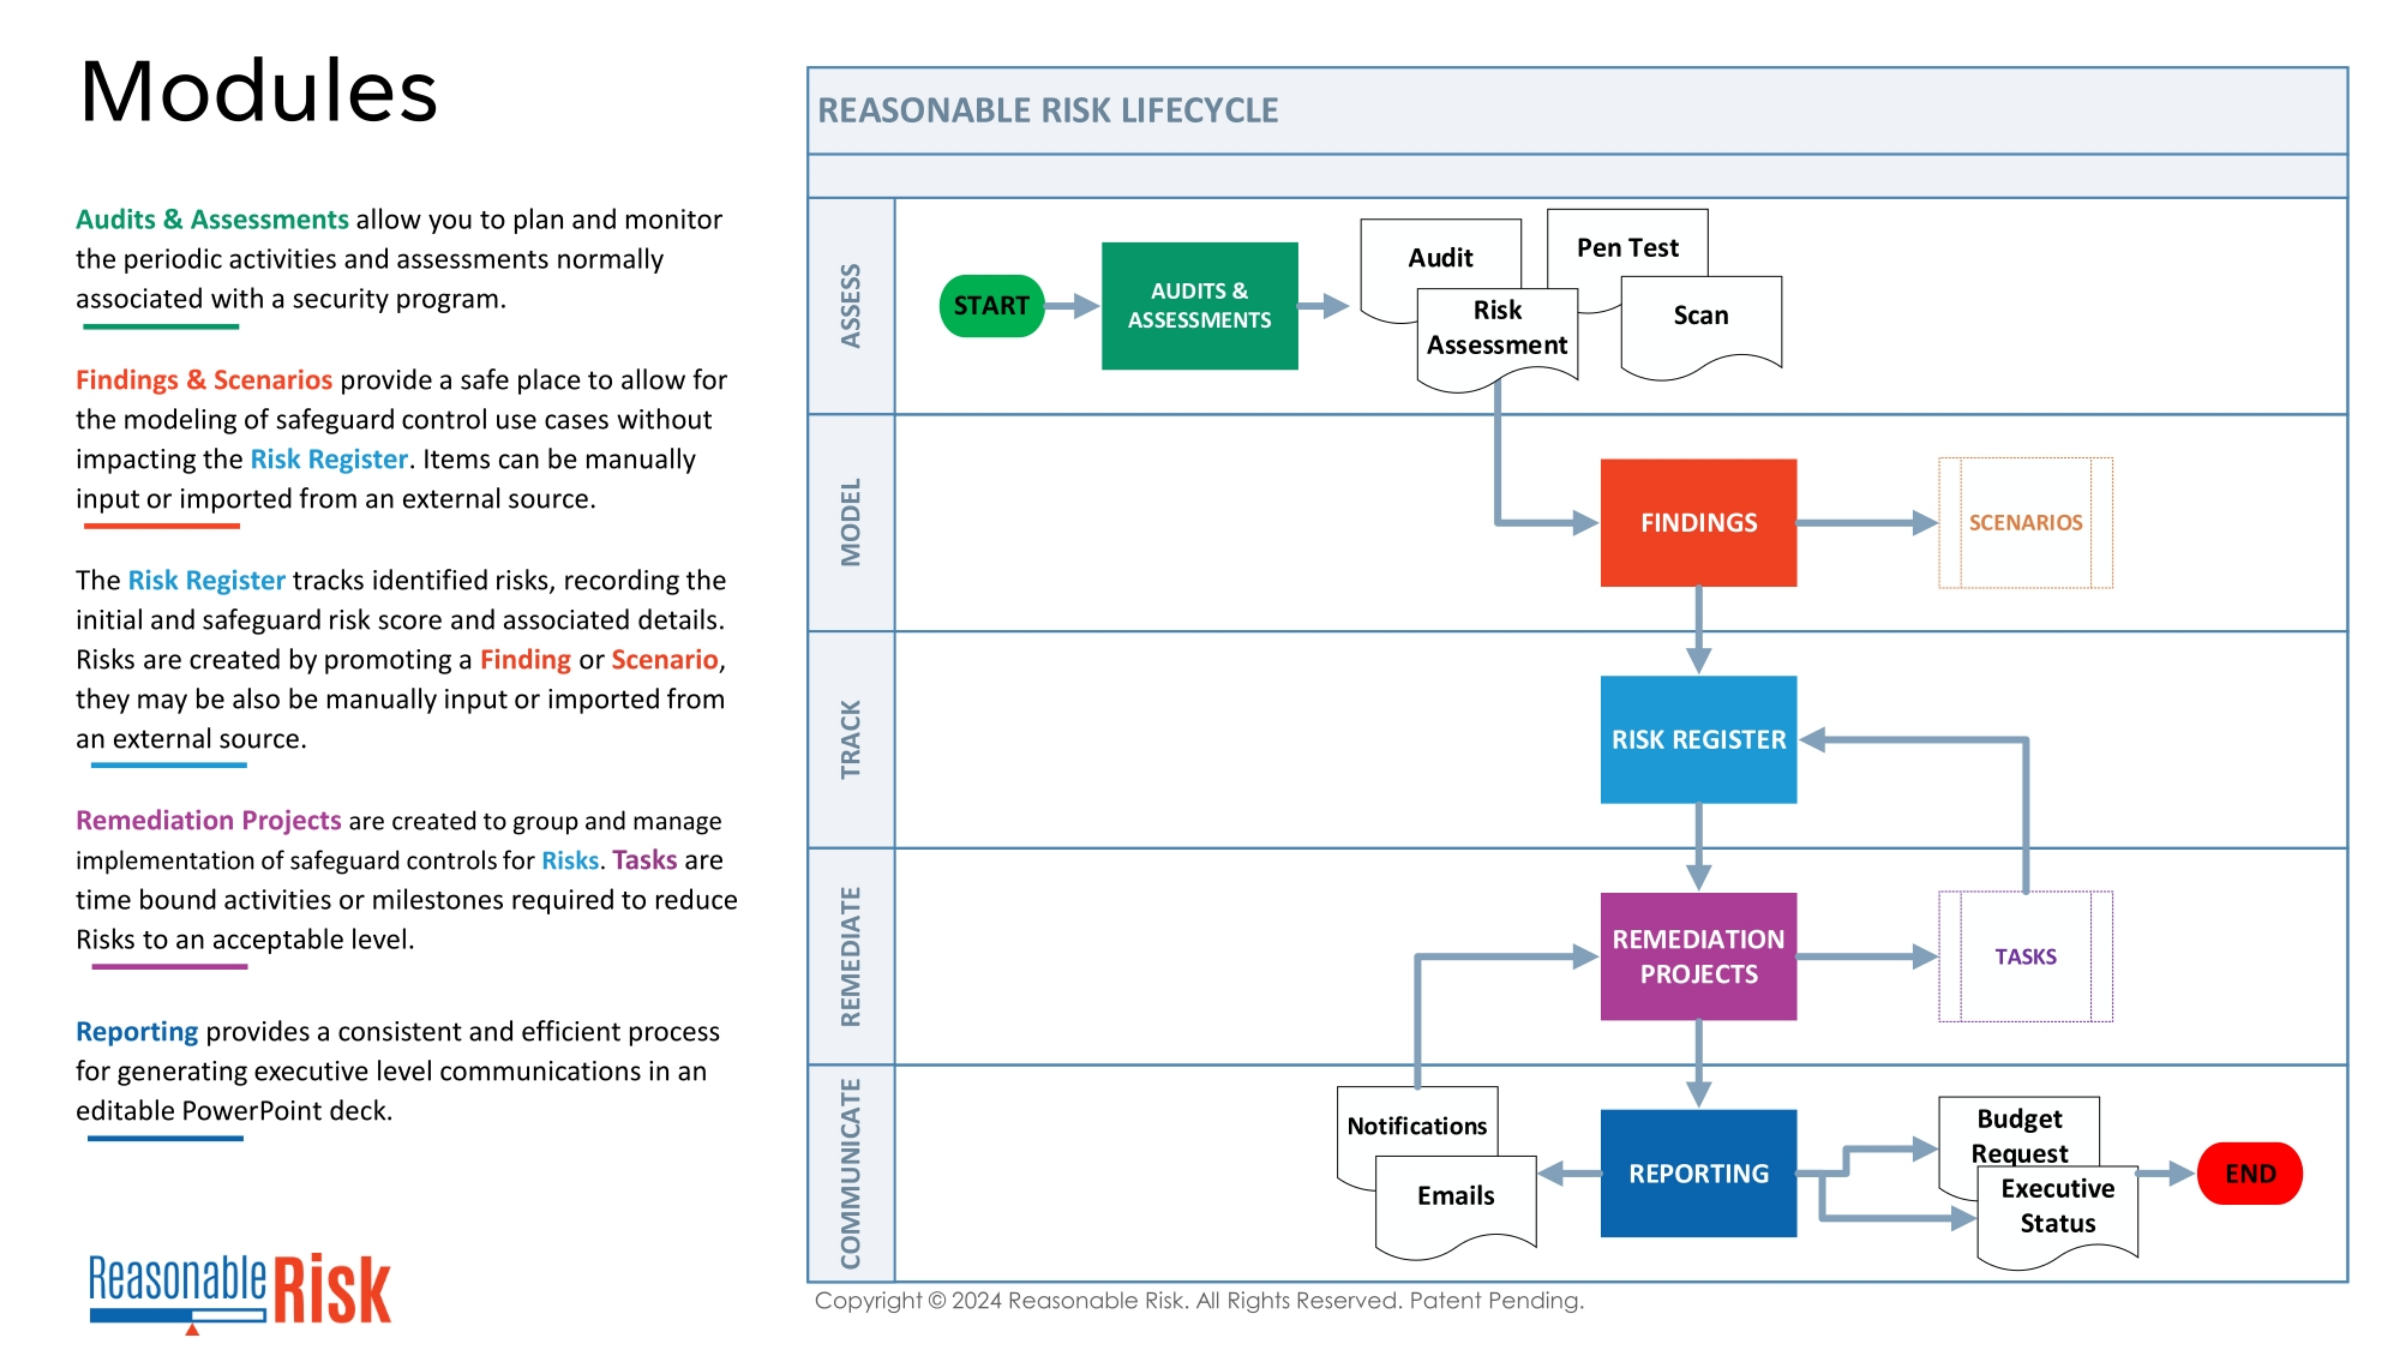
The Reasonable Risk lifecycle begins with Audits and Assessments, which help plan and monitor security program activities. Findings and Scenarios offer a safe environment to model safeguard control use cases without impacting the live Risk Register. The Risk Register itself tracks identified risks, recording initial scores and associated details. Risks are often created by promoting a Finding or Scenario, or by manual input. Remediation Projects group and manage the implementation of safeguard controls to reduce risks to an acceptable level. Finally, Reporting provides consistent, executive-level communications in an editable format.
4. Modules
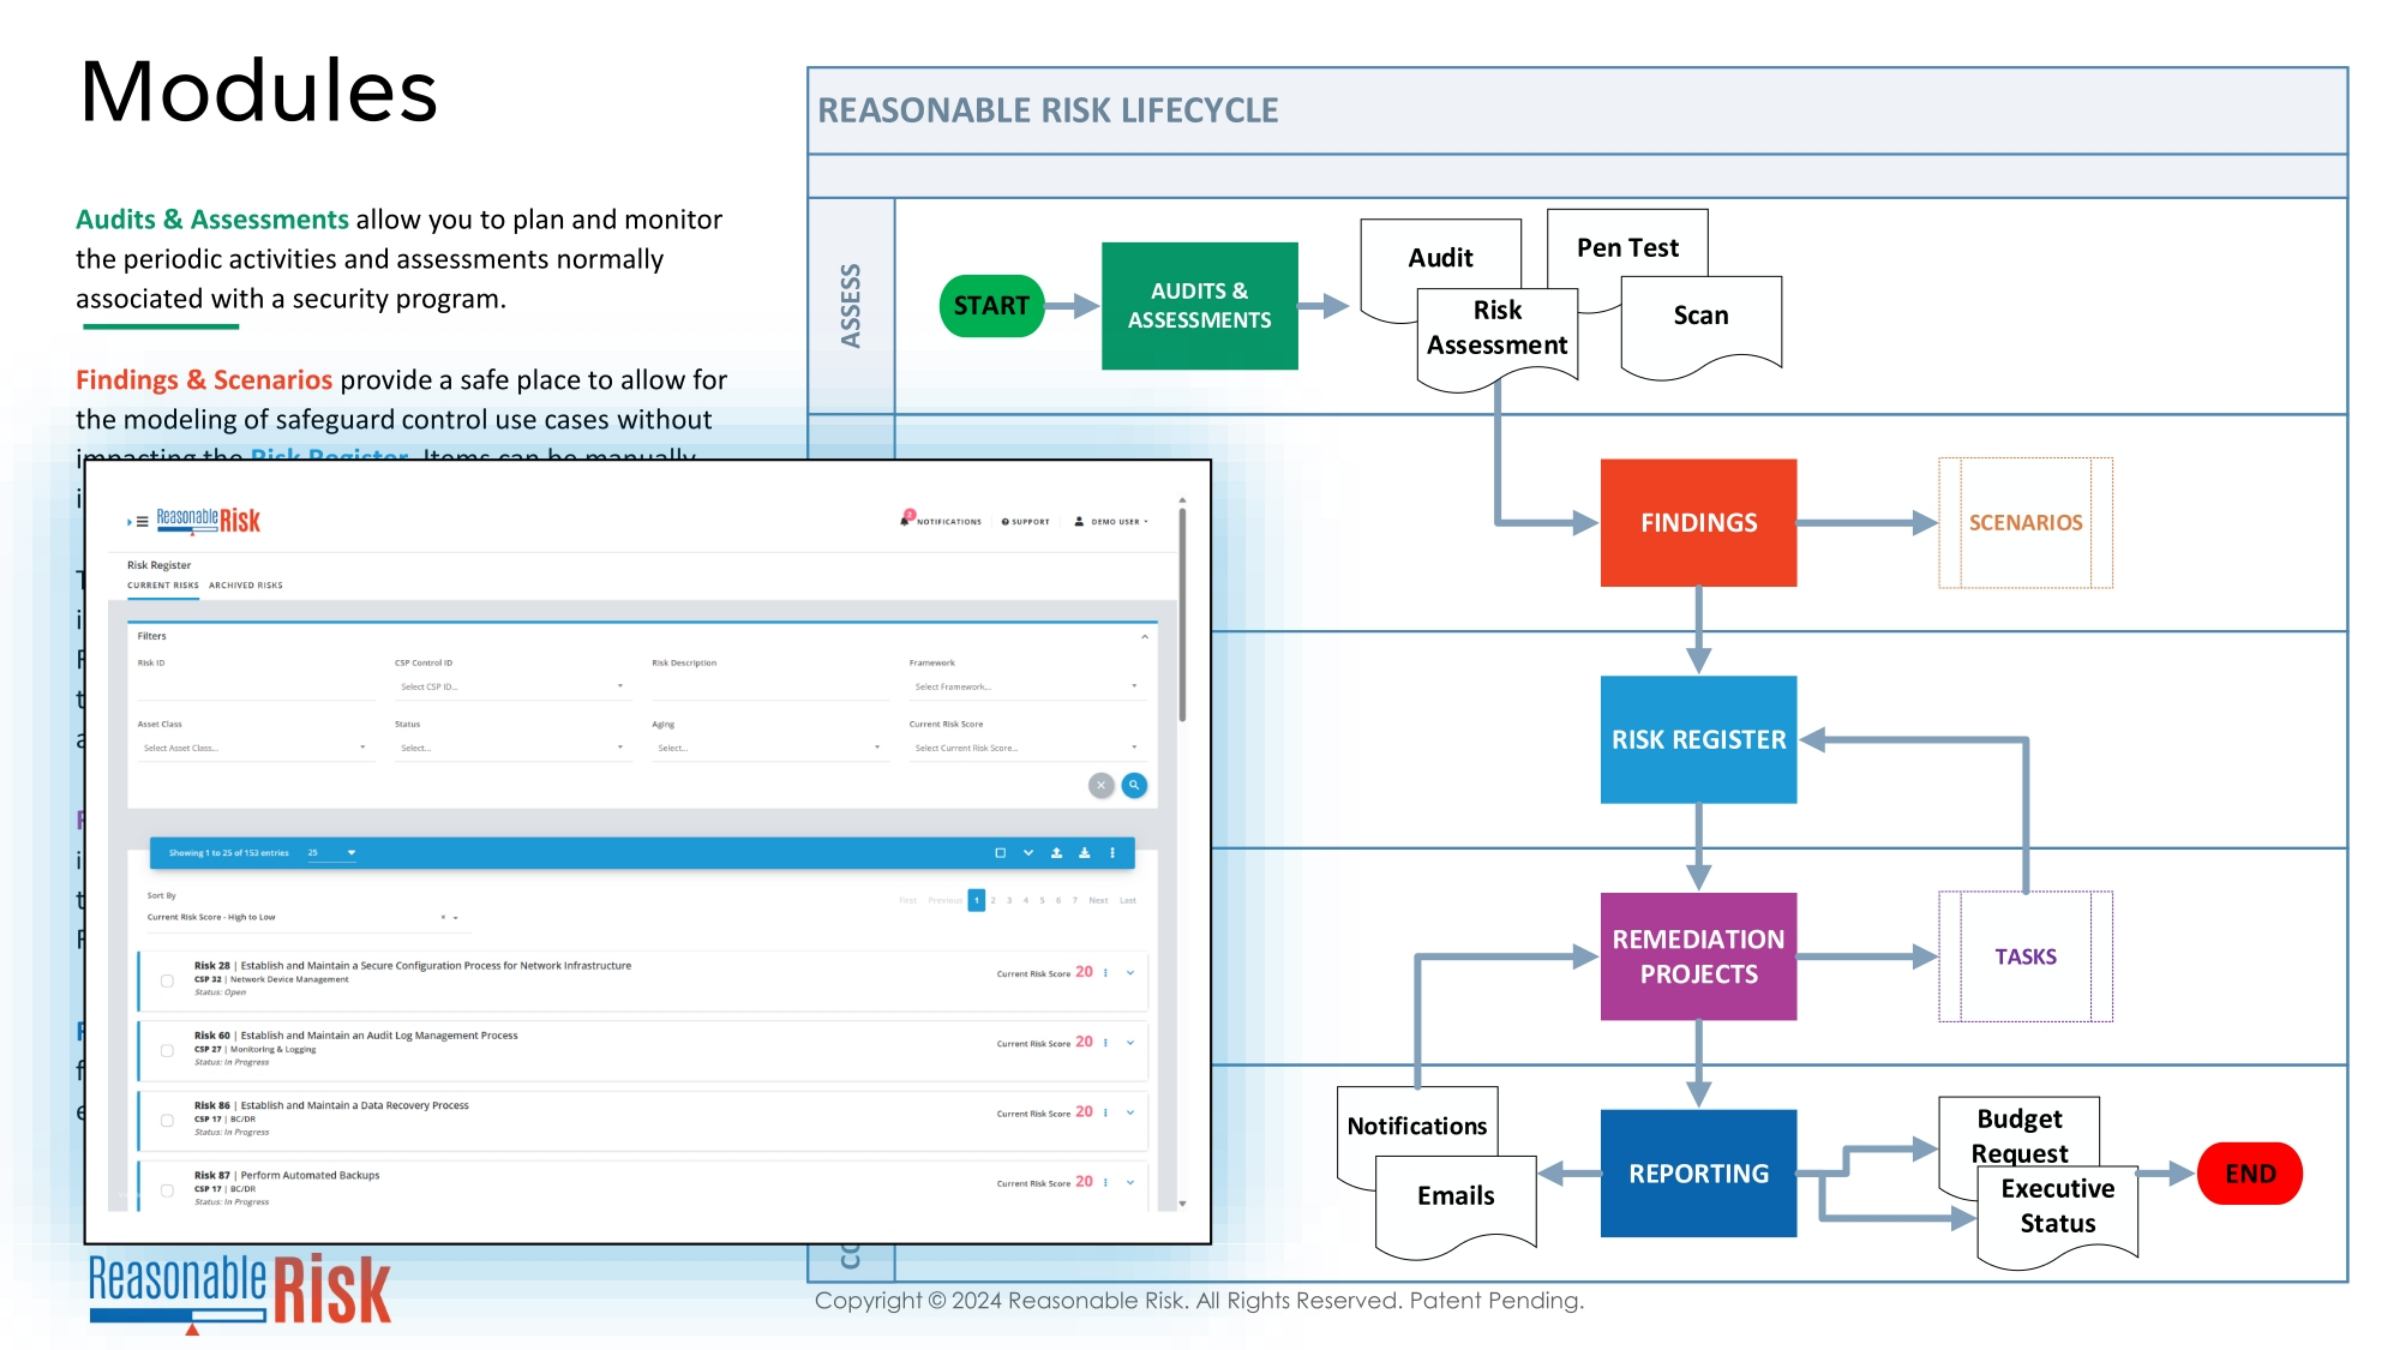
Expanding on the Reasonable Risk lifecycle, we see how the Risk Register integrates into the broader system. Audits and Assessments feed into Findings and Scenarios, which can then be promoted to the Risk Register. This central hub is where identified risks are tracked, scored, and managed. From the Risk Register, risks are assigned to Remediation Projects, where specific tasks are executed to mitigate them. The entire process culminates in comprehensive Reporting, providing clear insights into risk status and remediation efforts. The visual demonstrates the flow and the interface for managing risks.
5. Risk Register Objectives
Our objectives for this session on the Risk Register are clear. We will review and understand the risks list and search bar functionalities, gaining proficiency in navigating the system. We'll also delve into updating risk information and scores, ensuring accuracy in our risk assessments. Adding comments to risks is another key area, facilitating clear communication and historical tracking. Furthermore, we aim to understand the complete risk lifecycle and the specific reasons why a risk would reside in each state of that lifecycle.
6. Risk Register: Overview
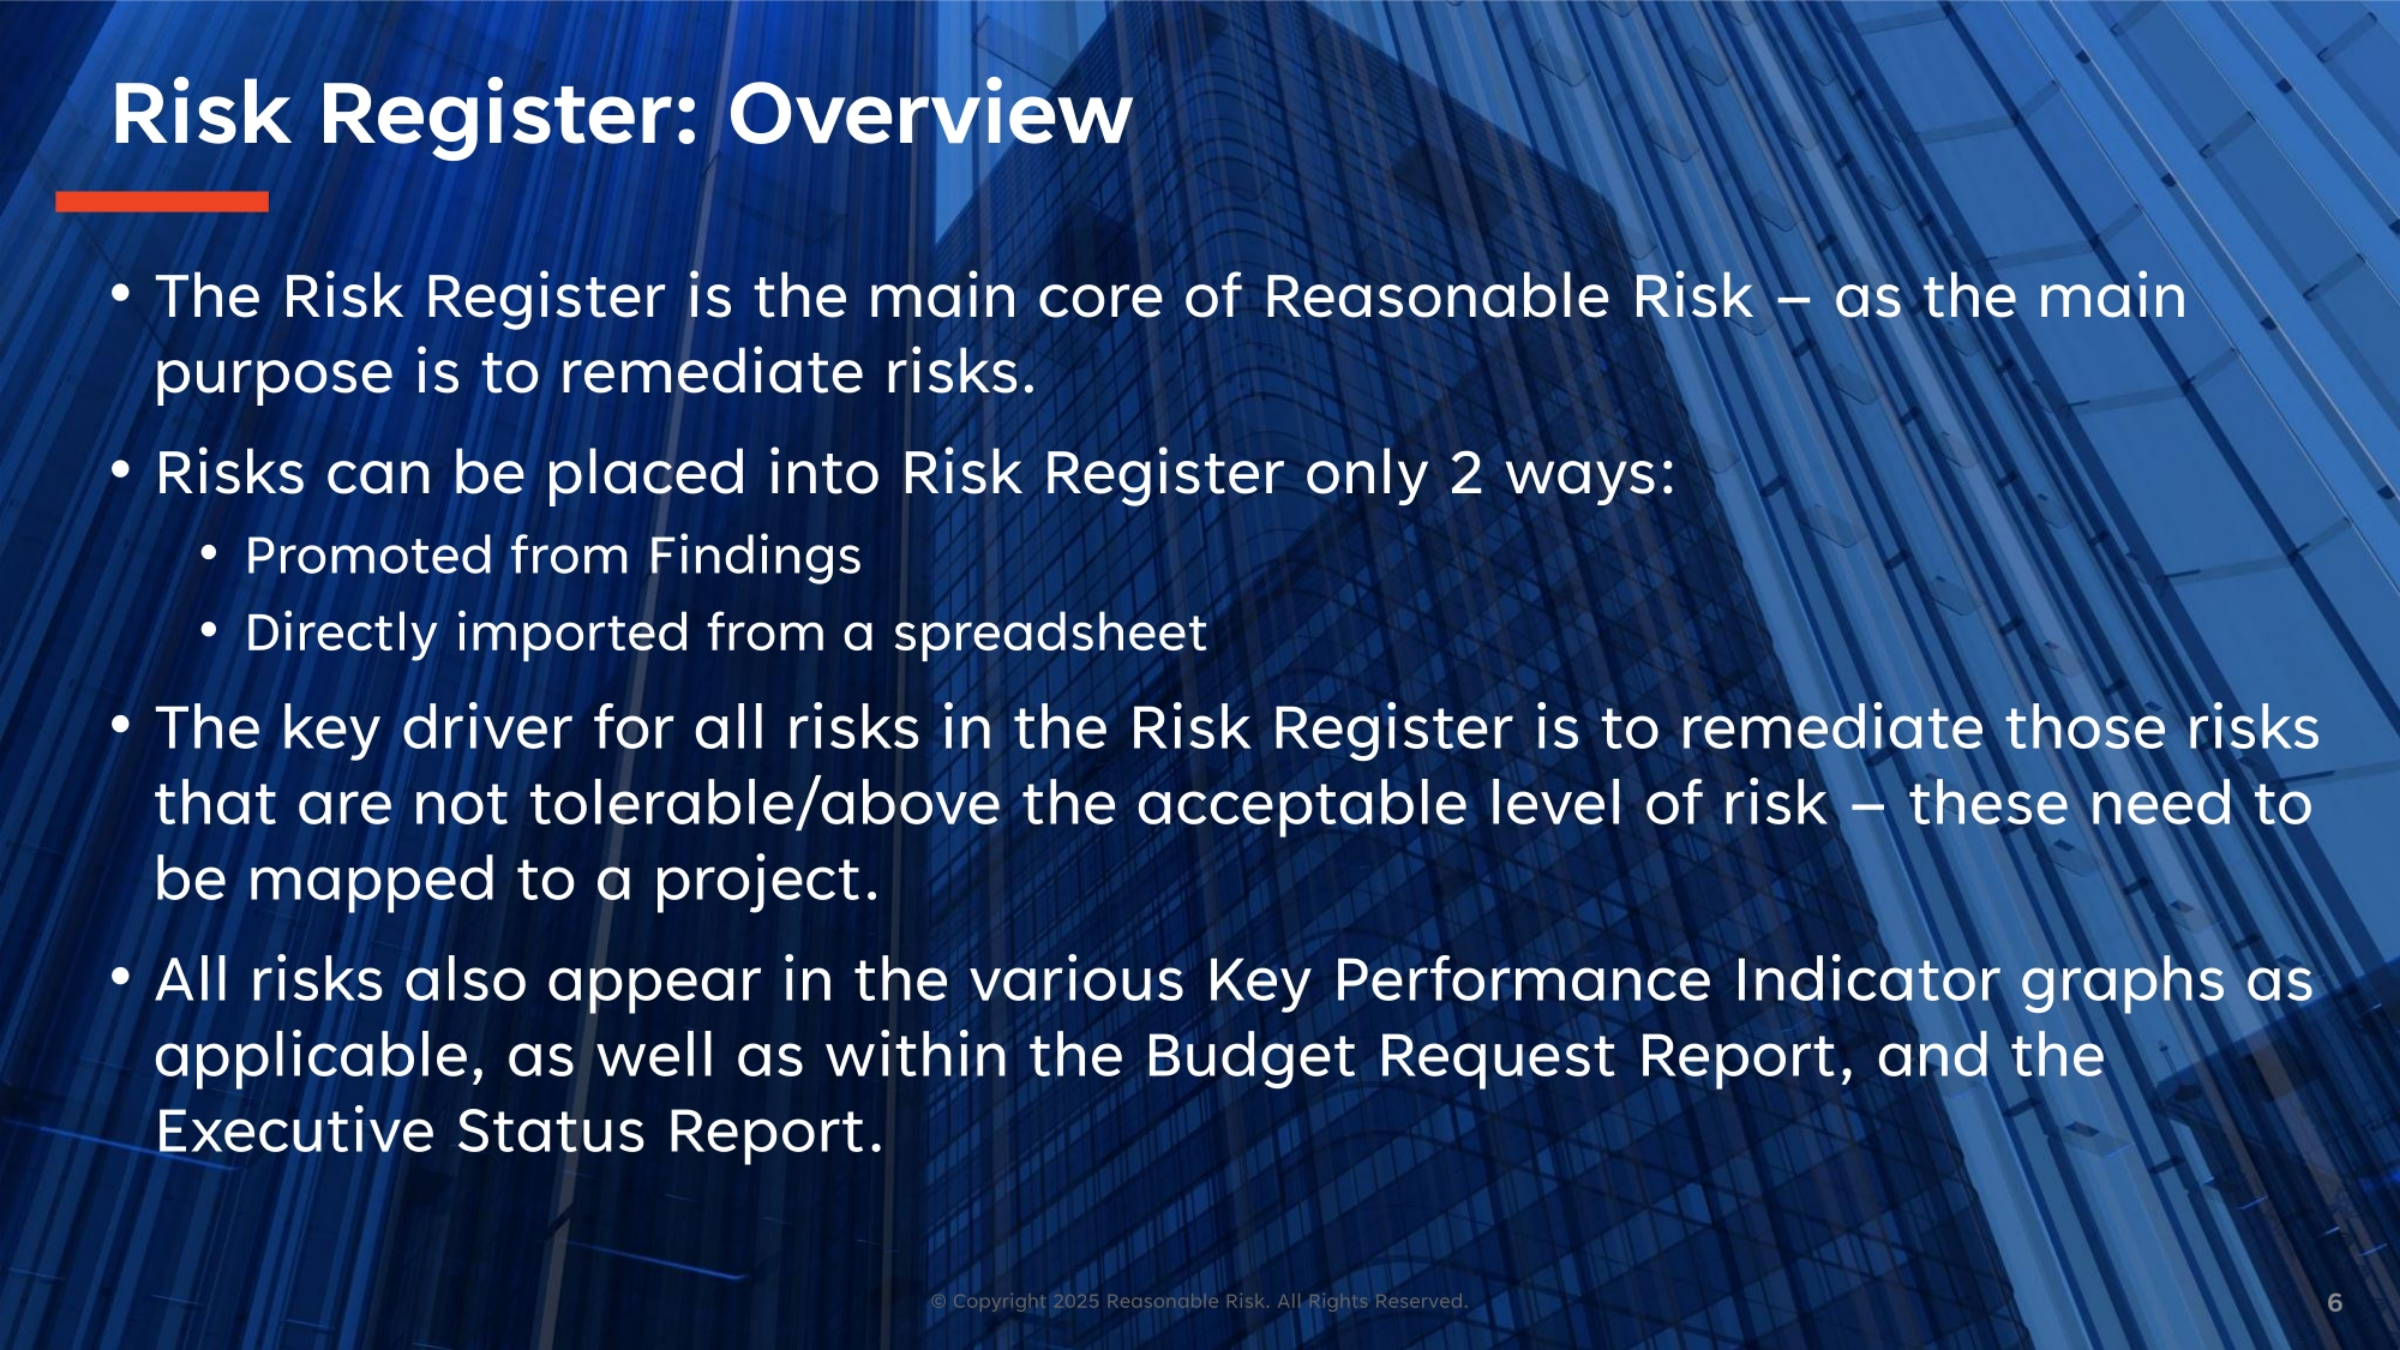
The Risk Register serves as the main core of Reasonable Risk, with its primary purpose being the remediation of identified risks. Risks can be introduced into the Risk Register in two primary ways: either by being promoted from Findings or by direct import from a spreadsheet. A critical driver for all risks within the Risk Register is the imperative to remediate those that are intolerable or exceed acceptable risk levels, necessitating their mapping to a specific project. Additionally, all risks are reflected in various Key Performance Indicator graphs, as well as within the Budget Request Report and the Executive Status Report, providing comprehensive visibility.
7. Risk Register: Risk Status Workflow
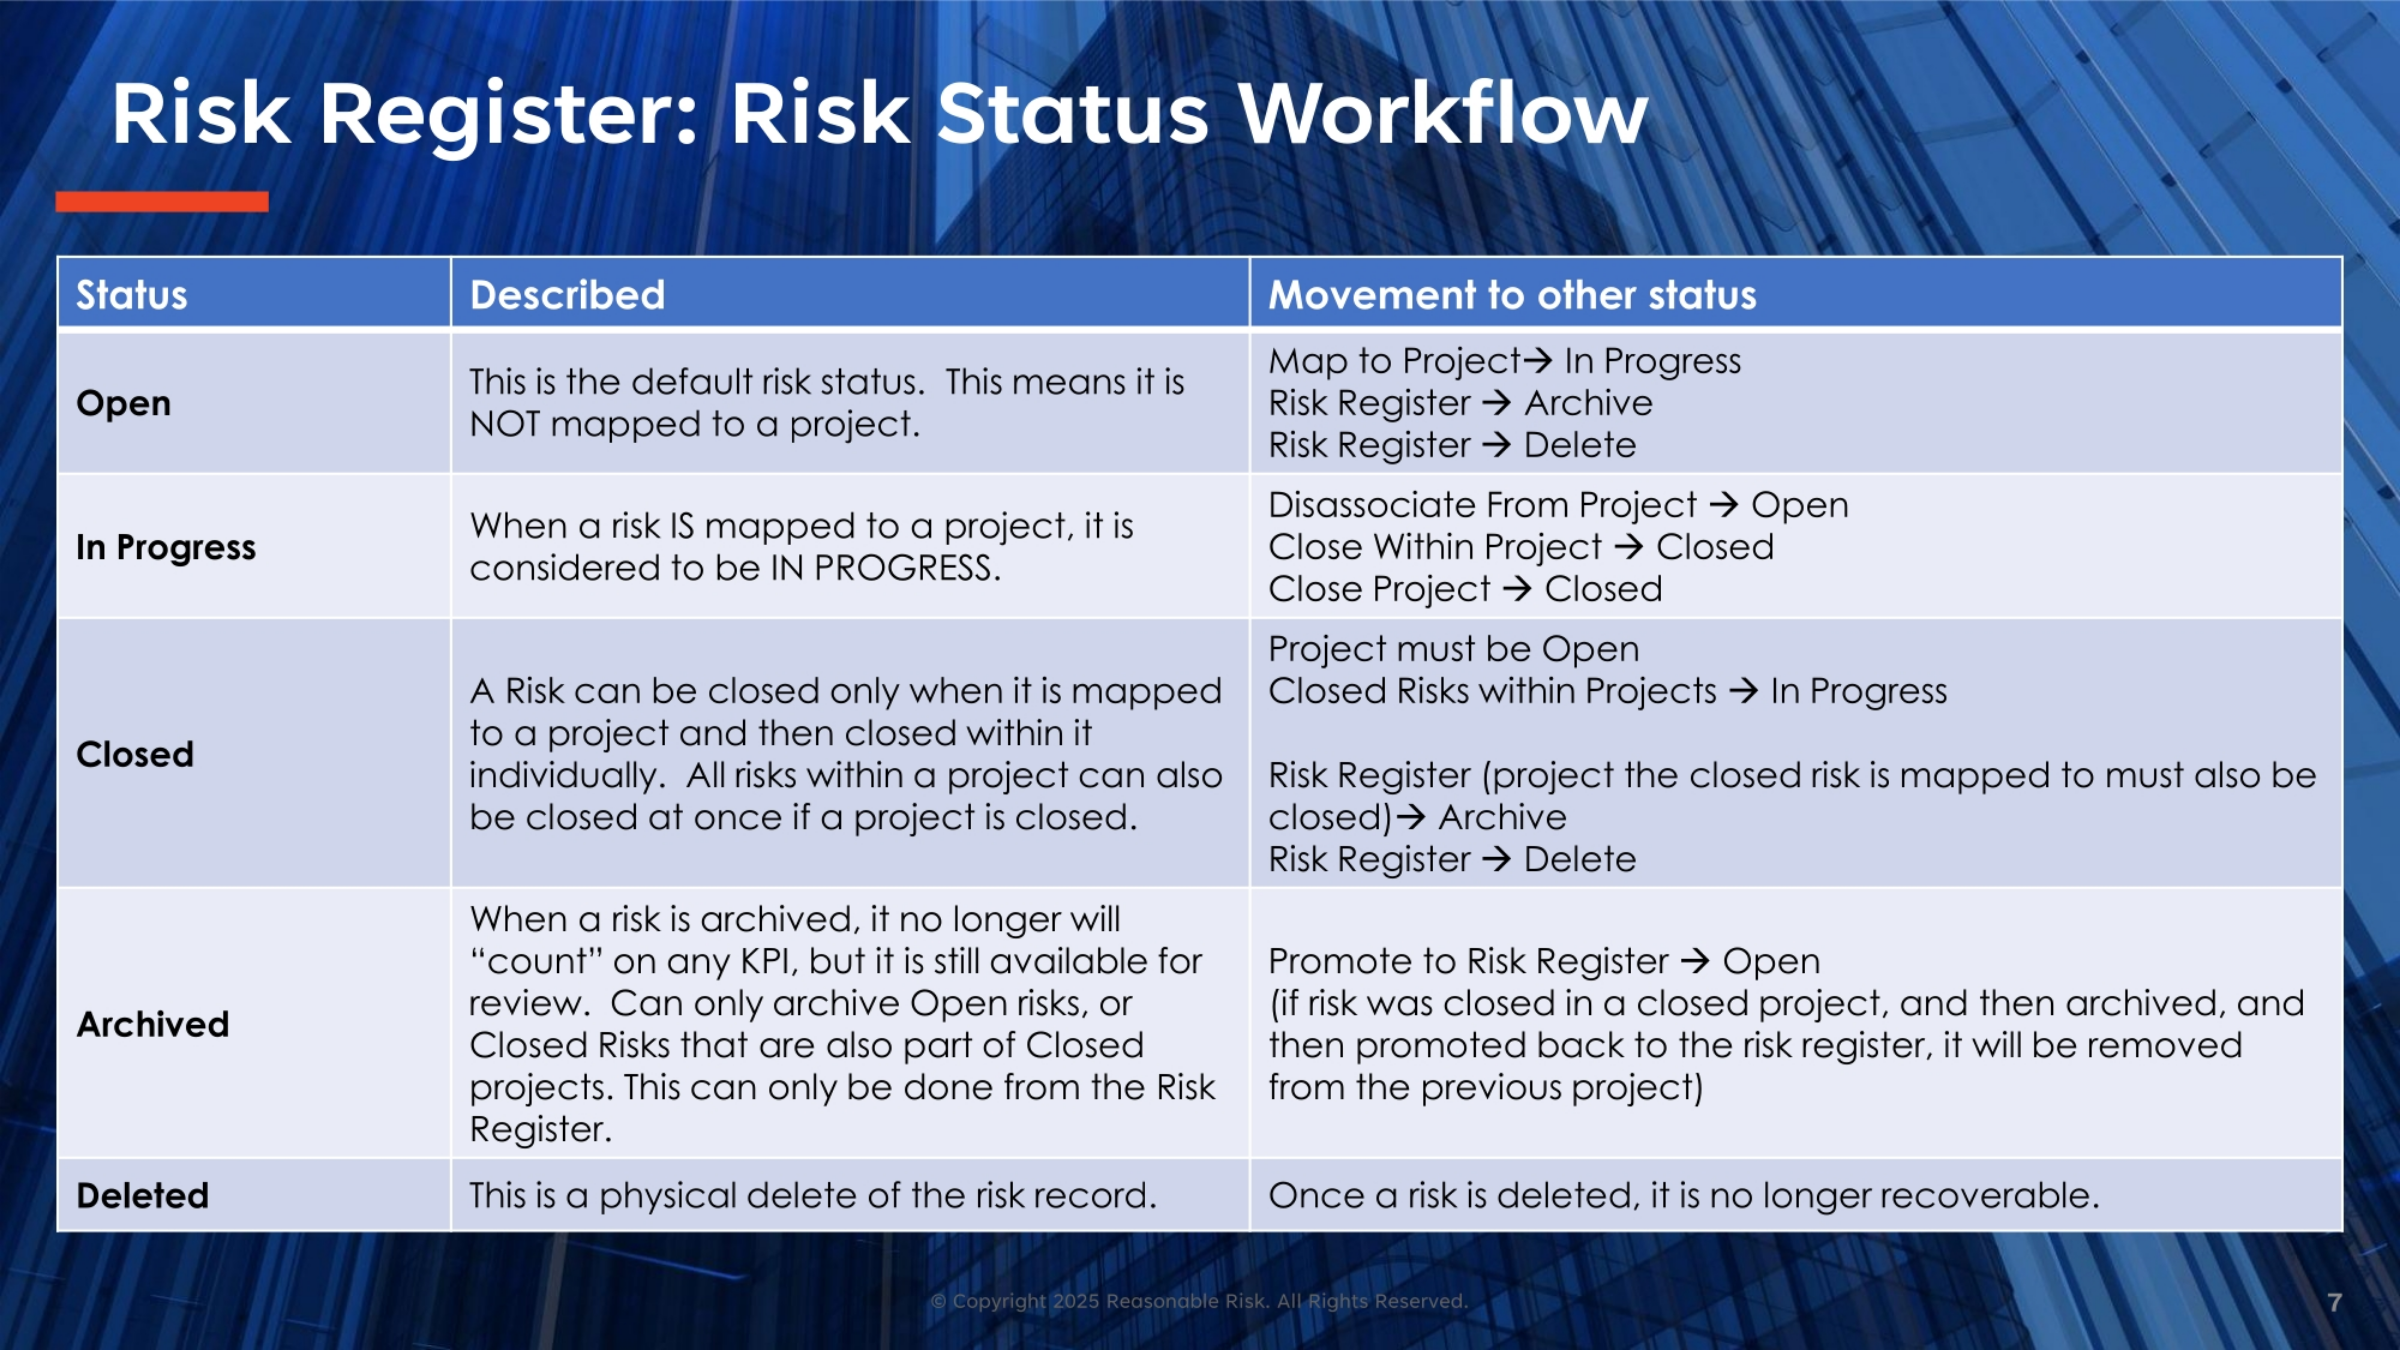
Understanding the Risk Status Workflow is crucial for effective risk management. An "Open" risk is the default status, meaning it's not yet mapped to a project. When a risk is mapped to a project, it transitions to "In Progress." A risk can only be "Closed" when it's mapped to a project and then individually closed within that project. All risks within a project can also be closed simultaneously if the project itself is closed. "Archived" risks no longer impact KPIs but remain available for review, applicable to Open or Closed risks within projects. Finally, "Deleted" represents a permanent removal of the risk record, making it unrecoverable.
8. Risk Status Lifecycle
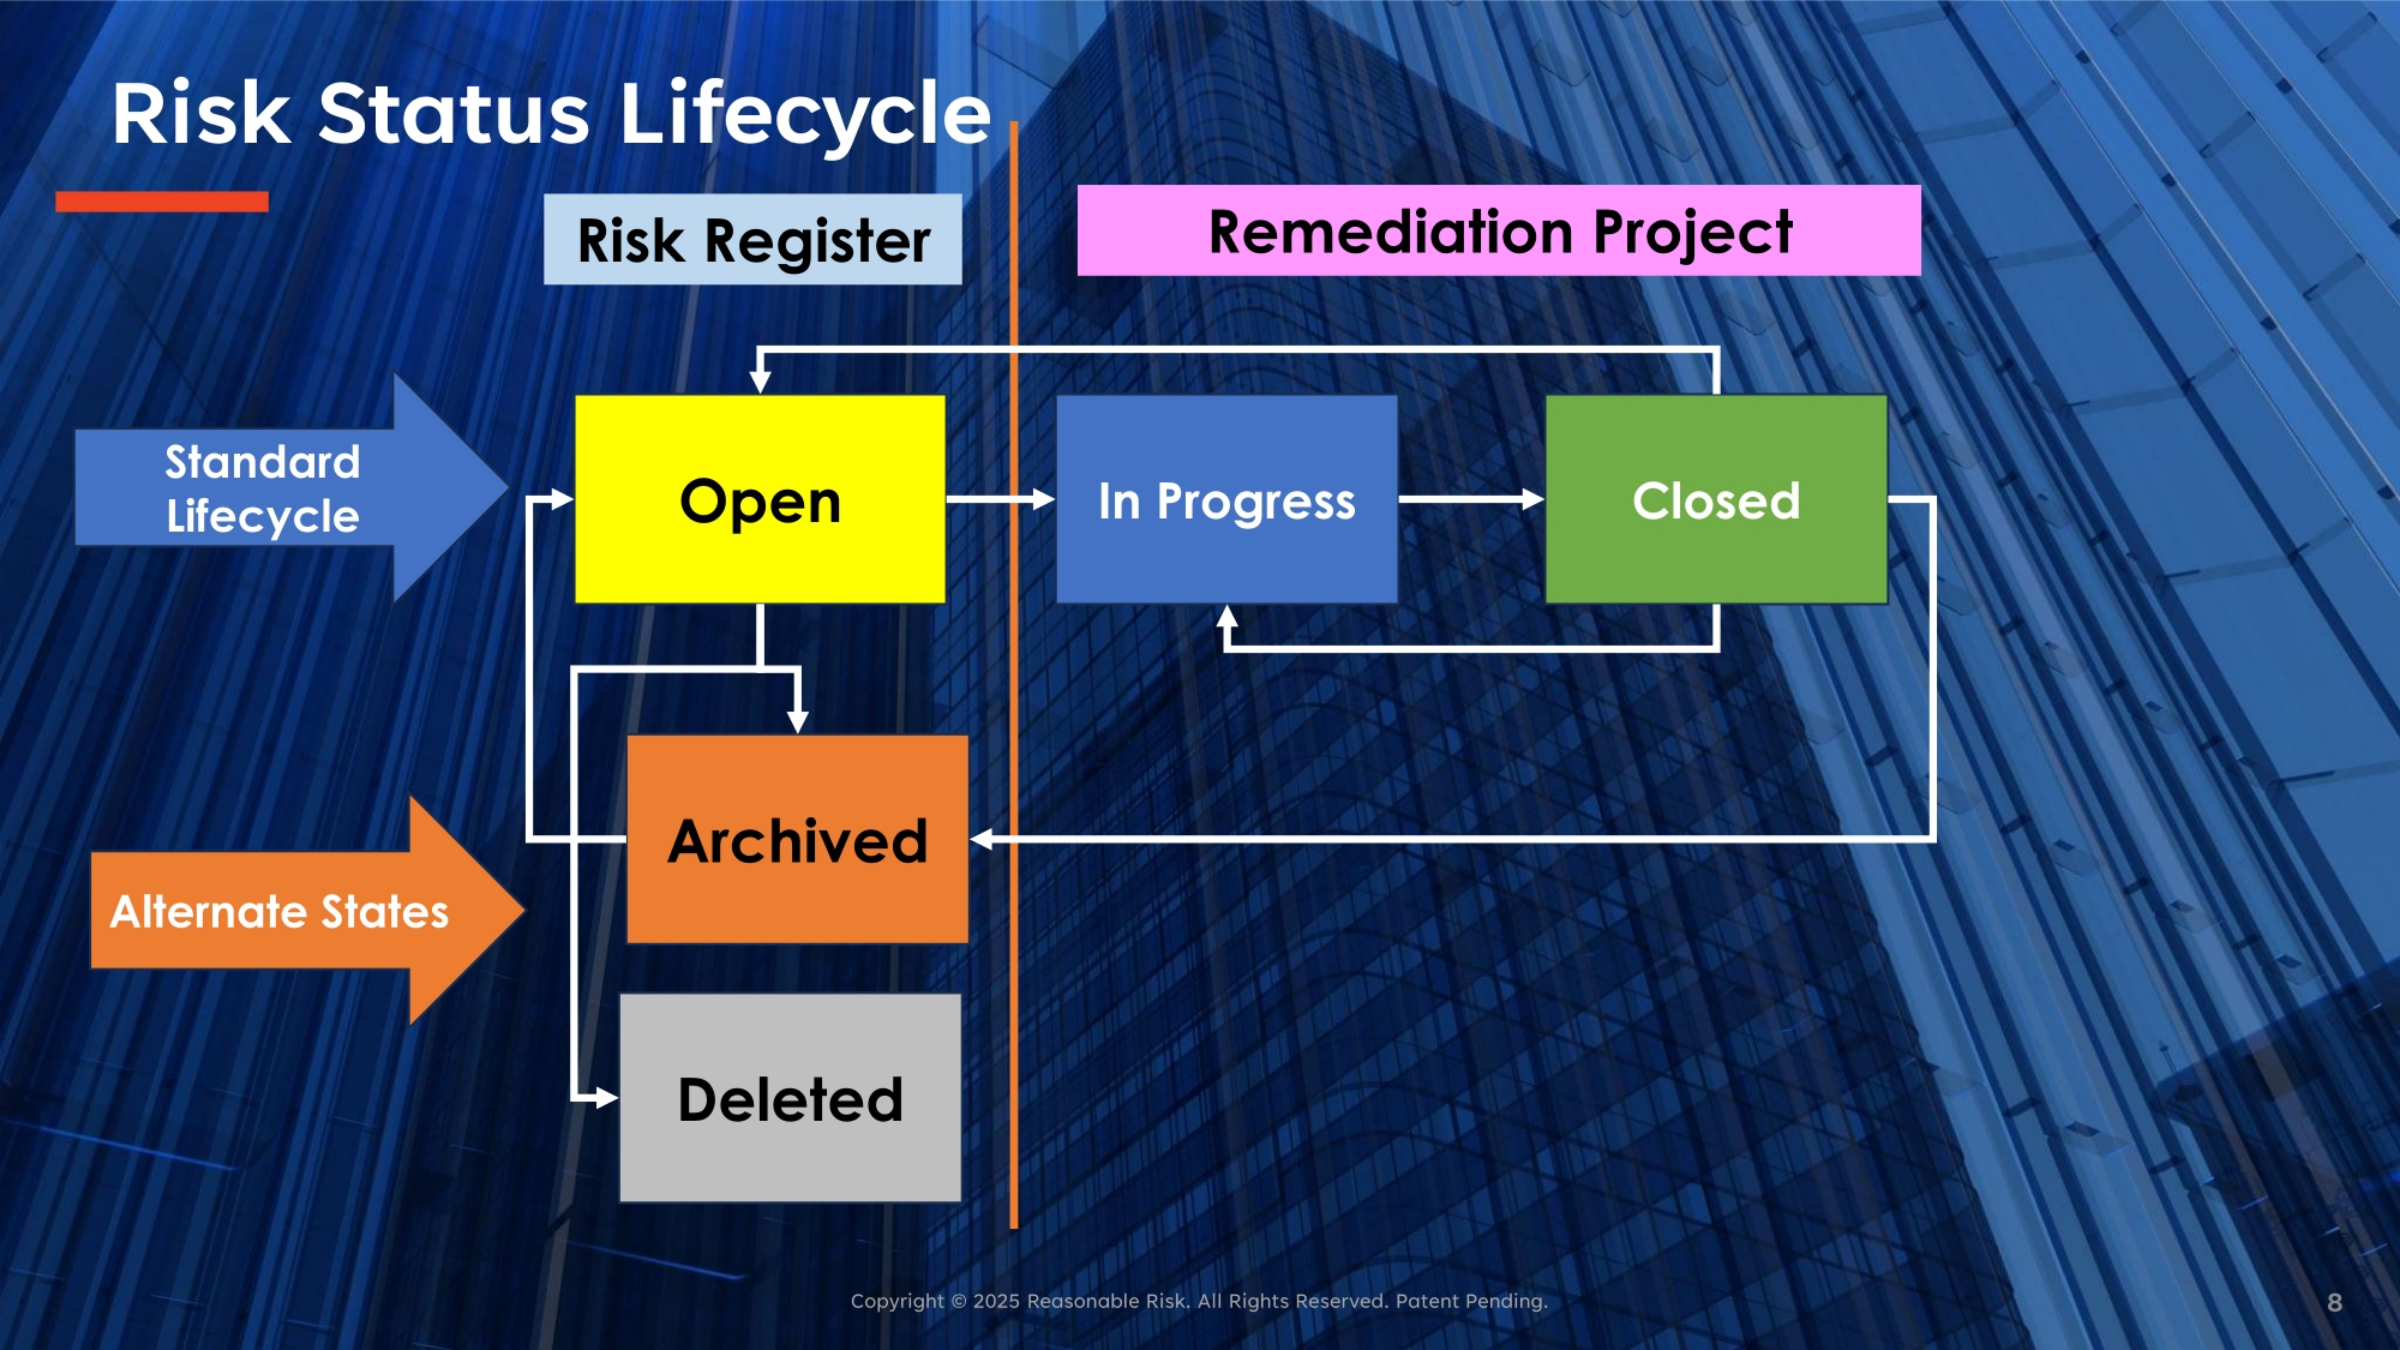
This diagram illustrates the Risk Status Lifecycle, showing the standard progression and alternate states. In the standard lifecycle, a risk begins as "Open" within the Risk Register. Once mapped to a Remediation Project, it moves to "In Progress," and upon successful mitigation, it becomes "Closed." The alternate states include "Archived," where a risk is retained for historical purposes but no longer actively managed, and "Deleted," which represents a permanent removal from the system. This visual helps us understand the various transitions and the overall flow of risk management.
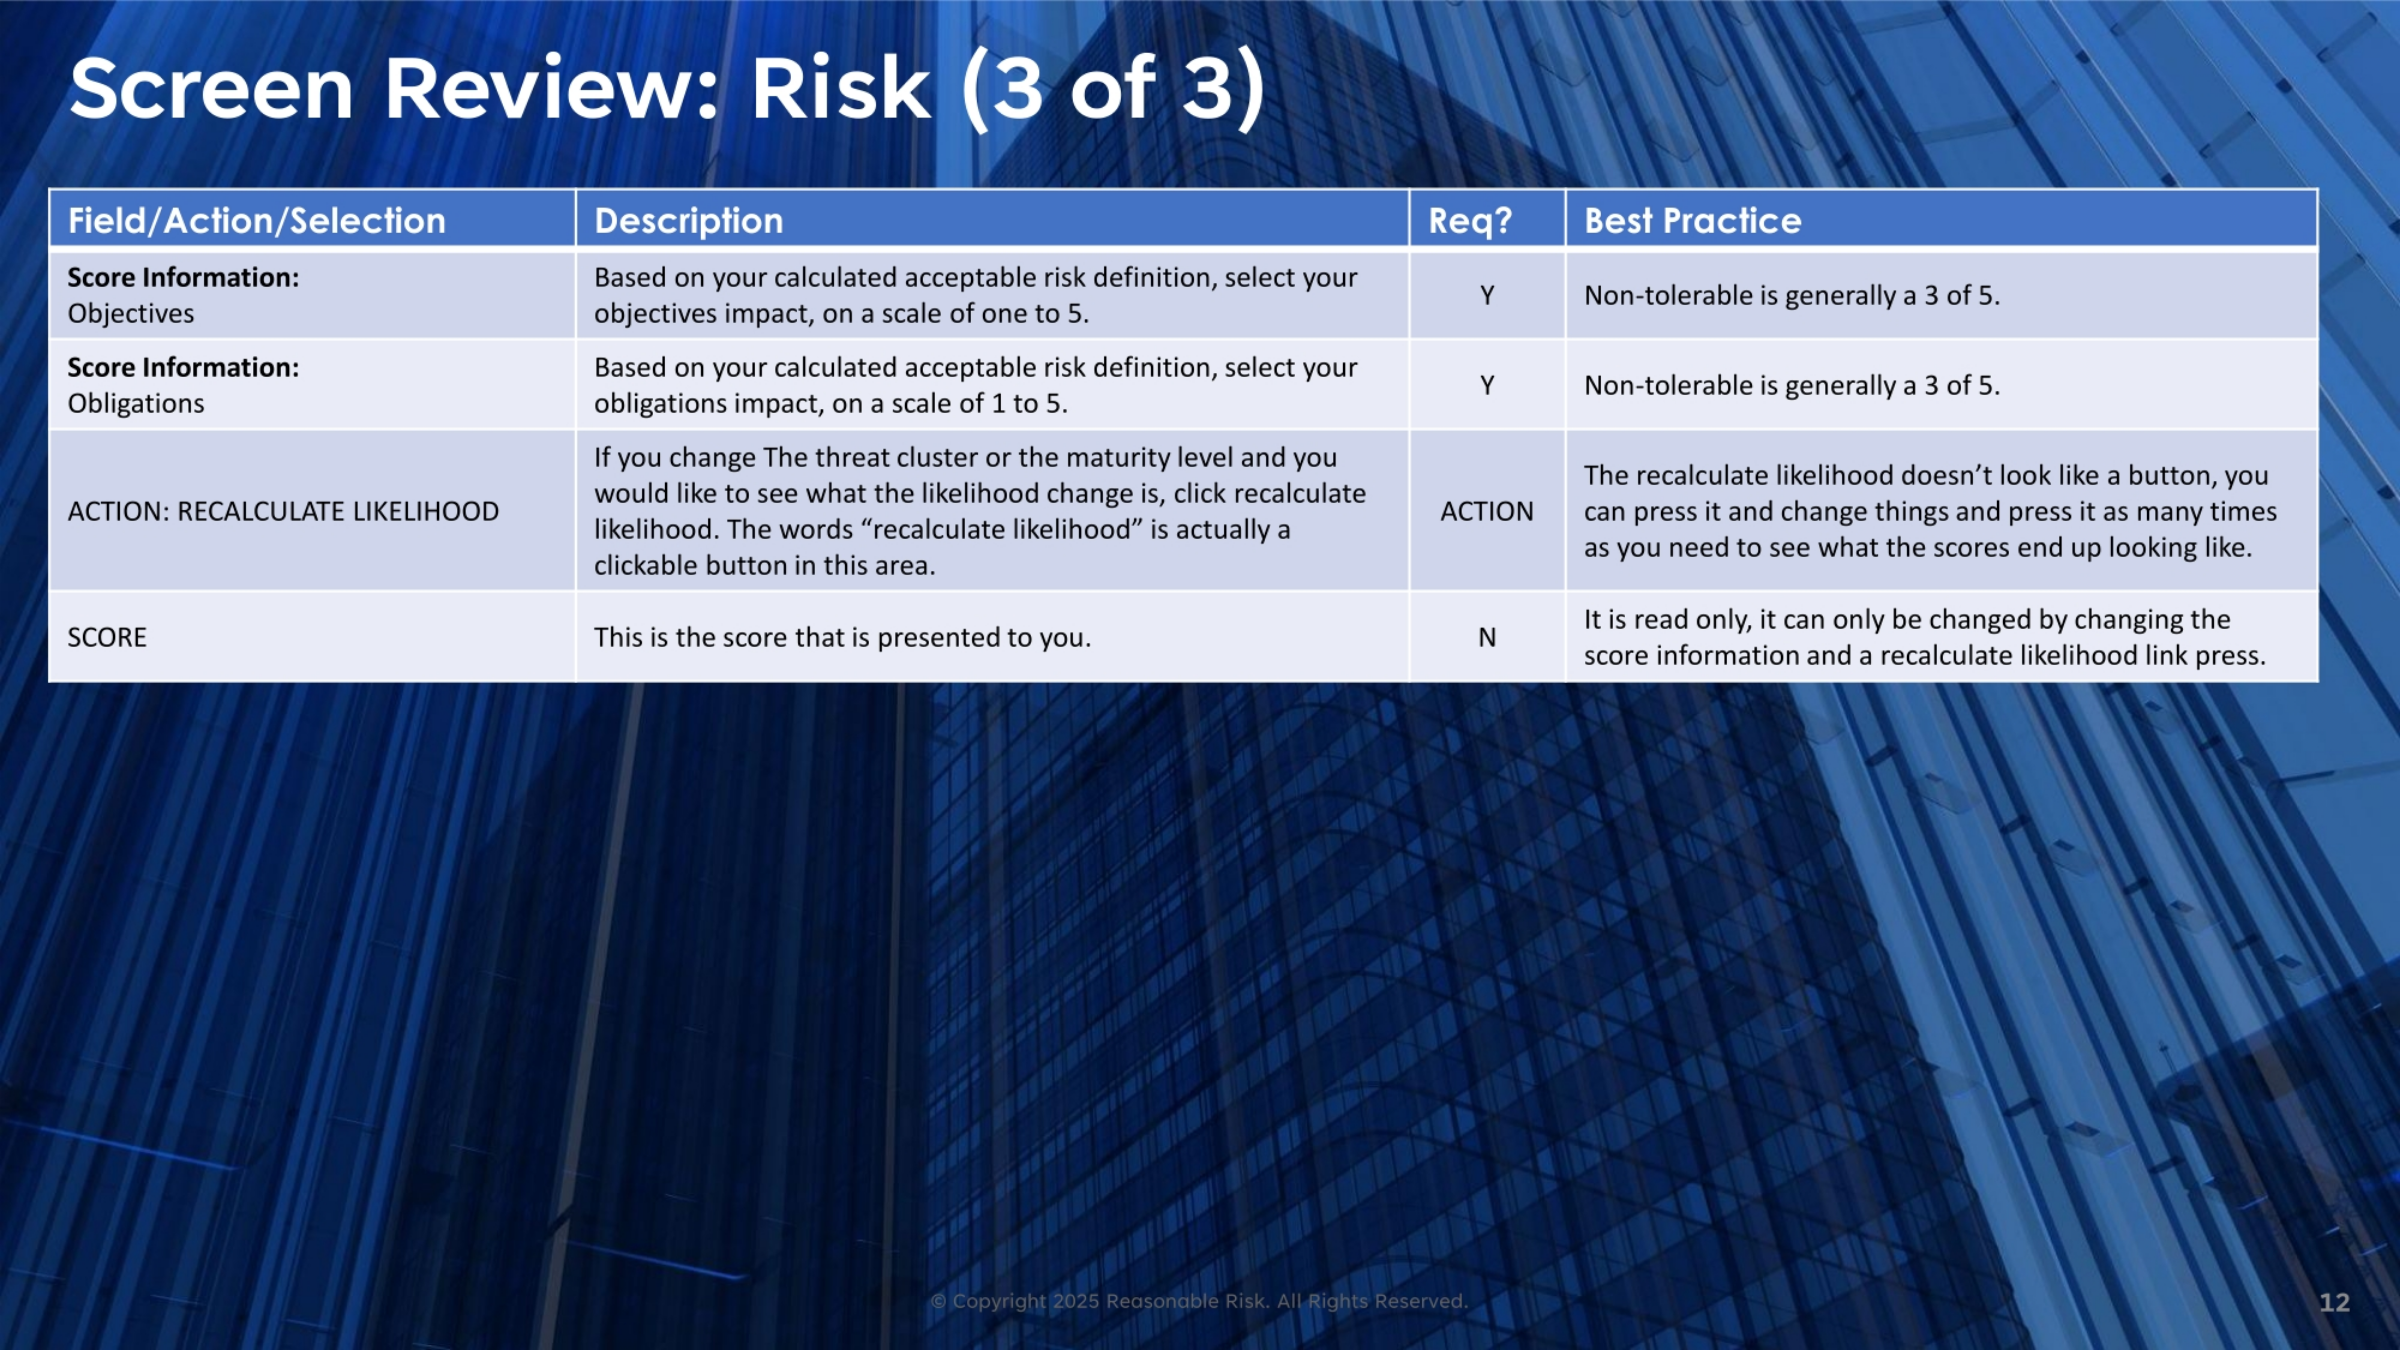
9. Screen Narrative: Risks
The "Risks" screen serves several key purposes, including maintaining, viewing, editing, deleting, and archiving risks, as well as mapping them to remediation projects. At a high level, risks are brought into the register, reviewed, edited, and mapped for remediation, forming the basis for all reports and KPIs. In detail, risks can be created from Findings, Scenarios, or external imports, and include descriptions, mitigating controls, vulnerabilities, and framework mappings. They feature Initial, Current, and Safeguard Risk Scores, are mapped to remediation projects, and allow for auditable comments. Within the overall risk lifecycle, risks start as "open," become "in progress" when associated with a project, and can be archived or deleted, with closure only possible within a remediation project.
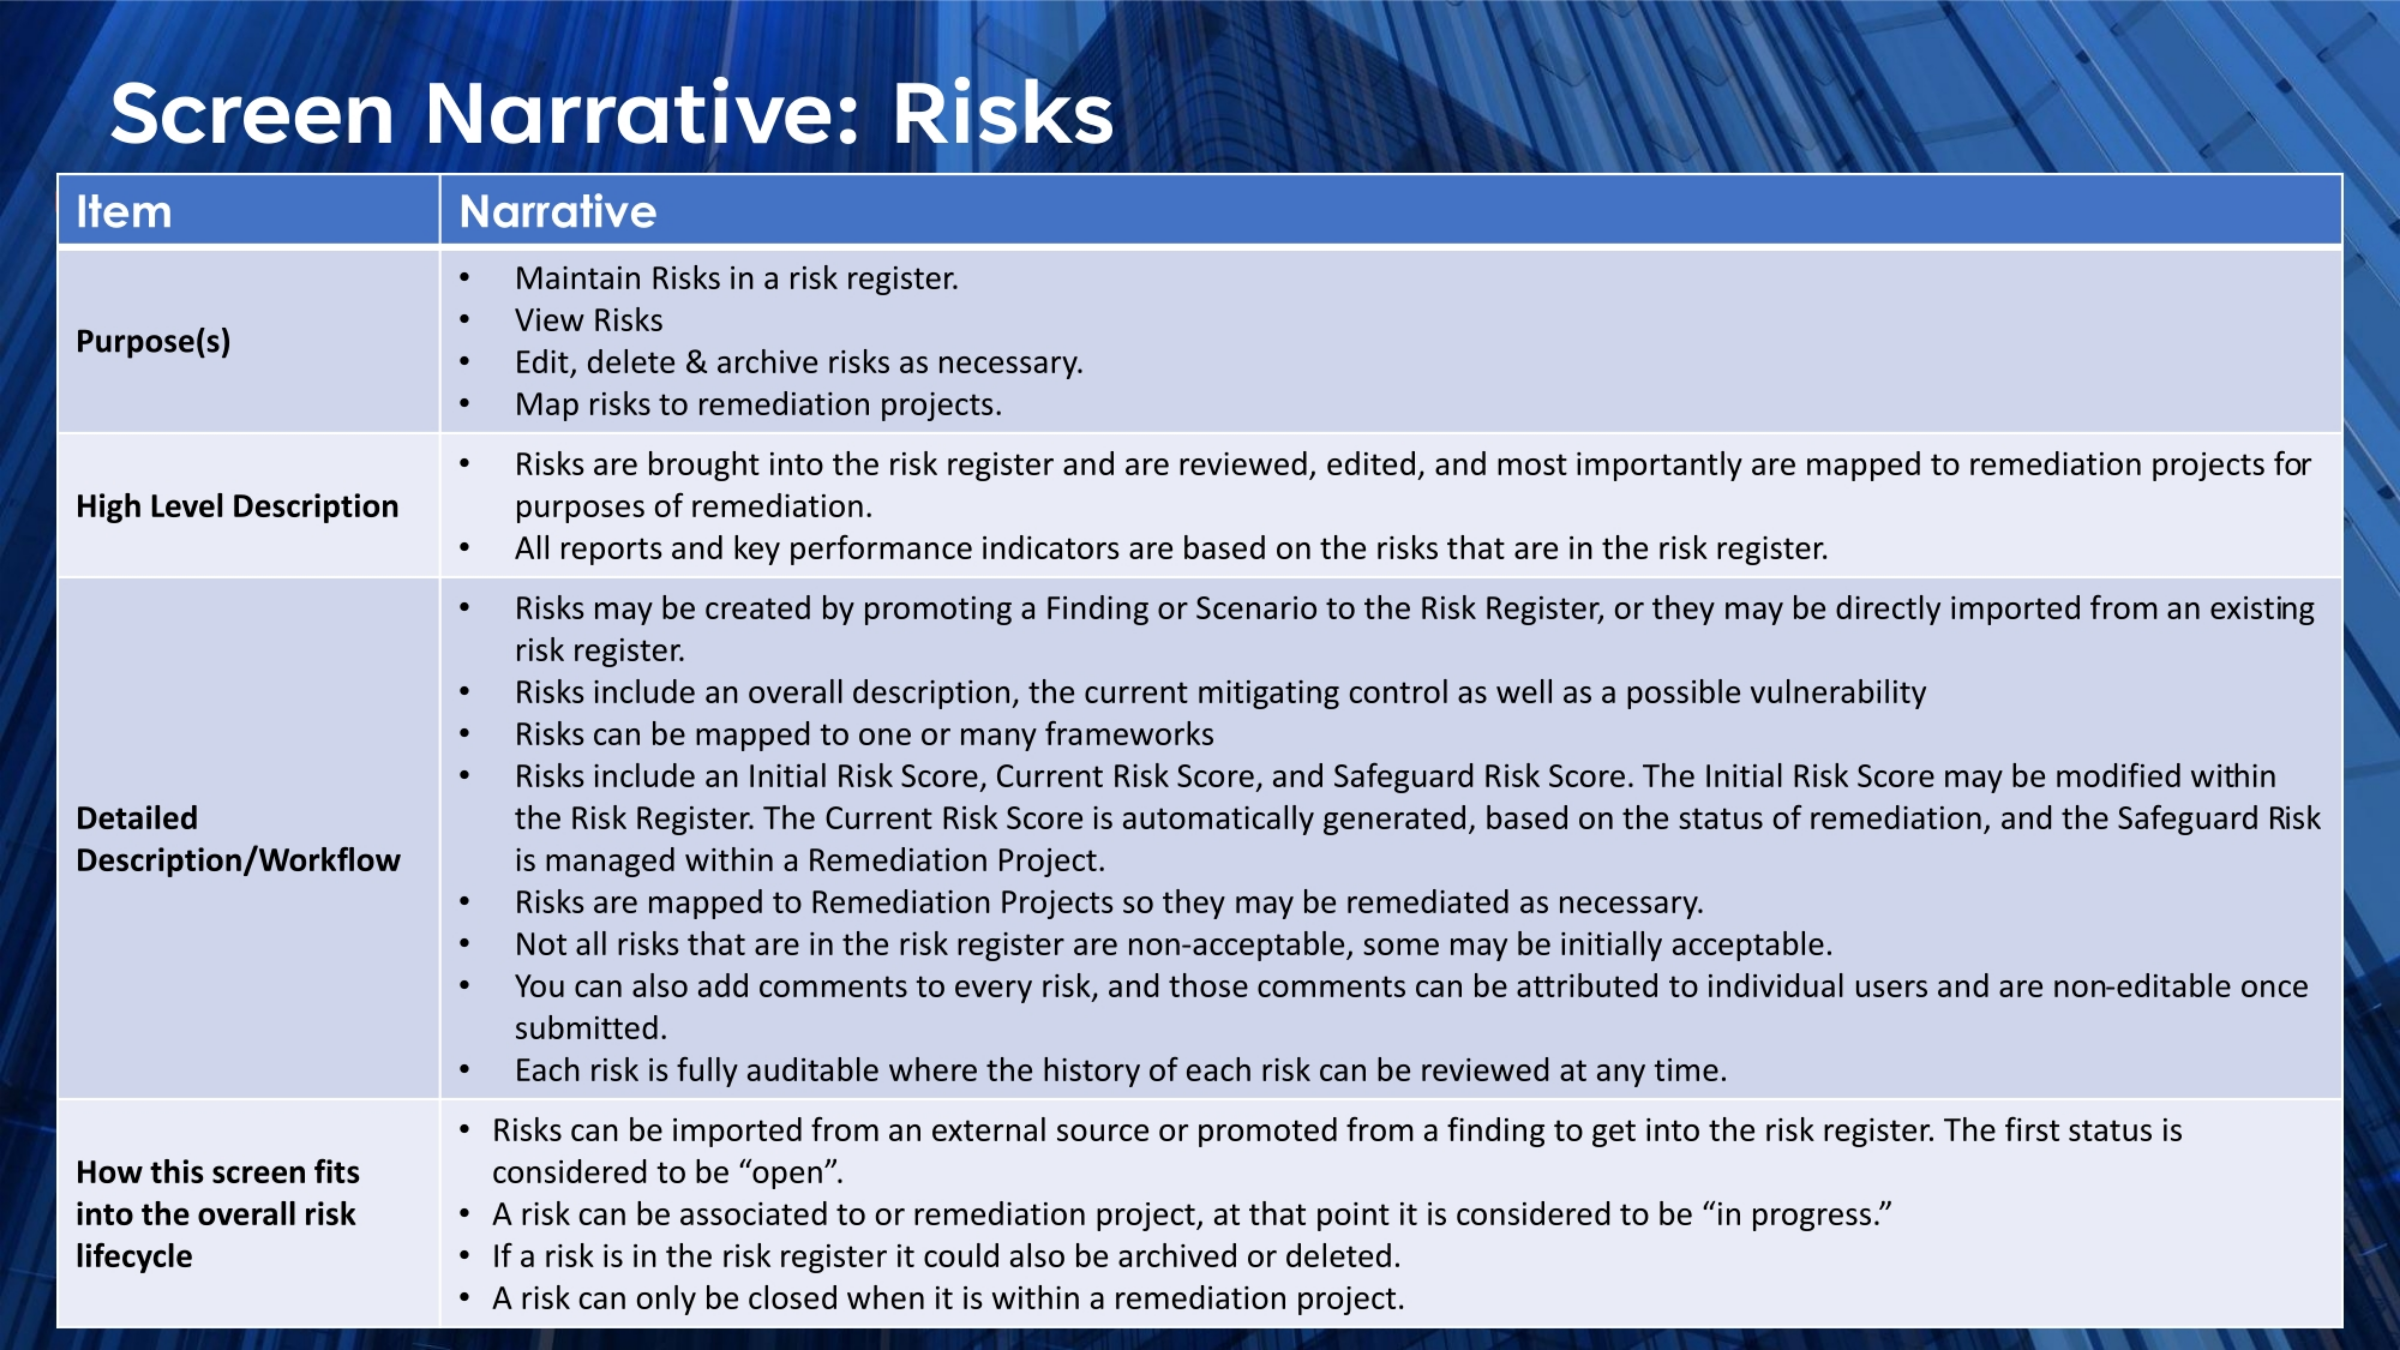
10. Screen Review: Risk (1 of 3)
Let's review the individual risk details, starting with the Blue Action Bar. The CSP Control ID, a common security program number, helps categorize controls, with over 30 categories available. Mapped Framework Controls are selected based on the chosen CSP, allowing for multiple selections. The Risk Description provides a comprehensive overview of the risk itself or the control from a framework. The Vulnerability field identifies the specific gap or "thing that needs to be fixed." Asset Class and Asset fields describe the type and specific name of the asset affected. Threat Type and Threat Description detail the nature of the threat. Industry specifies the organization's sector, typically a one-time setup. Origin and Origin Description clarify how the risk was identified. Finally, the Origin Score provides a numerical value, like a CVSS score, if available from a scan.
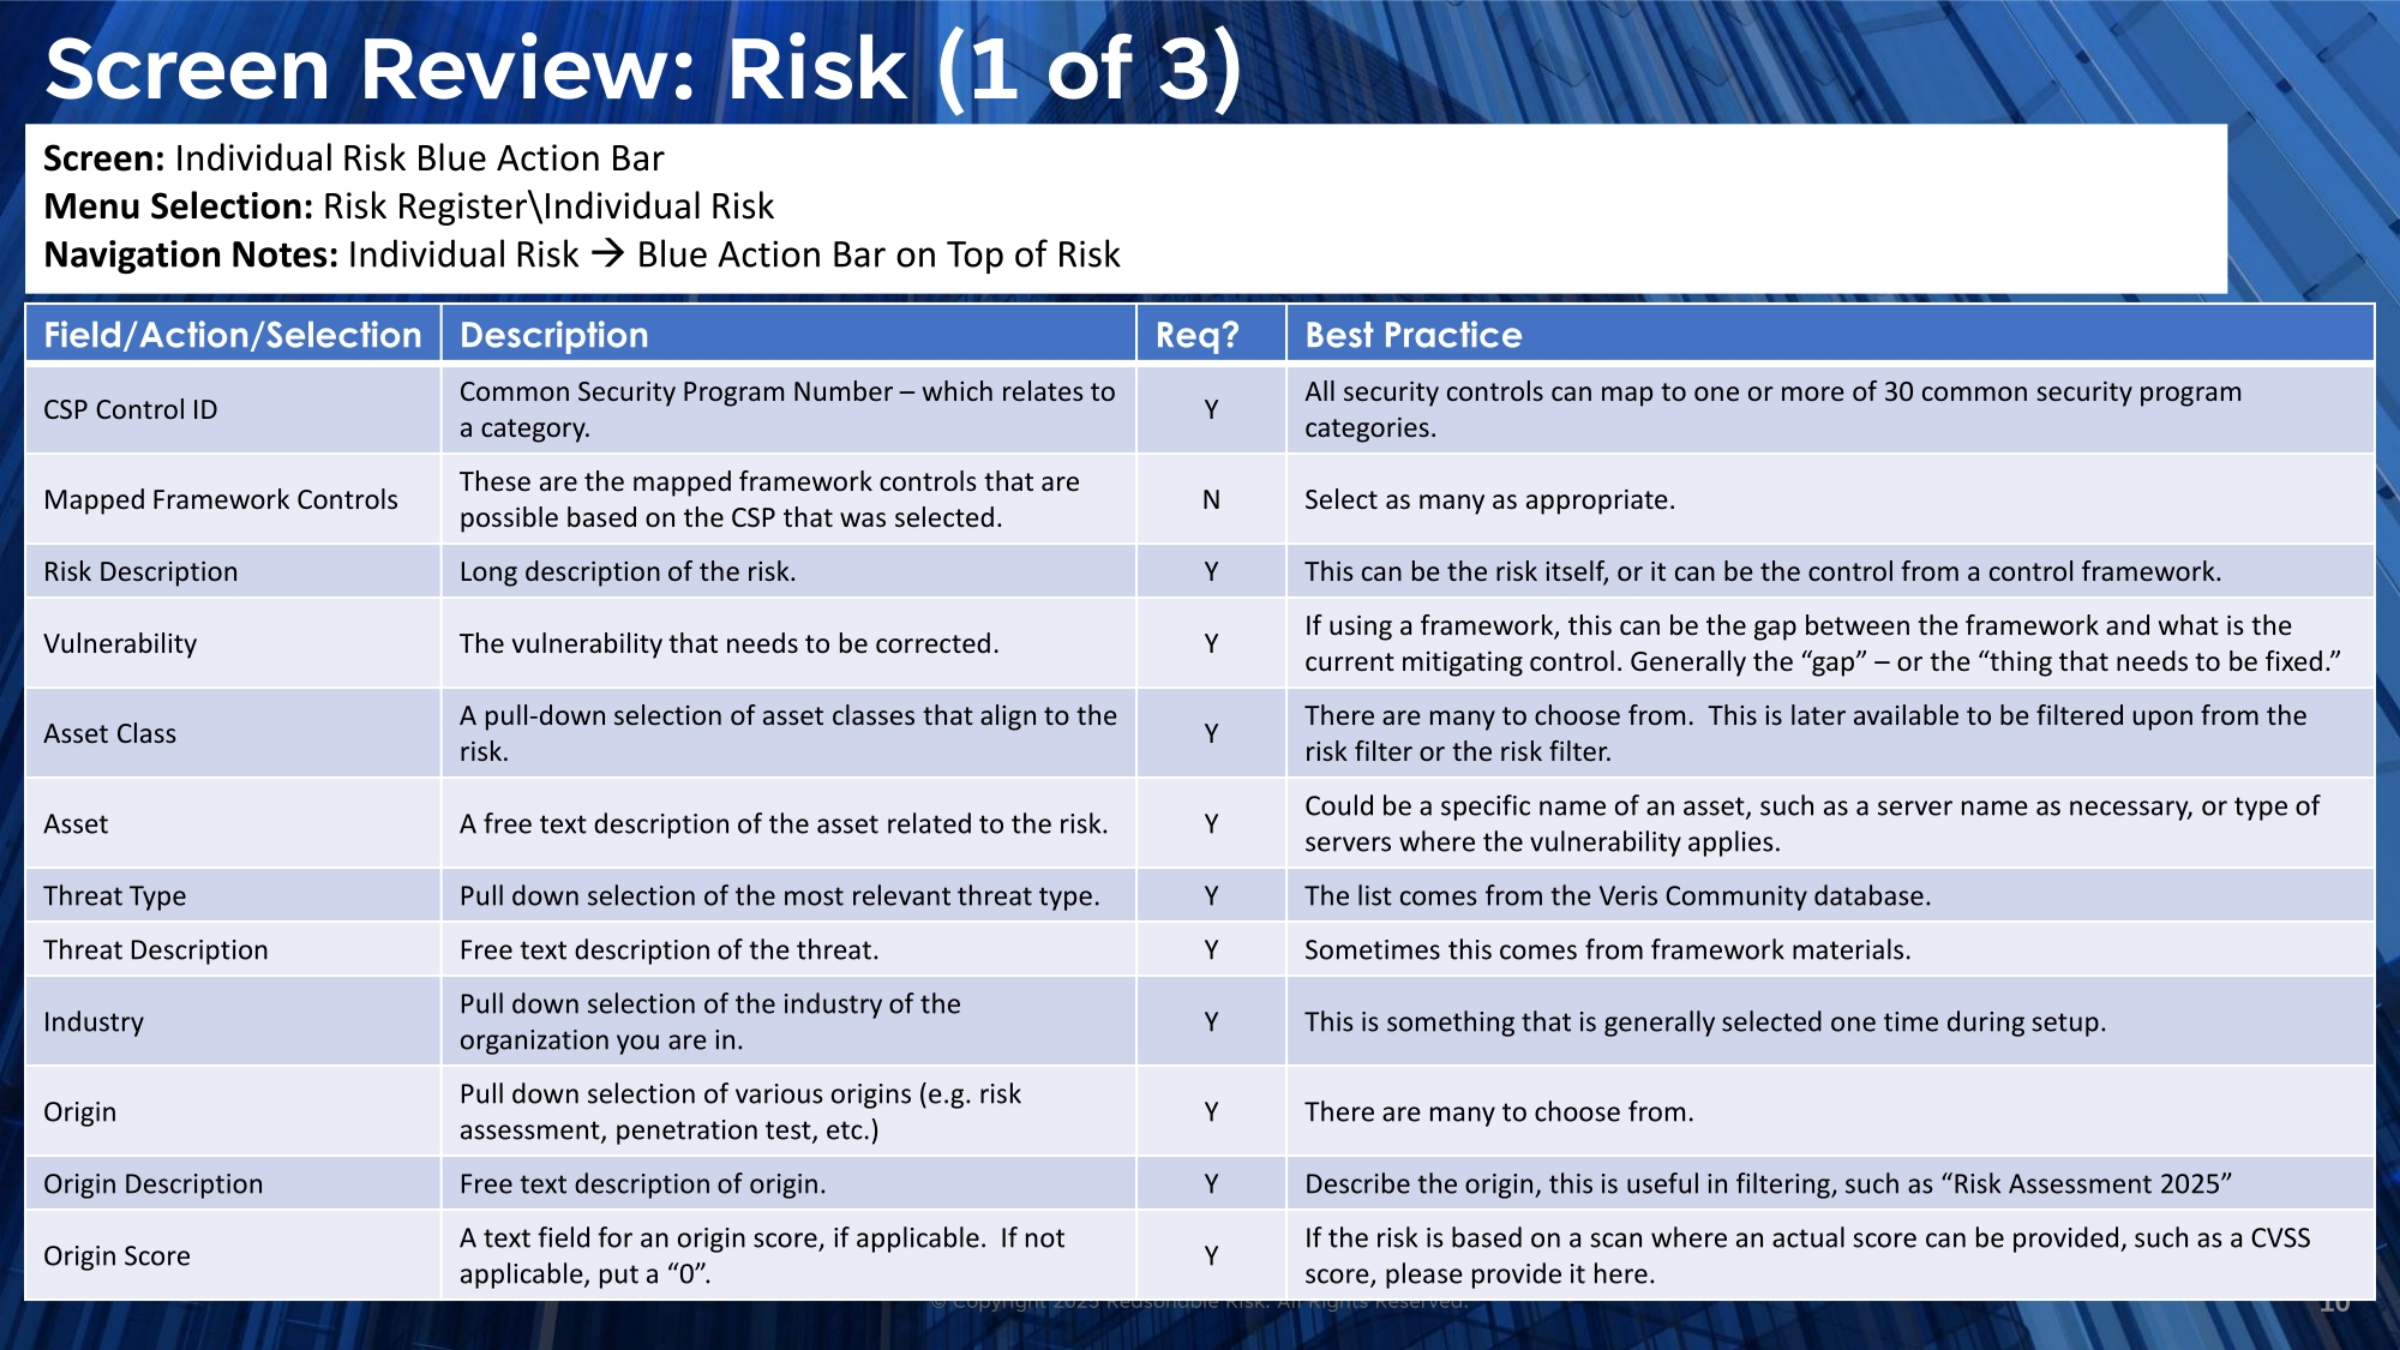
11. Screen Review: Risk (2 of 3)
Continuing our review of risk details, we examine the Mitigating Control and Safeguard Description fields. The Mitigating Control, which can be rich text formatted, describes the current control in place, explaining how framework controls are met. The Safeguard Description, also rich text formatted, outlines necessary remediation steps, addressing any identified vulnerabilities. Under Score Information, the Threat Cluster is selected from nine options. The Maturity Level, on a scale of one to five, indicates the current mitigating control's effectiveness. Likelihood is suggested based on the threat cluster, maturity level, and industry, but can be overridden. Lastly, Mission Impact, also on a scale of one to five, reflects the impact on objectives, with a score of three out of five generally considered non-tolerable.
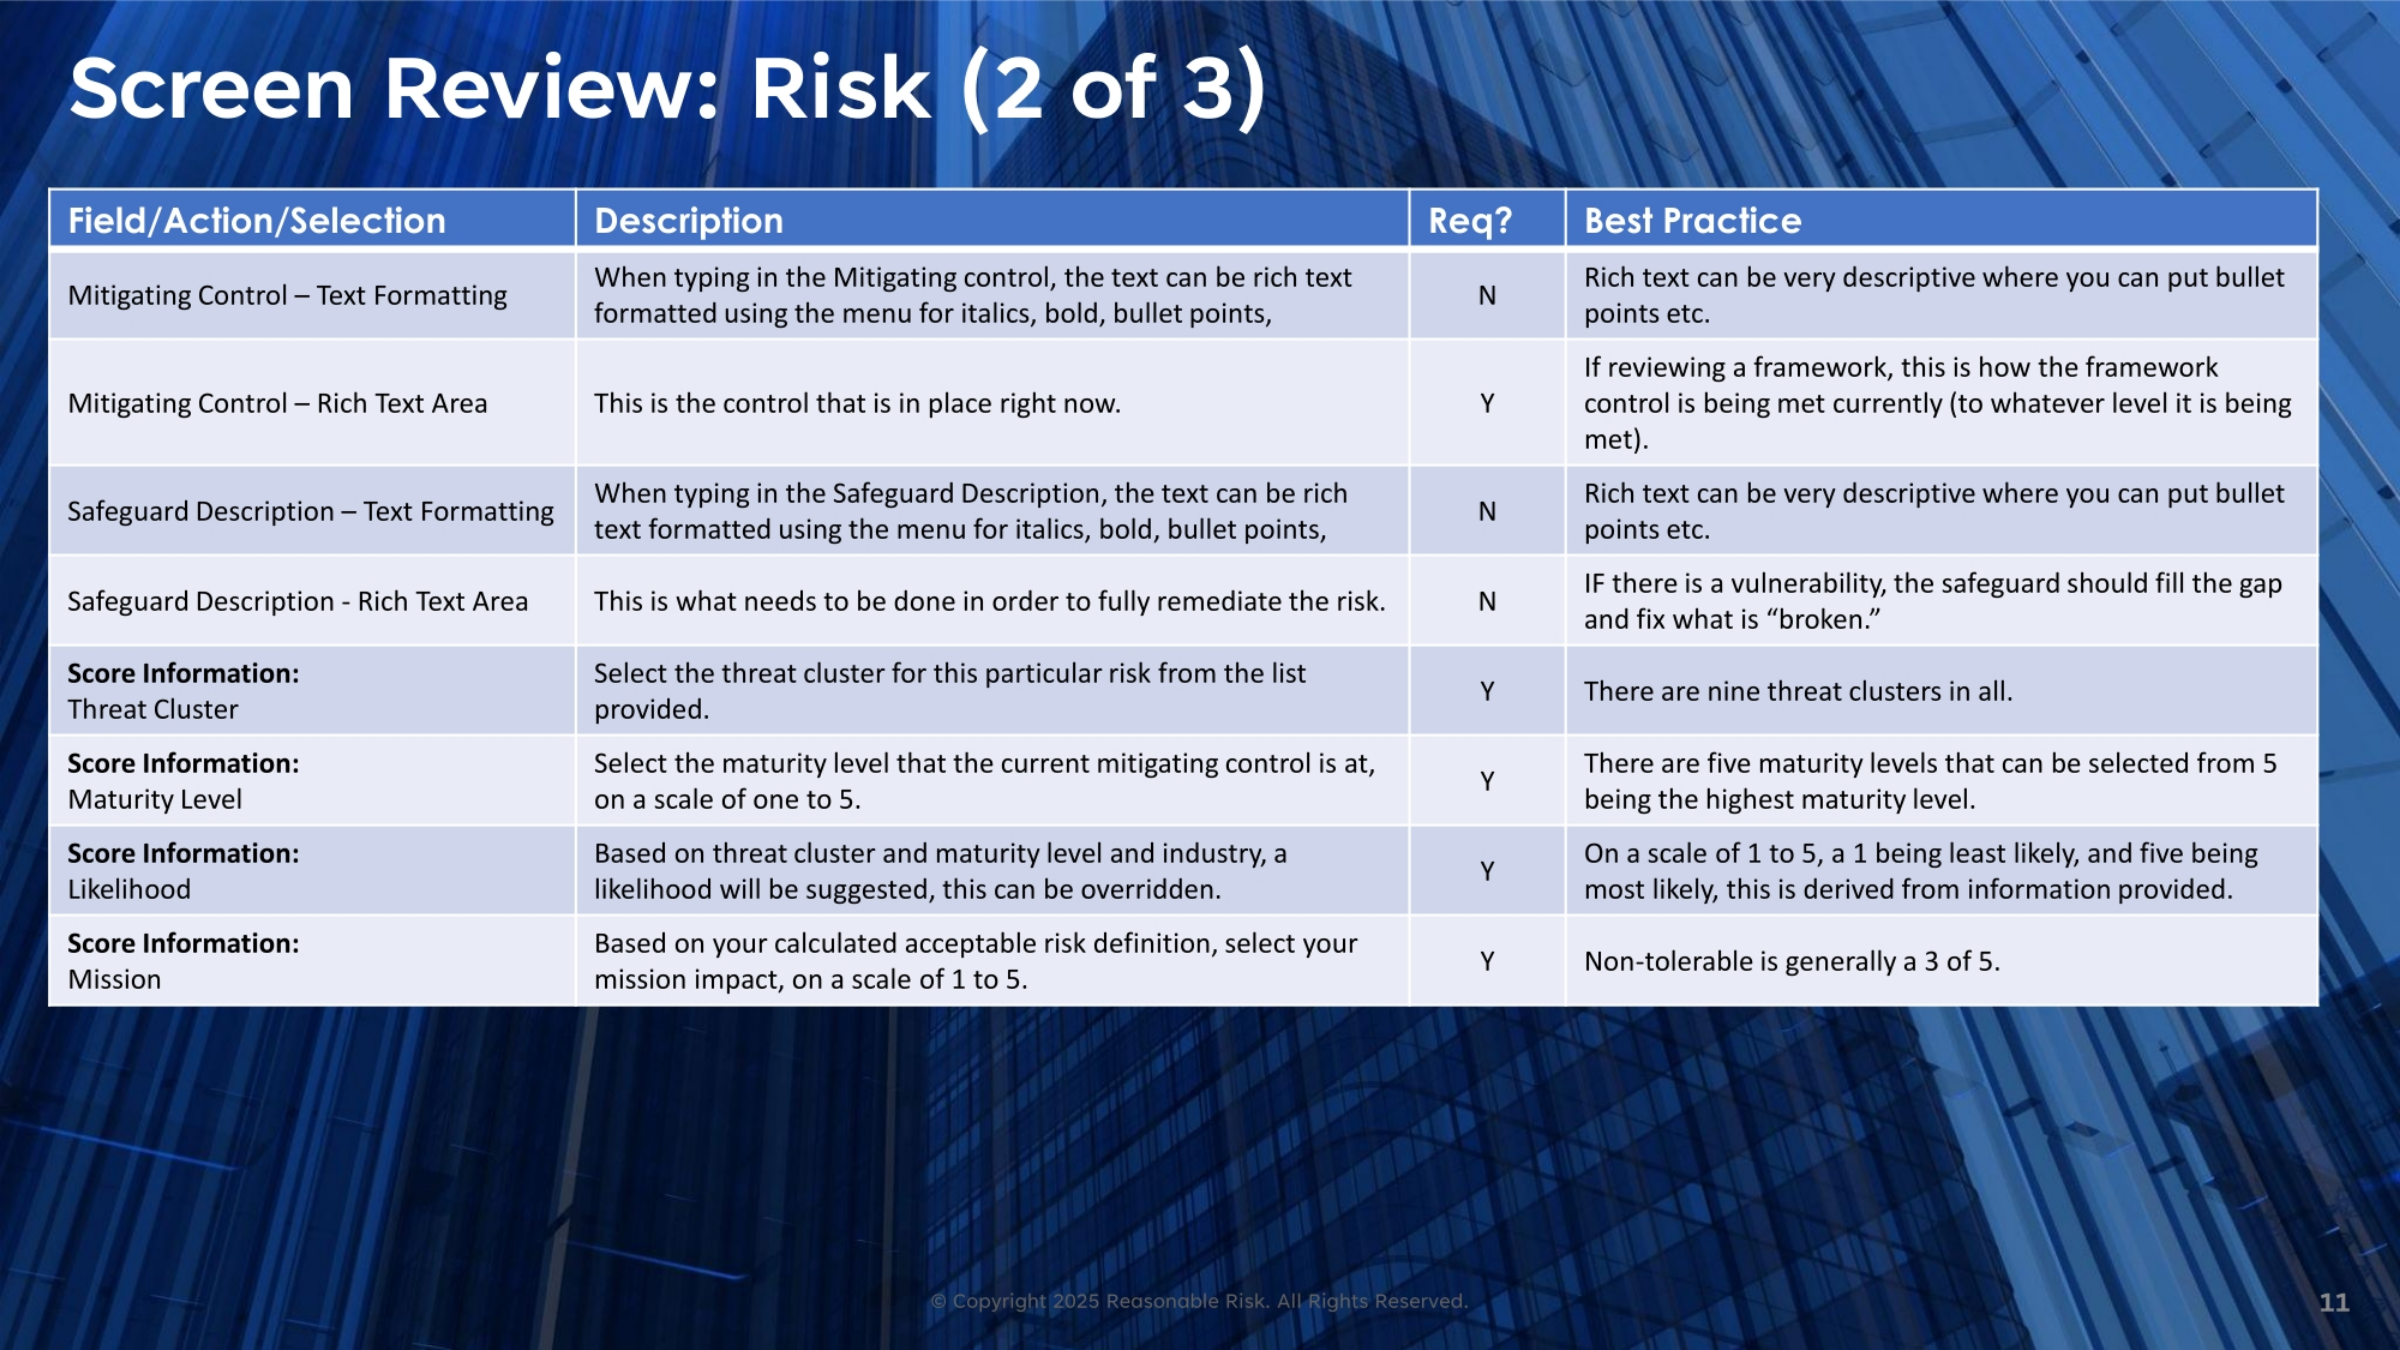
12. Screen Review: Risk (3 of 3)
Concluding our review of risk details, we look at the remaining Score Information and actions. The Objectives and Obligations fields, both on a scale of one to five, reflect the impact based on your acceptable risk definition. A score of three out of five is generally considered non-tolerable for both. The "Recalculate Likelihood" action is a clickable button that allows you to see how changes to the threat cluster or maturity level affect the likelihood score. This provides immediate feedback on potential adjustments. The final SCORE presented is read-only and can only be altered by modifying the underlying score information and then pressing the "Recalculate Likelihood" link.
13. Screen Visual: Risk
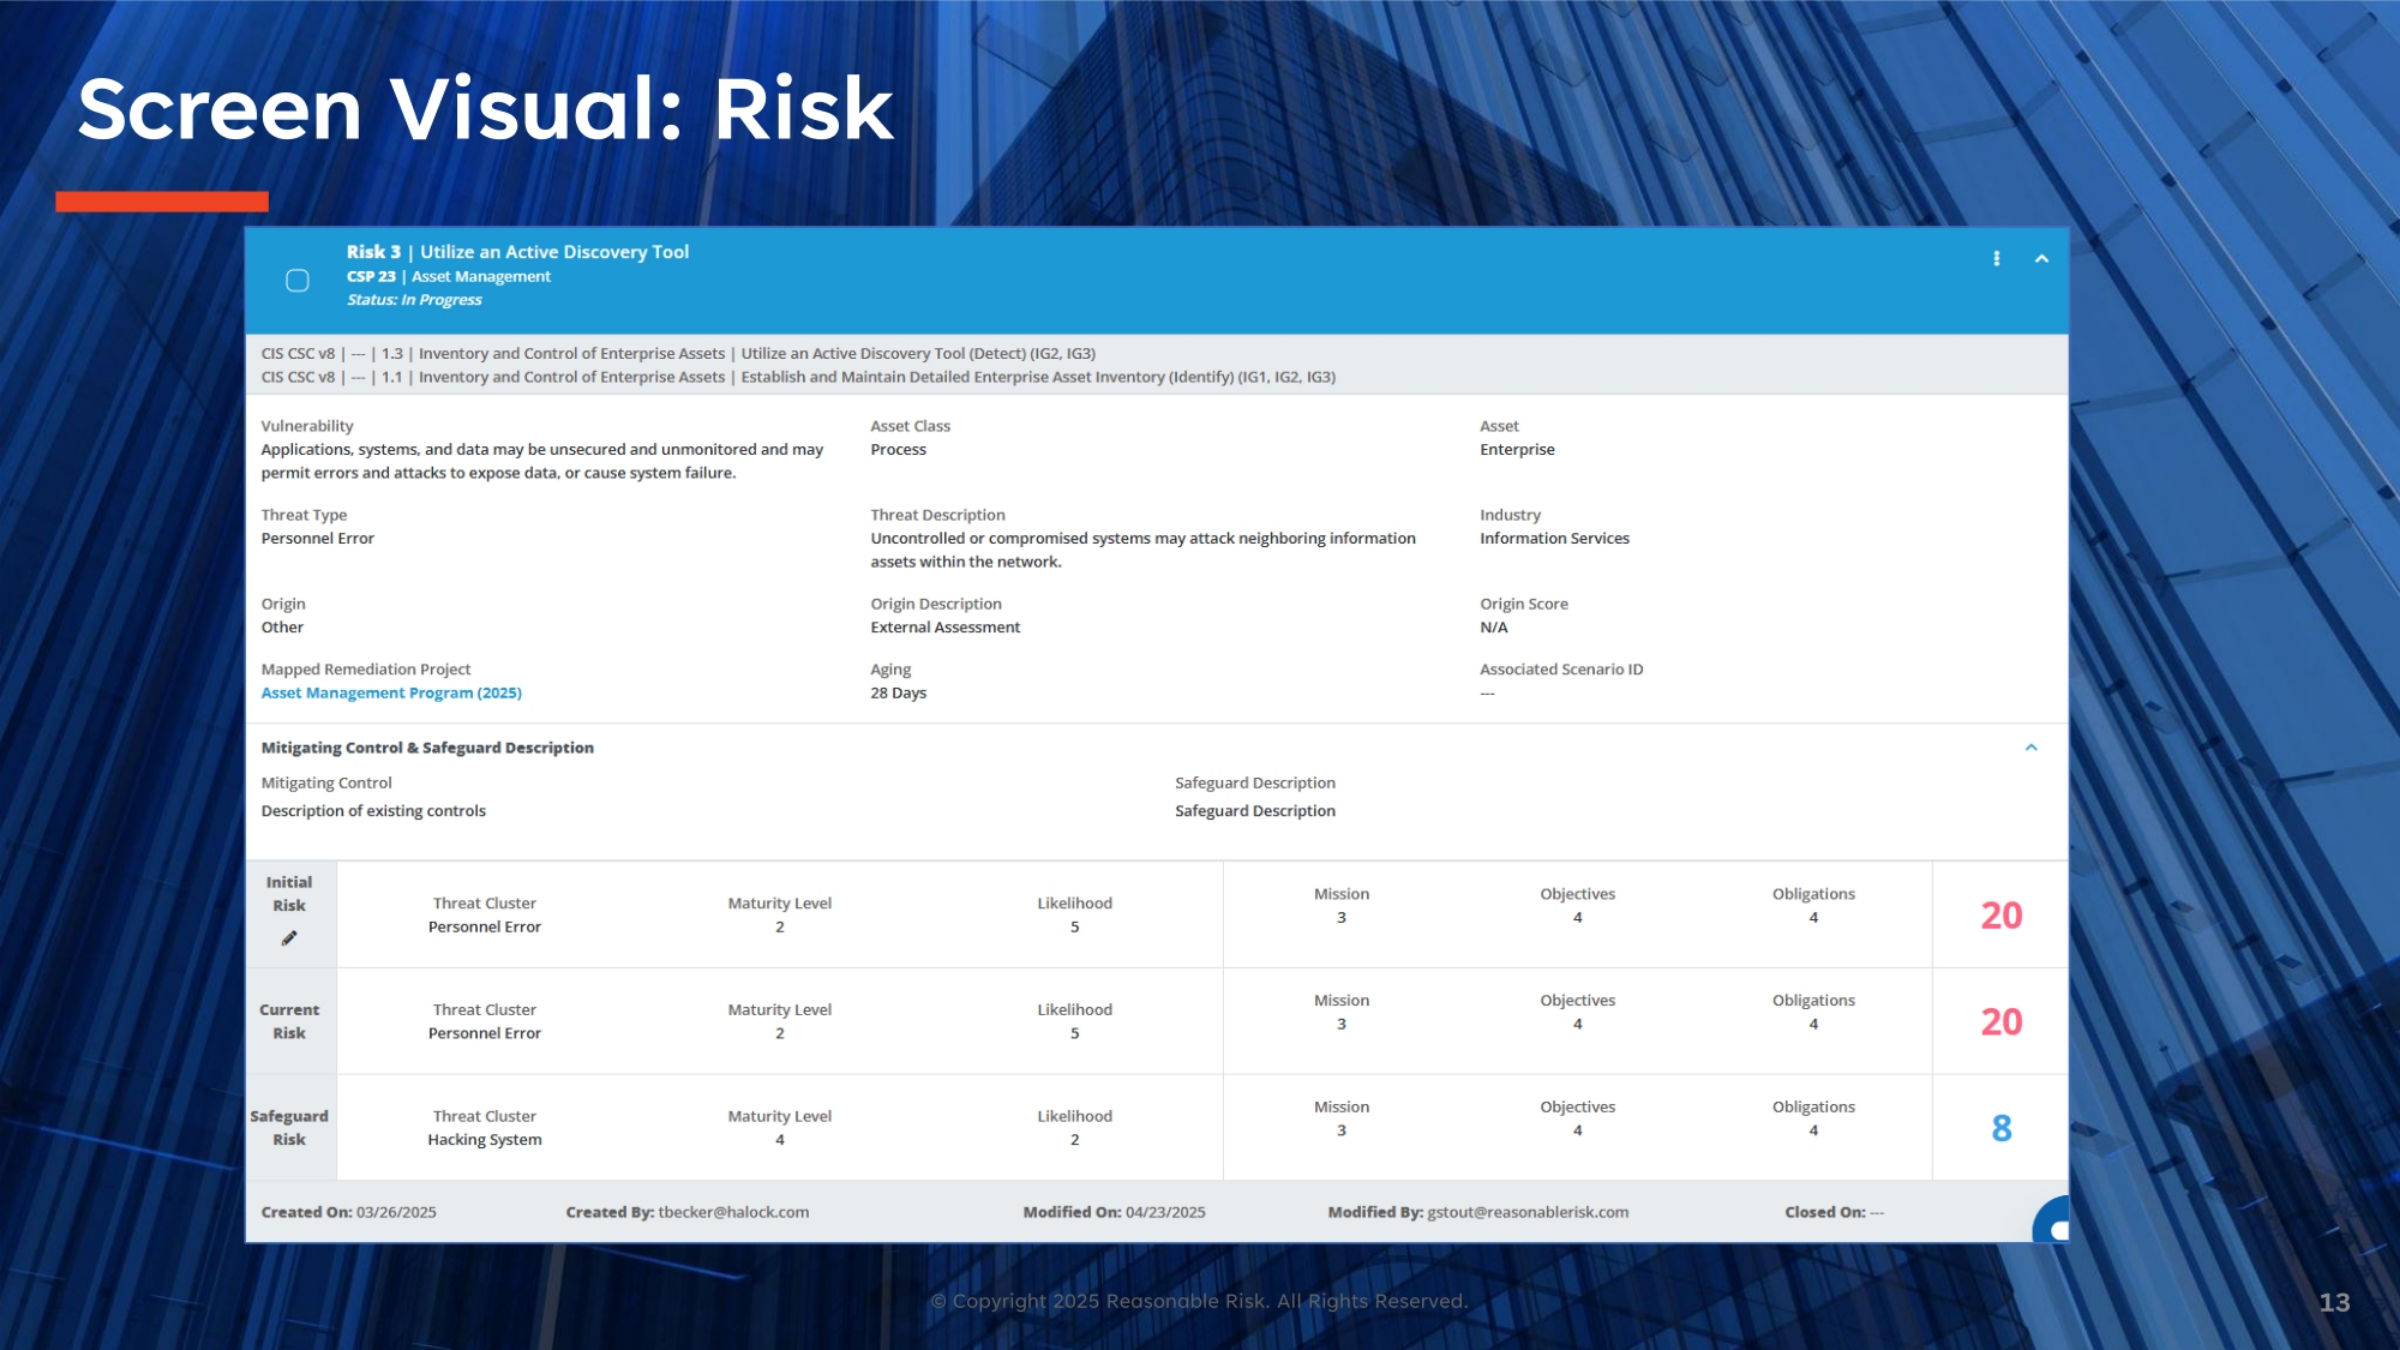
This screen visual provides a comprehensive view of an individual risk, specifically "Risk 3: Utilize an Active Discovery Tool." We can see its CSP, status, and associated CIS CSC v8 controls. The vulnerability description highlights potential data exposure due to unsecured systems. Details like Threat Type, Asset Class, and Industry are clearly displayed. The Mitigating Control and Safeguard Description sections outline existing controls and necessary remediation steps. Below, the Initial Risk, Current Risk, and Safeguard Risk scores are presented, showing the Threat Cluster, Maturity Level, Likelihood, Mission, Objectives, and Obligations, along with their numerical values. This visual also includes creation and modification timestamps, offering a complete audit trail for the risk.
14. Screen Review: Risk Register Filter
The Risk Register Filter provides powerful tools for narrowing down your risk list. The "Carat Upper Right" action expands or collapses the filter panel, optimizing screen real estate. Each risk is assigned a unique "Risk ID" for easy identification. You can filter by "CSP Control ID" to find risks related to specific security programs, or use the "Risk Description" field for keyword searches. The "Framework" filter allows you to view risks mapped to particular frameworks, while "Asset Class" helps identify risks associated with specific asset types. Filters for "Status" (Open, In Progress, Closed), "Aging," and "Current Risk Score" categories enable precise segmentation of your risk data. After setting your criteria, the "Magnifying Glass" executes the search, and the "Circle with X" clears all filters, resetting to default.
15. Screen Review: Risk List Blue Action Bar
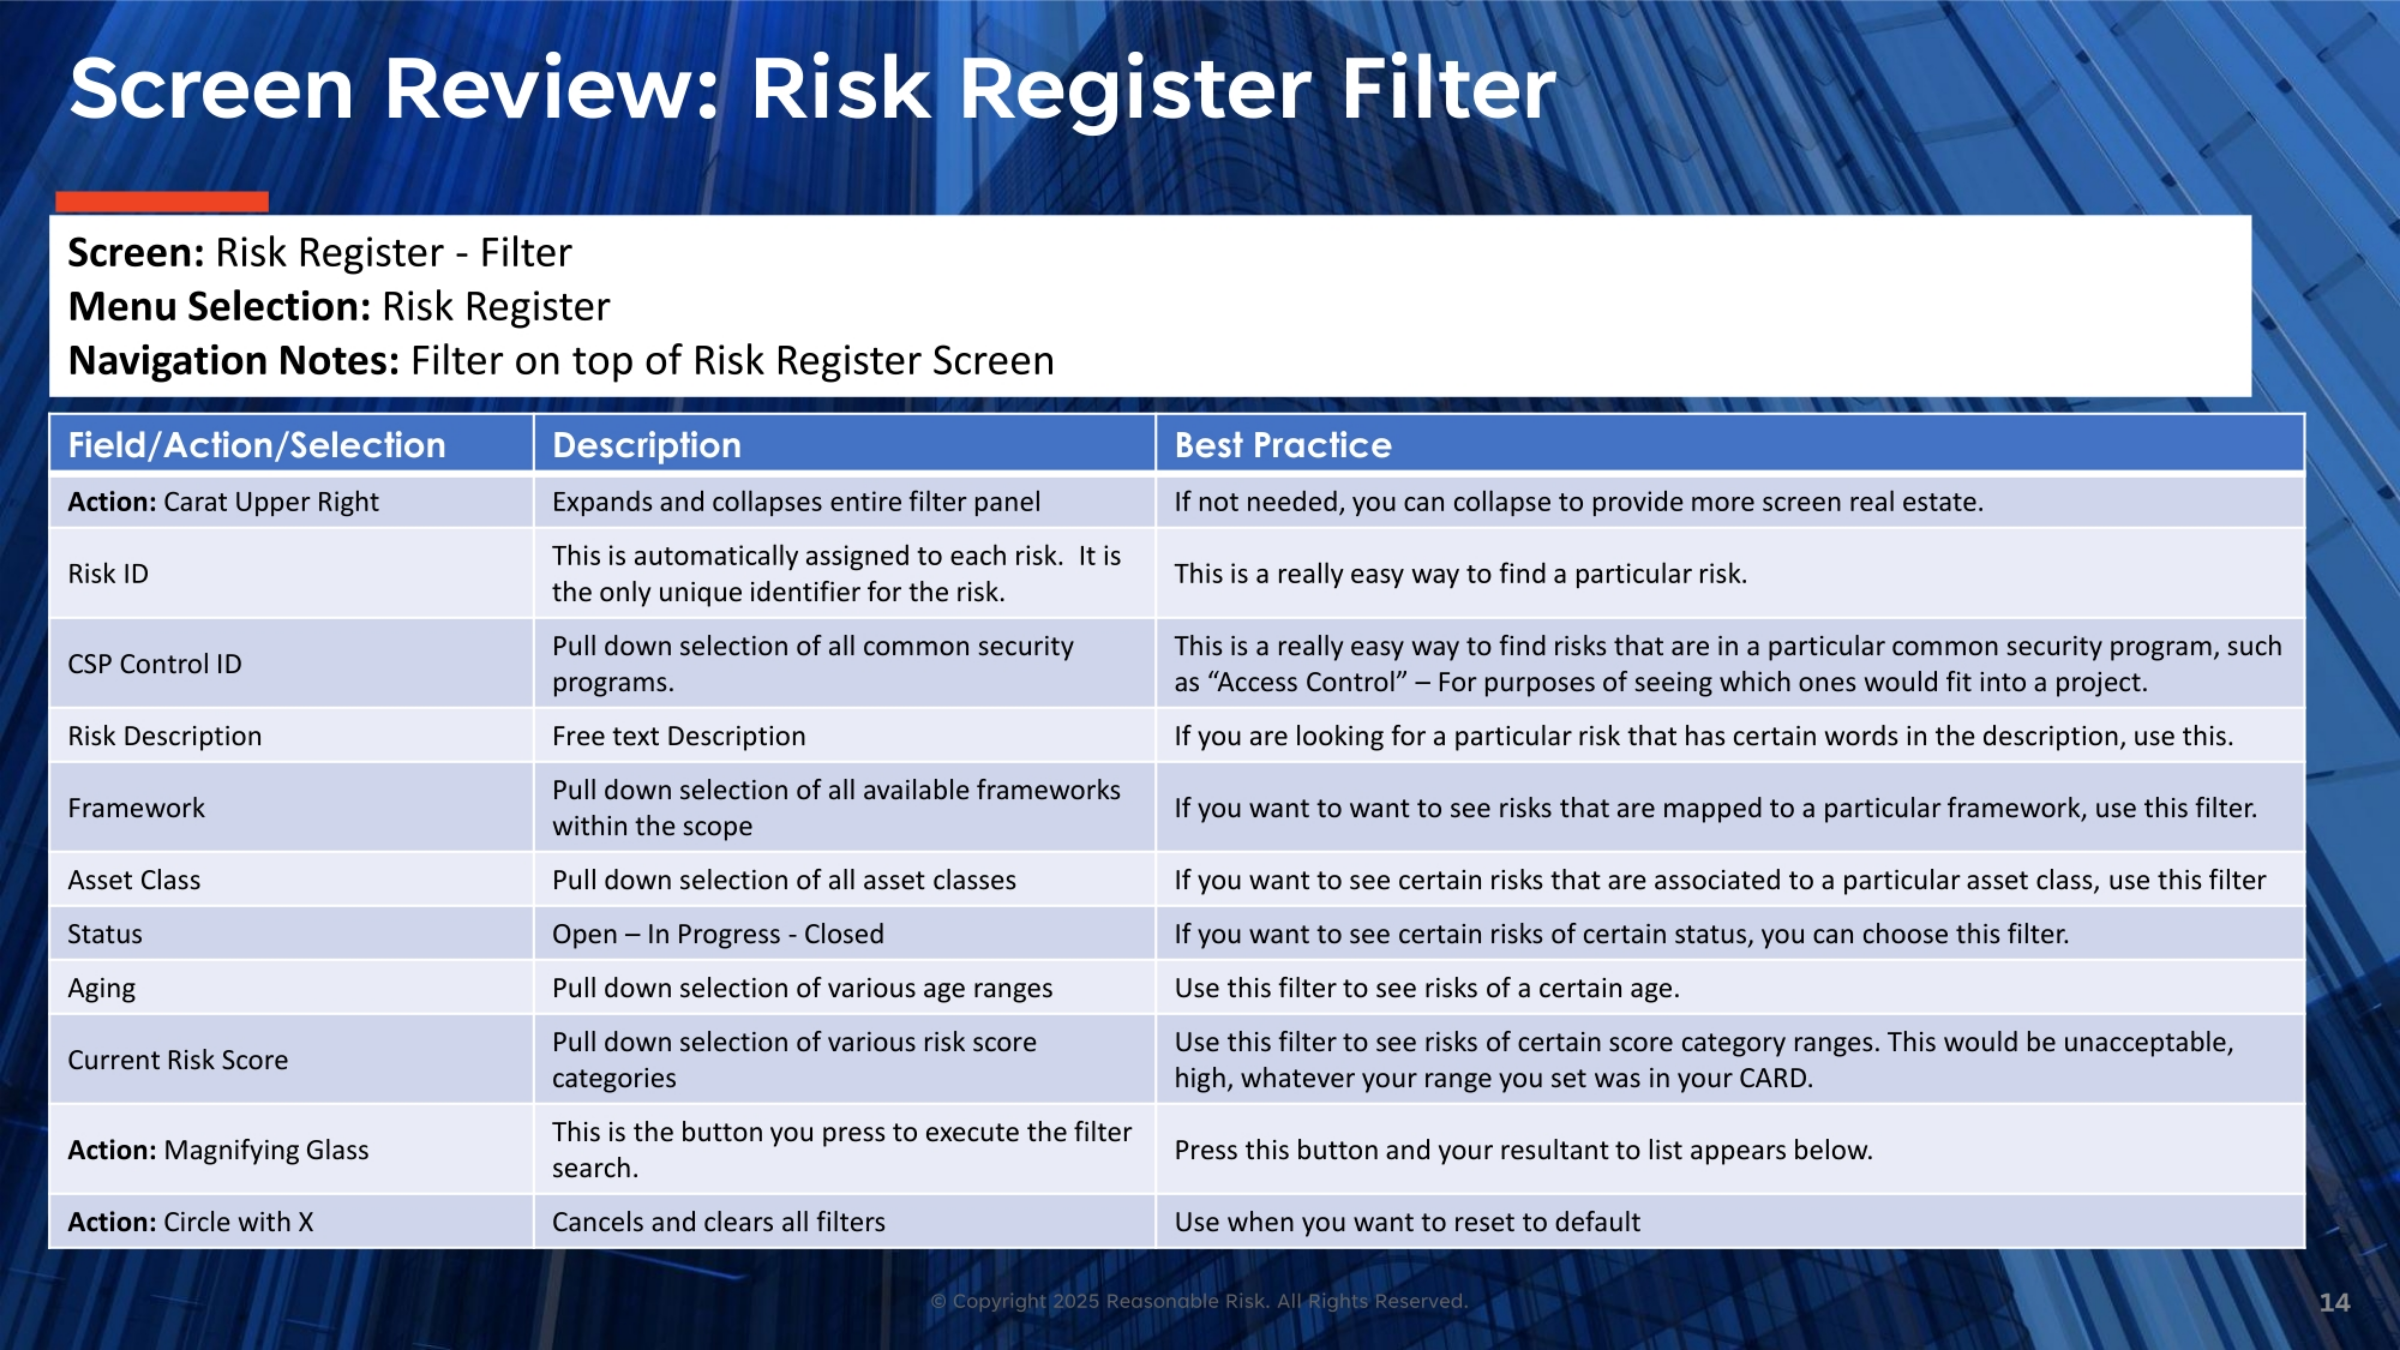
The Risk List Blue Action Bar offers several actions to manage your risks efficiently. The "Showing X to X entries" dropdown adjusts the number of risks displayed per page, with a default of 25. The "Square Box" selects all risks on the current page for bulk actions. The "Carat" expands or collapses risk details. The "Upload Arrow" is the import feature, allowing file selection and providing a downloadable template. The "Download Arrow" exports the entire risk register. The "Three Dot Menu" allows selected risks to be mapped to a single project. The "Sort By" pulldown offers various sorting options, with sorting by risk score from high to low being particularly valuable. Standard page navigation breadcrumbs are also available.
16. Screen Visual: Risk Register Filter & List Action Bar
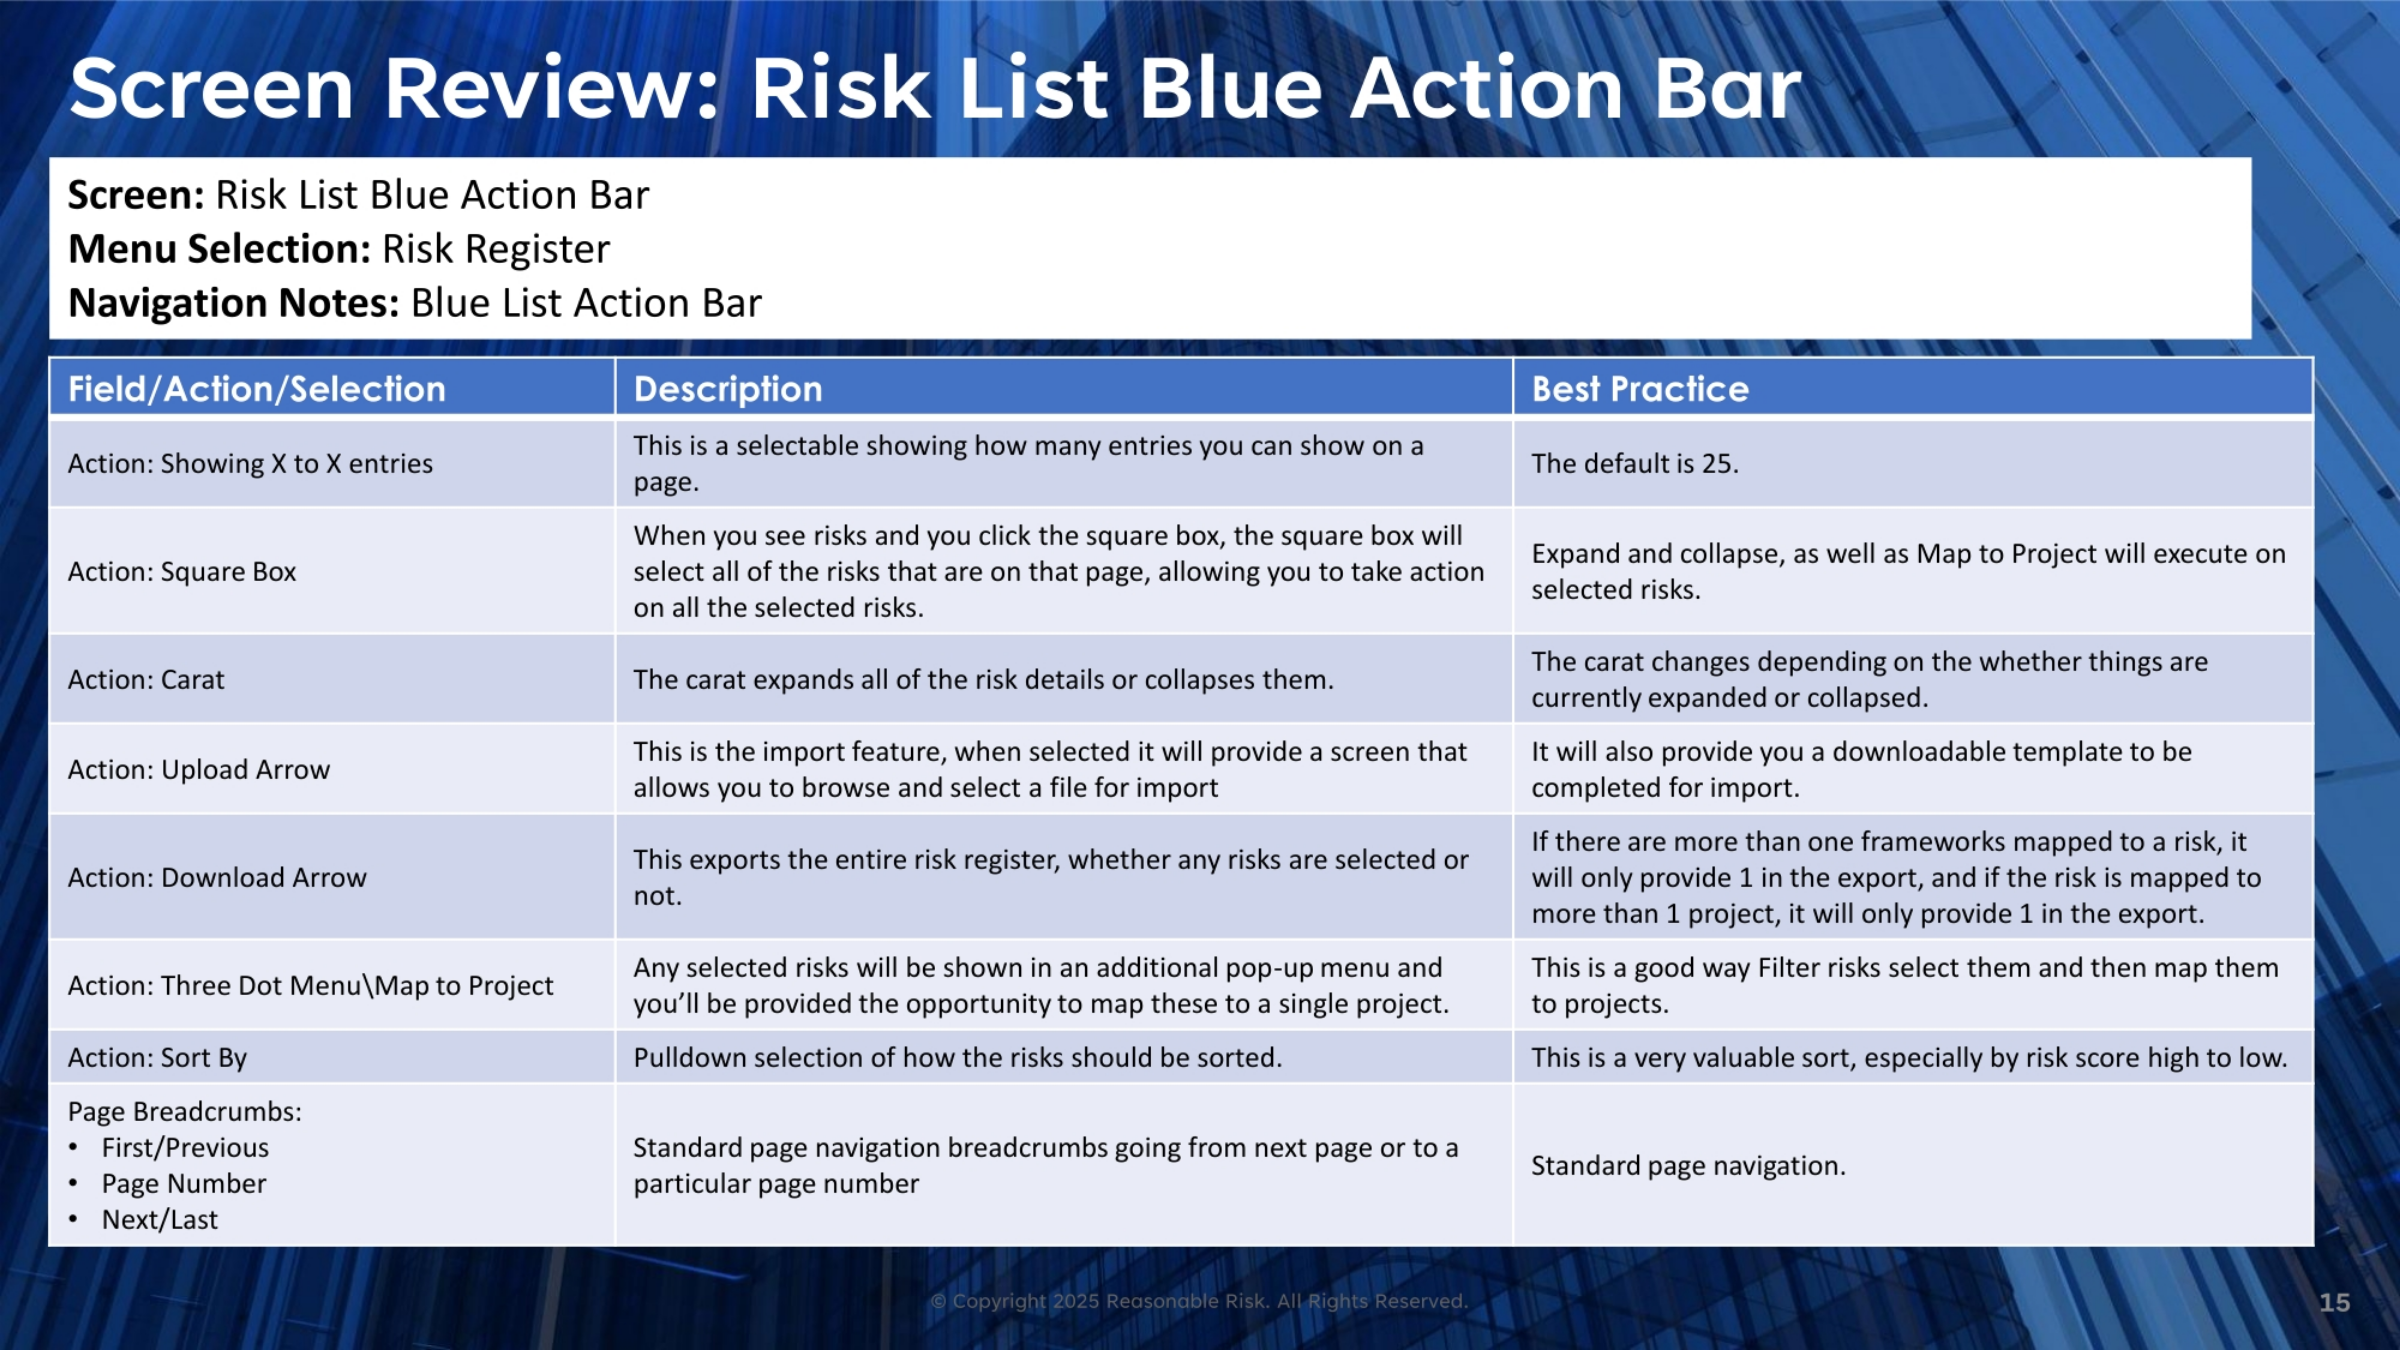
This screen visual demonstrates the Risk Register Filter and List Action Bar in action. At the top, you see the filter panel with various criteria such as Risk ID, CSP Control ID, Risk Description, Framework, Asset Class, Status, Aging, and Current Risk Score. These fields allow for precise filtering of the risk data. Below the filter panel, the list action bar is visible, showing options like "Showing 1 to 25 of 154 entries" and the "Sort By" dropdown, currently set to "Current Risk Score - High to Low." The page navigation controls, including "First," "Previous," page numbers, "Next," and "Last," are also clearly displayed, enabling users to navigate through the filtered risk list effectively.
17. Screen Review: Risk Blue Action Bar Three Dot Menu
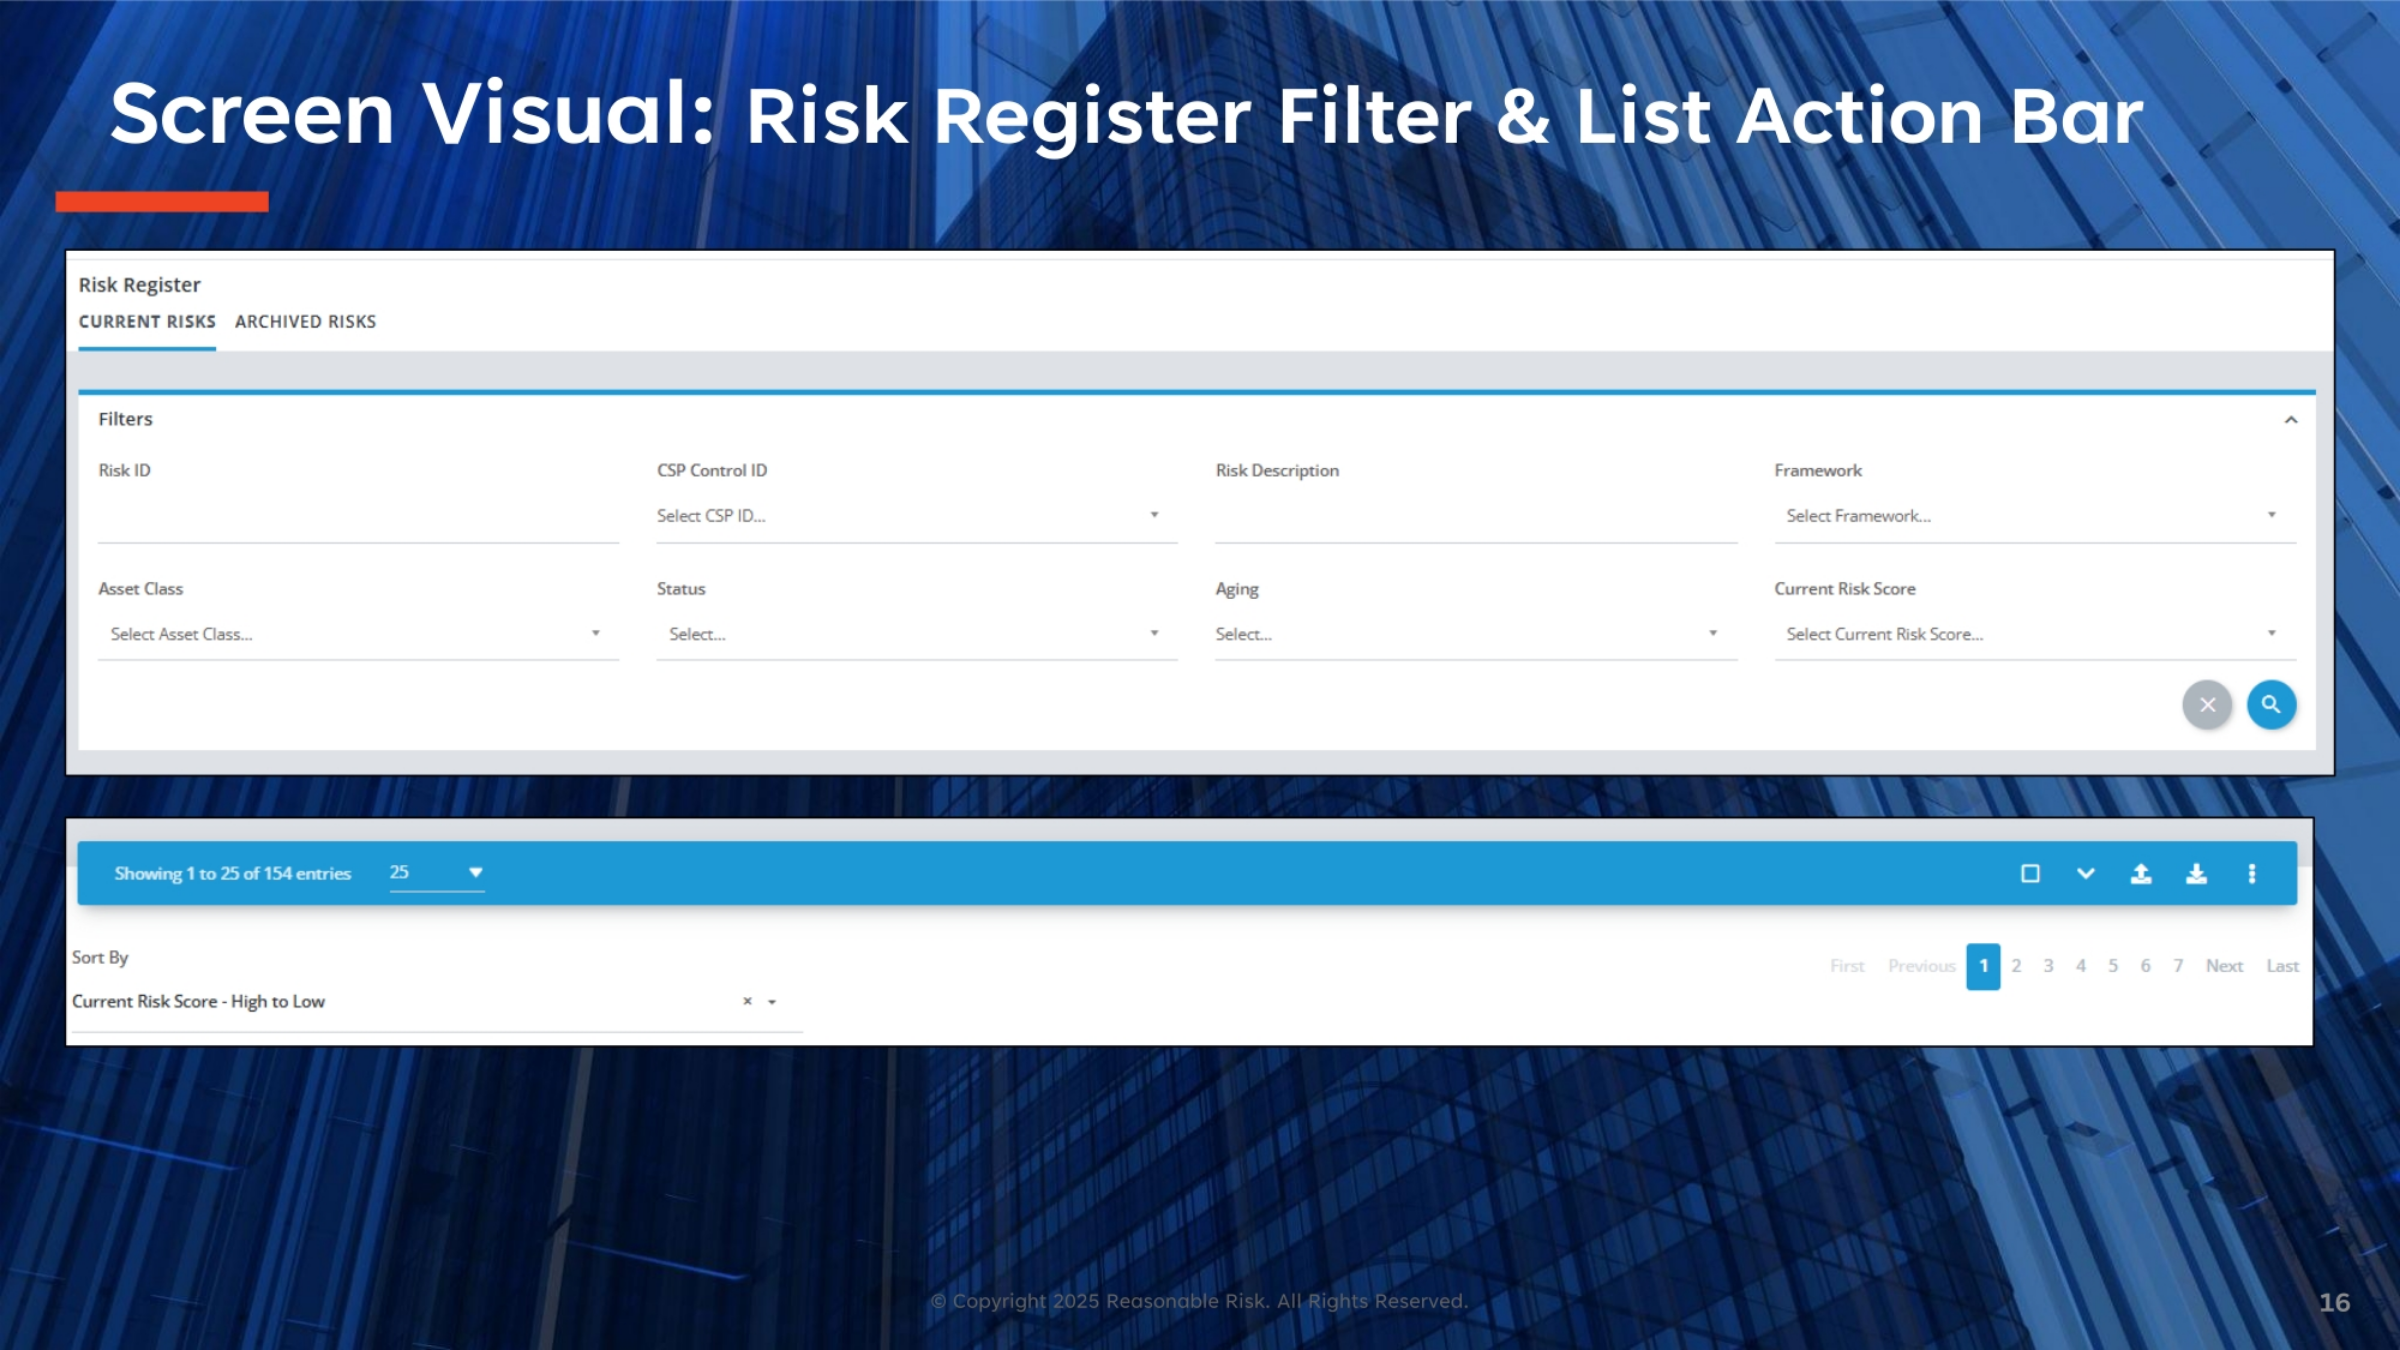
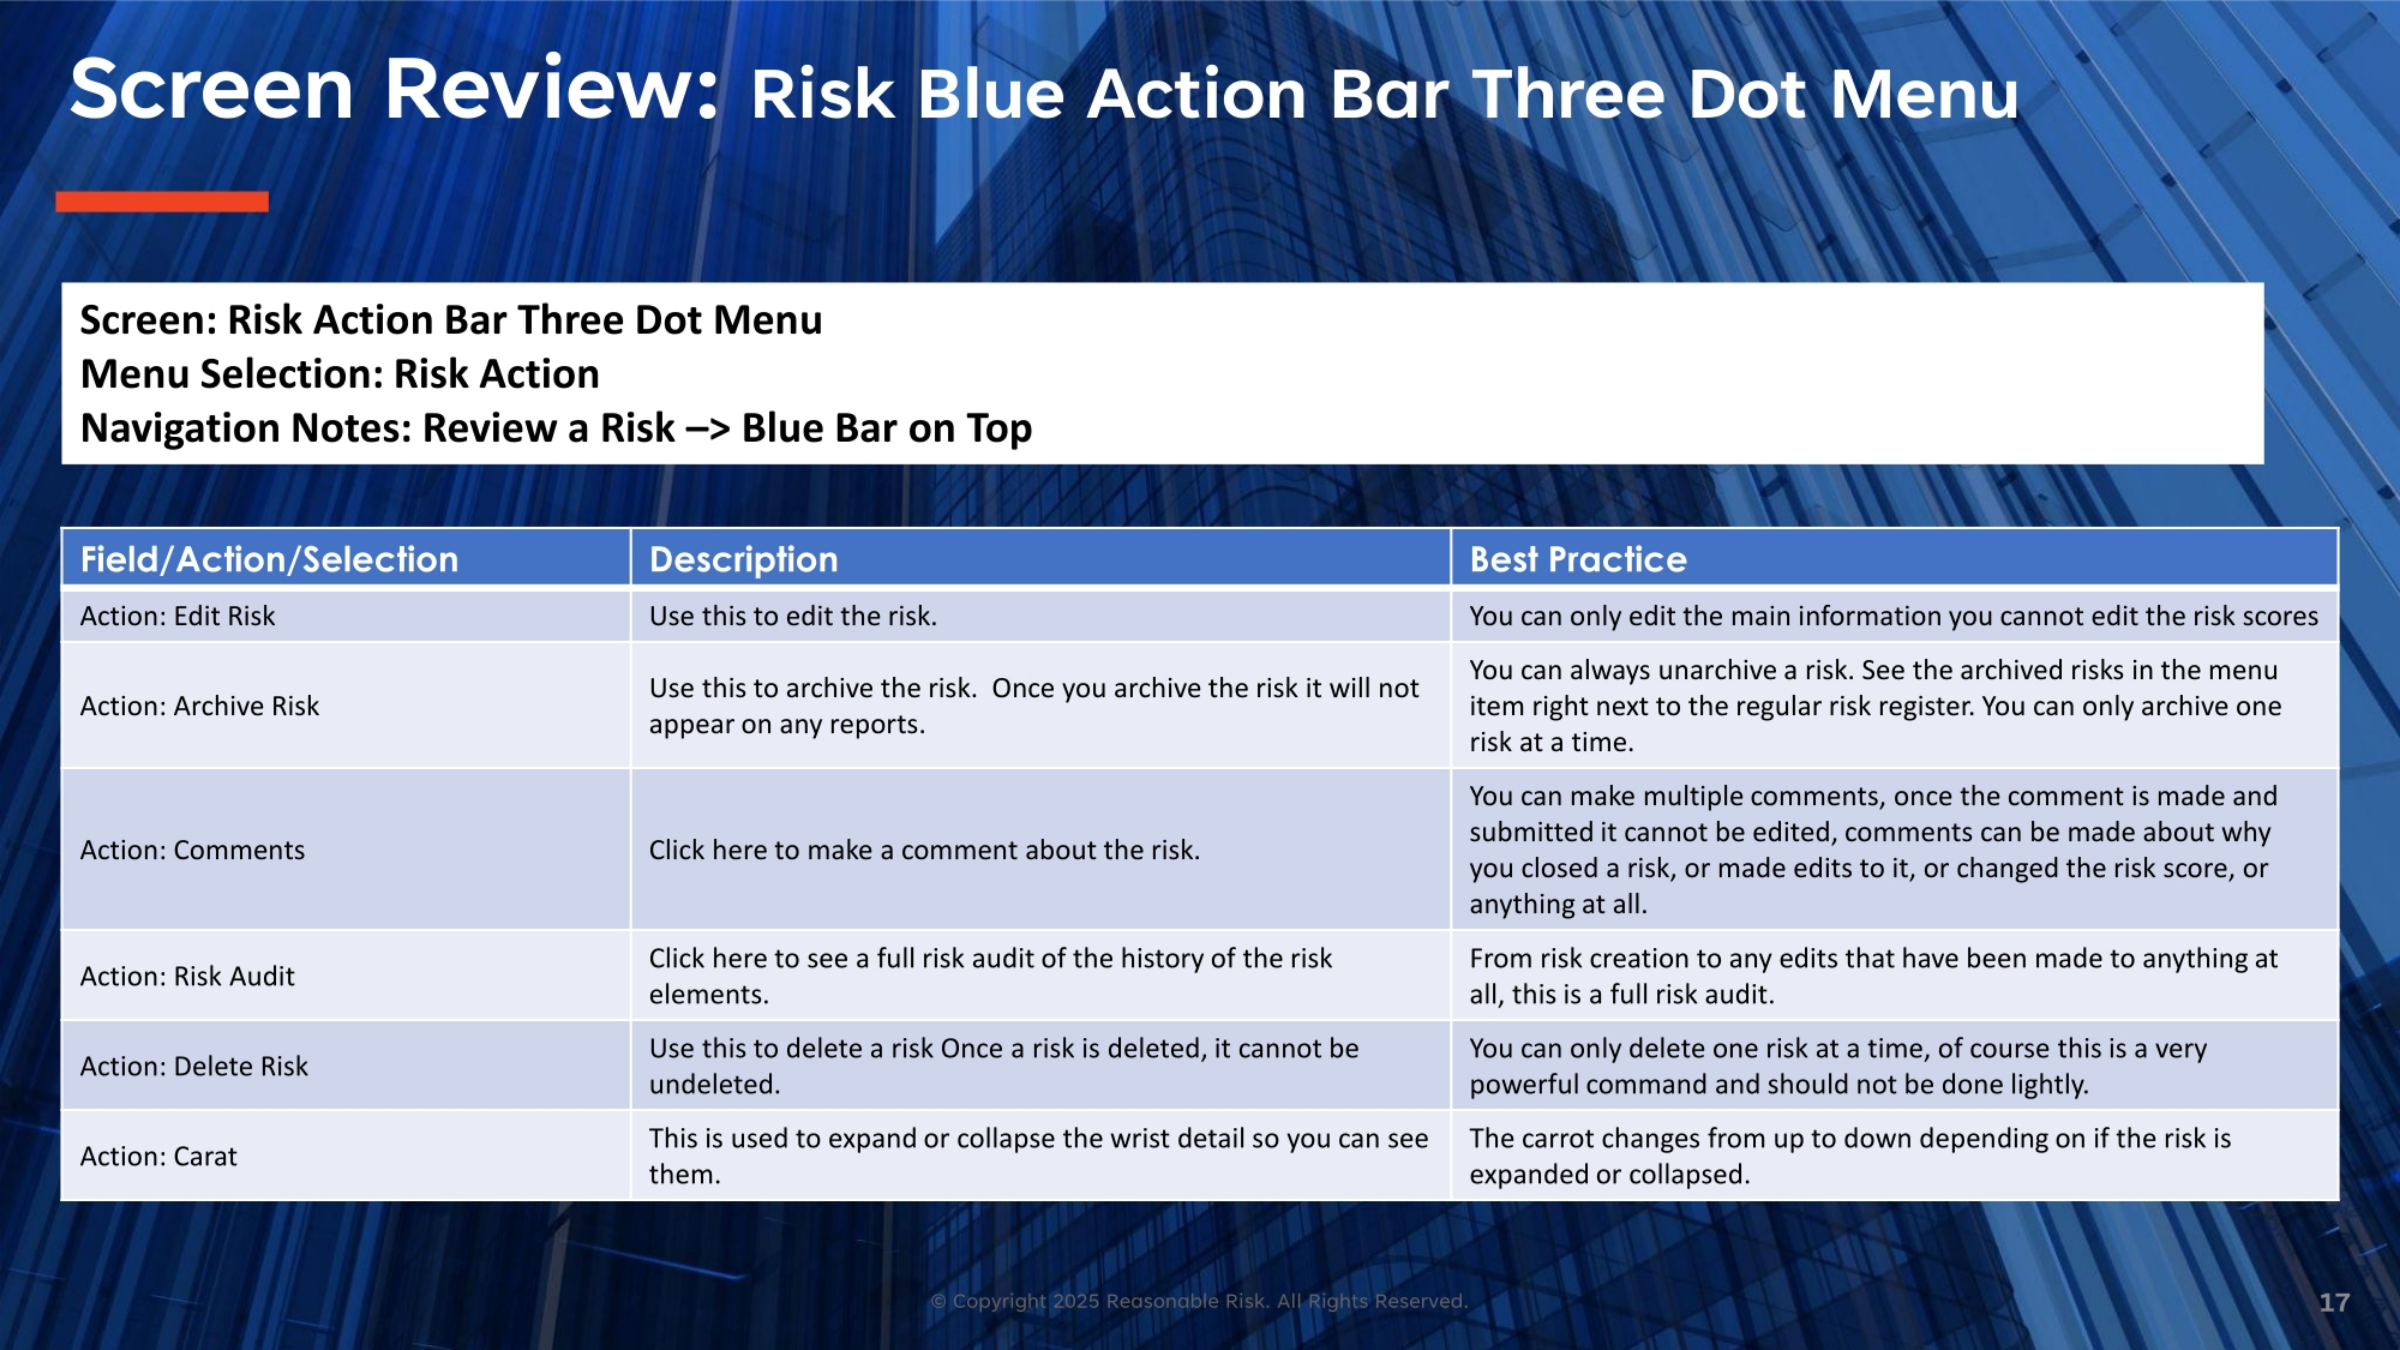
The Risk Blue Action Bar's Three Dot Menu provides critical actions for managing individual risks. "Edit Risk" allows you to modify main risk information, though not scores directly. "Archive Risk" moves a risk to an archived state, removing it from reports but allowing unarchiving later. "Comments" enables adding multiple, non-editable comments, providing an audit trail for decisions like closing a risk or changing its score. "Risk Audit" provides a full history of all edits. "Delete Risk" permanently removes a risk record, a powerful and irreversible command. Finally, the "Carat" expands or collapses wrist detail.
18. Screen Visual: Individual Risk Blue Action Bar
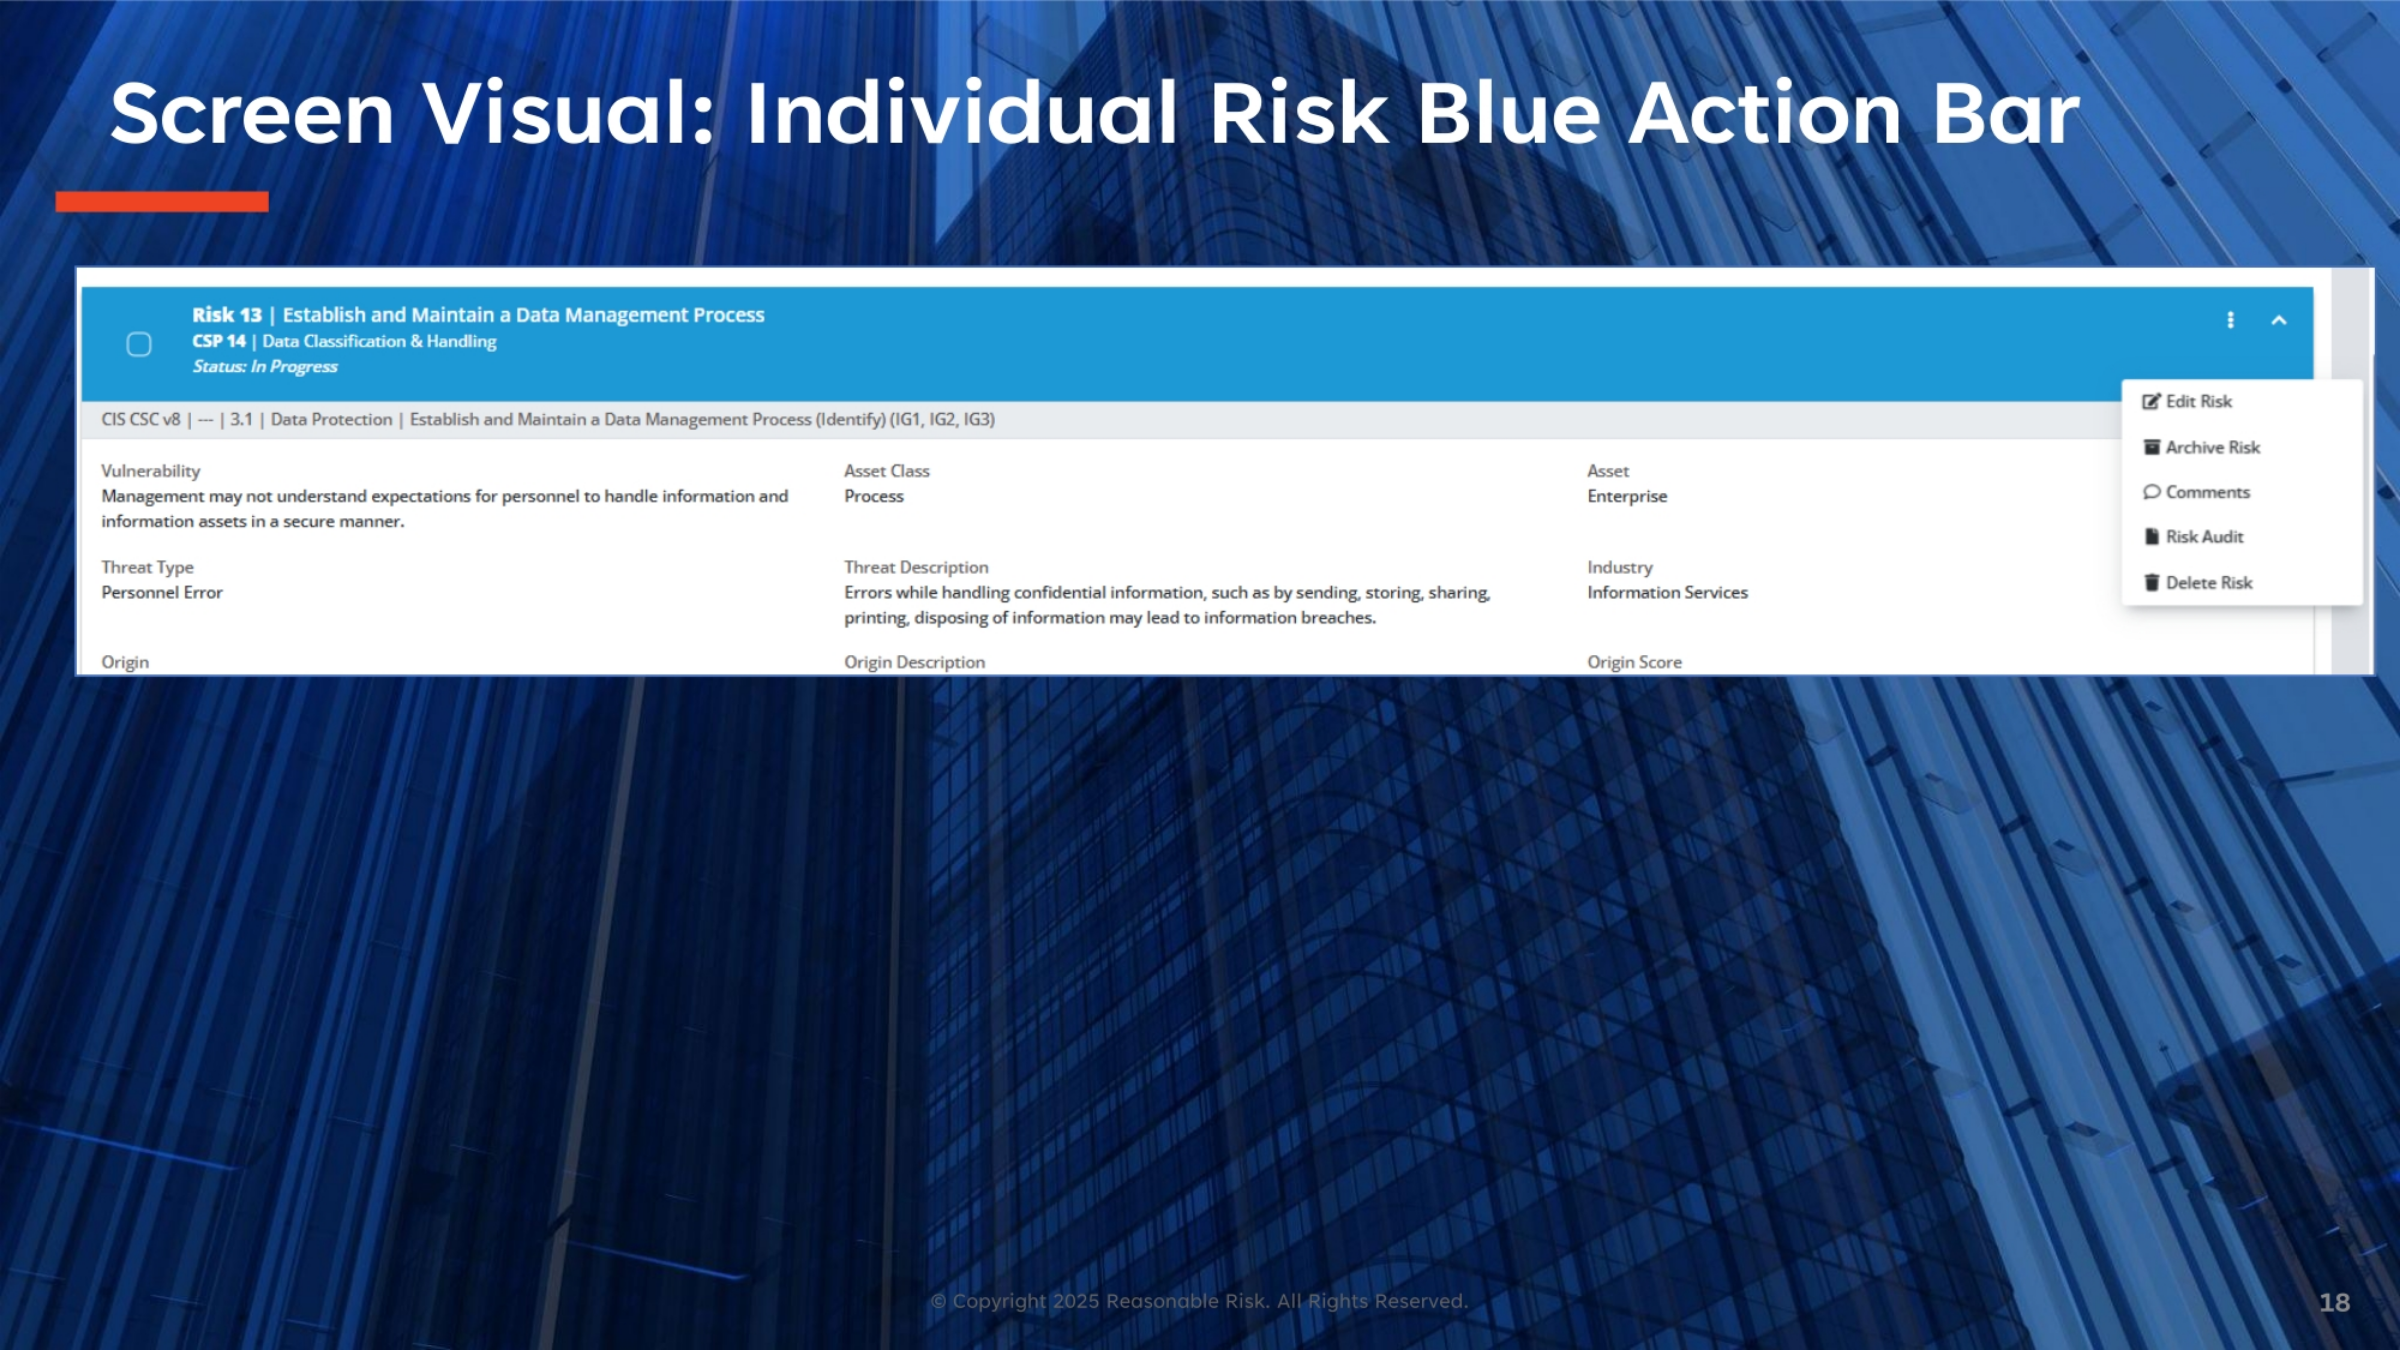
This screen visual highlights the Individual Risk Blue Action Bar, specifically for "Risk 13: Establish and Maintain a Data Management Process." The dropdown menu on the right reveals several key actions: "Edit Risk," "Archive Risk," "Comments," "Risk Audit," and "Delete Risk." These options provide comprehensive control over the individual risk record. The main section displays details such as the vulnerability, threat type, asset class, and industry, along with a description of errors related to handling confidential information. This visual demonstrates where users can access these critical management functions for any given risk.
19. Demonstrate
Now, let's move into a demonstration of these functionalities. We will show you how to effectively filter risks to quickly find specific items within the register. We'll then walk through the process of editing a risk, illustrating how to update its information. We'll also demonstrate how to archive a risk and, importantly, how to bring it back into the active risk register. Next, we'll cover the steps to delete a risk, emphasizing the finality of this action. Finally, we'll show you how to add comments to a risk, ensuring clear communication and historical tracking.
20. Exercise
For our exercise, you will apply what you've learned within the production environment. Your tasks include filtering risks to practice navigation and search. You will also edit a risk to familiarize yourself with updating its details. Additionally, you'll identify where to archive and delete risks, though you will not execute these actions. Finally, you will practice adding comments to a risk, reinforcing the importance of clear communication and record-keeping. This hands-on practice will solidify your understanding of the Risk Register's core functionalities.
21. Screen Narrative: Map Risks to Project
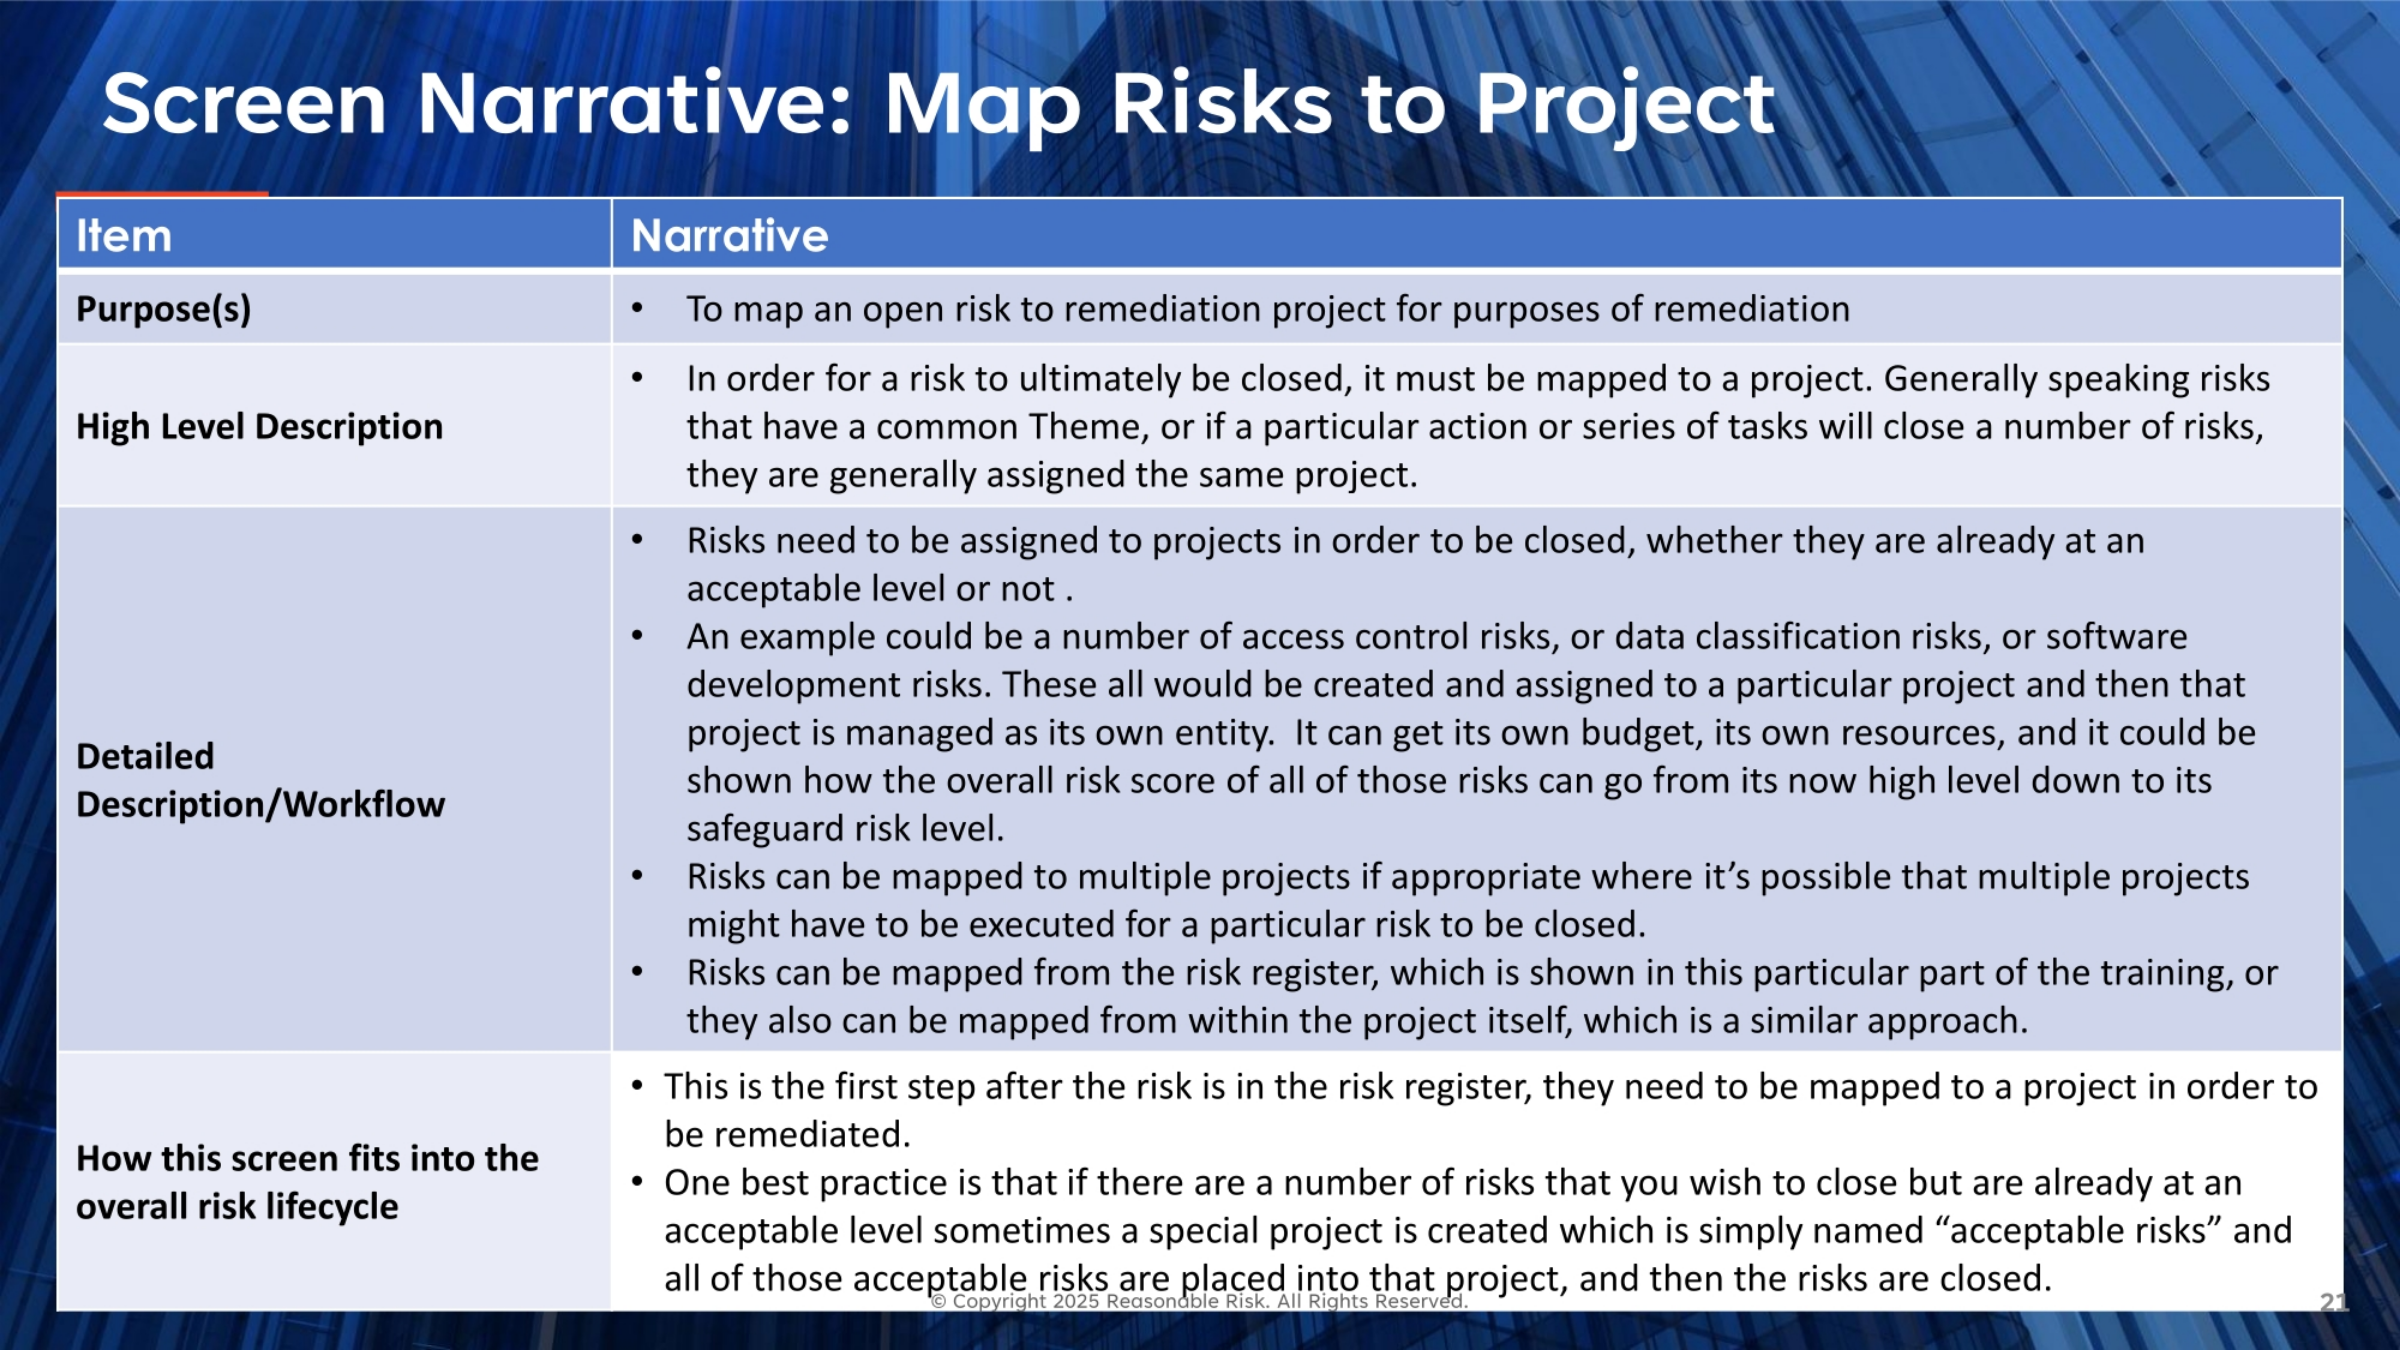
To effectively manage and close risks, they must be mapped to a remediation project. This process is crucial for addressing open risks and ensuring they are properly remediated. Risks with a common theme or those that can be closed by a single action are typically assigned to the same project. This mapping is the initial step after a risk enters the risk register, setting the stage for its remediation. A best practice involves creating a special project for risks already at an acceptable level, allowing for their formal closure.
22. Map Risks to Project: Overview
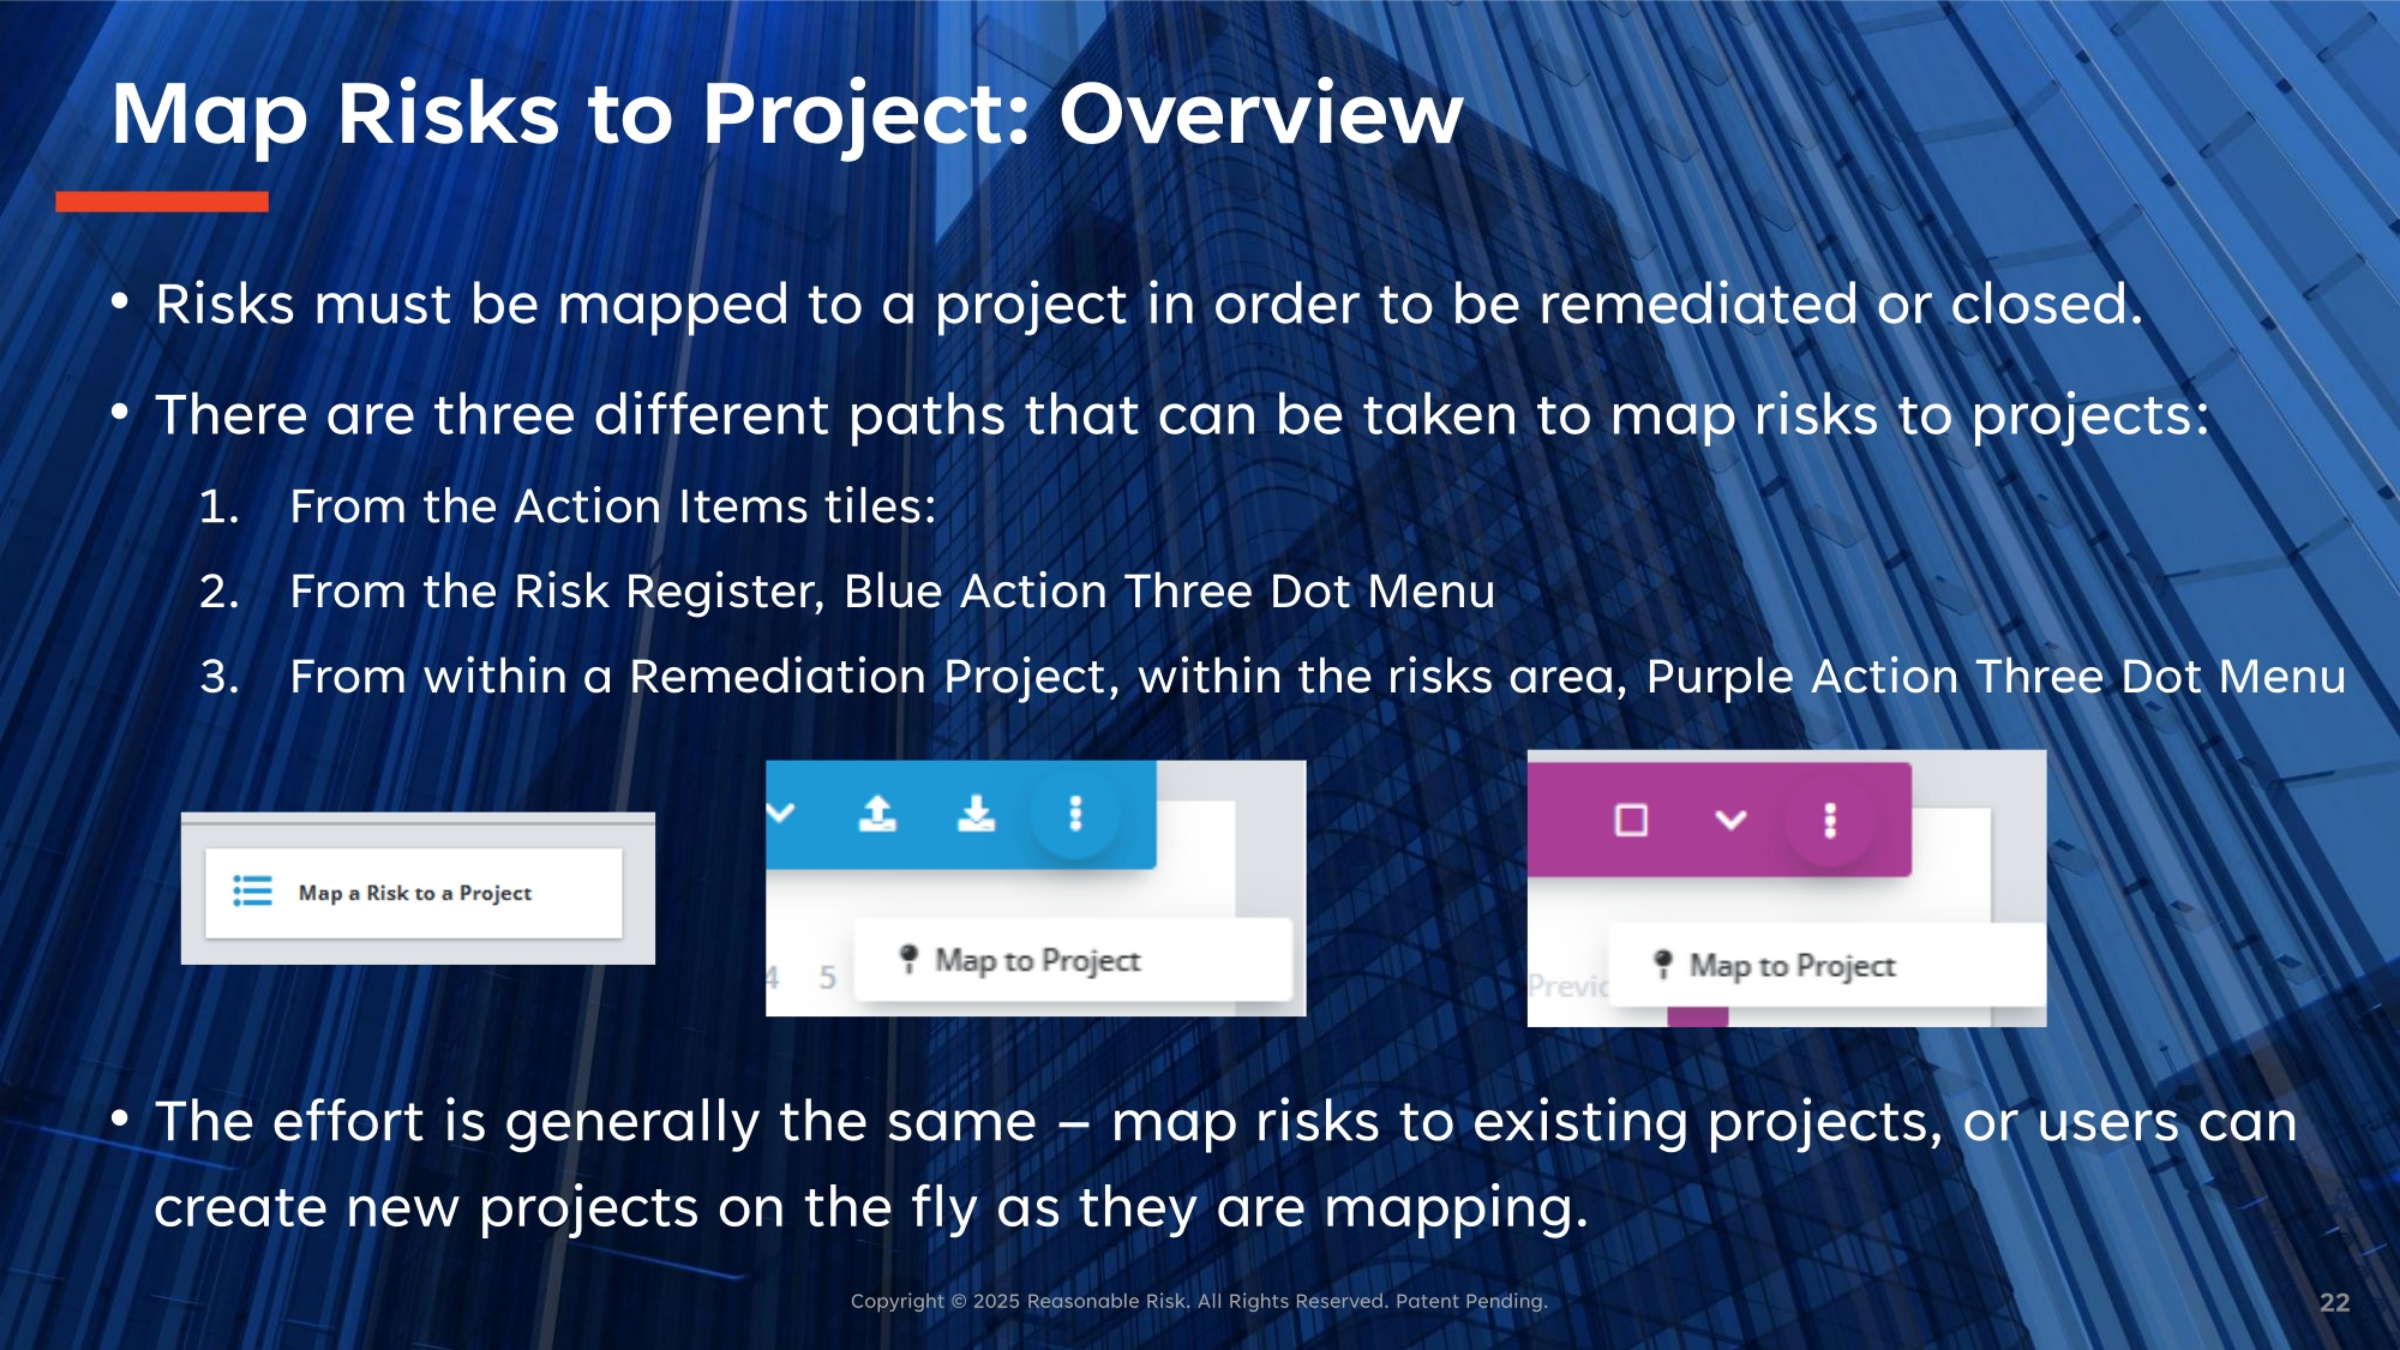
Mapping risks to projects is essential for their remediation or closure. There are three primary ways to achieve this: directly from the Action Items tiles, through the Risk Register's Blue Action Three Dot Menu, or from within a Remediation Project's risks area using the Purple Action Three Dot Menu. Regardless of the path chosen, the effort involved is generally consistent. Users can either map risks to existing projects or create new projects on the fly as they proceed with the mapping process.
23. Screen Visual: Map Risks to a Remediation Project
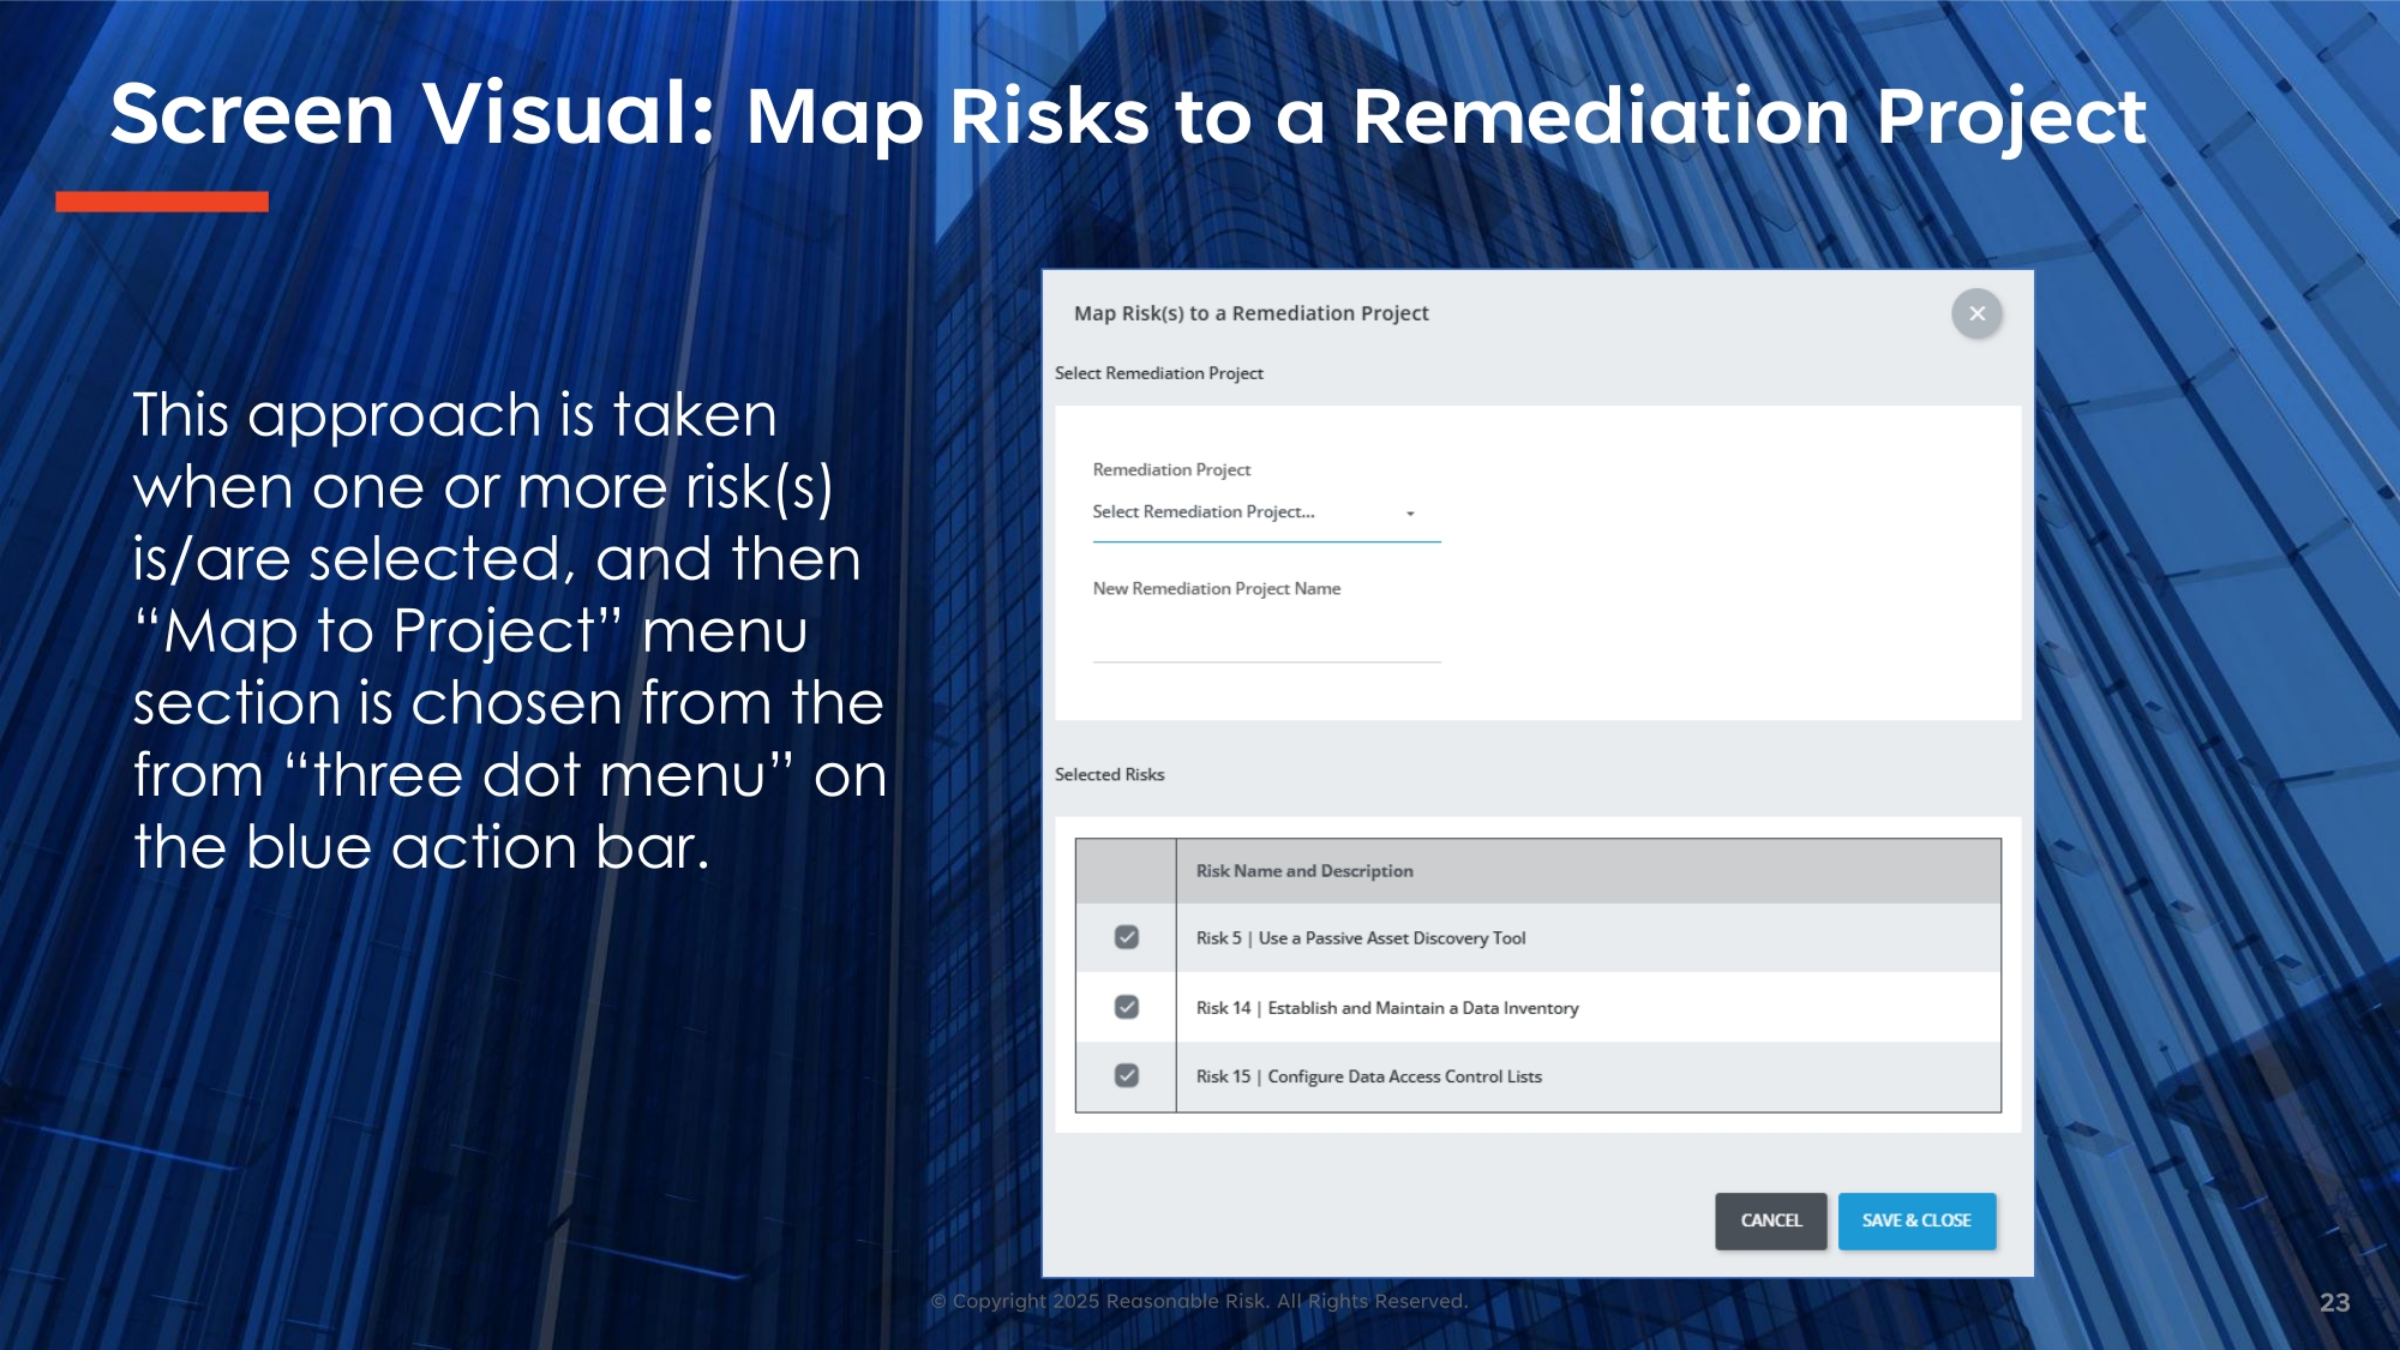
When mapping risks to a remediation project, you'll typically select one or more risks first. This action then allows you to choose the 'Map to Project' option from the three-dot menu located on the blue action bar. This visual demonstrates the interface where you select the remediation project, either an existing one or by creating a new project, and then confirm the selected risks for mapping. This ensures that specific risks are correctly associated with their corresponding remediation efforts.
24. Screen Visual: Map Risk to Project (1 of 2)
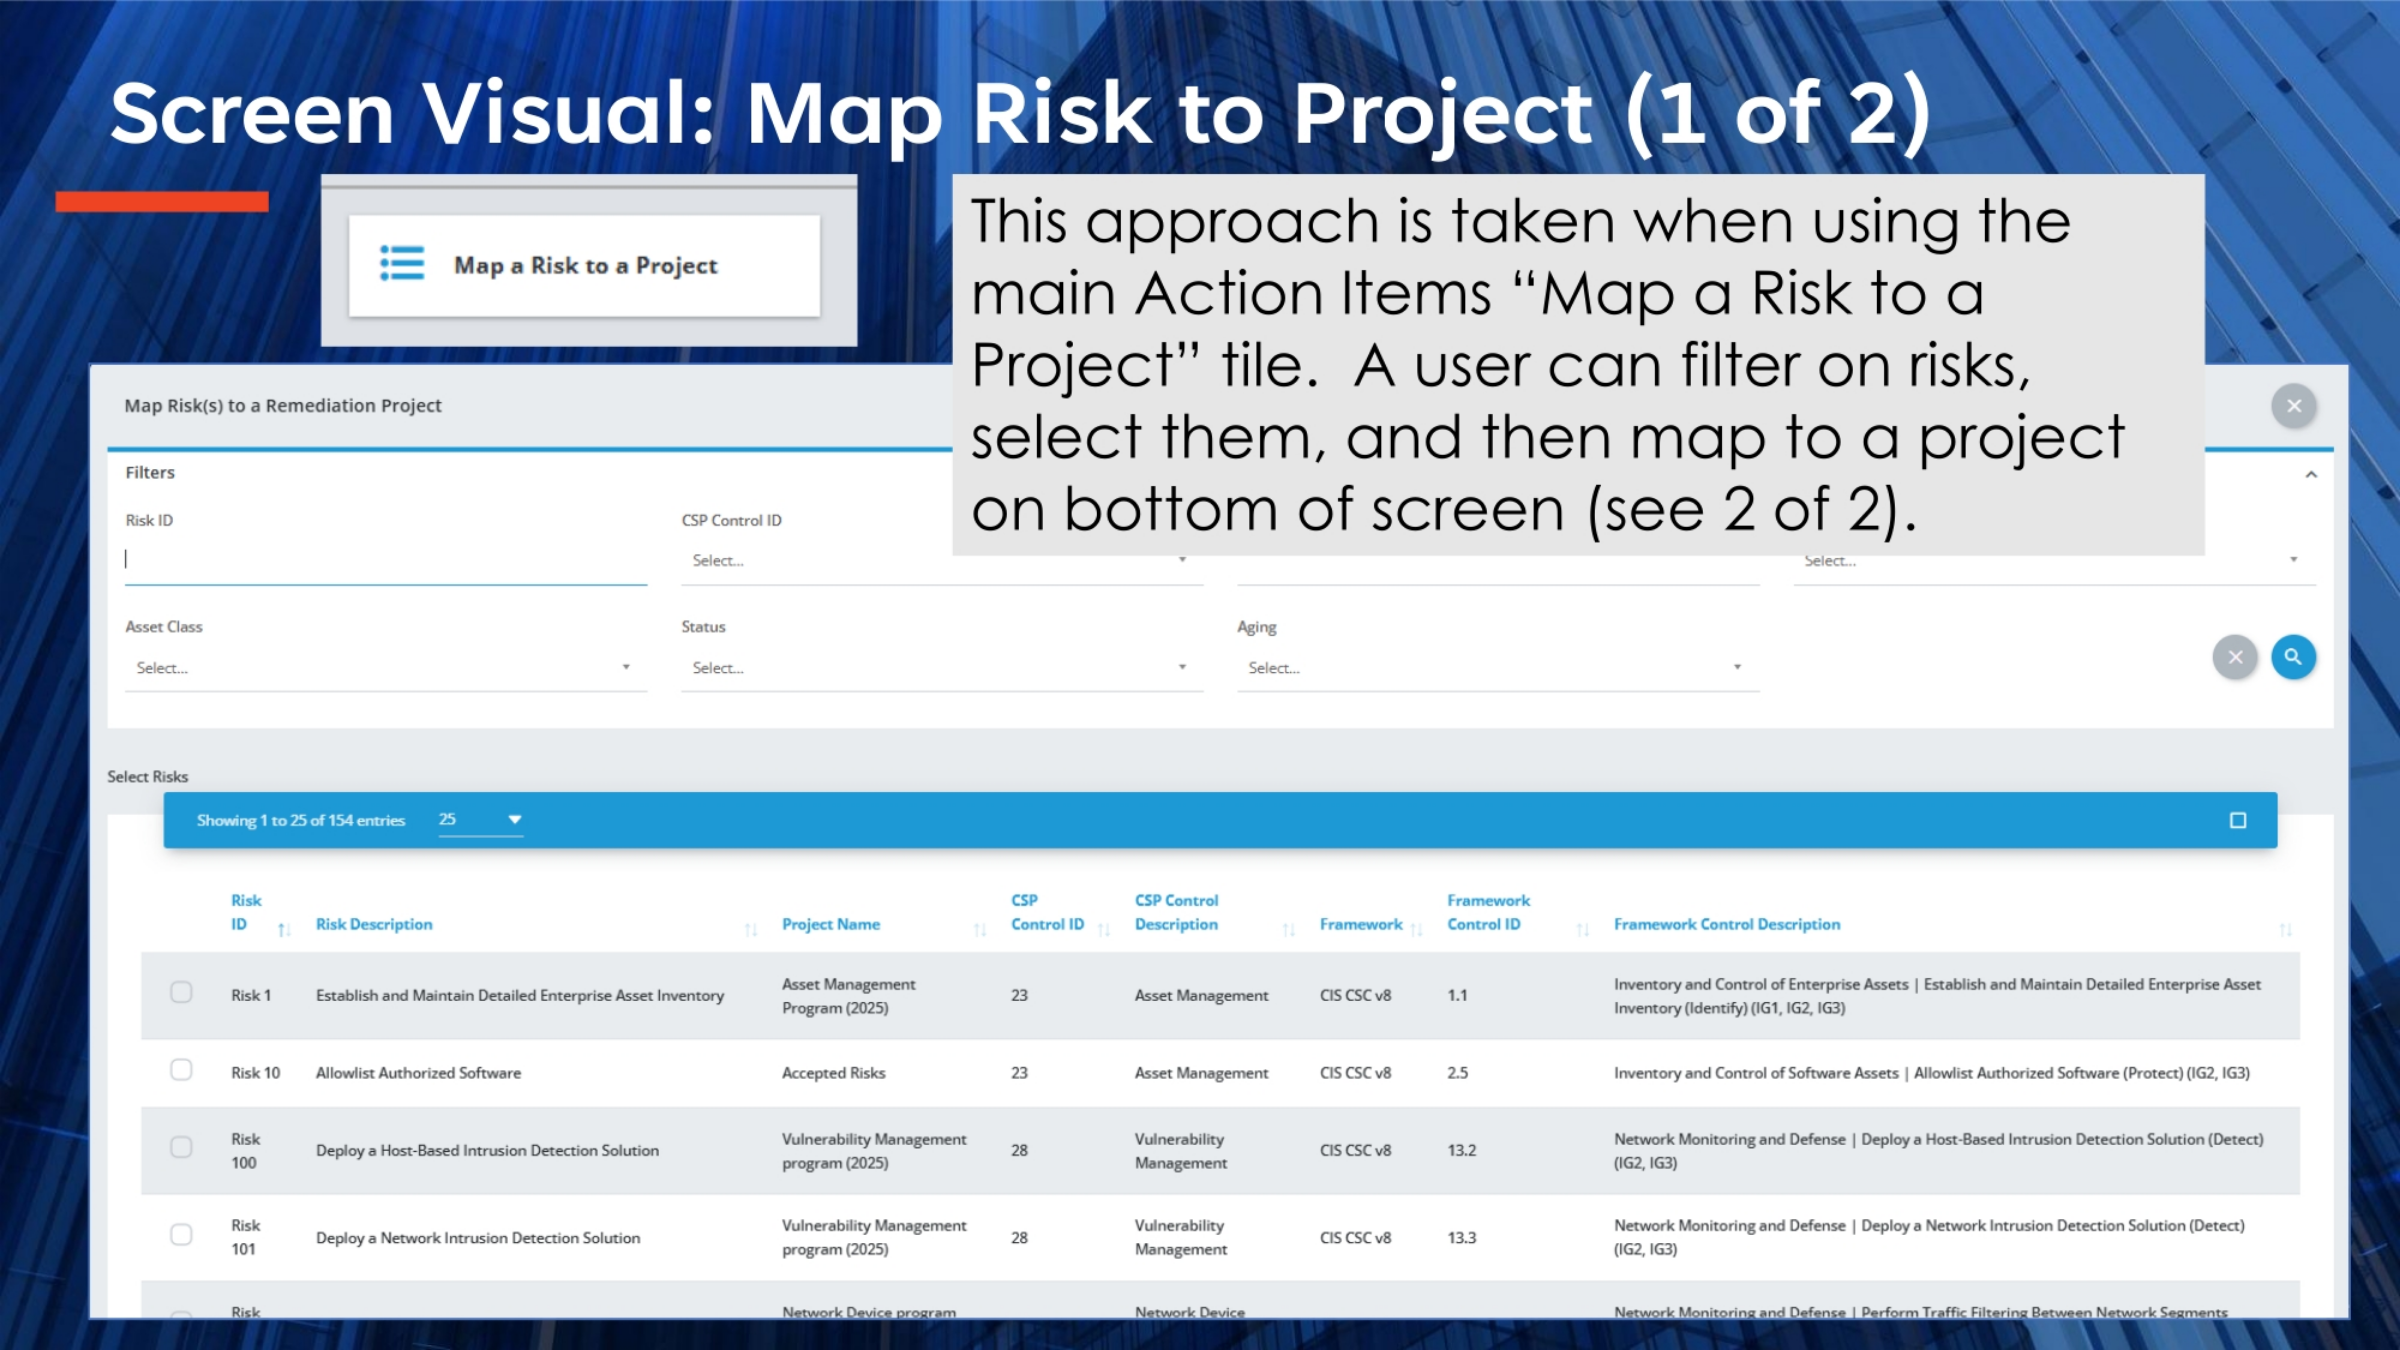
This screen illustrates the process of mapping risks to a project using the main Action Items 'Map a Risk to a Project' tile. Users can filter risks by various criteria such as Risk ID, CSP Control ID, Asset Class, Status, or Aging to narrow down their selection. Once the desired risks are identified and selected, they can then be mapped to a project. This initial view focuses on the filtering and selection capabilities, preparing for the actual mapping action shown in the next step.
25. Screen Visual: Map Risk to Project (2 of 2)
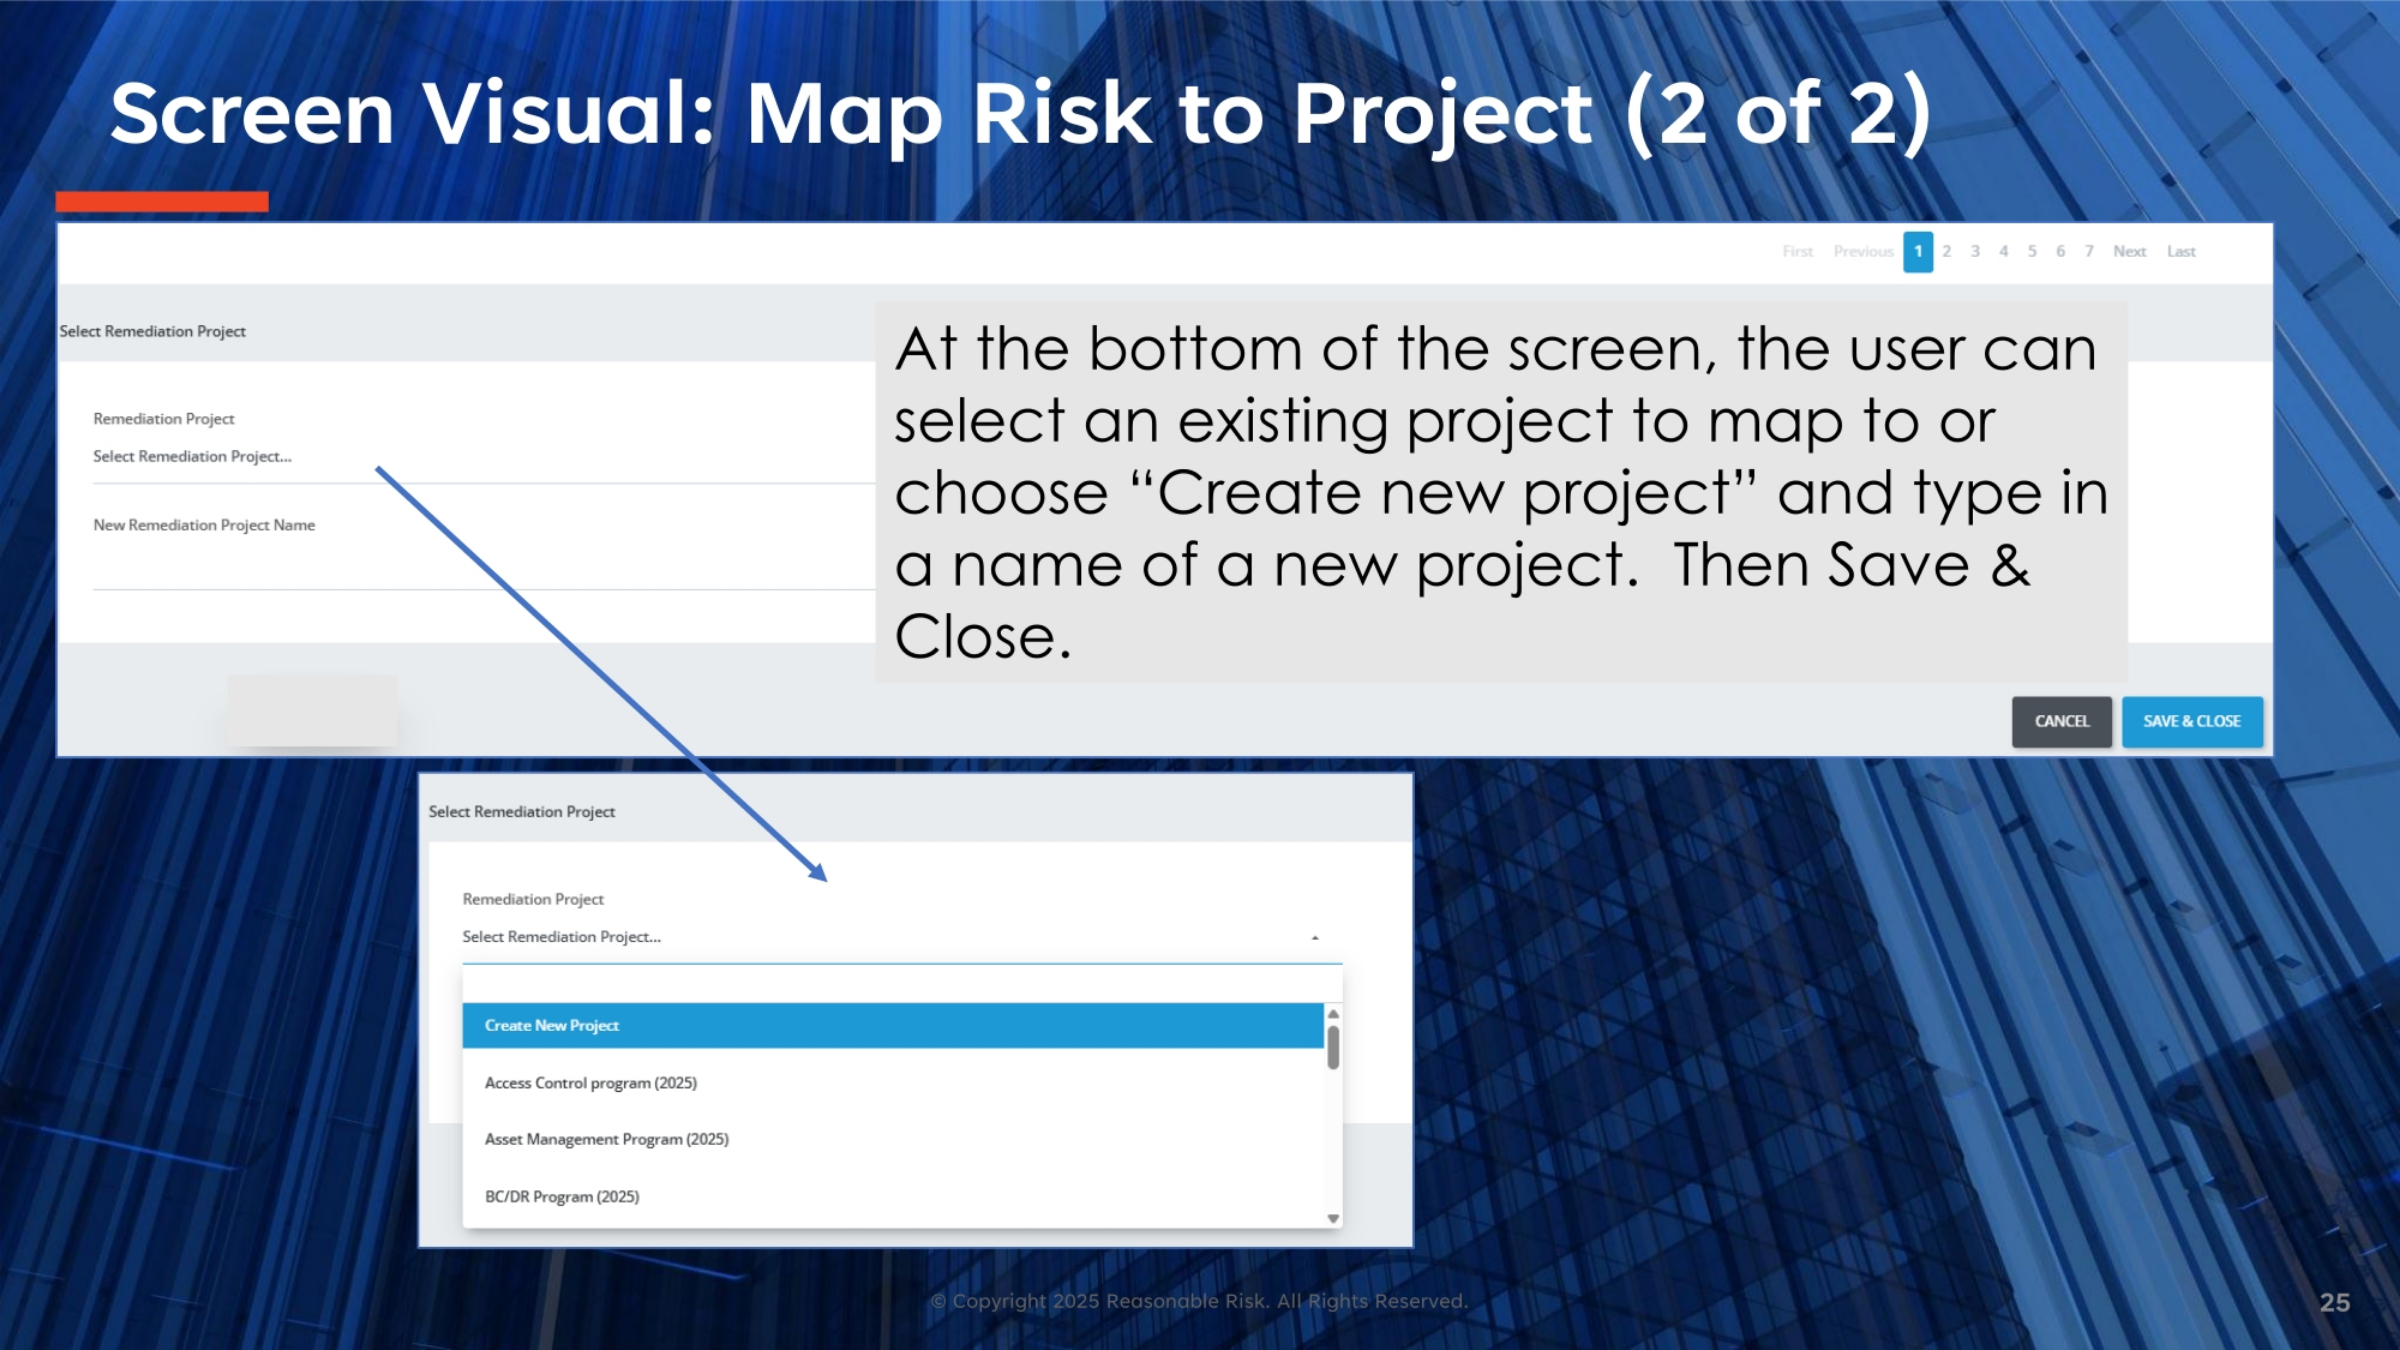
Continuing from the previous screen, this view shows the bottom section where the actual mapping takes place. After filtering and selecting risks, users can choose an existing remediation project from a dropdown list. Alternatively, they have the option to 'Create new project' and enter a new project name. Once the project is selected or created, the process is finalized by clicking 'Save & Close'. This completes the mapping of selected risks to their designated remediation project.
26. Screen Review: Map Risk to Project (1 of 2)
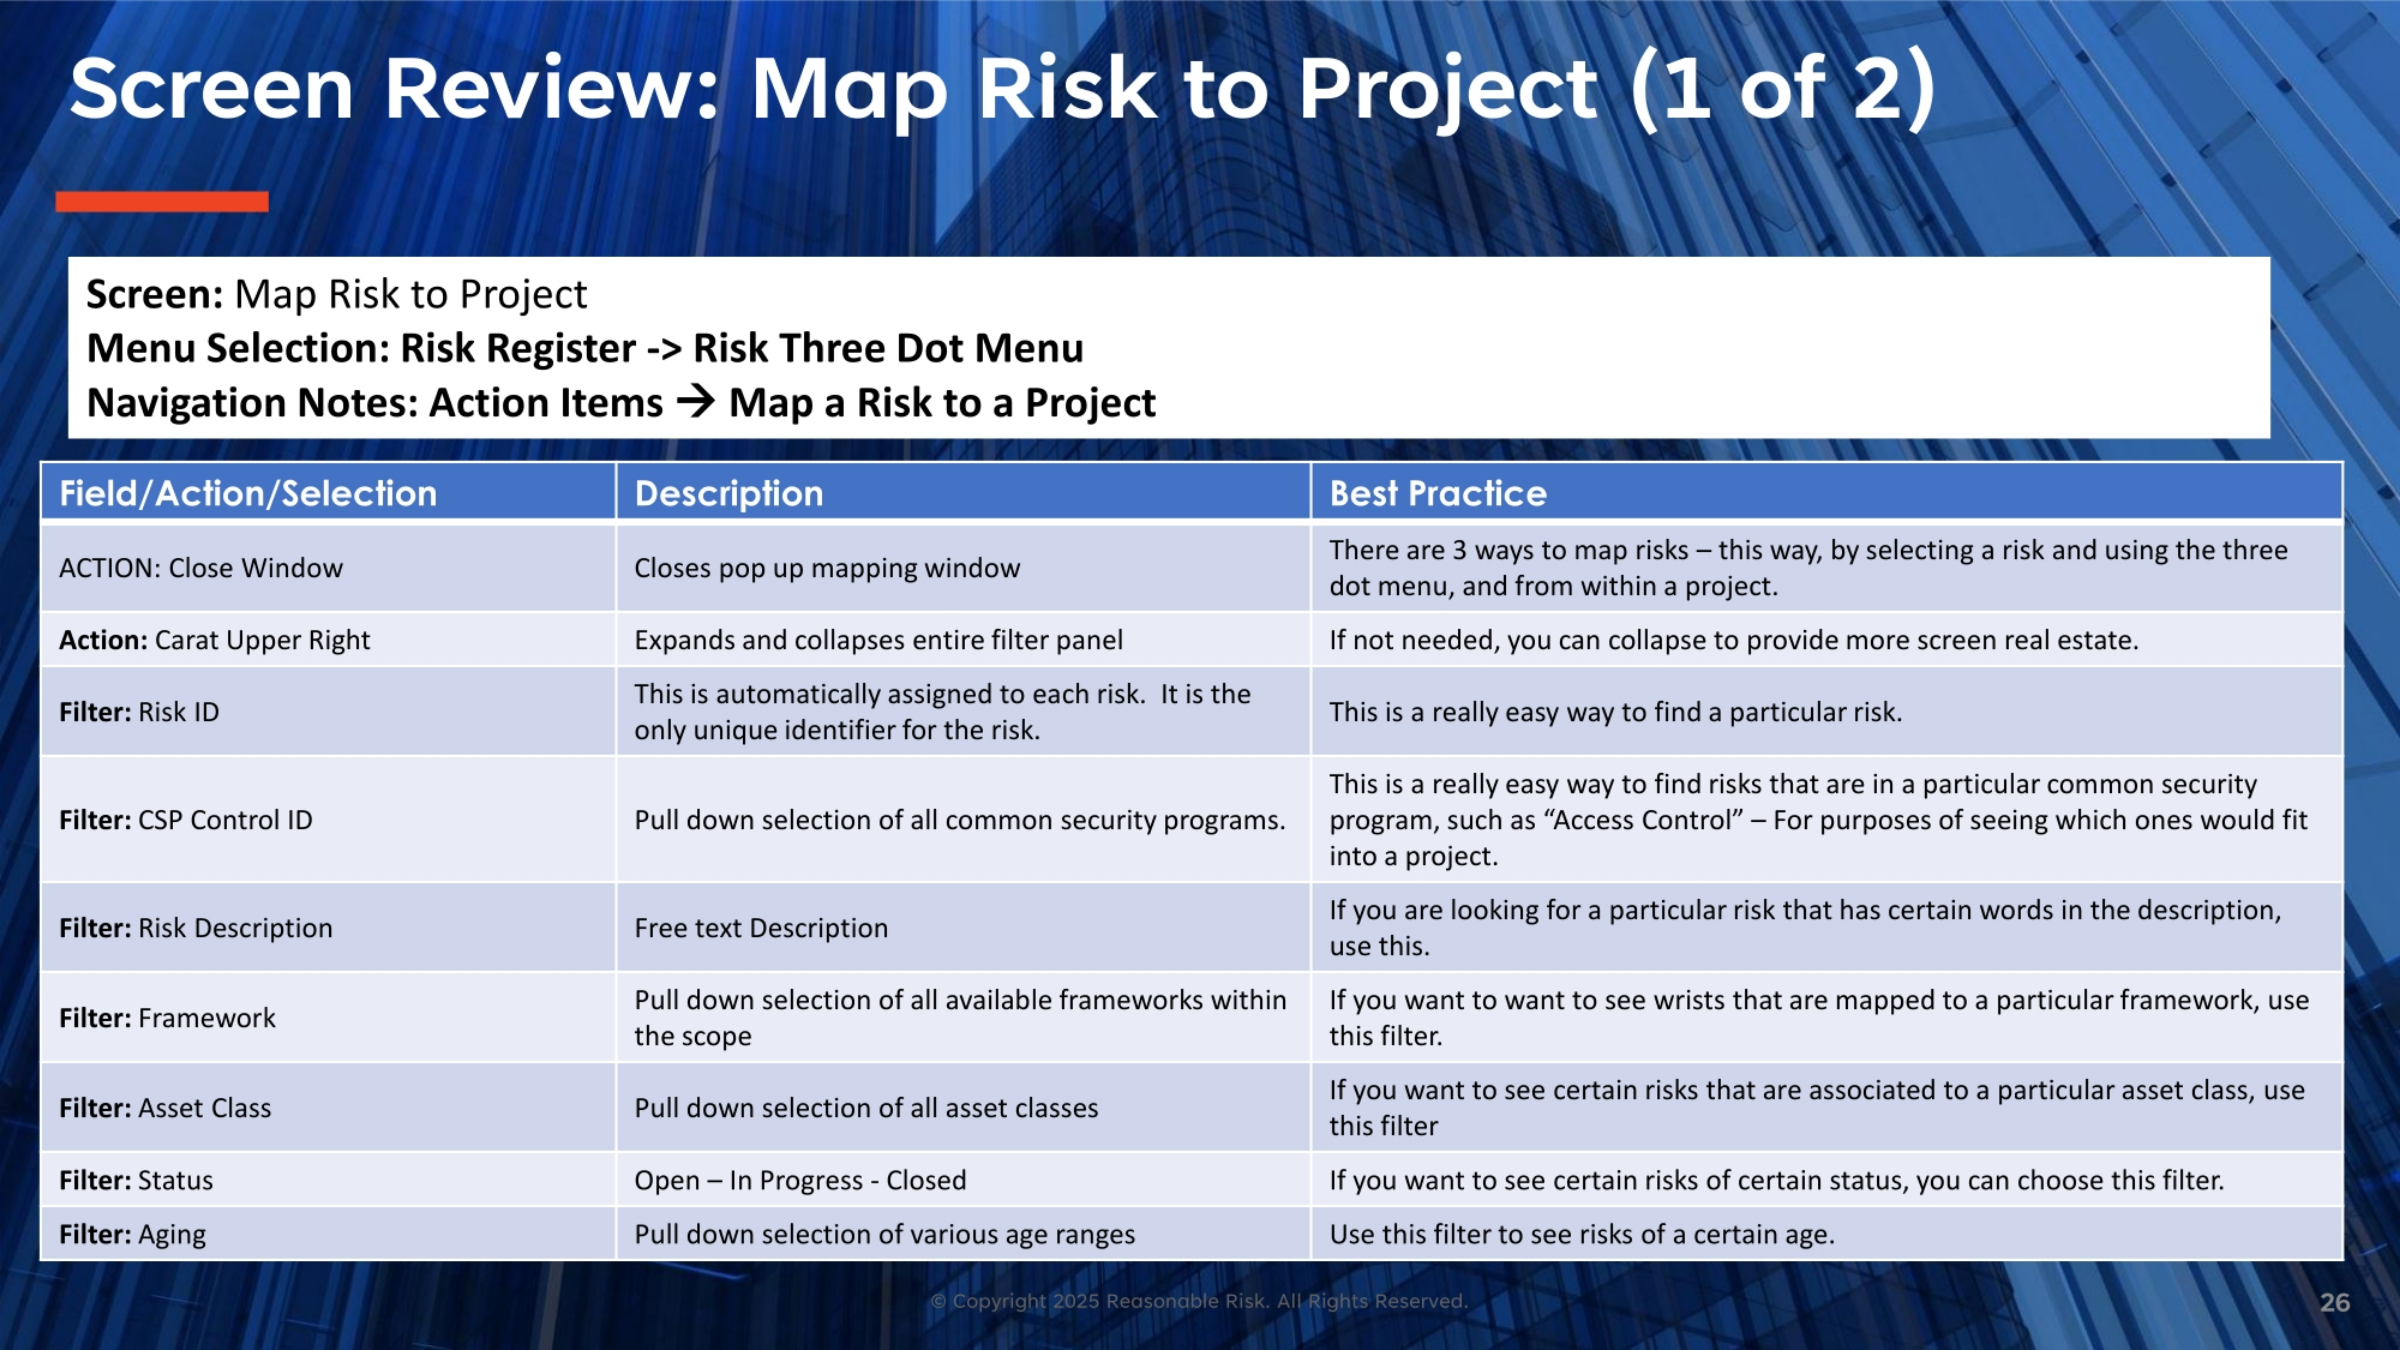
This review covers the various fields and actions available when mapping risks to a project. The 'Close Window' action closes the pop-up, while the 'Carat Upper Right' expands or collapses the filter panel, optimizing screen real estate. The 'Risk ID' is a unique identifier, useful for quickly locating specific risks. Filters for 'CSP Control ID', 'Risk Description', 'Framework', 'Asset Class', 'Status', and 'Aging' allow users to efficiently find risks based on security programs, keywords, frameworks, asset types, current status, or age, aiding in project assignment.
27. Screen Review: Map Risk to Project (2 of 2)
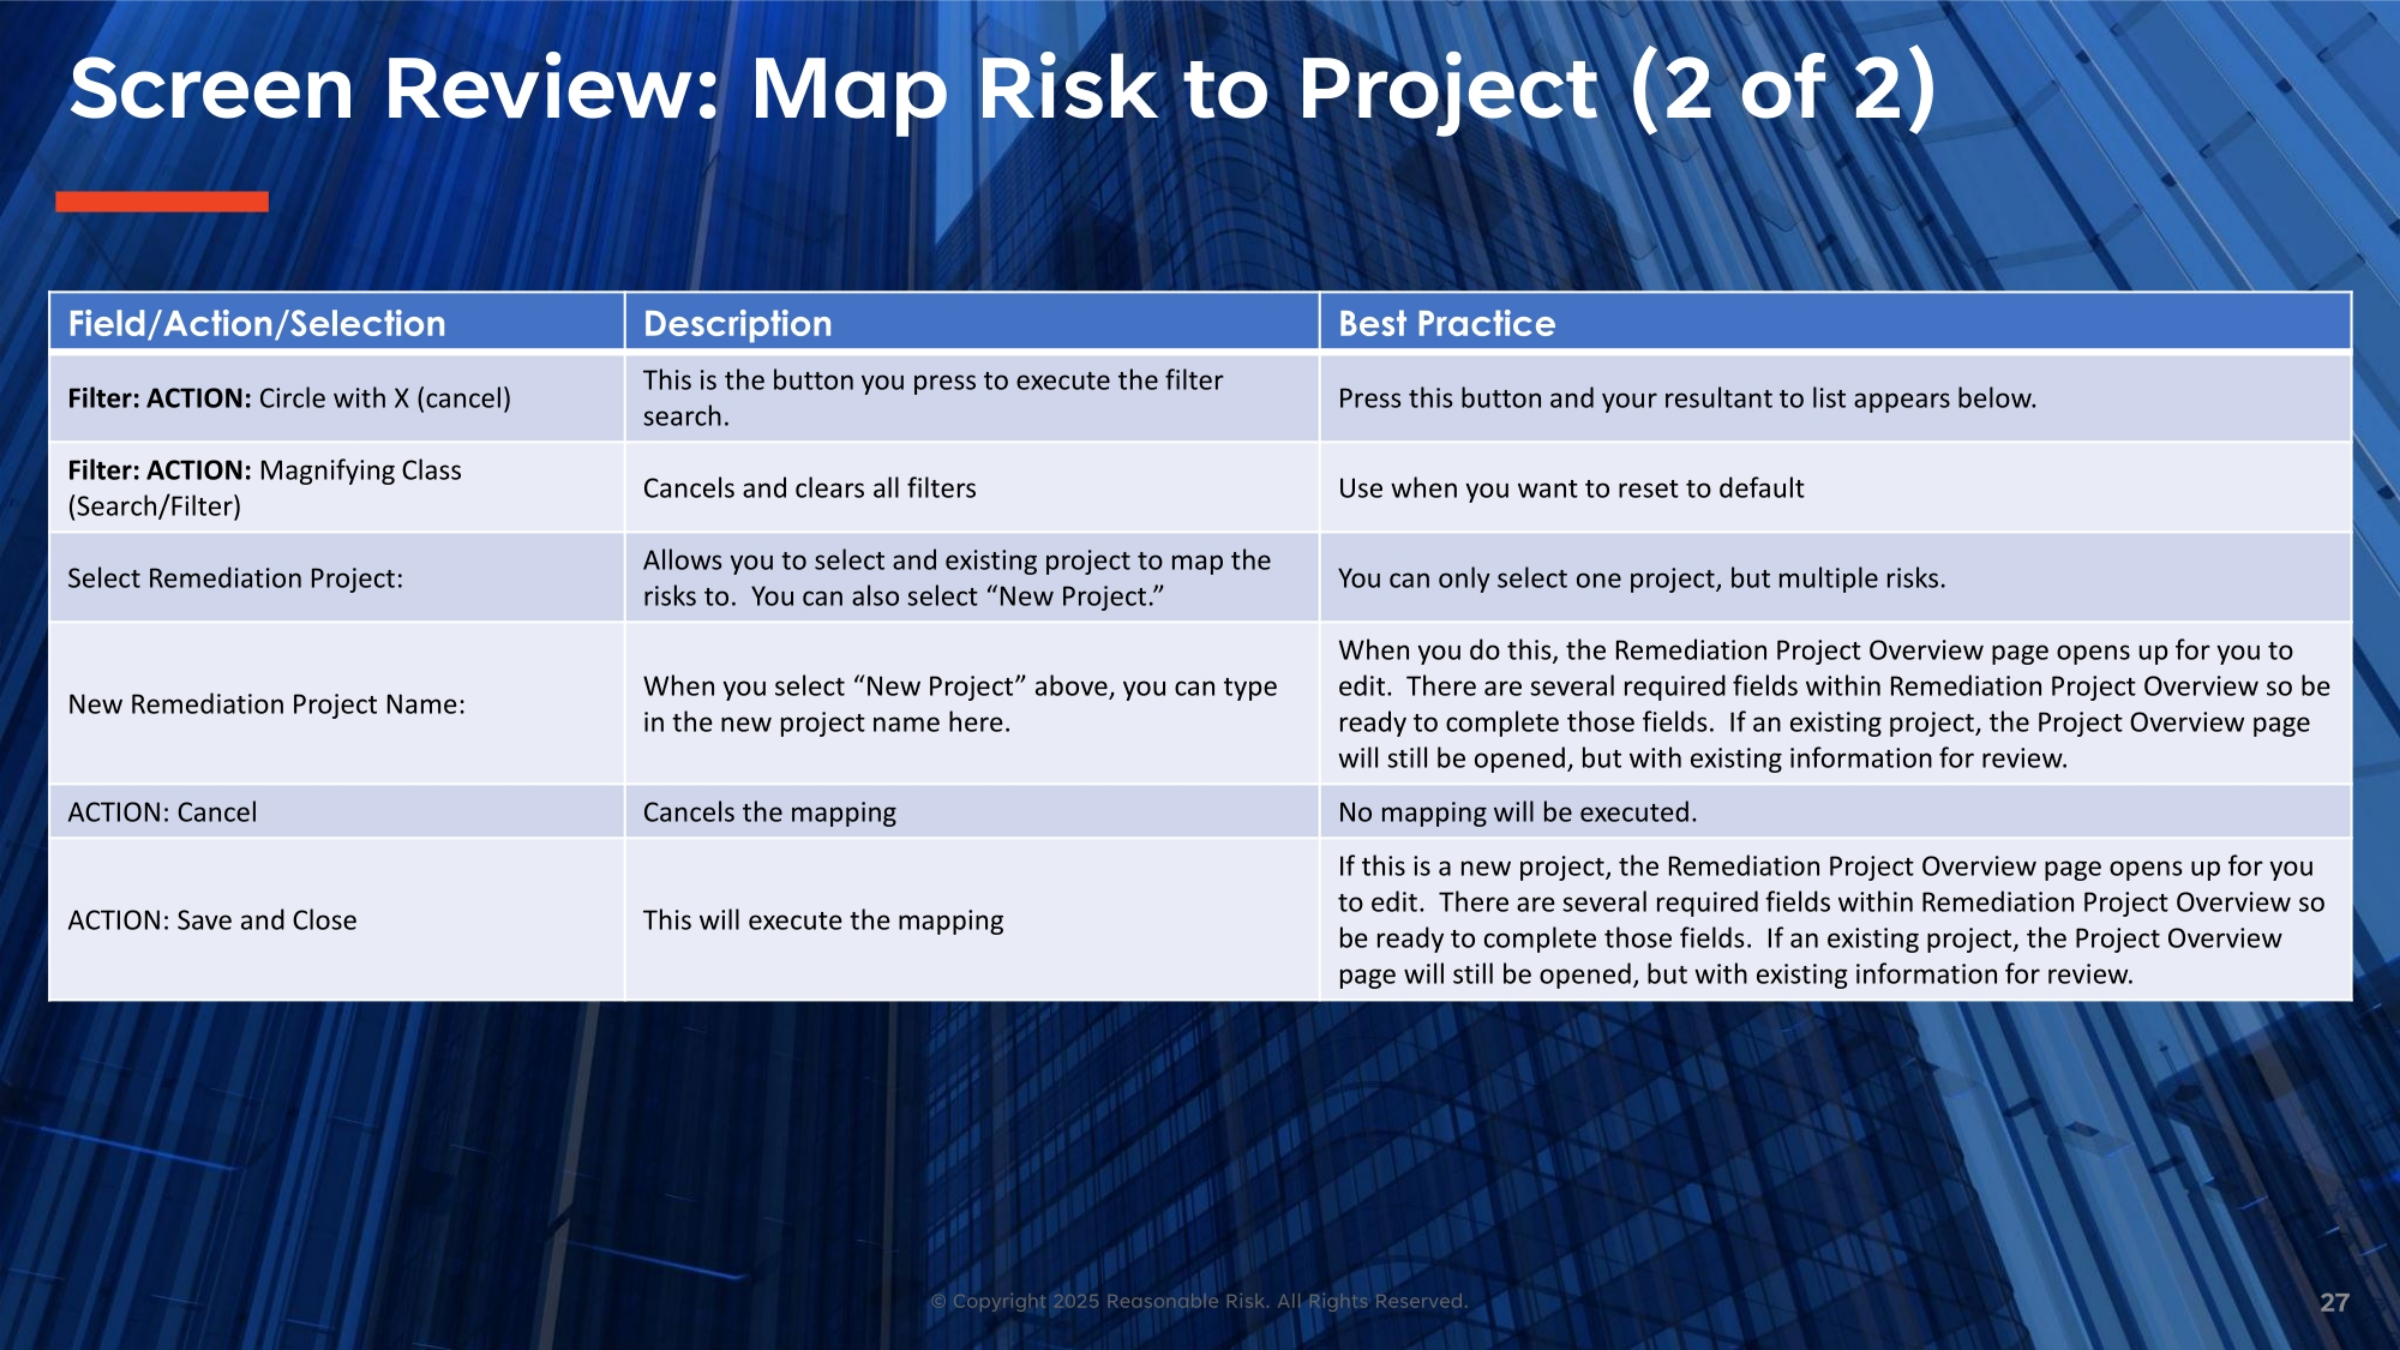
Continuing our review, the 'Circle with X' action executes a filter search, displaying the results below. The 'Magnifying Glass' icon clears all filters, resetting the view to default. When selecting a remediation project, users can choose an existing one or opt to create a 'New Project'. If a new project is chosen, a field appears to enter its name. The 'Cancel' action aborts the mapping, while 'Save and Close' executes the mapping. For new projects, the Remediation Project Overview page opens for required field completion; for existing projects, it opens for review.
28. Demonstrate
Let's move on to a demonstration of mapping risks. We will cover mapping from the Risk Register, from the Action Items Tiles, and from within a project.
29. Exercise
Now, let's practice with an exercise. We will simulate mapping risks in the production environment, covering mapping from the Risk Register, Action Items Tiles, and from within a project. Remember to do everything except save and close.
30. Overview: Edit Initial Risk Score
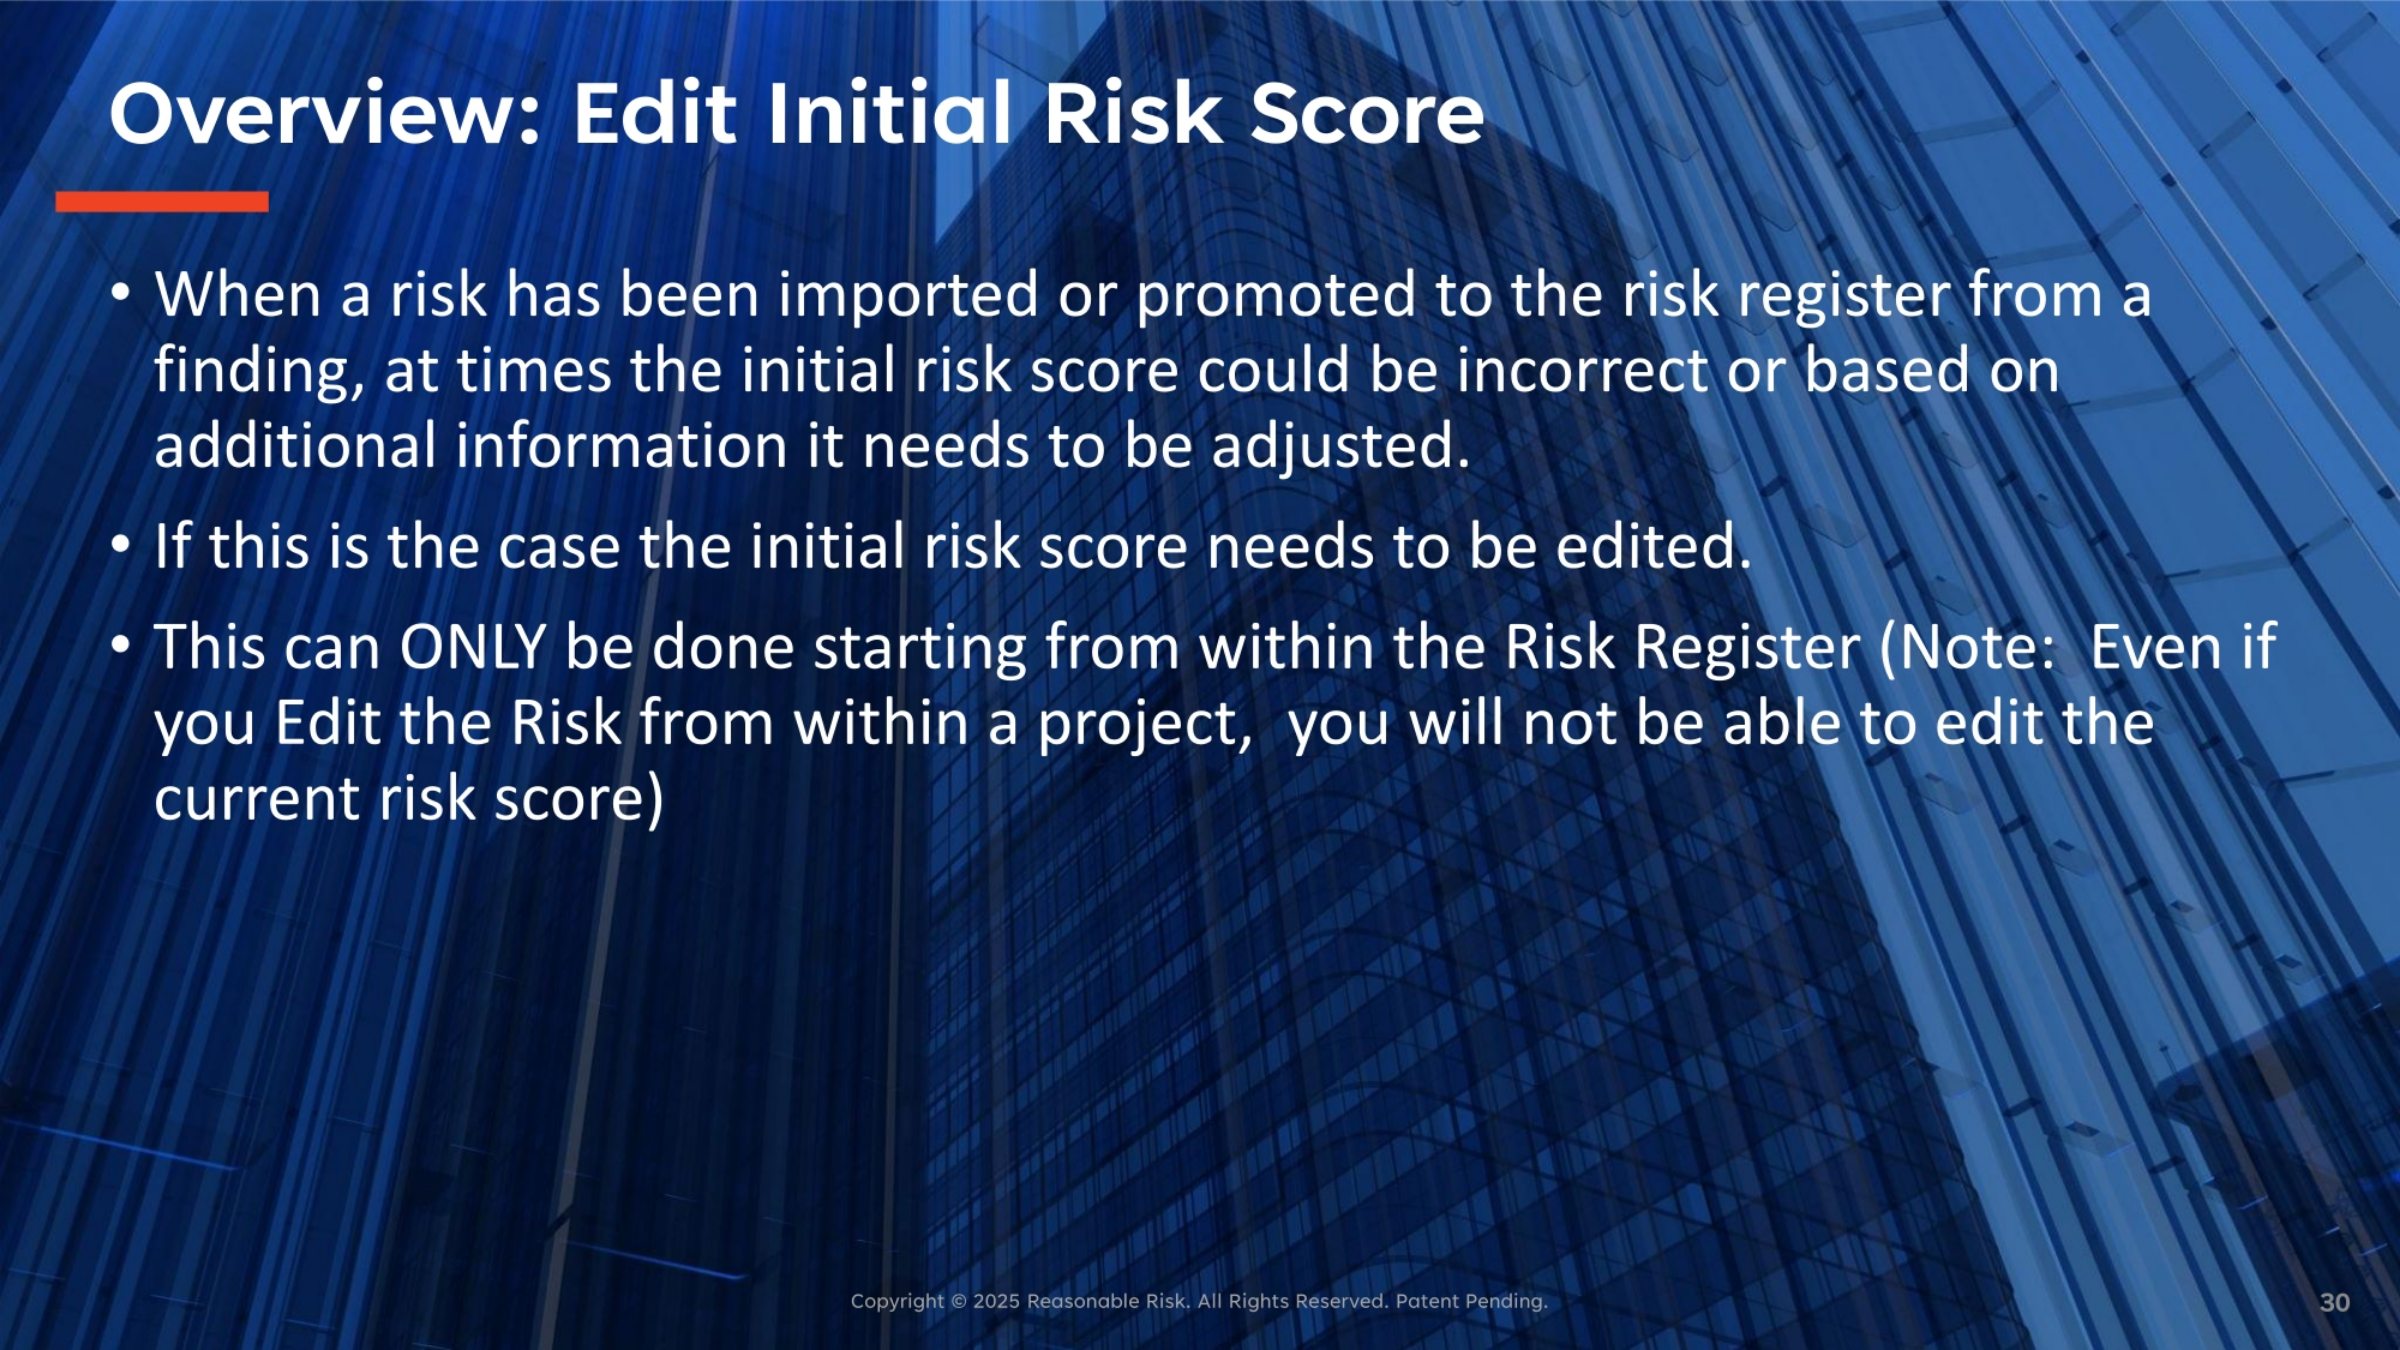
When a risk is imported or promoted to the risk register from a finding, its initial risk score may sometimes be incorrect or require adjustment based on new information. In such cases, the initial risk score needs to be edited. It's important to note that this editing can only be initiated from within the Risk Register. Even if you attempt to edit the risk from within a project, you will not be able to modify the current risk score from that location.
31. Screen Narrative: Edit Initial Risk Score
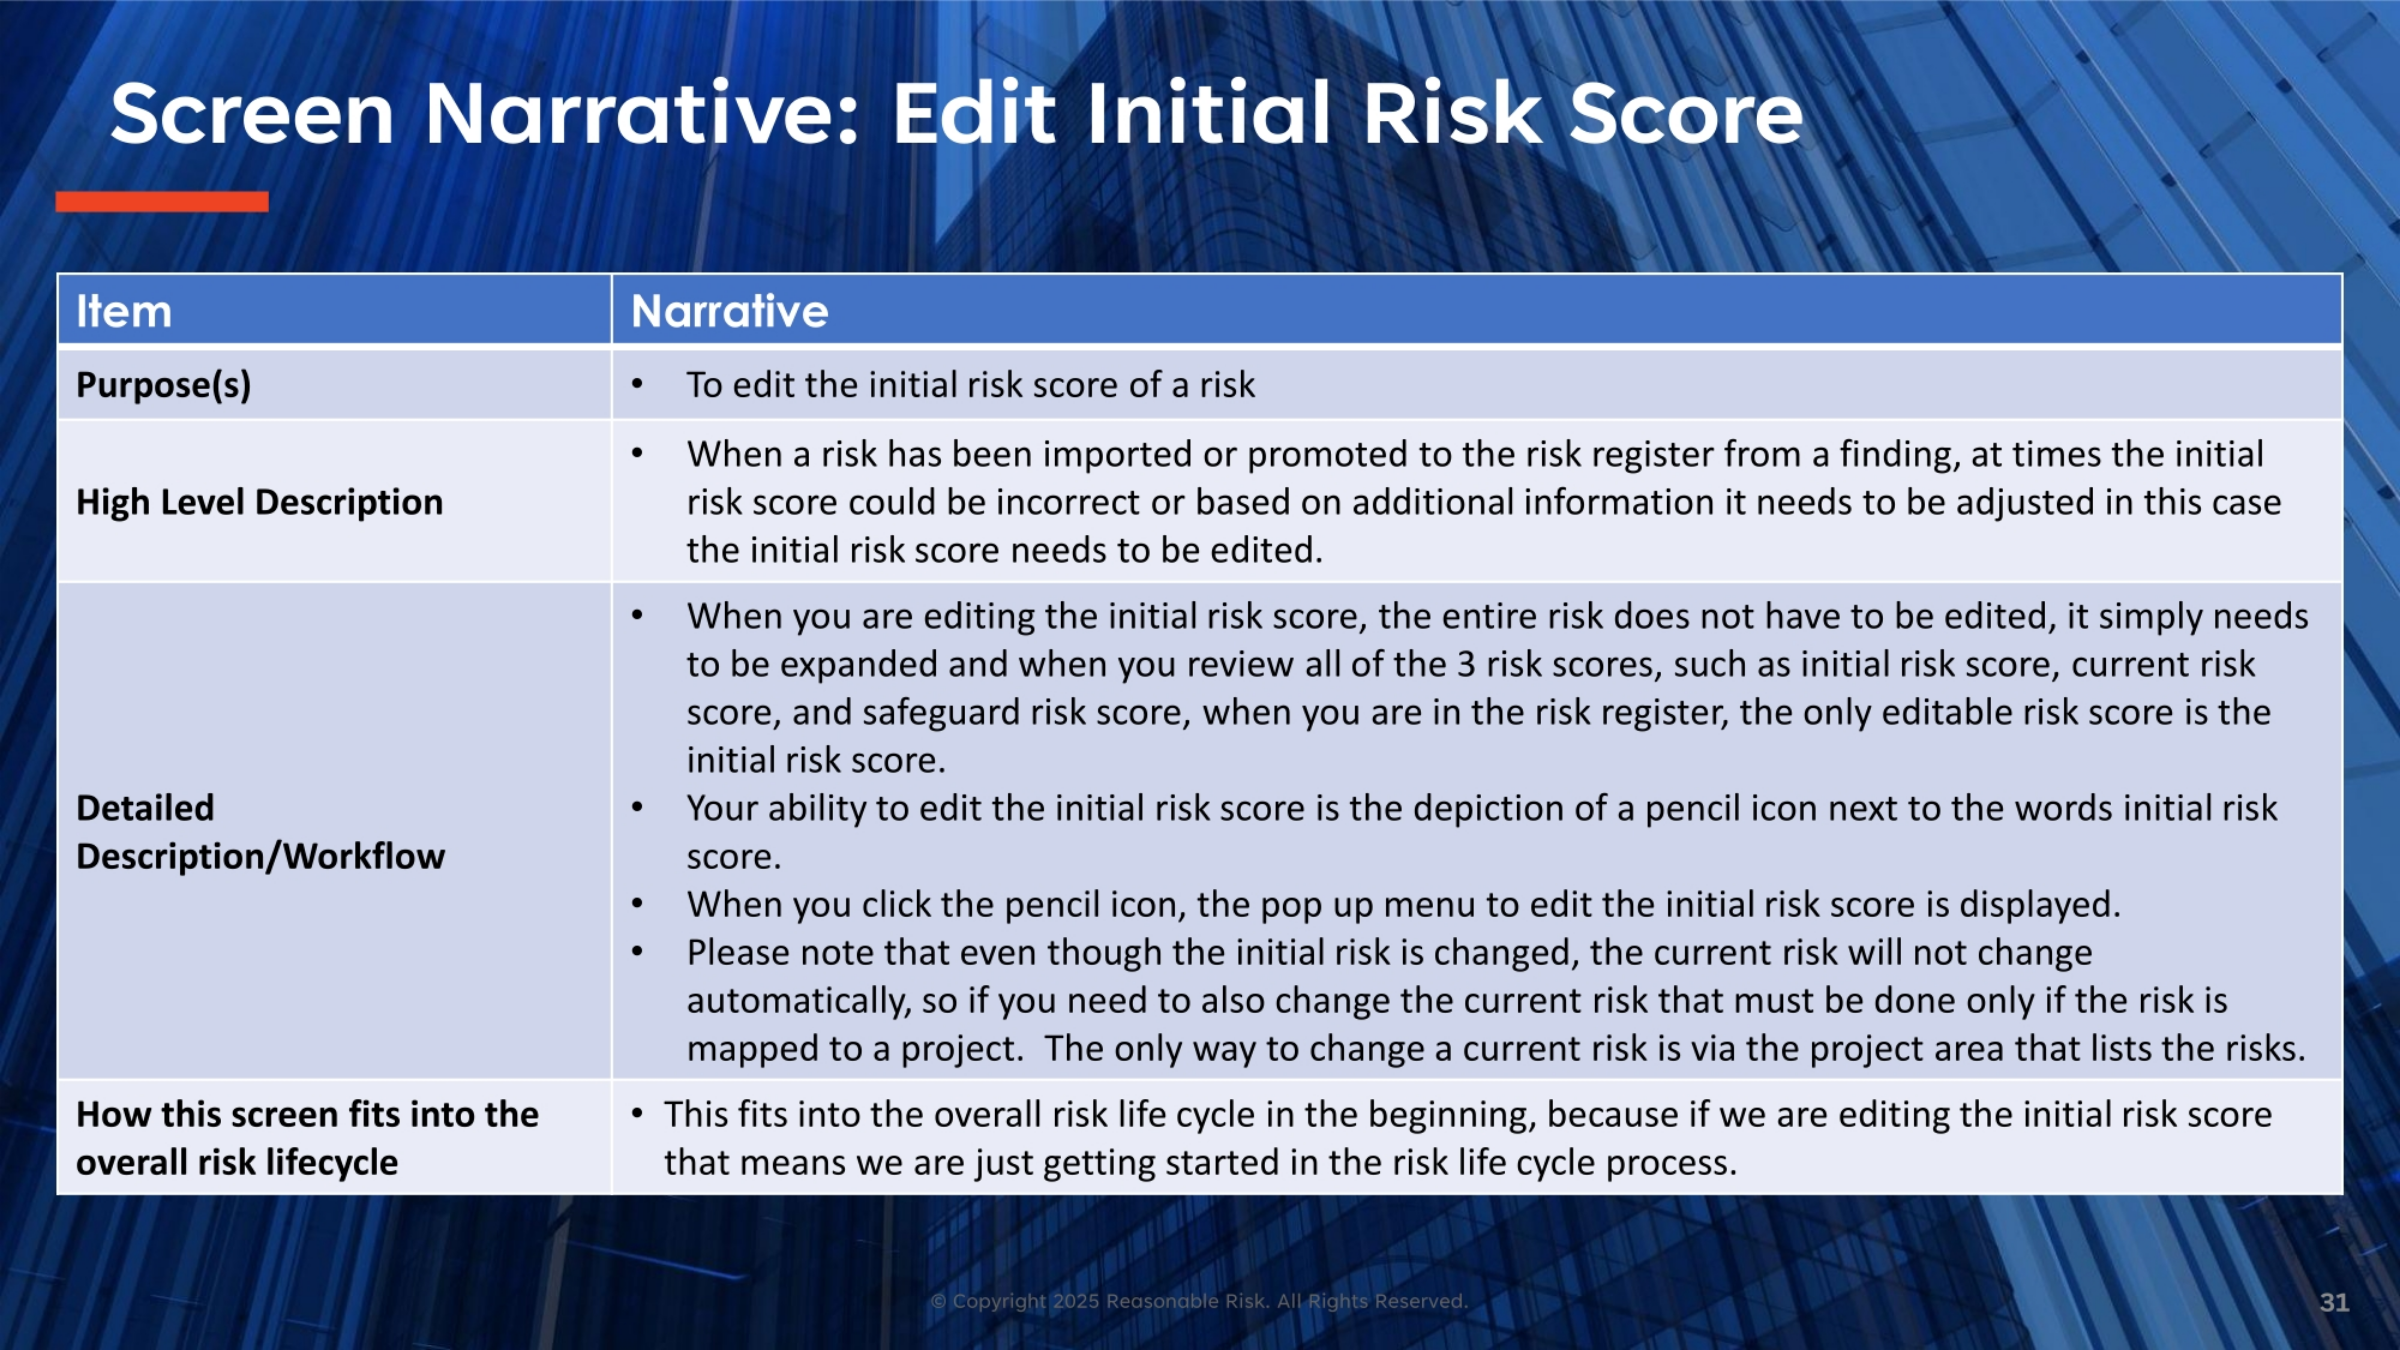
The purpose of this screen is to enable the editing of a risk's initial score. When a risk is imported or promoted to the risk register, its initial score might need adjustment due to new information. To edit the initial risk score, you expand the risk details within the risk register. Here, you'll find a pencil icon next to the 'initial risk score' field, indicating it's editable. Clicking this icon brings up a pop-up menu for editing. While the initial risk score can be changed, the current risk score does not automatically update; changing the current risk score requires it to be mapped to a project. This process is fundamental to the early stages of the overall risk lifecycle.
32. Screen Visual: Edit Initial Risk Score
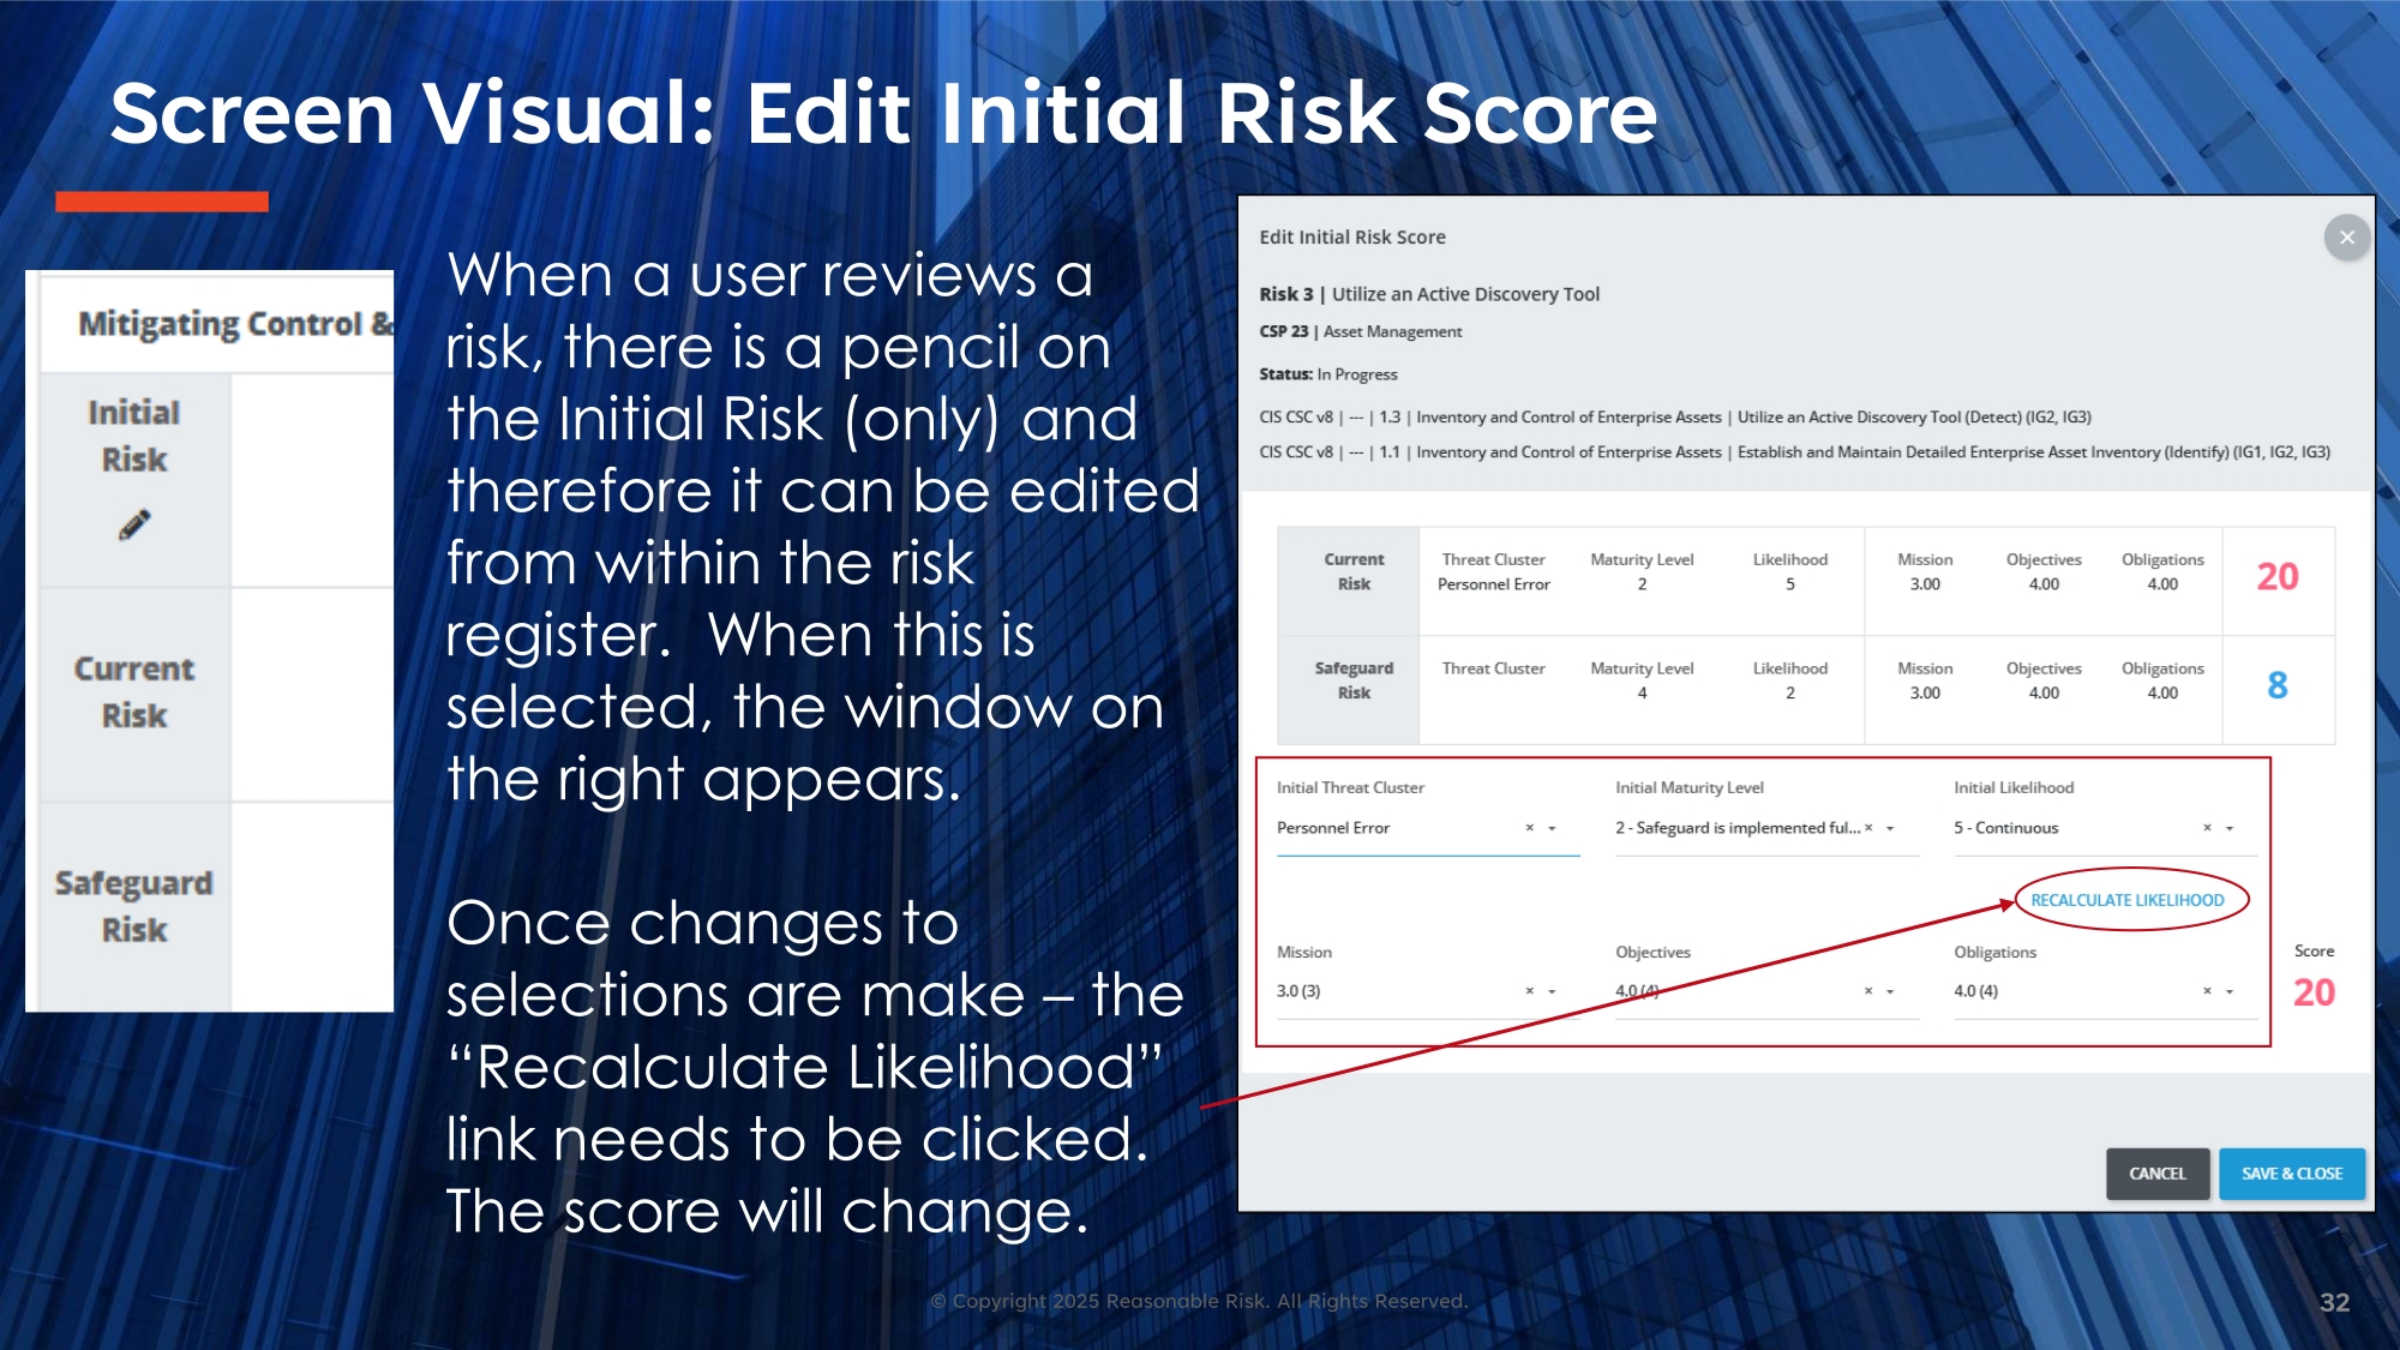
When reviewing a risk, users will notice a pencil icon next to the 'Initial Risk' field, indicating that this score can be edited directly from the risk register. Selecting this icon opens a dedicated window on the right, allowing for modifications. After making changes to the selections, it's crucial to click the 'Recalculate Likelihood' link. This action will update the score based on the new inputs. This visual demonstrates the interface for adjusting threat clusters, maturity levels, and other factors that influence the initial risk score.
33. Screen Review: Edit Initial Risk Score
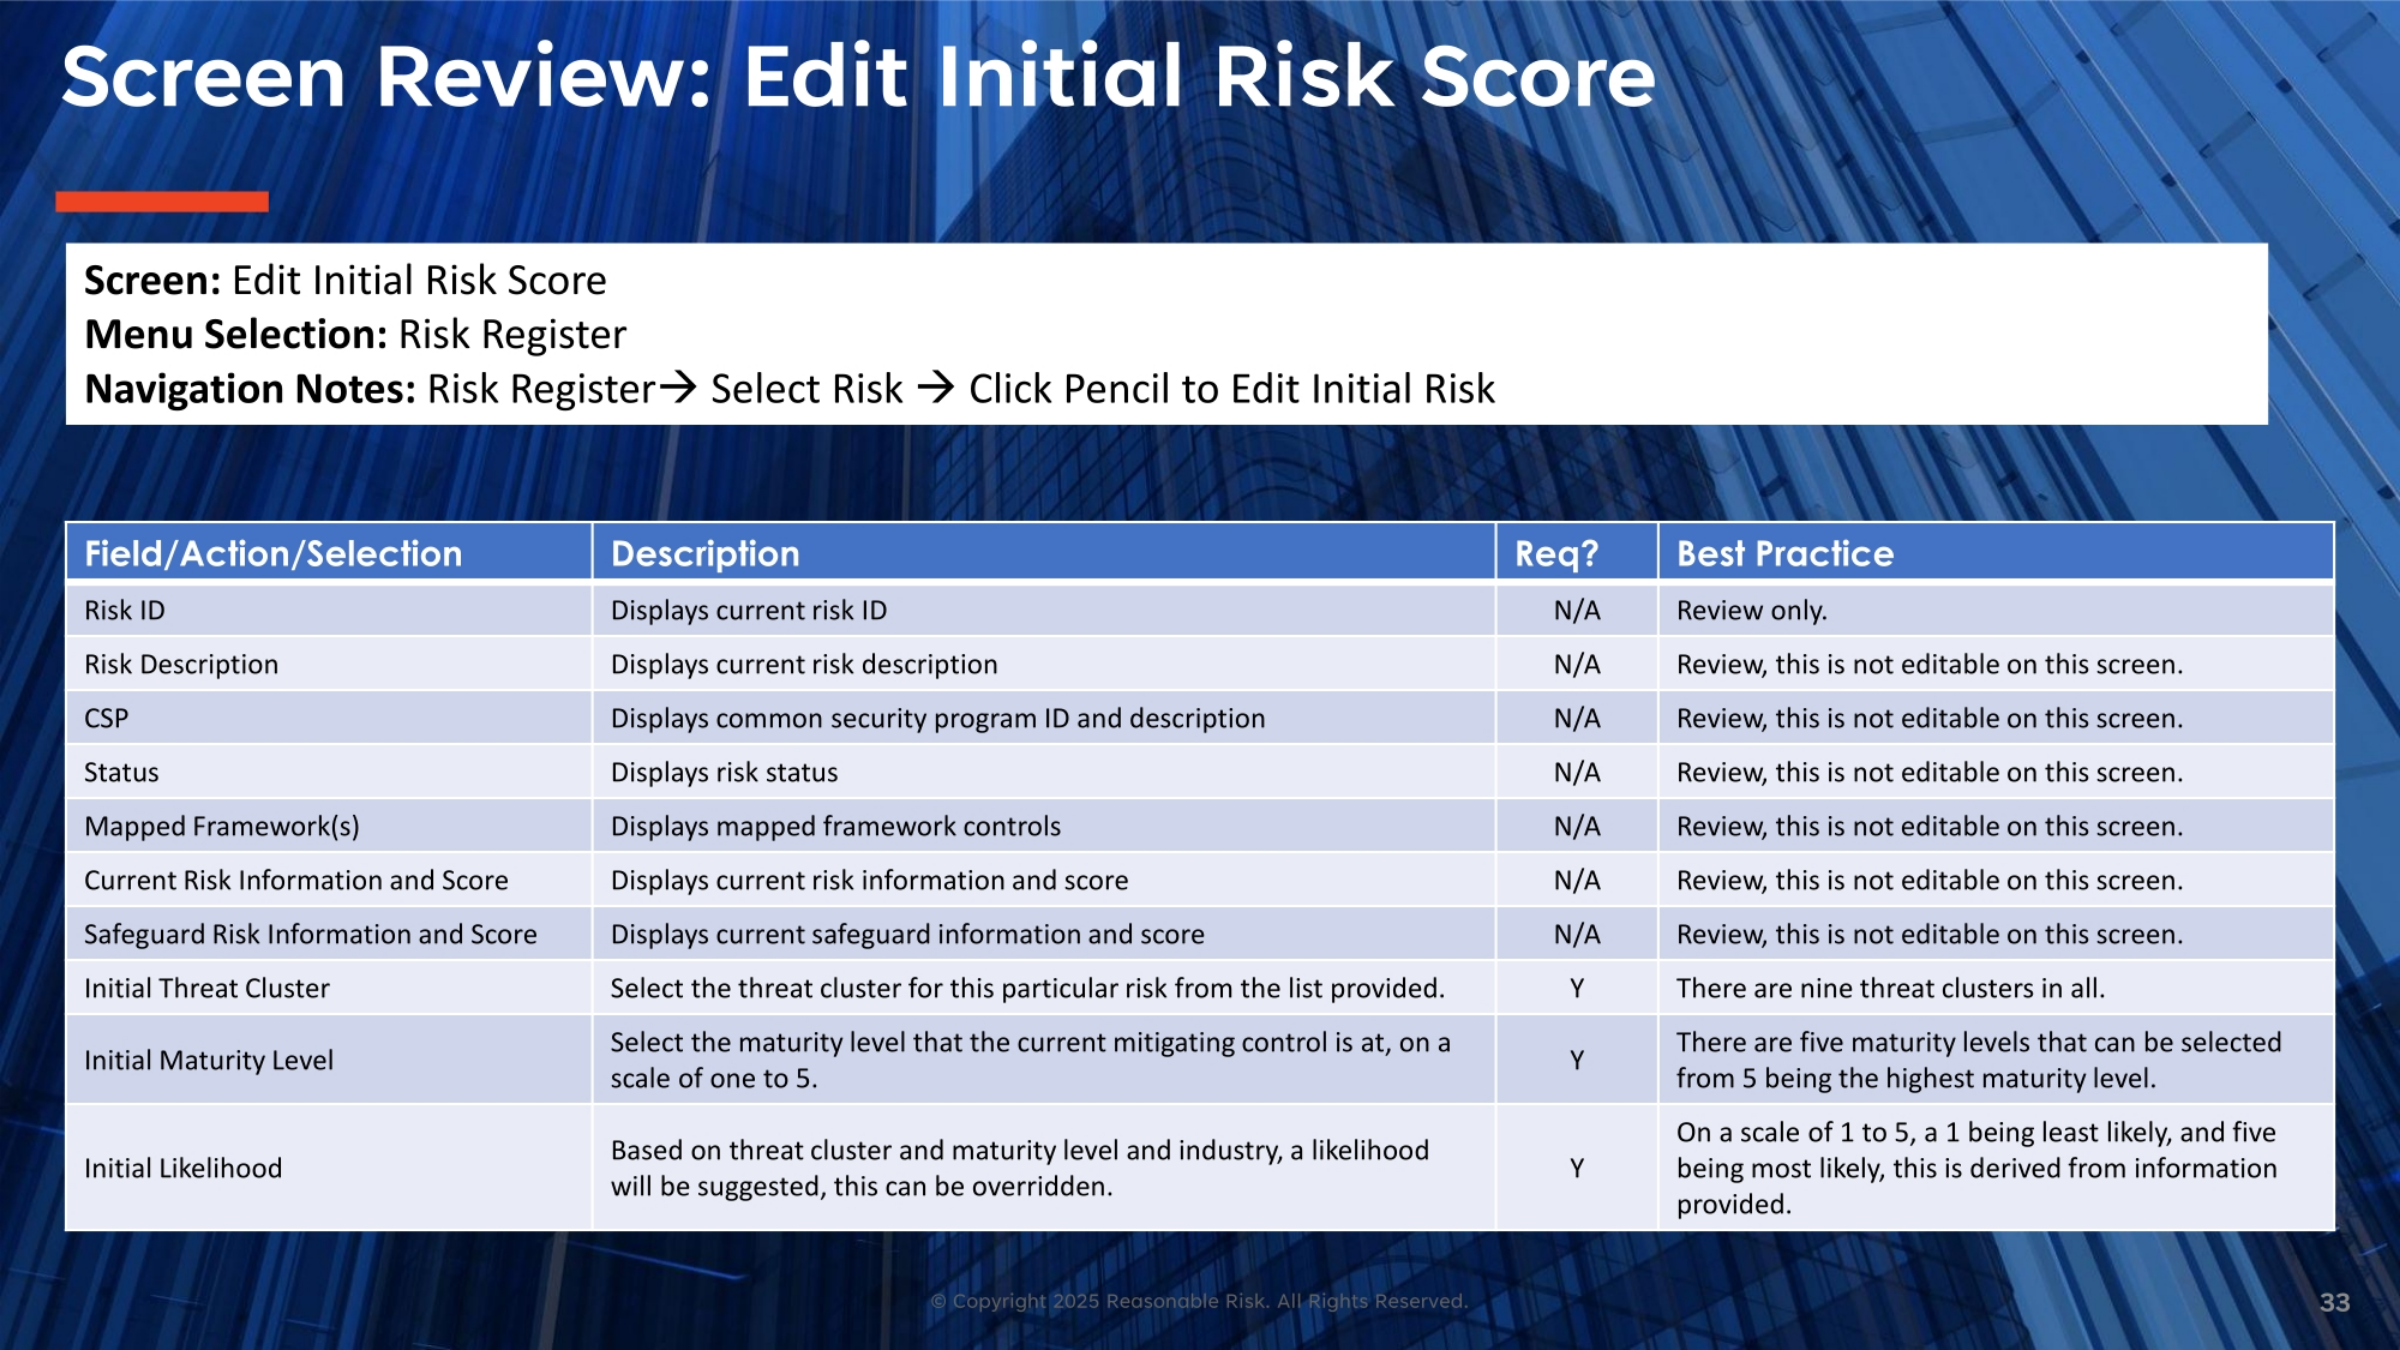
This review details the fields and actions for editing an initial risk score. Fields like 'Risk ID', 'Risk Description', 'CSP', 'Status', 'Mapped Framework(s)', 'Current Risk Information and Score', and 'Safeguard Risk Information and Score' are for review only and not editable here. However, 'Initial Threat Cluster' allows selection from nine options, and 'Initial Maturity Level' can be set on a scale of one to five, with five being the highest. 'Initial Likelihood' is suggested based on threat cluster, maturity, and industry, but can be overridden, ranging from one to five, with five being most likely.
34. Screen Review: Edit Initial Risk Score
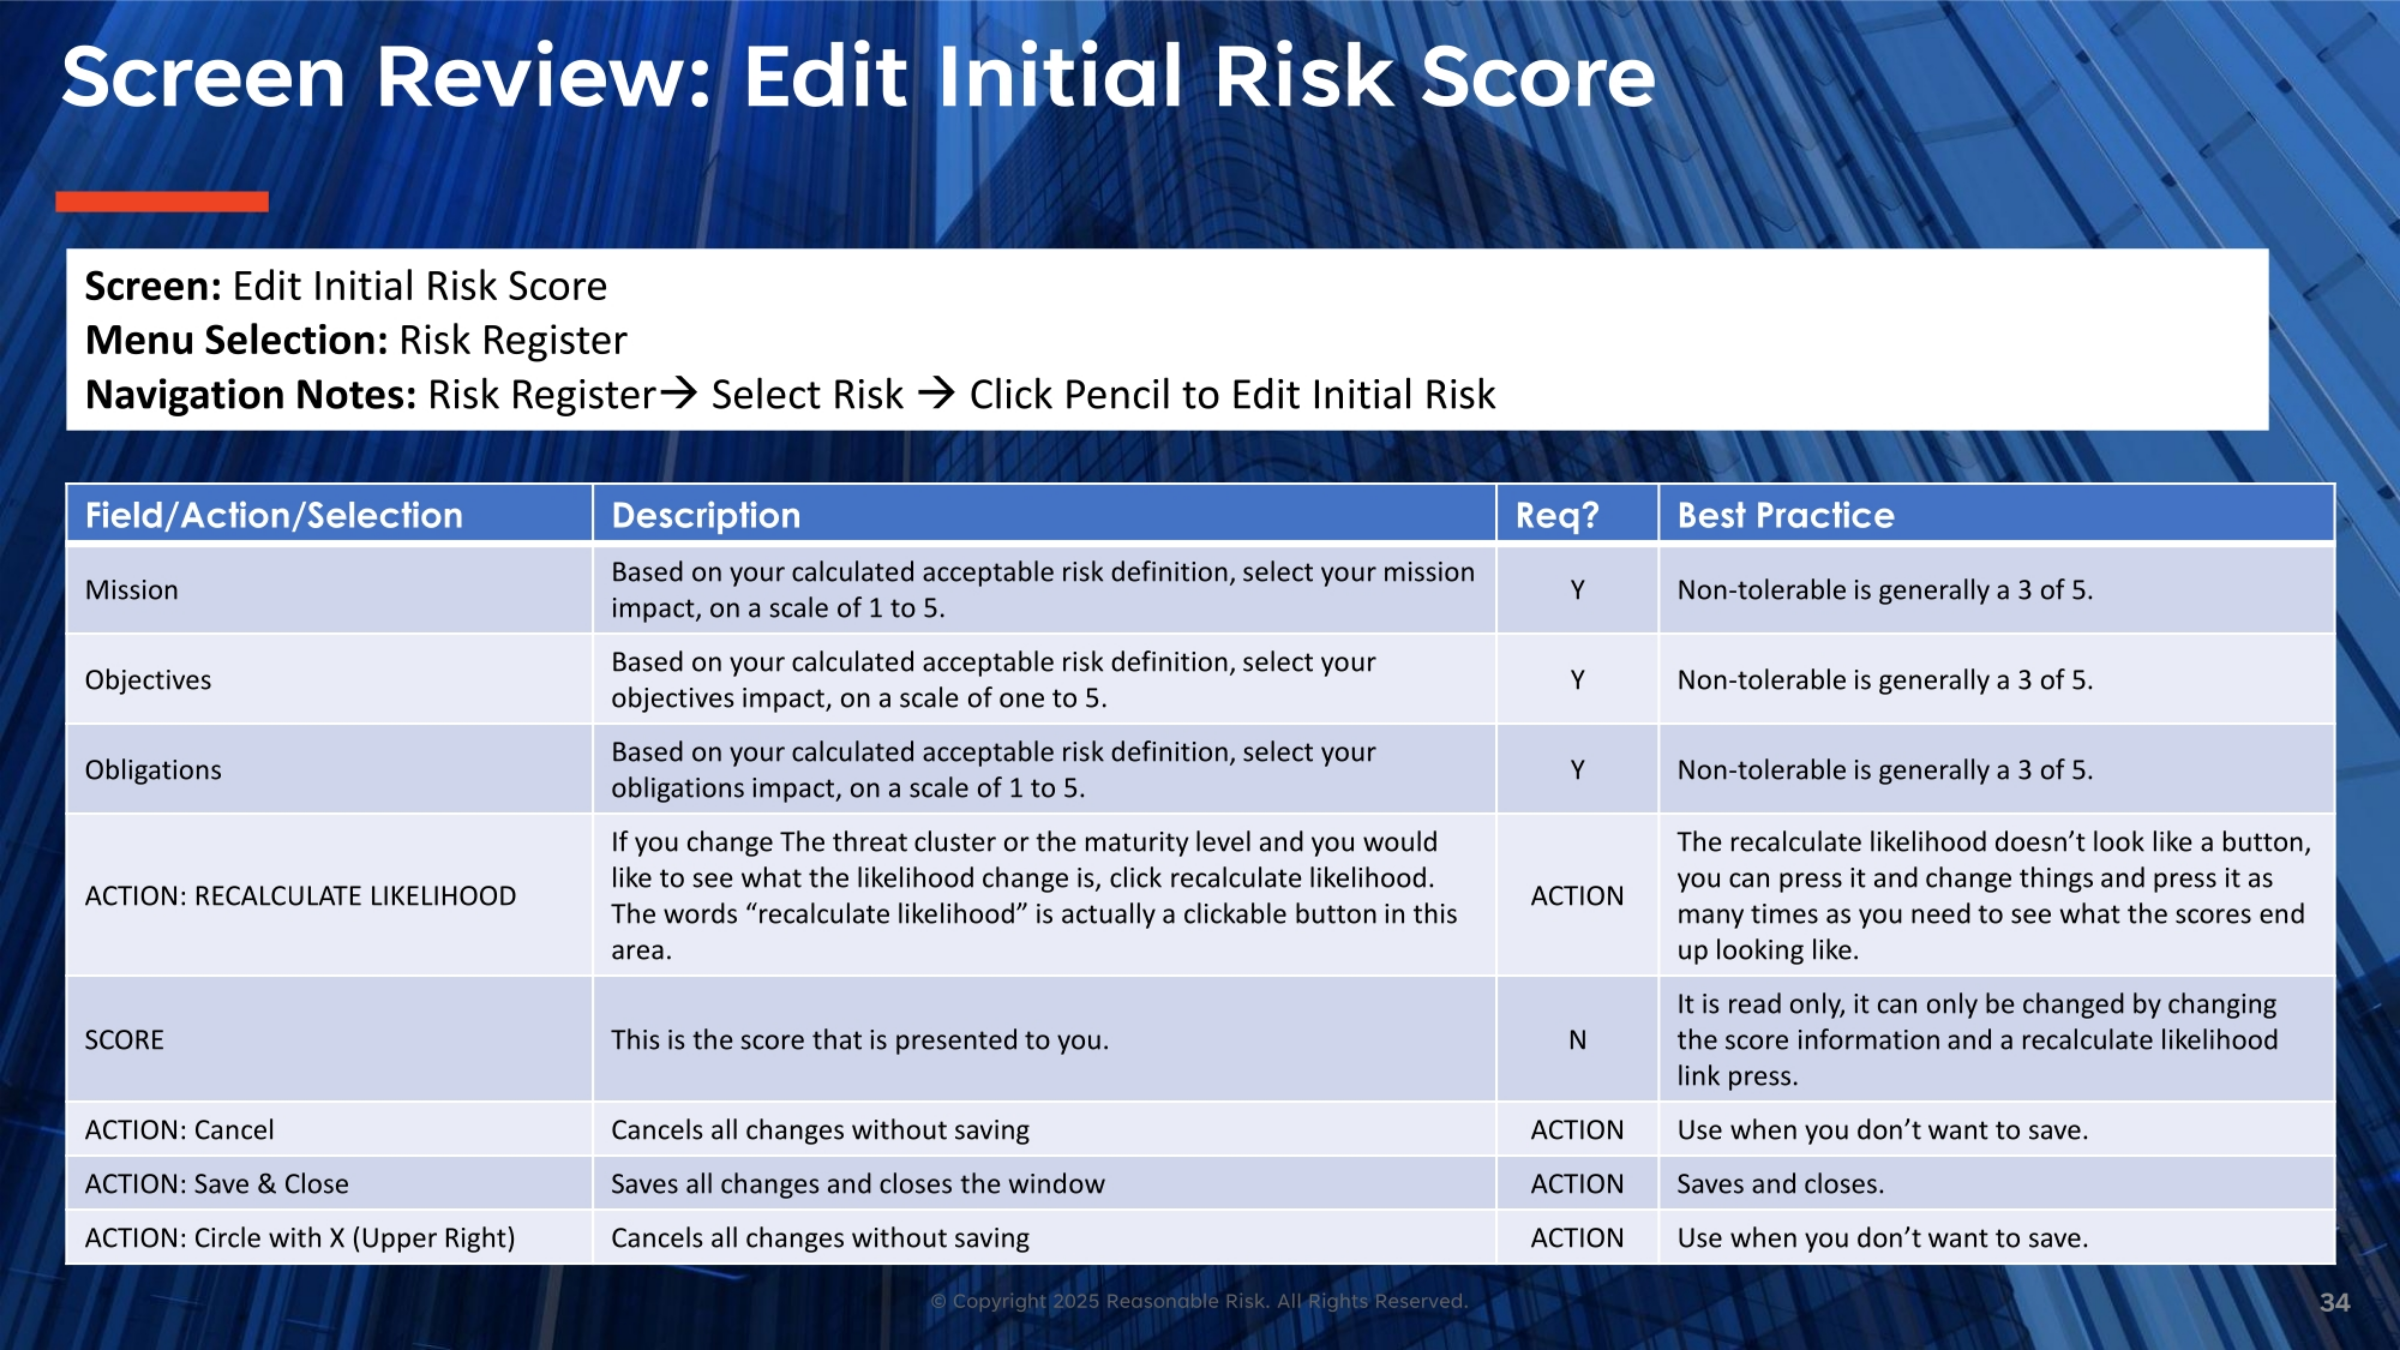
Continuing our review of editing initial risk scores, 'Mission', 'Objectives', and 'Obligations' impacts are selected on a scale of one to five, based on your acceptable risk definition, with three generally considered non-tolerable. The 'Recalculate Likelihood' action is a clickable button that updates the likelihood score if the threat cluster or maturity level is changed. The 'SCORE' field is read-only and reflects the calculated score. Actions like 'Cancel' and 'Circle with X' (Upper Right) discard changes, while 'Save & Close' saves all modifications and closes the window.
35. Demonstrate
Next, we will demonstrate this process. We will show how to change the initial risk score within the system.
36. Risk Audit: Overview
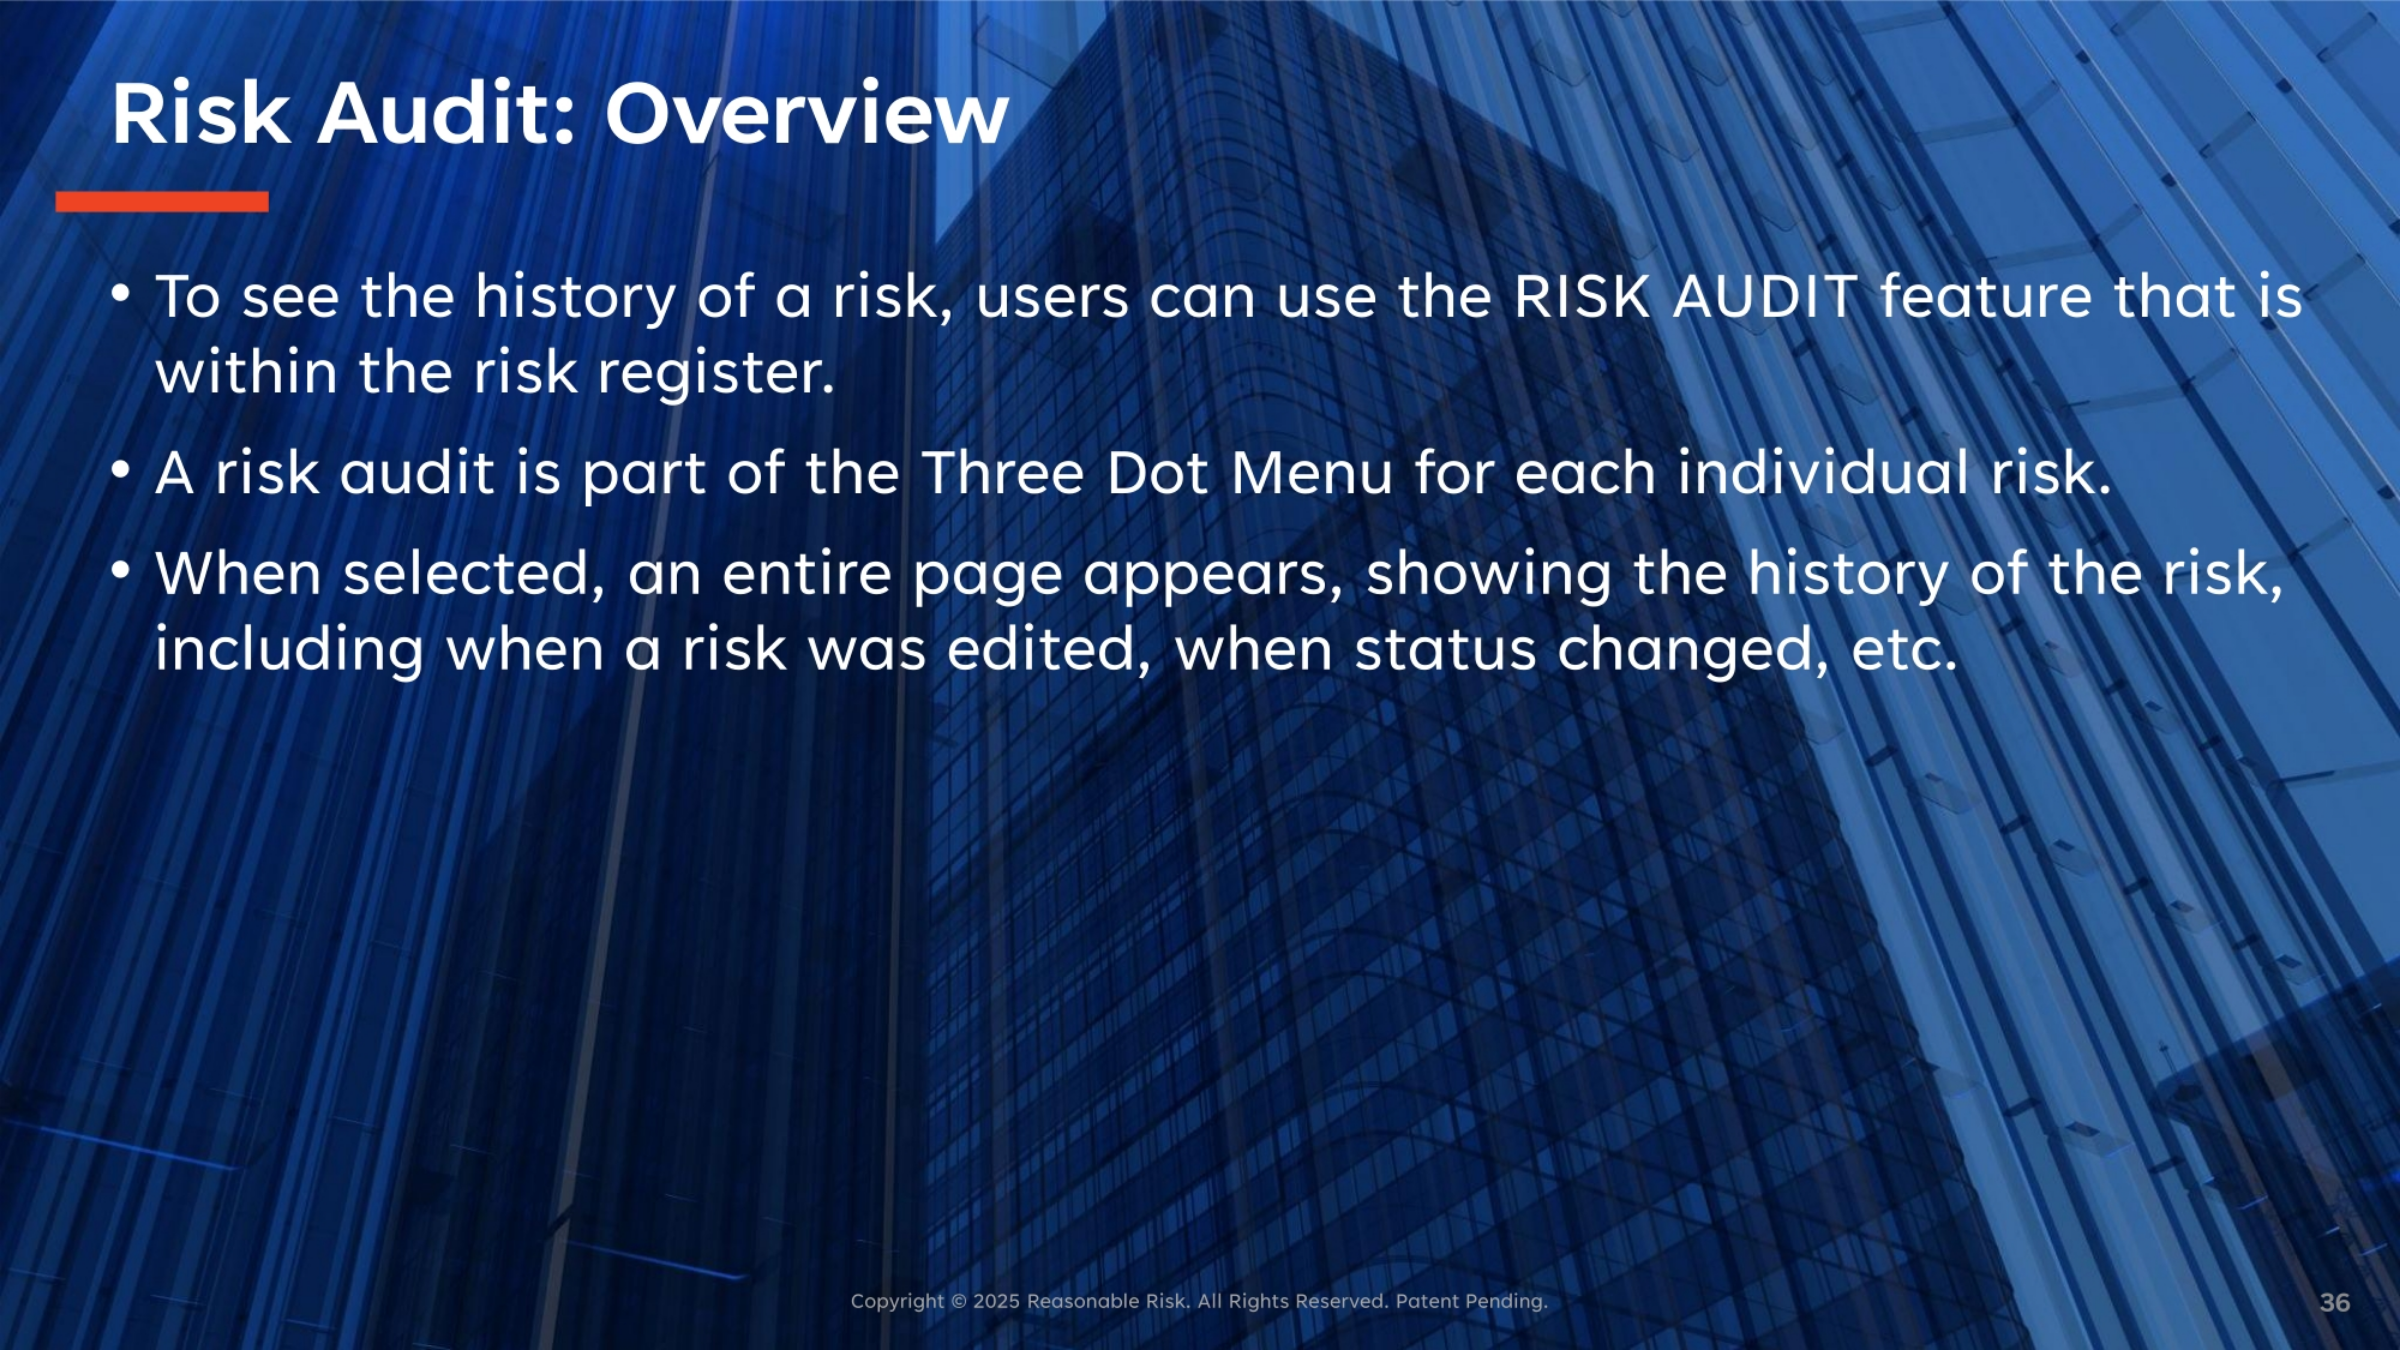
To maintain transparency and accountability, users can access the 'Risk Audit' feature within the risk register to view a comprehensive history of any risk. This audit functionality is conveniently located as part of the Three Dot Menu for each individual risk. When selected, a dedicated page appears, providing a detailed timeline of all changes made to the risk, including when it was edited, when its status was updated, and other significant modifications. This ensures a complete record of the risk's lifecycle.
This training module provided a comprehensive overview of the Reasonable Risk platform, detailing the full risk lifecycle within the Risk Register, from identification and assessment through remediation and reporting. It covered key functionalities like filtering, editing, and commenting, alongside essential aspects such as mapping risks to projects, editing initial risk scores, and utilizing the risk audit feature for comprehensive oversight and accountability.
Comments
0 comments
Please sign in to leave a comment.